

User Manual
Page 2
Copyright ...1 Disclaimer and Limitation of Liability 1 1 INTRODUCTION 1.1 Phusion™ Components 2 1.2 Touchpad Layout 6 1.3 Battery Installation 8 1.4 Adjusting the Clock After Battery Replacement 8 1.5 How to Use the Action Menu 9 2 DIGITAL CAMERA 2.1 Digital Camera: What is it 10 2.2 Commands 10 2.3 Using the Digital Camera 11 2.4 Adjust the Picture Contrast and Brightness 11 2.5 How to Use the Schedule Photo Taking Function ..... 11 2.6 How...
Copyright ...1 Disclaimer and Limitation of Liability 1 1 INTRODUCTION 1.1 Phusion™ Components 2 1.2 Touchpad Layout 6 1.3 Battery Installation 8 1.4 Adjusting the Clock After Battery Replacement 8 1.5 How to Use the Action Menu 9 2 DIGITAL CAMERA 2.1 Digital Camera: What is it 10 2.2 Commands 10 2.3 Using the Digital Camera 11 2.4 Adjust the Picture Contrast and Brightness 11 2.5 How to Use the Schedule Photo Taking Function ..... 11 2.6 How...
User Manual
Page 13
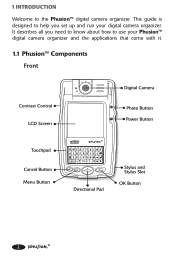
This guide is designed to help you need to know about how to the Phusion™ digital camera organizer. 1 INTRODUCTION Welcome to use your digital camera organizer. It describes all you set up and run your Phusion™ digital camera organizer and the applications that come with it. 1.1 Phusion™ Components Front 2
This guide is designed to help you need to know about how to the Phusion™ digital camera organizer. 1 INTRODUCTION Welcome to use your digital camera organizer. It describes all you set up and run your Phusion™ digital camera organizer and the applications that come with it. 1.1 Phusion™ Components Front 2
User Manual
Page 14
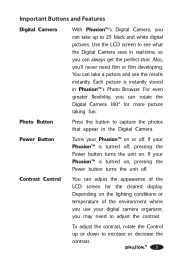
...or film developing. Photo Button Press the button to increase or decrease the contrast. 3 Important Buttons and Features Digital Camera With Phusion™'s Digital Camera, you can rotate the Digital Camera 180° for the clearest display. Contrast Control You can always get the perfect shot. Depending on ,...ll never need to see the results instantly. If your Phusion™ on . Each picture is instantly stored in the Digital Camera. To adjust the contrast, rotate the Control up to 25 black and white digital pictures. You can take up or down to capture ...
...or film developing. Photo Button Press the button to increase or decrease the contrast. 3 Important Buttons and Features Digital Camera With Phusion™'s Digital Camera, you can rotate the Digital Camera 180° for the clearest display. Contrast Control You can always get the perfect shot. Depending on ,...ll never need to see the results instantly. If your Phusion™ on . Each picture is instantly stored in the Digital Camera. To adjust the contrast, rotate the Control up to 25 black and white digital pictures. You can take up or down to capture ...

User Manual
Page 15
...Pad and other buttons. Touchpad The Touchpad is very similar to the previous screen. See the section, "Touchpad Layout" for your Phusion™ digital camera organizer. Stylus and Stylus Slot The stylus slides in and out of the slot. The Action menu contains additional commands for more ...information on your Phusion™ digital camera organizer. Also, the Directional Pad can be used to move the cursor clockwise. 4 On menu screens such as you would a ...
...Pad and other buttons. Touchpad The Touchpad is very similar to the previous screen. See the section, "Touchpad Layout" for your Phusion™ digital camera organizer. Stylus and Stylus Slot The stylus slides in and out of the slot. The Action menu contains additional commands for more ...information on your Phusion™ digital camera organizer. Also, the Directional Pad can be used to move the cursor clockwise. 4 On menu screens such as you would a ...
User Manual
Page 16
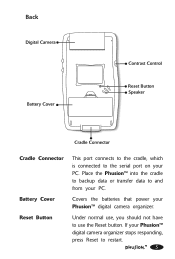
If your Phusion™ digital camera organizer stops responding, press Reset to use , you should not have to restart. 5 Covers the batteries that power your Phusion™ digital camera organizer. Under normal use the Reset button. Place the Phusion™ into the cradle to backup data or transfer data to the serial port on your PC. Back Cradle Connector Battery Cover Reset Button This port connects to the cradle, which is connected to and from your PC.
If your Phusion™ digital camera organizer stops responding, press Reset to use , you should not have to restart. 5 Covers the batteries that power your Phusion™ digital camera organizer. Under normal use the Reset button. Place the Phusion™ into the cradle to backup data or transfer data to the serial port on your PC. Back Cradle Connector Battery Cover Reset Button This port connects to the cradle, which is connected to and from your PC.

User Manual
Page 19
...: 1. After adjusting each of your Phusion™ digital camera organizer is how to adjust the clock, choose Yes. 2. If your Phusion™ digital camera organizer. Then adjust the time on your changes will be saved automatically. 8 Be sure your Phusion™ digital camera organizer. 3. You will be asked... to adjust the time on the following screen. 3. 1.3 Battery Installation Two (2) AA size batteries power your Phusion™ digital camera organizer stops working or if the screen appears dim, make sure the batteries are fresh and installed properly. 1.4 Adjusting...
...: 1. After adjusting each of your Phusion™ digital camera organizer is how to adjust the clock, choose Yes. 2. If your Phusion™ digital camera organizer. Then adjust the time on your changes will be saved automatically. 8 Be sure your Phusion™ digital camera organizer. 3. You will be asked... to adjust the time on the following screen. 3. 1.3 Battery Installation Two (2) AA size batteries power your Phusion™ digital camera organizer stops working or if the screen appears dim, make sure the batteries are fresh and installed properly. 1.4 Adjusting...

User Manual
Page 20
The Action menu is arranged in a cross section that allows you to view the Action menu. 1.5 How to Use the Action Menu Press the Menu button on your Phusion™ digital camera organizer to access commands using the fewest button presses. Use the Directional Pad to select a command, then press OK to continue. 9
The Action menu is arranged in a cross section that allows you to view the Action menu. 1.5 How to Use the Action Menu Press the Menu button on your Phusion™ digital camera organizer to access commands using the fewest button presses. Use the Directional Pad to select a command, then press OK to continue. 9
User Manual
Page 21
... & Time) Hide the date and time when a photo was taken. (Delete This Photo) Delete the current photo. 10 The Digital Camera can open the Digital Camera from other applications that use your Phusion™ digital camera organizer. 2 DIGITAL CAMERA 2.1 Digital Camera: What is it ? Where is instantly stored in some of photos over a set time. (Timer Photo Taking) Automatically take a series...
... & Time) Hide the date and time when a photo was taken. (Delete This Photo) Delete the current photo. 10 The Digital Camera can open the Digital Camera from other applications that use your Phusion™ digital camera organizer. 2 DIGITAL CAMERA 2.1 Digital Camera: What is it ? Where is instantly stored in some of photos over a set time. (Timer Photo Taking) Automatically take a series...
User Manual
Page 22
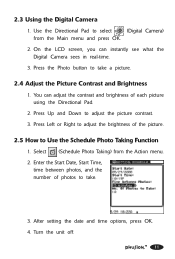
Use the Directional Pad to select (Digital Camera) from the Action menu. 2. You can instantly see what the Digital Camera sees in real-time. 3. Select (Schedule Photo Taking) from the Main menu and press OK. 2. After setting the date and time options, press OK. 4. Press ... the Start Date, Start Time, time between photos, and the number of each picture using the Directional Pad. 2. Turn the unit off. 11 2.3 Using the Digital Camera 1. Press Left or Right to adjust the brightness of the picture. 2.5 How to adjust the picture contrast. 3.
Use the Directional Pad to select (Digital Camera) from the Action menu. 2. You can instantly see what the Digital Camera sees in real-time. 3. Select (Schedule Photo Taking) from the Main menu and press OK. 2. After setting the date and time options, press OK. 4. Press ... the Start Date, Start Time, time between photos, and the number of each picture using the Directional Pad. 2. Turn the unit off. 11 2.3 Using the Digital Camera 1. Press Left or Right to adjust the brightness of the picture. 2.5 How to adjust the picture contrast. 3.
User Manual
Page 24
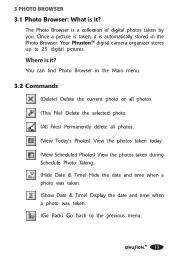
... time when a photo was taken. (Show Date & Time) Display the date and time when a photo was taken. (Go Back) Go back to 25 digital pictures. Your Phusion™ digital camera organizer stores up to the previous menu. 13 You can find Photo Browser in the Photo Browser. 3 PHOTO BROWSER 3.1 Photo Browser: What is a collection...
... time when a photo was taken. (Show Date & Time) Display the date and time when a photo was taken. (Go Back) Go back to 25 digital pictures. Your Phusion™ digital camera organizer stores up to the previous menu. 13 You can find Photo Browser in the Photo Browser. 3 PHOTO BROWSER 3.1 Photo Browser: What is a collection...
User Manual
Page 30
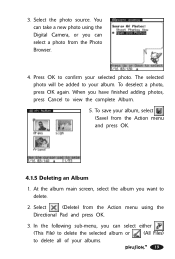
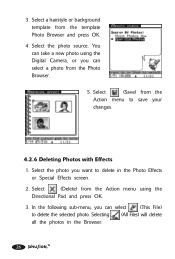
... can take a new photo using the Directional Pad and press OK. 3. Select the photo source. You can select a photo from the Action menu using the Digital Camera, or you want to view the complete Album. 5. To save your selected photo.
... can take a new photo using the Directional Pad and press OK. 3. Select the photo source. You can select a photo from the Action menu using the Digital Camera, or you want to view the complete Album. 5. To save your selected photo.
User Manual
Page 33
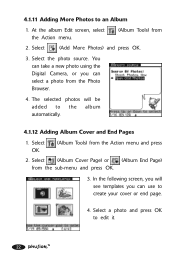
... photos will see templates you can use to the album automatically. 4.1.12 Adding Album Cover and End Pages 1. You can take a new photo using the Digital Camera, or you can select a photo from the sub-menu and press OK. 3. Select (Album Cover Page) or (Album End Page) from the Photo Browser. 4. Select...
... photos will see templates you can use to the album automatically. 4.1.12 Adding Album Cover and End Pages 1. You can take a new photo using the Digital Camera, or you can select a photo from the sub-menu and press OK. 3. Select (Album Cover Page) or (Album End Page) from the Photo Browser. 4. Select...
User Manual
Page 36
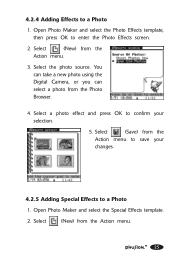
You can take a new photo using the Digital Camera, or you can select a photo from the Action menu. 25 Open Photo Maker and select the Photo Effects template, then press OK to a Photo 1. Select (...
You can take a new photo using the Digital Camera, or you can select a photo from the Action menu. 25 Open Photo Maker and select the Photo Effects template, then press OK to a Photo 1. Select (...
User Manual
Page 37
... to delete in the Browser. 26 Select the photo you can select a photo from the Photo Browser. 5. Select (Delete) from the Action menu using the Digital Camera, or you can select (This File) to save your changes. 4.2.6 Deleting Photos with Effects 1. Select (Save) from the template Photo Browser and press OK. 4. 3. Select...
... to delete in the Browser. 26 Select the photo you can select a photo from the Photo Browser. 5. Select (Delete) from the Action menu using the Digital Camera, or you can select (This File) to save your changes. 4.2.6 Deleting Photos with Effects 1. Select (Save) from the template Photo Browser and press OK. 4. 3. Select...
User Manual
Page 42
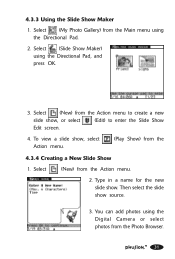
Select (Slide Show Maker) using the Digital Camera or select photos from the Photo Browser. 31 Then select the slide show , select Action menu. (Play Show) from the Action menu to enter the ...
Select (Slide Show Maker) using the Digital Camera or select photos from the Photo Browser. 31 Then select the slide show , select Action menu. (Play Show) from the Action menu to enter the ...
User Manual
Page 47
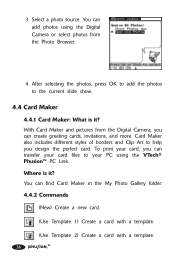
.... (Use Template 2) Create a card with a template. 36 Card Maker also includes different styles of borders and Clip Art to your PC using the Digital Camera or select photos from the Digital Camera, you can add photos using the VTech® Phusion™ PC Link. Select a photo source. With Card Maker and pictures from the Photo Browser. 4. 3.
.... (Use Template 2) Create a card with a template. 36 Card Maker also includes different styles of borders and Clip Art to your PC using the Digital Camera or select photos from the Digital Camera, you can add photos using the VTech® Phusion™ PC Link. Select a photo source. With Card Maker and pictures from the Photo Browser. 4. 3.
User Manual
Page 49
... the Action menu to save your new card, then press OK. 3. If you can select (Use Template 1) or (Use Template 2) to create a card using the Digital Camera or select photos from 7. You can select (Use Template 1) or (Use Template 2) to create a card using a template. 6. Select (New) from the Action menu to edit...
... the Action menu to save your new card, then press OK. 3. If you can select (Use Template 1) or (Use Template 2) to create a card using the Digital Camera or select photos from 7. You can select (Use Template 1) or (Use Template 2) to create a card using a template. 6. Select (New) from the Action menu to edit...
User Manual
Page 51
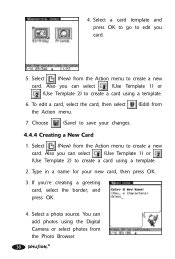
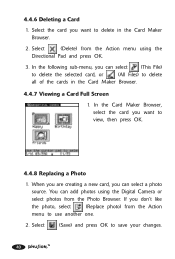
... source. When you are creating a new card, you want to save your changes. 40 In the following sub-menu, you can add photos using the Digital Camera or select photos from the Action menu using the Directional Pad and press OK. 3. Select (Save) and press OK to view, then press OK. 4.4.8 Replacing...
... source. When you are creating a new card, you want to save your changes. 40 In the following sub-menu, you can add photos using the Digital Camera or select photos from the Action menu using the Directional Pad and press OK. 3. Select (Save) and press OK to view, then press OK. 4.4.8 Replacing...
User Manual
Page 90
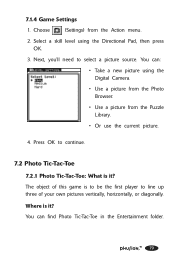
... folder. 79 Choose (Settings) from the Puzzle Library. • Or use the current picture. 4. Press OK to select a picture source. Select a skill level using the Digital Camera. • Use a picture from the Photo Browser. • Use a picture from the Action menu. 2.
... folder. 79 Choose (Settings) from the Puzzle Library. • Or use the current picture. 4. Press OK to select a picture source. Select a skill level using the Digital Camera. • Use a picture from the Photo Browser. • Use a picture from the Action menu. 2.
User Manual
Page 92
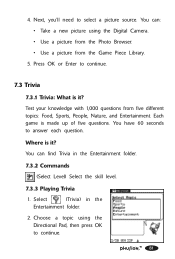
... (Trivia) in the Entertainment folder. 7.3.2 Commands (Select Level) Select the skill level. 7.3.3 Playing Trivia 1. Where is made up of five questions. Choose a topic using the Digital Camera. • Use a picture from the Photo Browser. • Use a picture from five different topics: Food, Sports, People, Nature, and Entertainment. You can : • Take a new...
... (Trivia) in the Entertainment folder. 7.3.2 Commands (Select Level) Select the skill level. 7.3.3 Playing Trivia 1. Where is made up of five questions. Choose a topic using the Digital Camera. • Use a picture from the Photo Browser. • Use a picture from five different topics: Food, Sports, People, Nature, and Entertainment. You can : • Take a new...


