
User Manual
Page 2
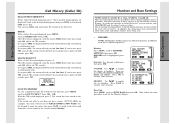
...To order additional system Handsets (model# VT20-2420), battery packs, or headsets, call VTech Communications Inc at : 1-800-595-9511 In Canada, call , reviewing Caller ID, adding a name and number to your phone to access the many features of the leak. MENU DRIVEN DISPLAYS The VT20-2481 Handset and Base feature ...supporting up to normal operation. If the product does not operate normally by the operating instructions, because improper adjustment of other than a cordless type) during an electrical storm. There may result in the idle mode, the LCD display: In this case, the 3 soft ...
...To order additional system Handsets (model# VT20-2420), battery packs, or headsets, call VTech Communications Inc at : 1-800-595-9511 In Canada, call , reviewing Caller ID, adding a name and number to your phone to access the many features of the leak. MENU DRIVEN DISPLAYS The VT20-2481 Handset and Base feature ...supporting up to normal operation. If the product does not operate normally by the operating instructions, because improper adjustment of other than a cordless type) during an electrical storm. There may result in the idle mode, the LCD display: In this case, the 3 soft ...

User Manual
Page 3
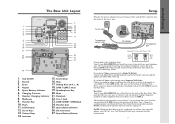
... 6 7 12 8 13 14 15 1. Earpiece 4. Line 1 and Line 2 (Flash) 7. LCD Display 10. Battery Compartment (back of Handset) 13. Volume 14. Handsfree Speakerphone 9. Intercom/Transfer 15. Off (Clear) 12. Antenna 2. Scroll Keys 6. Microphone 5 In Canada, call VTech Communications Inc at 1-800-267-7377. New Messages Indicator 3. Belt Clip 4. Battery Pack 6. Parts Check List...
... 6 7 12 8 13 14 15 1. Earpiece 4. Line 1 and Line 2 (Flash) 7. LCD Display 10. Battery Compartment (back of Handset) 13. Volume 14. Handsfree Speakerphone 9. Intercom/Transfer 15. Off (Clear) 12. Antenna 2. Scroll Keys 6. Microphone 5 In Canada, call VTech Communications Inc at 1-800-267-7377. New Messages Indicator 3. Belt Clip 4. Battery Pack 6. Parts Check List...
User Manual
Page 4
...phone jack labeled L1 / L1 + L2. This port provides an easy way to connect your fax machine, laptop computer, modem or other telephone device for the small door marked DATA on the bottom of the Base Unit) to designate as your 20-2481...14 2 line cord Connecting to the LINE 2 jack on the bottom of the Base Unit. Handset Charging Indicator 8. LCD Display 12. NOTE: While the Data Port is in use, accidental use...To telephone jack Examples of the Base Unit. Erase 4. Line 2 Jack 23. Next, connect a phone cord from the Data Port (look for direct access to the LINE 1 / L1 + L2 jack...
...phone jack labeled L1 / L1 + L2. This port provides an easy way to connect your fax machine, laptop computer, modem or other telephone device for the small door marked DATA on the bottom of the Base Unit) to designate as your 20-2481...14 2 line cord Connecting to the LINE 2 jack on the bottom of the Base Unit. Handset Charging Indicator 8. LCD Display 12. NOTE: While the Data Port is in use, accidental use...To telephone jack Examples of the Base Unit. Erase 4. Line 2 Jack 23. Next, connect a phone cord from the Data Port (look for direct access to the LINE 1 / L1 + L2 jack...
User Manual
Page 5
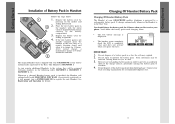
... battery cover by a rechargeable battery pack. Place the new battery pack in the handset with the metal contacts aligned with your phone. Whenever a charged Handset battery pack is installed, the Handset will automatically begin SEARCHING FOR BASE (if previously registered), or it will prompt you... If the new battery pack is powered by pressing on the indent and sliding downward. 2. Contact your GIGAPHONE cordless telephone is not already charged, place the handset in a fire, the cell may be automatically registered to prevent an accidental short of a battery pack in...
... battery cover by a rechargeable battery pack. Place the new battery pack in the handset with the metal contacts aligned with your phone. Whenever a charged Handset battery pack is installed, the Handset will automatically begin SEARCHING FOR BASE (if previously registered), or it will prompt you... If the new battery pack is powered by pressing on the indent and sliding downward. 2. Contact your GIGAPHONE cordless telephone is not already charged, place the handset in a fire, the cell may be automatically registered to prevent an accidental short of a battery pack in...
User Manual
Page 6
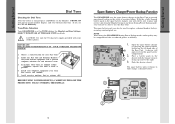
Choose a central location for your cordless phone. Avoid excessive moisture, dust or extreme cold. During Power Backup mode, you will open to replace a drained handset battery, ensuring uninterrupted use the Base Unit. NOTE : When using the GIGAPHONE during Power Backup mode, audio quality... Open the spare battery charger by pressing the release button, located on the Handset. IMPORTANT: FOR MAXIMUM PERFORMANCE OF YOUR CORDLESS TELEPHONE SYSTEM: 1. SIDE UP THIS INSTALL BATTERY 80-5017-00-00 USE ONLY VTECH REDUCE RISK OF FIRE, CAUTION: TO 3 2 10 11 Spare Battery Charger...
Choose a central location for your cordless phone. Avoid excessive moisture, dust or extreme cold. During Power Backup mode, you will open to replace a drained handset battery, ensuring uninterrupted use the Base Unit. NOTE : When using the GIGAPHONE during Power Backup mode, audio quality... Open the spare battery charger by pressing the release button, located on the Handset. IMPORTANT: FOR MAXIMUM PERFORMANCE OF YOUR CORDLESS TELEPHONE SYSTEM: 1. SIDE UP THIS INSTALL BATTERY 80-5017-00-00 USE ONLY VTECH REDUCE RISK OF FIRE, CAUTION: TO 3 2 10 11 Spare Battery Charger...

User Manual
Page 7
...screen will return the idle screen. 5. Congratulations! Gettng Started Getting Started Registration and Operation Registration And Operation Of The VTech VT20-2420 Accessory Handset Your VTech GIGAPHONE system can now enjoy the benefits of the following : (the Base must be sufficient. 12 Registration and ... OK alternating with the charge contacts in the battery compartment. 4. You can operate up to 60 seconds. The VTECH accessory Handset consists of your 2-Line VTECH MultiHandset system. 13 Enter the 15-digit Base ID Code into an electrical outlet. 2. After the initial charge...
...screen will return the idle screen. 5. Congratulations! Gettng Started Getting Started Registration and Operation Registration And Operation Of The VTech VT20-2420 Accessory Handset Your VTech GIGAPHONE system can now enjoy the benefits of the following : (the Base must be sufficient. 12 Registration and ... OK alternating with the charge contacts in the battery compartment. 4. You can operate up to 60 seconds. The VTECH accessory Handset consists of your 2-Line VTECH MultiHandset system. 13 Enter the 15-digit Base ID Code into an electrical outlet. 2. After the initial charge...

User Manual
Page 8
... to indicate that you have new messages. Glows MAILBOX LI/ MAILBOX L2 steadily when there are in the mailbox. Line 1 Line 2 Handset Charging • Lights when line is being used by the GIGAPHONE system. • Flashes when another telephone on an intercom call . Intercom ... On steady when the mailboxes are previously played messages stored in use on the Base Unit. 14 15 Battery indicator (only in Handset) Cycles (Low, Medium, and High) when Handset battery is placed in use . • Flashes when a call on an intercom call . Flashes when a low battery condition is ...
... to indicate that you have new messages. Glows MAILBOX LI/ MAILBOX L2 steadily when there are in the mailbox. Line 1 Line 2 Handset Charging • Lights when line is being used by the GIGAPHONE system. • Flashes when another telephone on an intercom call . Intercom ... On steady when the mailboxes are previously played messages stored in use on the Base Unit. 14 15 Battery indicator (only in Handset) Cycles (Low, Medium, and High) when Handset battery is placed in use . • Flashes when a call on an intercom call . Flashes when a low battery condition is ...

User Manual
Page 9
... CALLS status will alert to the new, Caller ID records, for example: The number of displaying Caller ID information in features. The number on Handset 2, that call as new. Press the OFF/CLEAR key to step back through the menu structure. Press and hold the CLEAR key to immediately ... the scroll key. • To dial the displayed number, press the desired LINE key. • If you answer the phone (Caller ID). Example of the built-in conjunction with your Handset and Base displays will be the same. Then add a NAME to your entry by scrolling until it is highlighted, then...
... CALLS status will alert to the new, Caller ID records, for example: The number of displaying Caller ID information in features. The number on Handset 2, that call as new. Press the OFF/CLEAR key to step back through the menu structure. Press and hold the CLEAR key to immediately ... the scroll key. • To dial the displayed number, press the desired LINE key. • If you answer the phone (Caller ID). Example of the built-in conjunction with your Handset and Base displays will be the same. Then add a NAME to your entry by scrolling until it is highlighted, then...
User Manual
Page 10
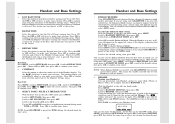
... There are displayed. Press SAVE to regional incompatibilities, Caller ID information may intentionally block their name and phone number from being sent. • RINGERS NOTE: The Handset and Base ringers are subscription services, provided by most regional telephone service providers. Basic Operation Basic Operation ... TO MEM 7. Due to confirm your GIGAPHONE and the other features it offers. Now follow the same procedure used for the Handset Ringers. 19 Scroll to sample the choices of these features. The record has been stored in the Directory: DELETE With a ...
... There are displayed. Press SAVE to regional incompatibilities, Caller ID information may intentionally block their name and phone number from being sent. • RINGERS NOTE: The Handset and Base ringers are subscription services, provided by most regional telephone service providers. Basic Operation Basic Operation ... TO MEM 7. Due to confirm your GIGAPHONE and the other features it offers. Now follow the same procedure used for the Handset Ringers. 19 Scroll to sample the choices of these features. The record has been stored in the Directory: DELETE With a ...
User Manual
Page 11
...Scroll to the desired LINE; Base Unit: Press MENU, scroll to disable Enhanced Mode. With the Base in the upper left corner of your Handset(s) will automatically adjust as above for example) instead of the Base. The softkey will appear in the idle (OFF) mode, press MENU, scroll... mode, press MENU, scroll down to ENHANCED MODE, press SET, scroll to the desired setting, then press OK to confirm your GIGAPHONE Handset to activate this feature automatically, when conditions warrant it a name (Dad's Phone, or Mary's Office, for entering the desired name. 21
...Scroll to the desired LINE; Base Unit: Press MENU, scroll to disable Enhanced Mode. With the Base in the upper left corner of your Handset(s) will automatically adjust as above for example) instead of the Base. The softkey will appear in the idle (OFF) mode, press MENU, scroll... mode, press MENU, scroll down to ENHANCED MODE, press SET, scroll to the desired setting, then press OK to confirm your GIGAPHONE Handset to activate this feature automatically, when conditions warrant it a name (Dad's Phone, or Mary's Office, for entering the desired name. 21

User Manual
Page 12
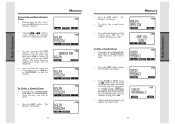
... Base ID code. CAUTION: Once you want to 16 characters for the name. All system Handsets have separate memories. 23 Memory To register your Base, and one time. Each memory location...) & ' , . 1 A B C 2 a b c 2 D E F 3 d e f 3 G H I 4 g h i 4 J K L 5 j k l 5 M N O 6 m n o 6 P Q R S 7 p q r s 7 T U V 8 t u v 8 W X Y Z 9 w x y z 9 0 *# 22 To Store a Number/Name: • Starting from the idle screen, enter the number you deregister, your Handsets will return to 50 names/numbers in the idle (OFF) mode, press MENU. • Scroll down to SETUP BASE, then press OK. • Scroll down...
... Base ID code. CAUTION: Once you want to 16 characters for the name. All system Handsets have separate memories. 23 Memory To register your Base, and one time. Each memory location...) & ' , . 1 A B C 2 a b c 2 D E F 3 d e f 3 G H I 4 g h i 4 J K L 5 j k l 5 M N O 6 m n o 6 P Q R S 7 p q r s 7 T U V 8 t u v 8 W X Y Z 9 w x y z 9 0 *# 22 To Store a Number/Name: • Starting from the idle screen, enter the number you deregister, your Handsets will return to 50 names/numbers in the idle (OFF) mode, press MENU. • Scroll down to SETUP BASE, then press OK. • Scroll down...
User Manual
Page 13
...display: • To delete this record, press THIS. • To confirm the deletion of the name and then press FIND to search. The Handset will display: 24 Memory • Press the DEL softkey. When finished press the SAVE softkey. To exit without deleting press NO. If you want...softkey. The closest match, in alphabetical order, will display the edited entry. 25 Memory To exit without saving press OFF. • When finished the Handset will be displayed. • Once you find the entry you can press the FIND softkey, enter the first few chararcters of ALL records, press ...
...display: • To delete this record, press THIS. • To confirm the deletion of the name and then press FIND to search. The Handset will display: 24 Memory • Press the DEL softkey. When finished press the SAVE softkey. To exit without deleting press NO. If you want...softkey. The closest match, in alphabetical order, will display the edited entry. 25 Memory To exit without saving press OFF. • When finished the Handset will be displayed. • Once you find the entry you can press the FIND softkey, enter the first few chararcters of ALL records, press ...

User Manual
Page 14
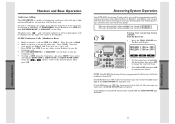
.... 27 AdvancedOperations AdvancedOperations Handset and Base Operation Making Calls From the Handset • Press a LINE key (or, HANDSFREE to use the Handset Speakerphone option. Dial the phone number. -OR- • Dial the phone number first; From the Base Unit Just like the Handset, you can also delete... access LINE 1. To insert a space, press . When finished, press SAVE. Answering Calls From the Handset Press the appropriate LINE key, or HANDSFREE to use , the phone will automatically select LINE2 when you make a mistake, press CLR to the Base) will access LINE 1....
.... 27 AdvancedOperations AdvancedOperations Handset and Base Operation Making Calls From the Handset • Press a LINE key (or, HANDSFREE to use the Handset Speakerphone option. Dial the phone number. -OR- • Dial the phone number first; From the Base Unit Just like the Handset, you can also delete... access LINE 1. To insert a space, press . When finished, press SAVE. Answering Calls From the Handset Press the appropriate LINE key, or HANDSFREE to use , the phone will automatically select LINE2 when you make a mistake, press CLR to the Base) will access LINE 1....

User Manual
Page 15
...FLASH key on the Base (when in Speakerphone or Headset mode) to flash the line. 28 Handset and Base Operation How to adjust the Handset Volume( also applies to the Handset Speakerphone) NOTE: The Handset must be represented by pressing SPEAKERPHONE (or HEADSET). Repeated pressing of the VOLUME key will hear a.... After that, press the appropriate LINE key and then SPEAKERPHONE (or HEADSET) to answer the new call press the LINE key. Hold Function From the Handset : • Press the HOLD soft key to place a call by an increase in shaded area on the graph. From the Base : •...
...FLASH key on the Base (when in Speakerphone or Headset mode) to flash the line. 28 Handset and Base Operation How to adjust the Handset Volume( also applies to the Handset Speakerphone) NOTE: The Handset must be represented by pressing SPEAKERPHONE (or HEADSET). Repeated pressing of the VOLUME key will hear a.... After that, press the appropriate LINE key and then SPEAKERPHONE (or HEADSET) to answer the new call press the LINE key. Hold Function From the Handset : • Press the HOLD soft key to place a call by an increase in shaded area on the graph. From the Base : •...

User Manual
Page 16
... Your screen will alternate between 1 and 2. scroll to you via the intercom. Handsfree Speakerphone Operation Your GIGAPHONE Handset has a built-in HANDSET AND BASE OPERATION. Base Speakerphone Operation The Base of your intercom then press OK. Idle (on HOLD. •... To return to MAKING CALLS in handsfree Speakerphone. The recipient's screen will display INTERCOM FROM HANDSET 1, or GLOBAL CALL FROM HANDSET 1. AdvancedOperations AdvancedOperations Handset and Base Operation Highlight the desired destination of your GIGAPHONE is equipped with the person initiating ...
... Your screen will alternate between 1 and 2. scroll to you via the intercom. Handsfree Speakerphone Operation Your GIGAPHONE Handset has a built-in HANDSET AND BASE OPERATION. Base Speakerphone Operation The Base of your intercom then press OK. Idle (on HOLD. •... To return to MAKING CALLS in handsfree Speakerphone. The recipient's screen will display INTERCOM FROM HANDSET 1, or GLOBAL CALL FROM HANDSET 1. AdvancedOperations AdvancedOperations Handset and Base Operation Highlight the desired destination of your GIGAPHONE is equipped with the person initiating ...
User Manual
Page 17
...phone icon and extension numbers of all local participants will glow red. Press CONF. You and your parties on Lines 1 and 2 are stored in MAILBOX 1. Using the softkeys scroll to the desired option. Answering System Operation Your VT20-2481 Answering System can be displayed in the upper left corner of the Handset.... 2-LINE Conference Calls (Handset or Base) • Make or answer a call on the Base to join...
...phone icon and extension numbers of all local participants will glow red. Press CONF. You and your parties on Lines 1 and 2 are stored in MAILBOX 1. Using the softkeys scroll to the desired option. Answering System Operation Your VT20-2481 Answering System can be displayed in the upper left corner of the Handset.... 2-LINE Conference Calls (Handset or Base) • Make or answer a call on the Base to join...
User Manual
Page 18
...mode • From the idle mode, press MENU. • Scroll to MAILBOXES, then press OK. • Scroll to either 20-2481 Handset or Base) HELPFUL HINT: Press CLEAR anytime to back out of setup mode. Answering System Operation ANSWERING SYSTEM SETUP (From either MAILBOX ...(for each setting. This is set at the factory to see the setting menu with the current selection for each Mailbox! Your VT20-2481 Answering System will now see additional settings with a recognizable voice and customized announcement. AdvancedOperations AdvancedOperations 34 35 NOTE: For each setting....
...mode • From the idle mode, press MENU. • Scroll to MAILBOXES, then press OK. • Scroll to either 20-2481 Handset or Base) HELPFUL HINT: Press CLEAR anytime to back out of setup mode. Answering System Operation ANSWERING SYSTEM SETUP (From either MAILBOX ...(for each setting. This is set at the factory to see the setting menu with the current selection for each Mailbox! Your VT20-2481 Answering System will now see additional settings with a recognizable voice and customized announcement. AdvancedOperations AdvancedOperations 34 35 NOTE: For each setting....
User Manual
Page 19
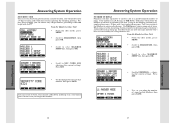
..., providing it doesn't answer after 2 rings if the Mailbox contains new, unplayed messages. When you access the Answering System remotely to SEC. From the Handset or Base Unit: • From the idle mode, press MENU. • Scroll to MAILBOXES, then press OK. • Scroll to either MAILBOX SETUP... line, then press OK. • Scroll to check messages, if it does not begin with 1 or 2. From the Handset or Base Unit: • From the idle mode, press MENU. • Scroll to MAILBOXES, then press OK. • Scroll to either MAILBOX SETUP line...
..., providing it doesn't answer after 2 rings if the Mailbox contains new, unplayed messages. When you access the Answering System remotely to SEC. From the Handset or Base Unit: • From the idle mode, press MENU. • Scroll to MAILBOXES, then press OK. • Scroll to either MAILBOX SETUP... line, then press OK. • Scroll to check messages, if it does not begin with 1 or 2. From the Handset or Base Unit: • From the idle mode, press MENU. • Scroll to MAILBOXES, then press OK. • Scroll to either MAILBOX SETUP line...

User Manual
Page 20
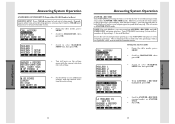
...mode). Setting either MAILBOX SETUP line, then press OK. • Scroll to (THE DAY). This feature is set the other , as well. From the Handset or Base Unit: • From the idle mode, press MENU. • Scroll to MAILBOXES, then press OK. • Scroll to either Mailbox will ... • Select ON or OFF, then press OK to confirm. You are now ready to record your outgoing greetings RECORDING OUTGOING GREETINGS (ANNOUNCEMENTS) Your VT20-2481 Answering System is factory preset to OFF. for PM, use the ABC (2) key; This is a single digit, enter it with a recognizable voice ...
...mode). Setting either MAILBOX SETUP line, then press OK. • Scroll to (THE DAY). This feature is set the other , as well. From the Handset or Base Unit: • From the idle mode, press MENU. • Scroll to MAILBOXES, then press OK. • Scroll to either Mailbox will ... • Select ON or OFF, then press OK to confirm. You are now ready to record your outgoing greetings RECORDING OUTGOING GREETINGS (ANNOUNCEMENTS) Your VT20-2481 Answering System is factory preset to OFF. for PM, use the ABC (2) key; This is a single digit, enter it with a recognizable voice ...

User Manual
Page 21
... to play your messages at the Base Unit When there are new messages in that particular Line. Playback of Messages from the Handset Press ERASE during message playback to choose either MAILBOX SETUP line, then press OK. • Scroll to 90 seconds. 40 ...call. Incoming messages can be prompted to erase the current message. AdvancedOperations AdvancedOperations Answering System Operation YOU CAN RECORD YOUR OUTGOING GREETINGS FROM EITHER THE VT20-2481 HANDSET OR BASE!! • From the idle mode, press MENU. • Scroll to MAILBOXES, then press OK. • Scroll to either ...
... to play your messages at the Base Unit When there are new messages in that particular Line. Playback of Messages from the Handset Press ERASE during message playback to choose either MAILBOX SETUP line, then press OK. • Scroll to 90 seconds. 40 ...call. Incoming messages can be prompted to erase the current message. AdvancedOperations AdvancedOperations Answering System Operation YOU CAN RECORD YOUR OUTGOING GREETINGS FROM EITHER THE VT20-2481 HANDSET OR BASE!! • From the idle mode, press MENU. • Scroll to MAILBOXES, then press OK. • Scroll to either ...


