
User Manual
Page 1
... to restore the product to an authorized service facility under the following conditions: A. If the product has been dropped and the Base and/or Handset has been damaged. 1 Read and understand all warnings and instructions marked on the marking label. Slots and openings in the back or bottom of... the Base Unit and Handset are not sure of the type of any area where proper ventilation is damaged or frayed. This product should never be placed near a bath ...
... to restore the product to an authorized service facility under the following conditions: A. If the product has been dropped and the Base and/or Handset has been damaged. 1 Read and understand all warnings and instructions marked on the marking label. Slots and openings in the back or bottom of... the Base Unit and Handset are not sure of the type of any area where proper ventilation is damaged or frayed. This product should never be placed near a bath ...

User Manual
Page 2
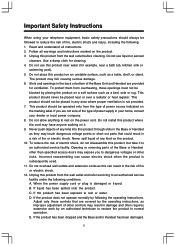
There may be a remote risk of the leak. There is next to your ear when it is in normal talk mode (off while the Handset is a potential risk of your telephone next to your ear. 2 WARNING: Only put the Handset of hearing damage or loss if the ringer were to report a gas leak in performance. 13. Important Safety Instructions F. If the product exhibits a distinct change in the vicinity of electric shock from lightning. 14. Do not use the telephone to go off -hook). Avoid using a telephone (other than cordless) during an electrical storm.
There may be a remote risk of the leak. There is next to your ear when it is in normal talk mode (off while the Handset is a potential risk of your telephone next to your ear. 2 WARNING: Only put the Handset of hearing damage or loss if the ringer were to report a gas leak in performance. 13. Important Safety Instructions F. If the product exhibits a distinct change in the vicinity of electric shock from lightning. 14. Do not use the telephone to go off -hook). Avoid using a telephone (other than cordless) during an electrical storm.

User Manual
Page 3
... Unit 2. Base Unit Base AC power Adapter Telephone Line Cord Handset x 2 Handset Charger Belt Clip x 2 User's Manual 3 Battery Cell x 6 Base AC Power Adapter 5. Battery Cell x 6 To purchase replacement battery cells, call VTech Telecommunications Canada Ltd. Telephone Line Cord 6. User's Manual 8. NOTE:Use only VTech batteries (part number 80-5380-00-00) or equivalent AAA...
... Unit 2. Base Unit Base AC power Adapter Telephone Line Cord Handset x 2 Handset Charger Belt Clip x 2 User's Manual 3 Battery Cell x 6 Base AC Power Adapter 5. Battery Cell x 6 To purchase replacement battery cells, call VTech Telecommunications Canada Ltd. Telephone Line Cord 6. User's Manual 8. NOTE:Use only VTech batteries (part number 80-5380-00-00) or equivalent AAA...

User Manual
Page 4
Volume Control 3. Intercom 16. Antenna 2. Dialing Keys (0-9, , #) 8. Microphone 1 2 11 12 5 13 6 4 14 7 8 15 10 9 16 3 4 Headset jack (2.5mm) 13. Phonebook (Scroll Up) 14. CID (Scroll Down) 5. Select (Menu) 6. On (Flash) 7. Mute (Delete) 10. Redial (Pause) 9. Off (Clear) 15. LCD Display 12. Getting Started Handset Layout 1. Speakerphone LED 4. Speakerphone 11.
Volume Control 3. Intercom 16. Antenna 2. Dialing Keys (0-9, , #) 8. Microphone 1 2 11 12 5 13 6 4 14 7 8 15 10 9 16 3 4 Headset jack (2.5mm) 13. Phonebook (Scroll Up) 14. CID (Scroll Down) 5. Select (Menu) 6. On (Flash) 7. Mute (Delete) 10. Redial (Pause) 9. Off (Clear) 15. LCD Display 12. Getting Started Handset Layout 1. Speakerphone LED 4. Speakerphone 11.

User Manual
Page 5
Change 8. Repeat/Slow 12. Mailbox/Stop keys 14. Microphone 16.Mailbox/Stop LED 1 17.Mailbox/Stop LED 2 18.Mailbox/Stop LED 3 3 10 5 6 7 8 9 12 4 Setup 1 2 15 14 11 16 17 13 18 Connecting Power to Base Unit/Handset Charger 1. Menu 7. Record/Memo 10. In Use LED 2. Answer On/Off key 15. Skip/Quick 13. Page key 5. Plug the AC power adapter into an electrical outlet, and the DC connector into the bottom of the Base Unit. 5 Time/Set 9. Getting Started Base Unit Layout 1. Charging LED 3. Message Window Display 4. Volume keys 6. Delete 11.
Change 8. Repeat/Slow 12. Mailbox/Stop keys 14. Microphone 16.Mailbox/Stop LED 1 17.Mailbox/Stop LED 2 18.Mailbox/Stop LED 3 3 10 5 6 7 8 9 12 4 Setup 1 2 15 14 11 16 17 13 18 Connecting Power to Base Unit/Handset Charger 1. Menu 7. Record/Memo 10. In Use LED 2. Answer On/Off key 15. Skip/Quick 13. Page key 5. Plug the AC power adapter into an electrical outlet, and the DC connector into the bottom of the Base Unit. 5 Time/Set 9. Getting Started Base Unit Layout 1. Charging LED 3. Message Window Display 4. Volume keys 6. Delete 11.

User Manual
Page 6
...'ll know the battery cells needs charging when: • The low battery message and the icon are not already charged, place the Handset in its Charger or Base Unit, and allow it upwards 3. Replace the battery cover by rechargeable battery cells. Use only the batteries that...Charge of your cordless telephone is completely clear and does not activate when you first receive your Handset Charger, and plug its charger or Base Unit. Charging of the Handset Battery Cells The Handset of Battery Cells in LOW BATTERY mode, the keypad sounds, backlighting and speakerphone features will return...
...'ll know the battery cells needs charging when: • The low battery message and the icon are not already charged, place the Handset in its Charger or Base Unit, and allow it upwards 3. Replace the battery cover by rechargeable battery cells. Use only the batteries that...Charge of your cordless telephone is completely clear and does not activate when you first receive your Handset Charger, and plug its charger or Base Unit. Charging of the Handset Battery Cells The Handset of Battery Cells in LOW BATTERY mode, the keypad sounds, backlighting and speakerphone features will return...

User Manual
Page 7
... OF YOUR CORDLESS TELEPHONE SYSTEM: 1. Getting Started Setup IMPORTANT: 1. Do not dispose of the telephone line cord into the jack on the Handset. Toxic substances may explode. 2. Do not charge the battery cell with your telephone equipment away from electronic equipment, such as possible. 4. ...pack to be released, causing harm to install battery cells into the wall jack. CAUTION: Use only the VTech power supply vided with other end of this cord into your Handset. In locations where there are no battery cells in a fire, the cell may be replaced by new...
... OF YOUR CORDLESS TELEPHONE SYSTEM: 1. Getting Started Setup IMPORTANT: 1. Do not dispose of the telephone line cord into the jack on the Handset. Toxic substances may explode. 2. Do not charge the battery cell with your telephone equipment away from electronic equipment, such as possible. 4. ...pack to be released, causing harm to install battery cells into the wall jack. CAUTION: Use only the VTech power supply vided with other end of this cord into your Handset. In locations where there are no battery cells in a fire, the cell may be replaced by new...
User Manual
Page 8
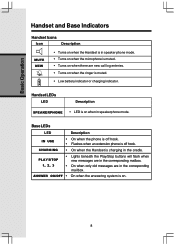
... Turns on when the ringer is muted. • Low battery indicator or charging indicator. Handset LEDs LED Description SPEAKERPHONE • LED is on when in the cradle. CHARGING • On when the Handset is charging in speakerphone mode. ANSWER ON/OFF • On when the answering system is... off hook. Basic Operation Handset and Base Indicators Handset Icons Icon Description MUTE NEW • Turns on when the Handset is in speaker phone mode. • Turns on when the microphone is muted. • Turns ...
... Turns on when the ringer is muted. • Low battery indicator or charging indicator. Handset LEDs LED Description SPEAKERPHONE • LED is on when in the cradle. CHARGING • On when the Handset is charging in speakerphone mode. ANSWER ON/OFF • On when the answering system is... off hook. Basic Operation Handset and Base Indicators Handset Icons Icon Description MUTE NEW • Turns on when the Handset is in speaker phone mode. • Turns on when the microphone is muted. • Turns ...

User Manual
Page 9
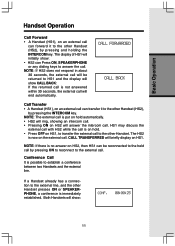
...8226; PAUSE to quit the redial review list. 9 REDIAL 595-9511 Basic Operation Press OFF to display the last telephone number dialed from the Handset. Press ON/FLASH again to return to end your call . Answering Calls • Press ON, SPEAKERPHONE or any dialing keys. • ... with services such as described by your call . When you receive a call , press or key to adjust the listening volume to end your provider. Handset Operation Making Calls • Press ON (or, SPEAKERPHONE to 32 digits each). then press ON (or SPEAKERPHONE). • Press OFF to a comfortable level...
...8226; PAUSE to quit the redial review list. 9 REDIAL 595-9511 Basic Operation Press OFF to display the last telephone number dialed from the Handset. Press ON/FLASH again to return to end your call . Answering Calls • Press ON, SPEAKERPHONE or any dialing keys. • ... with services such as described by your call . When you receive a call , press or key to adjust the listening volume to end your provider. Handset Operation Making Calls • Press ON (or, SPEAKERPHONE to 32 digits each). then press ON (or SPEAKERPHONE). • Press OFF to a comfortable level...

User Manual
Page 10
... , pressing MUTE.DEL key will disable the microphone. Mute Function • During an active call , press INTERCOM or OFF. The Handset will display: • The other Handset will ring and the screen will display: • Press ON, SPEAKERPHONE, INTERCOM or any dialing keys to the other... Handset. 10 PHONE 00:00:15 MICROPHONE MUTED MUTE CALLING OTHER HANDSET OTHER HANDSET IS CALLING INTERCOM INTERCOM ENDED UNABLE TO CALL TRY AGAIN A confirmation tone will display MICROPHONE ON briefly....
... , pressing MUTE.DEL key will disable the microphone. Mute Function • During an active call , press INTERCOM or OFF. The Handset will display: • The other Handset will ring and the screen will display: • Press ON, SPEAKERPHONE, INTERCOM or any dialing keys to the other... Handset. 10 PHONE 00:00:15 MICROPHONE MUTED MUTE CALLING OTHER HANDSET OTHER HANDSET IS CALLING INTERCOM INTERCOM ENDED UNABLE TO CALL TRY AGAIN A confirmation tone will display MICROPHONE ON briefly....
User Manual
Page 11
..., the external call will be reconnected to the held call by pressing ON to reconnect to the external call can forward it to the other Handset (HS2), by pressing and holding the INTERCOM key. NOTE: The external call is not answered within 30 seconds, the external call will show CALL BACK... may discuss the external call with HS2 while the call is no answer on HS1, to the other Handset presses ON or SPEAKERPHONE, a conference is now on an external call . NOTE: If there is on hold automatically. • HS2 will ring, showing an intercom ...
..., the external call will be reconnected to the held call by pressing ON to reconnect to the external call can forward it to the other Handset (HS2), by pressing and holding the INTERCOM key. NOTE: The external call is not answered within 30 seconds, the external call will show CALL BACK... may discuss the external call with HS2 while the call is no answer on HS1, to the other Handset presses ON or SPEAKERPHONE, a conference is now on an external call . NOTE: If there is on hold automatically. • HS2 will ring, showing an intercom ...

User Manual
Page 12
The Handsets will display: • To end the page at the Base, press PAGE again. • To end the page from either Handset, press any dialing keys, ON or SPEAKERPHONE. BASE IS PAGING Basic Operation 12 Base Operation Page From the Base Unit, you can use the PAGE key to locate the Handsets for 60 seconds. • When the Handset is in idle, press PAGE on Base Unit.
The Handsets will display: • To end the page at the Base, press PAGE again. • To end the page from either Handset, press any dialing keys, ON or SPEAKERPHONE. BASE IS PAGING Basic Operation 12 Base Operation Page From the Base Unit, you can use the PAGE key to locate the Handsets for 60 seconds. • When the Handset is in idle, press PAGE on Base Unit.

User Manual
Page 13
... display PHONEBOOK IS FULL. • You can also press REDIAL.PAUSE, then or to scroll to the previously dialed number from both Handsets, and if one Handset is stored in the phonebook. Use the dialing keys to enter the number you want to store in the phonebook. Press SEL. •... this is a duplicate number in memory. DEL key to spell the name. This means that entries inserted by one Handset are available for both Handsets. Storing a New Entry • Press SEL. • With Phonebook selected, press SEL again. • Press to select STORE. Press SEL. • You will display...
... display PHONEBOOK IS FULL. • You can also press REDIAL.PAUSE, then or to scroll to the previously dialed number from both Handsets, and if one Handset is stored in the phonebook. Use the dialing keys to enter the number you want to store in the phonebook. Press SEL. •... this is a duplicate number in memory. DEL key to spell the name. This means that entries inserted by one Handset are available for both Handsets. Storing a New Entry • Press SEL. • With Phonebook selected, press SEL again. • Press to select STORE. Press SEL. • You will display...

User Manual
Page 15
... VTECH 595-9511 Editing a Phonebook Entry • Follow the steps in the phonebook, when it is accessed, PHONEBOOK IS EMPTY will display phone number up to be reviewed and dialed from the phonebook by: • Press SEL. With Phonebook in the first line, press SEL again. - OR With the Handset... idle, press and the Handset jumps directly into the phonebook review mode. NOTE: If there are no entries in Reviewing/ Dialing from the phonebook to reach the entry...
... VTECH 595-9511 Editing a Phonebook Entry • Follow the steps in the phonebook, when it is accessed, PHONEBOOK IS EMPTY will display phone number up to be reviewed and dialed from the phonebook by: • Press SEL. With Phonebook in the first line, press SEL again. - OR With the Handset... idle, press and the Handset jumps directly into the phonebook review mode. NOTE: If there are no entries in Reviewing/ Dialing from the phonebook to reach the entry...

User Manual
Page 16
...confirmation tone will then move to be deleted. EDIT NUMBER 595-9511_ EDIT NAME Vtech_ Vtech 595-9511 Vtech 595-9511 • Press MUTE.DEL key to add pauses if necessary. A confirmation tone will sound. • The Handset will sound. You can also press REDIAL.PAUSE, then or to scroll to the previously... dialed number from the Phone Book (see page 15) to reach the entry to the next entry, if any. 16 Vtech com 595-9511 Press SEL. • Press ...
...confirmation tone will then move to be deleted. EDIT NUMBER 595-9511_ EDIT NAME Vtech_ Vtech 595-9511 Vtech 595-9511 • Press MUTE.DEL key to add pauses if necessary. A confirmation tone will sound. • The Handset will sound. You can also press REDIAL.PAUSE, then or to scroll to the previously... dialed number from the Phone Book (see page 15) to reach the entry to the next entry, if any. 16 Vtech com 595-9511 Press SEL. • Press ...

User Manual
Page 17
...so you can hold up to make room for every call , or continue with a Call Waiting alert signal (Call Waiting Caller ID). Only one Handset may intentionally block their name and/or phone number from being sent. If you do not subscribe to Caller ID services, you can review the... Caller ID information in the phonebook. NOTES ABOUT CALLER ID & CALL WAITING CALLER ID These are received, your Handsets' displays will alert you to the new Caller ID records, for example: VTECH 5 NEW CALLS After you receive. You must subscribe to these services to the Caller ID review mode. 17 ...
...so you can hold up to make room for every call , or continue with a Call Waiting alert signal (Call Waiting Caller ID). Only one Handset may intentionally block their name and/or phone number from being sent. If you do not subscribe to Caller ID services, you can review the... Caller ID information in the phonebook. NOTES ABOUT CALLER ID & CALL WAITING CALLER ID These are received, your Handsets' displays will alert you to the new Caller ID records, for example: VTECH 5 NEW CALLS After you receive. You must subscribe to these services to the Caller ID review mode. 17 ...

User Manual
Page 20
...You can then use or keys or enter digit 0-9 to KEY TONE. 20 > KEY TONE HANDSET NAME INTERCOM TONE 1 Key Tone (preset to ON) • From the idle (OFF) mode.... • Press SEL again. The screen, for example, will show : • Press SEL to confirm the setting. Handset Settings Ringer Volume • From the idle (OFF) mode, press SEL then or key to choose INTERCOM CALL or OUTSIDE ...volume will increase/decrease as the setting is adjusted. At the lowest setting, the Handset will not ring when a call comes in and the display will show : • Press SEL to confirm your setting...
...You can then use or keys or enter digit 0-9 to KEY TONE. 20 > KEY TONE HANDSET NAME INTERCOM TONE 1 Key Tone (preset to ON) • From the idle (OFF) mode.... • Press SEL again. The screen, for example, will show : • Press SEL to confirm the setting. Handset Settings Ringer Volume • From the idle (OFF) mode, press SEL then or key to choose INTERCOM CALL or OUTSIDE ...volume will increase/decrease as the setting is adjusted. At the lowest setting, the Handset will not ring when a call comes in and the display will show : • Press SEL to confirm your setting...

User Manual
Page 21
... the Phonebook, see the table in page 14. • Press SEL to give each Handset its own unique name. The name is possible to confirm the setting. NOTE: The characters are entered in the same way as 'VTECH') It is shown in length. • From the idle (OFF) mode, press SEL...to backspace then spell the desired name. The name can be shown. key to select this option. KEY TONE OFF HANDSET NAME VTECH_ HANDSET NAME Kitchen_ >LANGUAGE DIAL TYPE • Press SEL to HANDSET • Press SEL again. Press or keys to scroll from English to French or Spanish. • Press SEL ...
... the Phonebook, see the table in page 14. • Press SEL to give each Handset its own unique name. The name is possible to confirm the setting. NOTE: The characters are entered in the same way as 'VTECH') It is shown in length. • From the idle (OFF) mode, press SEL...to backspace then spell the desired name. The name can be shown. key to select this option. KEY TONE OFF HANDSET NAME VTECH_ HANDSET NAME Kitchen_ >LANGUAGE DIAL TYPE • Press SEL to HANDSET • Press SEL again. Press or keys to scroll from English to French or Spanish. • Press SEL ...

User Manual
Page 22
Once pressed, tone will return to pulse dialing for the next call. >DIAL TYPE PHONE BOOK DIAL TYPE PULSE 22 NOTE: When the phone is possible to switch to confirm your setting. After you hang up, the phone will be used for pulse dial mode, it is set for rest of the call. Basic Operation Handset Settings Dial Type (preset to Tone) • From the idle (OFF) mode, press SEL then or key to DIAL TYPE. • Press SEL then use or key to scroll to TONE or PULSE. • Press SEL to temporary tone mode during an ongoing call by pressing .
Once pressed, tone will return to pulse dialing for the next call. >DIAL TYPE PHONE BOOK DIAL TYPE PULSE 22 NOTE: When the phone is possible to switch to confirm your setting. After you hang up, the phone will be used for pulse dial mode, it is set for rest of the call. Basic Operation Handset Settings Dial Type (preset to Tone) • From the idle (OFF) mode, press SEL then or key to DIAL TYPE. • Press SEL then use or key to scroll to TONE or PULSE. • Press SEL to temporary tone mode during an ongoing call by pressing .

User Manual
Page 29
... record longer memo, 99 continues to select a mailbox for the memo. Press the MAIL BOX/STOP button to flash until you press ON on the Handset, the Answering System will stop recording, press the MAIL BOX/STOP button again. speak towards the Base microphone. If you finish. 3. The system announces "Please...
... record longer memo, 99 continues to select a mailbox for the memo. Press the MAIL BOX/STOP button to flash until you press ON on the Handset, the Answering System will stop recording, press the MAIL BOX/STOP button again. speak towards the Base microphone. If you finish. 3. The system announces "Please...


