

User Manual
Page 1
...UP YOUR VT 2931...7 WALL MOUNTING...8 BASIC OPERATIONS Area Code Programming...11 Key Beeps ...12 Setting The Handset Ringer 12 Base Unit Ringer...12 Making Calls...12 Redial/Pause...13 Answering Calls...13 Handset Volume ...13 Speakerphone Volume ...13 Mute...13 Speakerphone Tips...14 Call Timer...14 Hold...14 Call Waiting......14 Paging the Handset...14 Intercom...14 Voice Mail Indicator...14 Voice Mail Tips...15 Conference Calling...15 CALLER ID Reviewing the Call Log...16 Erasing Calls......
...UP YOUR VT 2931...7 WALL MOUNTING...8 BASIC OPERATIONS Area Code Programming...11 Key Beeps ...12 Setting The Handset Ringer 12 Base Unit Ringer...12 Making Calls...12 Redial/Pause...13 Answering Calls...13 Handset Volume ...13 Speakerphone Volume ...13 Mute...13 Speakerphone Tips...14 Call Timer...14 Hold...14 Call Waiting......14 Paging the Handset...14 Intercom...14 Voice Mail Indicator...14 Voice Mail Tips...15 Conference Calling...15 CALLER ID Reviewing the Call Log...16 Erasing Calls......

User Manual
Page 4
... 1 2 ABC 3 DEF 4 GHI 5 JKL 6 MNO 7 PQRS 8 TUV 9 WXYZ TONE 0 OPER HOLD PROG FLASH REDIAL/PAUSE CONF INTERCOM HANDSET WALL MOUNTING BRACKET MIC BASE UNIT AC POWER ADAPTOR SHORT TELEPHONE LINE CORD TELEPHONE LINE CORD 2 WIRE BATTERY PACK TELEPHONE LINE CORD 4 WIRE 4 BELT ...CLIP Handset 2. AC power Adaptor 5. Telephone Line Cords (x2) 7. PARTS CHECK LIST 1. Wall Mounting Bracket 4. In Canada, call VTECH Communications at 1-800267-7377. Short Telephone Line Cord 6. Belt Clip To purchase replacement...
... 1 2 ABC 3 DEF 4 GHI 5 JKL 6 MNO 7 PQRS 8 TUV 9 WXYZ TONE 0 OPER HOLD PROG FLASH REDIAL/PAUSE CONF INTERCOM HANDSET WALL MOUNTING BRACKET MIC BASE UNIT AC POWER ADAPTOR SHORT TELEPHONE LINE CORD TELEPHONE LINE CORD 2 WIRE BATTERY PACK TELEPHONE LINE CORD 4 WIRE 4 BELT ...CLIP Handset 2. AC power Adaptor 5. Telephone Line Cords (x2) 7. PARTS CHECK LIST 1. Wall Mounting Bracket 4. In Canada, call VTECH Communications at 1-800267-7377. Short Telephone Line Cord 6. Belt Clip To purchase replacement...

User Manual
Page 5
HANDSET UNIT KEYS AND FEATURES ANTENNA HEADSET JACK LINE 1 SELECT OFF LINE 2 1 2 ABC 3 DEF 4 GHI 5 JKL 6 MNO 7PQRS 8 TUV 9 WXYZ TONE 0OPER HOLD PROG FLASH REDIAL/PAUSE CONF INTERCOM VOLUME UP & DOWN DISPLAY BACK KEY FORWARD KEY SELECT KEY LINE 2 KEY OFF KEY LINE 1 KEY DIALING KEYS (0-9) FLASH KEY REDIAL/PAUSE KEY PROG KEY HOLD KEY INTERCOM KEY CONF KEY TONE KEY (Temporary Tone) BATTERY COMPARTMENT 5
HANDSET UNIT KEYS AND FEATURES ANTENNA HEADSET JACK LINE 1 SELECT OFF LINE 2 1 2 ABC 3 DEF 4 GHI 5 JKL 6 MNO 7PQRS 8 TUV 9 WXYZ TONE 0OPER HOLD PROG FLASH REDIAL/PAUSE CONF INTERCOM VOLUME UP & DOWN DISPLAY BACK KEY FORWARD KEY SELECT KEY LINE 2 KEY OFF KEY LINE 1 KEY DIALING KEYS (0-9) FLASH KEY REDIAL/PAUSE KEY PROG KEY HOLD KEY INTERCOM KEY CONF KEY TONE KEY (Temporary Tone) BATTERY COMPARTMENT 5

User Manual
Page 7
...THE BATTERY COMPARTMENT PLEASE NOTE THE CORRECT POSITION OF THE BATTERY PACK WHEN INSTALLING 3. Place the Handset into the back of the Base Unit. Install the BATTERY PACK, with the Handset contacts. SLIDE IN THE BATTERY COVER SIMON JAMES WILD 10:00 AM 654532 465929115 NEW 00...up or down and aligned with the metal contacts facing down . 7 PRESS and SLIDE DOWNWARD 2. Replace Handset battery cover. Slide the Handset battery cover down, and remove it from the Handset. Plug the AC POWER ADAPTER into a live electrical outlet and the DC POWER CONNECTOR into the Base ...
...THE BATTERY COMPARTMENT PLEASE NOTE THE CORRECT POSITION OF THE BATTERY PACK WHEN INSTALLING 3. Place the Handset into the back of the Base Unit. Install the BATTERY PACK, with the Handset contacts. SLIDE IN THE BATTERY COVER SIMON JAMES WILD 10:00 AM 654532 465929115 NEW 00...up or down and aligned with the metal contacts facing down . 7 PRESS and SLIDE DOWNWARD 2. Replace Handset battery cover. Slide the Handset battery cover down, and remove it from the Handset. Plug the AC POWER ADAPTER into a live electrical outlet and the DC POWER CONNECTOR into the Base ...

User Manual
Page 8
.... TELEPHONE WALL JACK RJ-11 - + DC IN 9V LINE 2 L1/L1+L2 LINLE22 DC RJ-11 II. Set the TONE/PULSE switch, located on the Handset and Base Unit when using your convenience. In most areas, TONE is provided for your telephone. 8 For best results, raise the antenna on the antenna...
.... TELEPHONE WALL JACK RJ-11 - + DC IN 9V LINE 2 L1/L1+L2 LINLE22 DC RJ-11 II. Set the TONE/PULSE switch, located on the Handset and Base Unit when using your convenience. In most areas, TONE is provided for your telephone. 8 For best results, raise the antenna on the antenna...

User Manual
Page 9
Remove the Spare Battery charger cover by calling VTECH Customer Service at 1-800-595-9511 in the U.S.A and VTech Electronics Canada Ltd at a slower rate than a battery pack charging in the Handset. Make sure the metal charging contacts on the underside of the battery pack are aligned with the charging...800-267-7377 in the Spare Battery charger. 9 MIC 4. Place a battery pack in the event your Handset battery pack runs down. NOTE: To obtain an optional Spare Battery, contact an authorized VTECH dealer, or by pressing the release tab and lifting up. It takes 24 hours to always have a...
Remove the Spare Battery charger cover by calling VTECH Customer Service at 1-800-595-9511 in the U.S.A and VTech Electronics Canada Ltd at a slower rate than a battery pack charging in the Handset. Make sure the metal charging contacts on the underside of the battery pack are aligned with the charging...800-267-7377 in the Spare Battery charger. 9 MIC 4. Place a battery pack in the event your Handset battery pack runs down. NOTE: To obtain an optional Spare Battery, contact an authorized VTECH dealer, or by pressing the release tab and lifting up. It takes 24 hours to always have a...
User Manual
Page 11
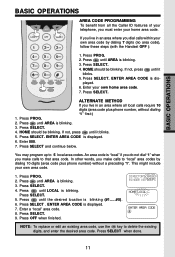
... "local" if you do not dial "1" when you make calls to "local" area codes by dialing 7 digits (no area code), follow these steps (with the Handset OFF ): 1. Press SELECT when done. 11 This might include your own home area code. 7. Press SELECT. An area code is displayed. 7. LINE 1 OFF LINE 2 1 2 ABC...
... "local" if you do not dial "1" when you make calls to "local" area codes by dialing 7 digits (no area code), follow these steps (with the Handset OFF ): 1. Press SELECT when done. 11 This might include your own home area code. 7. Press SELECT. An area code is displayed. 7. LINE 1 OFF LINE 2 1 2 ABC...

User Manual
Page 12
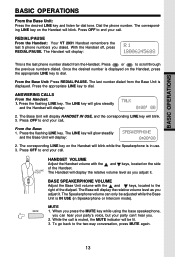
...ring styles OR turn the keybeep feature ON again, repeat steps 1 through 3. Press PROG. 2. Press or to end your call . MAKING CALLS From the Handset: LINE 1 OFF LINE 2 1. Dial the phone number, checking the display for dial tone. 2. If you do not want to hear the beep, ...do the following while the Handset is controlled by switches located on hook) : 1. Press OFF to backspace. 2. The current setting is displayed, press SELECT. From the Base: The Base...
...ring styles OR turn the keybeep feature ON again, repeat steps 1 through 3. Press PROG. 2. Press or to end your call . MAKING CALLS From the Handset: LINE 1 OFF LINE 2 1. Dial the phone number, checking the display for dial tone. 2. If you do not want to hear the beep, ...do the following while the Handset is controlled by switches located on hook) : 1. Press OFF to backspace. 2. The current setting is displayed, press SELECT. From the Base: The Base...
User Manual
Page 13
...the base speakerphone, you adjust it . The last number dialed from the Base Unit is the last phone number dialed from the Handset. The Base Unit will display HANDSET IN USE, and the corresponding LlNE key will display: 2. Press OFF to end your call . BASE SPEAKERPHONE VOLUME Adjust the Base... Unit volume with the and keys, located on the Handset will blink. BASIC OPERATIONS BASIC OPERATIONS From the Base Unit: Press the desired LINE key and listen for dial tone. Dial the phone number. ...
...the base speakerphone, you adjust it . The last number dialed from the Base Unit is the last phone number dialed from the Handset. The Base Unit will display HANDSET IN USE, and the corresponding LlNE key will display: 2. Press OFF to end your call . BASE SPEAKERPHONE VOLUME Adjust the Base... Unit volume with the and keys, located on the Handset will blink. BASIC OPERATIONS BASIC OPERATIONS From the Base Unit: Press the desired LINE key and listen for dial tone. Dial the phone number. ...

User Manual
Page 14
...approximate duration of that call . To answer Call Waiting, press FLASH. INTERCOM (Conversation between the Base and Handset) From the Handset: Press INTERCOM. The Handset will display: 3. The Handset and Base Unit will ring. Otherwise, press MUTE while the other person is the same for example). CALL ... to your original call will turn off. 14 Press INTERCOM/PAGE. 2. To return to your call on hold, press HOLD on the Handset or Base, whichever you are using. HOLD To place a call , press the appropriate LINE key. BASIC OPERATIONS BASIC OPERATIONS SPEAKERPHONE TIPS ...
...approximate duration of that call . To answer Call Waiting, press FLASH. INTERCOM (Conversation between the Base and Handset) From the Handset: Press INTERCOM. The Handset will display: 3. The Handset and Base Unit will ring. Otherwise, press MUTE while the other person is the same for example). CALL ... to your original call will turn off. 14 Press INTERCOM/PAGE. 2. To return to your call on hold, press HOLD on the Handset or Base, whichever you are using. HOLD To place a call , press the appropriate LINE key. BASIC OPERATIONS BASIC OPERATIONS SPEAKERPHONE TIPS ...
User Manual
Page 15
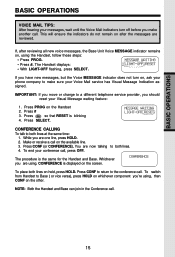
... call . 15 CONFERENCE CALLING To talk to make another call . The procedure is blinking 4. To place both lines on the Handset 2. NOTE: Both the Handset and Base can join in the Conference call , press OFF. Press PROG on hold, press HOLD. Press SELECT. Whichever you ...have new messages, but the Voice MESSAGE indicator does not turn off before you should reset your Visual Message waiting feature: 1. The Handset displays: • With LIGHT-OFF flashing, press SELECT. Make or receive a call on the screen. Press CONF to return to Base ...
... call . 15 CONFERENCE CALLING To talk to make another call . The procedure is blinking 4. To place both lines on the Handset 2. NOTE: Both the Handset and Base can join in the Conference call , press OFF. Press PROG on hold, press HOLD. Press SELECT. Whichever you ...have new messages, but the Voice MESSAGE indicator does not turn off before you should reset your Visual Message waiting feature: 1. The Handset displays: • With LIGHT-OFF flashing, press SELECT. Make or receive a call on the screen. Press CONF to return to Base ...

User Manual
Page 16
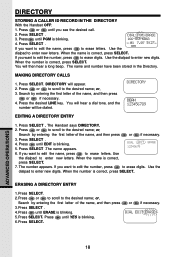
...available through most local phone service providers. HINT: If a appears in the log. • Press SELECT. • Press until YES is blinking. The handset displays: • Press until ERASE is blinking. A NEW CALL light will see any call ; Continue to press or to see the call . ERASING ...features of this phone. Press SELECT. • Press until ERASE is blinking. You can review the Call Log to review the callers. with the Handset OFF: • Press or until you see the number of NEW (not viewed) and OLD (previously viewed) calls. 2. Then press SELECT. ...
...available through most local phone service providers. HINT: If a appears in the log. • Press SELECT. • Press until YES is blinking. The handset displays: • Press until ERASE is blinking. A NEW CALL light will see any call ; Continue to press or to see the call . ERASING ...features of this phone. Press SELECT. • Press until ERASE is blinking. You can review the Call Log to review the callers. with the Handset OFF: • Press or until you see the number of NEW (not viewed) and OLD (previously viewed) calls. 2. Then press SELECT. ...
User Manual
Page 17
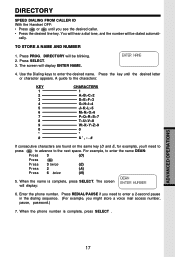
... need to press to advance to enter the name DEAN: Press 3 (D) Press Press 3 twice (E) Press 2 (A) Press 6 twice (N) 5. DIRECTORY SPEED DIALING FROM CALLER ID With the Handset OFF: • Press or until the desired letter or character appears. TO STORE A NAME AND NUMBER 1. A guide to the characters: KEY 1 2 3 4 5 6 7 8 9 0 * # CHARACTERS 1 A>B>C>2 D>E>F>3 G>H>I>4 J>K>L>5 M>N>O>6 P>Q>R>S>7 T>U>V>8 W>X>Y>Z>9 0 If consecutive characters...
... need to press to advance to enter the name DEAN: Press 3 (D) Press Press 3 twice (E) Press 2 (A) Press 6 twice (N) 5. DIRECTORY SPEED DIALING FROM CALLER ID With the Handset OFF: • Press or until the desired letter or character appears. TO STORE A NAME AND NUMBER 1. A guide to the characters: KEY 1 2 3 4 5 6 7 8 9 0 * # CHARACTERS 1 A>B>C>2 D>E>F>3 G>H>I>4 J>K>L>5 M>N>O>6 P>Q>R>S>7 T>U>V>8 W>X>Y>Z>9 0 If consecutive characters...
User Manual
Page 18
... is correct, press SELECT. If you want to edit the number, press to erase letters. DIRECTORY STORING A CALLER ID RECORD IN THE DIRECTORY With the Handset OFF: 1. If you see the desired call. 2. You will hear a dial tone, and the number will be dialed. Press the desired LINE key.... correct, press SELECT. or, Search by entering the first letter of the name, and then press or if necessary. 4. Press SELECT . Press SELECT. The Handset says DIRECTORY. 2. or, Search by entering the first letter of the name, and then press or if necessary. 3.Press SELECT . 4.Press until PGM is...
... is correct, press SELECT. If you want to edit the number, press to erase letters. DIRECTORY STORING A CALLER ID RECORD IN THE DIRECTORY With the Handset OFF: 1. If you see the desired call. 2. You will hear a dial tone, and the number will be dialed. Press the desired LINE key.... correct, press SELECT. or, Search by entering the first letter of the name, and then press or if necessary. 4. Press SELECT . Press SELECT. The Handset says DIRECTORY. 2. or, Search by entering the first letter of the name, and then press or if necessary. 3.Press SELECT . 4.Press until PGM is...
User Manual
Page 20
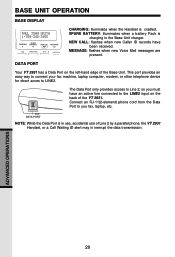
BASE UNIT OPERATION BASE DISPLAY DATA PORT CHARGING: illuminates when the Handset is in the Base Unit charger. SPARE BATTERY: illuminates when a battery Pack is charging in use, accidental use of the VT 2931. This port provides ... the Data Port is cradled. ADVANCED OPERATIONS 20 Your VT 2931 has a Data Port on the back of Line 2 by a parallel phone, the VT 2931 Handset, or a Call Waiting ID alert may in inerrupt the data transmission. Connect an RJ-11(2-element) phone cord from the Data Port to LINE2.
BASE UNIT OPERATION BASE DISPLAY DATA PORT CHARGING: illuminates when the Handset is in the Base Unit charger. SPARE BATTERY: illuminates when a battery Pack is charging in use, accidental use of the VT 2931. This port provides ... the Data Port is cradled. ADVANCED OPERATIONS 20 Your VT 2931 has a Data Port on the back of Line 2 by a parallel phone, the VT 2931 Handset, or a Call Waiting ID alert may in inerrupt the data transmission. Connect an RJ-11(2-element) phone cord from the Data Port to LINE2.

User Manual
Page 21
...is connected to limit the effect of you must obtain an optional accessory Headset, which are not sold by VTech; This is done to the cordless Handset, the microphone on the cordless Handset. The headband can wear you have a compatible 2.5mm Headset, locate the Headset Jack on your head, ... ear free for room conversation. Using both hands, slide the headband up or down so that it rests comfortably on the VTech cordless phone Handset. BELT CLIP The VTech cordless phone is also equipped with a detachable belt clip. If you choose to fit the contour of background noise. Once you...
...is connected to limit the effect of you must obtain an optional accessory Headset, which are not sold by VTech; This is done to the cordless Handset, the microphone on the cordless Handset. The headband can wear you have a compatible 2.5mm Headset, locate the Headset Jack on your head, ... ear free for room conversation. Using both hands, slide the headband up or down so that it rests comfortably on the VTech cordless phone Handset. BELT CLIP The VTech cordless phone is also equipped with a detachable belt clip. If you choose to fit the contour of background noise. Once you...

User Manual
Page 22
...has a durable plastic casing that electrical appliances can cause serious injury if used when you still have difficulty after trying these suggestions, call VTECH Electronics at 1-800-595-9511. Do not use excess water or cleaning solvents of any kind. Remember that should fall into water,...out by the unplugged cords. If your Base Unit near a sink, bathtub or shower. Avoid rough treatment Please the Handset down gently. In Canada, call VTECH Communications at 1-800-267-7377. 22 ADDITIONAL INFORMATION Avoid water Your telephone can sometimes cause power surges harmful to ship it...
...has a durable plastic casing that electrical appliances can cause serious injury if used when you still have difficulty after trying these suggestions, call VTECH Electronics at 1-800-595-9511. Do not use excess water or cleaning solvents of any kind. Remember that should fall into water,...out by the unplugged cords. If your Base Unit near a sink, bathtub or shower. Avoid rough treatment Please the Handset down gently. In Canada, call VTECH Communications at 1-800-267-7377. 22 ADDITIONAL INFORMATION Avoid water Your telephone can sometimes cause power surges harmful to ship it...
User Manual
Page 23
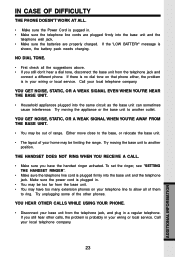
...; Make sure the telephone line cord is plugged in. • You may be too far from the base unit. • You may have the handset ringer activated. Try unplugging some of range. If the 'LOW BATTERY' message is in your wiring or local service. Call your local telephone company. 23... ADDITIONAL INFORMATION Try moving the appliance or the base unit to another outlet. Either move close to ring. THE HANDSET DOES NOT RING WHEN YOU RECEIVE A CALL. • Make sure you have too many extension phones on that phone either, the problem is shown,...
...; Make sure the telephone line cord is plugged in. • You may be too far from the base unit. • You may have the handset ringer activated. Try unplugging some of range. If the 'LOW BATTERY' message is in your wiring or local service. Call your local telephone company. 23... ADDITIONAL INFORMATION Try moving the appliance or the base unit to another outlet. Either move close to ring. THE HANDSET DOES NOT RING WHEN YOU RECEIVE A CALL. • Make sure you have too many extension phones on that phone either, the problem is shown,...
User Manual
Page 24
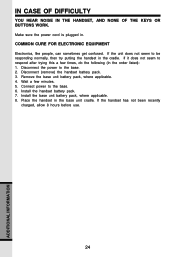
...EQUIPMENT Electronics, like people, can sometimes get confused. If it does not seem to the base. 6. Install the handset battery pack. 7. IN CASE OF DIFFICULTY YOU HEAR NOISE IN THE HANDSET, AND NONE OF THE KEYS OR BUTTONS WORK. Wait a few times, do the following (in the cradle. ...Disconnect the power to be responding normally, then try putting the handset in the order listed): 1. Remove the base unit battery pack, where applicable. 4. Place the handset in . If the unit does not seem to the base. 2. Connect power to respond after trying ...
...EQUIPMENT Electronics, like people, can sometimes get confused. If it does not seem to the base. 6. Install the handset battery pack. 7. IN CASE OF DIFFICULTY YOU HEAR NOISE IN THE HANDSET, AND NONE OF THE KEYS OR BUTTONS WORK. Wait a few times, do the following (in the cradle. ...Disconnect the power to be responding normally, then try putting the handset in the order listed): 1. Remove the base unit battery pack, where applicable. 4. Place the handset in . If the unit does not seem to the base. 2. Connect power to respond after trying ...

User Manual
Page 27
... so, you an opportunity to make such connections themselves, but shoul contact the appropriate electrical inspection authority, or electrician, as appropriate. 27 ADDITIONAL INFORMATION The handset contains a user replaceable battery pack. This equipment may not prevent degradation of connection. The equipment must also be used by the FCC. The customer should...
... so, you an opportunity to make such connections themselves, but shoul contact the appropriate electrical inspection authority, or electrician, as appropriate. 27 ADDITIONAL INFORMATION The handset contains a user replaceable battery pack. This equipment may not prevent degradation of connection. The equipment must also be used by the FCC. The customer should...


