
User Manual
Page 6
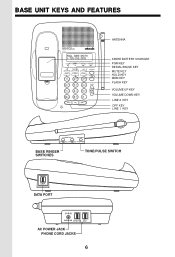
BASE UNIT KEYS AND FEATURES ANTENNA SPARE BATTERY CHARGER PGM KEY REDIAL/PAUSE KEY MUTE KEY HOLD KEY MEM KEY FLASH KEY VOLUME UP KEY VOLUME DOWN KEY LINE 2 KEY OFF KEY LINE 1 KEY L 2 BASE RINGER SWITCHES TONE/PULSE SWITCH DATA PORT LINE 2 LINE 2 DC AC POWER JACK PHONE CORD JACKS 6
BASE UNIT KEYS AND FEATURES ANTENNA SPARE BATTERY CHARGER PGM KEY REDIAL/PAUSE KEY MUTE KEY HOLD KEY MEM KEY FLASH KEY VOLUME UP KEY VOLUME DOWN KEY LINE 2 KEY OFF KEY LINE 1 KEY L 2 BASE RINGER SWITCHES TONE/PULSE SWITCH DATA PORT LINE 2 LINE 2 DC AC POWER JACK PHONE CORD JACKS 6

User Manual
Page 7
... 5 JKL 6 MNO 7 PQRS 8 TUV 9 WXYZ TONE 0 OPER HOLD PROG FLASH REDIAL/PAUSE CONF INTERCOM MIC 4. Charge for at least 16 hours before first using the phone. The Handset can charge face up or down and aligned with the Handset contacts. Slide the Handset battery cover down, and remove it from the...
... 5 JKL 6 MNO 7 PQRS 8 TUV 9 WXYZ TONE 0 OPER HOLD PROG FLASH REDIAL/PAUSE CONF INTERCOM MIC 4. Charge for at least 16 hours before first using the phone. The Handset can charge face up or down and aligned with the Handset contacts. Slide the Handset battery cover down, and remove it from the...

User Manual
Page 8
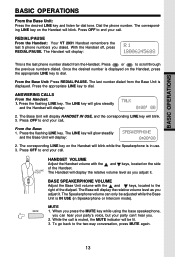
... 2 L1/L1+L2 LINLE22 DC RJ-14 I. WALL RJ-14 TELEPHONE WALL JACK If you have 2 lines, each coming out of a separate wall jack: Connect a phone cord from the remaining wall jack to designate as well. TELEPHONE WALL JACK RJ-11 - + DC IN 9V LINE 2 L1/L1+L2 LINLE22 DC RJ... OFF LOWHIGH OFF L 2 LOW HIGH PULSE TONE BASE RINGER SWITCHES TONE/PULSE SWITCH 5. TELEPHONE WALL JACK 6. NOTE: You can use your VT 2931 as a oneline phone, as your convenience. Set the TONE/PULSE switch, located on the back of the Base Unit, to the L1 / L1+L2 jack on the antenna...
... 2 L1/L1+L2 LINLE22 DC RJ-14 I. WALL RJ-14 TELEPHONE WALL JACK If you have 2 lines, each coming out of a separate wall jack: Connect a phone cord from the remaining wall jack to designate as well. TELEPHONE WALL JACK RJ-11 - + DC IN 9V LINE 2 L1/L1+L2 LINLE22 DC RJ... OFF LOWHIGH OFF L 2 LOW HIGH PULSE TONE BASE RINGER SWITCHES TONE/PULSE SWITCH 5. TELEPHONE WALL JACK 6. NOTE: You can use your VT 2931 as a oneline phone, as your convenience. Set the TONE/PULSE switch, located on the back of the Base Unit, to the L1 / L1+L2 jack on the antenna...
User Manual
Page 10
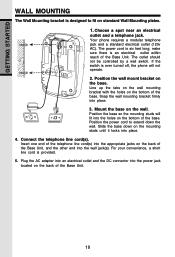
GETTING STARTED WALL MOUNTING The Wall Mounting bracket is designed to extend down on the bottom of the base. Your phone requires a modular telephone jack and a standard electrical outlet (120v AC). Line up the tabs on the wall mounting bracket with the holes on the back ...of the Base Unit. 10 Position the wall mount bracket on standard Wall Mounting plates. 1. make sure there is ever turned off, the phone will fit into the holes on the mounting studs until it locks into the power jack located on the wall. If the wallboard switch is...
GETTING STARTED WALL MOUNTING The Wall Mounting bracket is designed to extend down on the bottom of the base. Your phone requires a modular telephone jack and a standard electrical outlet (120v AC). Line up the tabs on the wall mounting bracket with the holes on the back ...of the Base Unit. 10 Position the wall mount bracket on standard Wall Mounting plates. 1. make sure there is ever turned off, the phone will fit into the holes on the mounting studs until it locks into the power jack located on the wall. If the wallboard switch is...
User Manual
Page 11
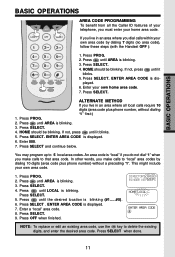
... you do not dial "1" when you live in an area where you must enter your own area code by dialing 10 digits (area code plus phone number, without a preceding "1". DIRECTORY AREA RINGER KEYBEEPS NOTE: To replace or edit an existing area code, use the key to "local" area codes by dialing.... 9. Press PROG. 2. Press SELECT. Enter 000. 7. BASIC OPERATIONS BASIC OPERATIONS AREA CODE PROGRAMMING To benefit from all local calls require 10 digits (area code plus phone number) without dialing "1" first:) 1. Press PROG. 2.
... you do not dial "1" when you live in an area where you must enter your own area code by dialing 10 digits (area code plus phone number, without a preceding "1". DIRECTORY AREA RINGER KEYBEEPS NOTE: To replace or edit an existing area code, use the key to "local" area codes by dialing.... 9. Press PROG. 2. Press SELECT. Enter 000. 7. BASIC OPERATIONS BASIC OPERATIONS AREA CODE PROGRAMMING To benefit from all local calls require 10 digits (area code plus phone number) without dialing "1" first:) 1. Press PROG. 2.

User Manual
Page 12
...Once you press them. Press SELECT 4. SET IN USE, and the corresponding LINE key will display HAND- The Base Unit will blink. 3. Dial the phone number, checking the display for dial tone. 2. Press OFF to OFF, L 2 LOW, or HIGH volume. Press SELECT. 4. The current setting is... flashing 3. BASIC OPERATIONS BASIC OPERATIONS KEY BEEPS Your Handset keys emit a beep as you have entered the phone number, press the desired LINE key. 3. Press until ON is flashing 5. KEYBEEPS ON OFF SETTING RINGER From the Handset 1. Press PROG. ...
...Once you press them. Press SELECT 4. SET IN USE, and the corresponding LINE key will display HAND- The Base Unit will blink. 3. Dial the phone number, checking the display for dial tone. 2. Press OFF to OFF, L 2 LOW, or HIGH volume. Press SELECT. 4. The current setting is... flashing 3. BASIC OPERATIONS BASIC OPERATIONS KEY BEEPS Your Handset keys emit a beep as you have entered the phone number, press the desired LINE key. 3. Press until ON is flashing 5. KEYBEEPS ON OFF SETTING RINGER From the Handset 1. Press PROG. ...
User Manual
Page 13
... dial. The Handset will be adjusted while the Base Unit is displayed. The Speakerphone volume can 't hear you. 2. While the call . Dial the phone number. Press the flashing LINE key. The LINE key will glow steadily and the Base Unit will display the relative volume level as you can...display: 2. The last number dialed from the Handset. MUTE 1. To go back to end your call . The Handset will display: This is the last phone number dialed from the Base Unit is IN USE (in use. 3. ANSWERING CALLS From the Handset: 1. Press the flashing LINE key. BASIC OPERATIONS BASIC ...
... dial. The Handset will be adjusted while the Base Unit is displayed. The Speakerphone volume can 't hear you. 2. While the call . Dial the phone number. Press the flashing LINE key. The LINE key will glow steadily and the Base Unit will display the relative volume level as you can...display: 2. The last number dialed from the Handset. MUTE 1. To go back to end your call . The Handset will display: This is the last phone number dialed from the Base Unit is IN USE (in use. 3. ANSWERING CALLS From the Handset: 1. Press the flashing LINE key. BASIC OPERATIONS BASIC ...

User Manual
Page 14
... . CALL WAITING If you subscribe to Call Waiting, you receive a second call will be automatically connected. To return to your call , press INTERCOM on the phone as you will flash when you have new messages. To answer the call , press the appropriate LINE key. Once you have reviewed your Speakerphone in...
... . CALL WAITING If you subscribe to Call Waiting, you receive a second call will be automatically connected. To return to your call , press INTERCOM on the phone as you will flash when you have new messages. To answer the call , press the appropriate LINE key. Once you have reviewed your Speakerphone in...
User Manual
Page 15
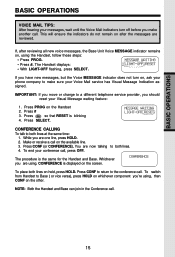
... HOLD. You are reviewed. BASIC OPERATIONS BASIC OPERATIONS VOICE MAIL TIPS: After hearing your messages, wait until the Voice Mail indicators turn on, ask your phone company to make another call. IMPORTANT: If you move or change to a different telephone service provider, you should reset your conference call . Make or receive...
... HOLD. You are reviewed. BASIC OPERATIONS BASIC OPERATIONS VOICE MAIL TIPS: After hearing your messages, wait until the Voice Mail indicators turn on, ask your phone company to make another call. IMPORTANT: If you move or change to a different telephone service provider, you should reset your conference call . Make or receive...

User Manual
Page 16
... Log to erase. • Press SELECT. • Press until ERASE is blinking. You must subscribe to these services to review the callers. Contact your phone will go out. Press or . When you want to see the number of NEW (not viewed) and OLD (previously viewed) calls. 2. ERASING CALLS .... • Press SELECT. • Press until you were out. with the Handset OFF: • Press or until ERASE is blinking. after the phone begins ringing (requires Caller ID service from being delivered by Caller ID, your entire Call Log; NOTE: Caller ID and Call Waiting Caller ID are...
... Log to erase. • Press SELECT. • Press until ERASE is blinking. You must subscribe to these services to review the callers. Contact your phone will go out. Press or . When you want to see the number of NEW (not viewed) and OLD (previously viewed) calls. 2. ERASING CALLS .... • Press SELECT. • Press until you were out. with the Handset OFF: • Press or until ERASE is blinking. after the phone begins ringing (requires Caller ID service from being delivered by Caller ID, your entire Call Log; NOTE: Caller ID and Call Waiting Caller ID are...
User Manual
Page 17
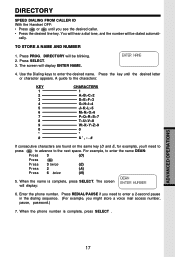
... key (D and E, for example), you'll need to the next space. The screen will be dialed automati- Enter the phone number. ADVANCED OPERATIONS 17 The screen will be blinking. 2. When the phone number is complete, press SELECT. DIRECTORY SPEED DIALING FROM CALLER ID With the Handset OFF: • Press or until the...
... key (D and E, for example), you'll need to the next space. The screen will be dialed automati- Enter the phone number. ADVANCED OPERATIONS 17 The screen will be blinking. 2. When the phone number is complete, press SELECT. DIRECTORY SPEED DIALING FROM CALLER ID With the Handset OFF: • Press or until the...
User Manual
Page 20
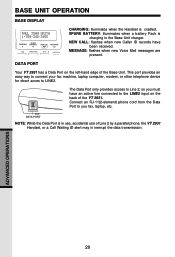
...or other telephone device for direct acces to the LINE2 input on the left-hand edge of the Base Unit. Connect an RJ-11(2-element) phone cord from the Data Port to you must have been received. DATA PORT NOTE: While the Data Port is cradled. BASE UNIT OPERATION BASE DISPLAY... DATA PORT CHARGING: illuminates when the Handset is in use, accidental use of Line 2 by a parallel phone, the VT 2931 Handset, or a Call Waiting ID alert may in the Base Unit charger. NEW CALL: flashes when new Caller ID records have an...
...or other telephone device for direct acces to the LINE2 input on the left-hand edge of the Base Unit. Connect an RJ-11(2-element) phone cord from the Data Port to you must have been received. DATA PORT NOTE: While the Data Port is cradled. BASE UNIT OPERATION BASE DISPLAY... DATA PORT CHARGING: illuminates when the Handset is in use, accidental use of Line 2 by a parallel phone, the VT 2931 Handset, or a Call Waiting ID alert may in the Base Unit charger. NEW CALL: flashes when new Caller ID records have an...

User Manual
Page 21
...have a compatible 2.5mm Headset, locate the Headset Jack on the sides of the VTech cordless phone Handset. Align the pins on the inside edge of your ear. HEADSET OPERATION Your VTech cordless phone is equipped with a 2.5mm Headset Jack for use the Headset option, you must... the cordless Handset, the microphone on the cordless Handset. Connect the plug on the Headset cord to other headsets which is also equipped with the VTech cordless phone. The plug should snap securely into place.Do not force the connection. LINE 1 OFF LINE 2 1 2 ABC 3 DEF 4 GHI 5 JKL...
...have a compatible 2.5mm Headset, locate the Headset Jack on the sides of the VTech cordless phone Handset. Align the pins on the inside edge of your ear. HEADSET OPERATION Your VTech cordless phone is equipped with a 2.5mm Headset Jack for use the Headset option, you must... the cordless Handset, the microphone on the cordless Handset. Connect the plug on the Headset cord to other headsets which is also equipped with the VTech cordless phone. The plug should snap securely into place.Do not force the connection. LINE 1 OFF LINE 2 1 2 ABC 3 DEF 4 GHI 5 JKL...

User Manual
Page 22
... sophisticated electronic parts, so it must be damaged if it with wet hands. Do not use the Handset outdoors in water. If your phone, the suggestions below should solve the problem. Clean it . If you are wet or standing in the rain, or handle it gets wet... Electrical storms Electrical storms can cause serious injury if used when you have difficulty after trying these suggestions, call VTECH Electronics at 1-800-595-9511. In Canada, call VTECH Communications at 1-800-267-7377. 22 ADDITIONAL INFORMATION Avoid rough treatment Please the Handset down gently. Do not ...
... sophisticated electronic parts, so it must be damaged if it with wet hands. Do not use the Handset outdoors in water. If your phone, the suggestions below should solve the problem. Clean it . If you are wet or standing in the rain, or handle it gets wet... Electrical storms Electrical storms can cause serious injury if used when you have difficulty after trying these suggestions, call VTECH Electronics at 1-800-595-9511. In Canada, call VTECH Communications at 1-800-267-7377. 22 ADDITIONAL INFORMATION Avoid rough treatment Please the Handset down gently. Do not ...
User Manual
Page 23
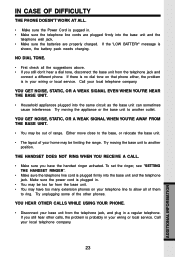
... Try unplugging some of range. If you still don't hear a dial tone, disconnect the base unit from the telephone jack and connect a different phone. Call your local telephone company. 23 ADDITIONAL INFORMATION Either move close to another outlet. If the 'LOW BATTERY' message is in your home may ... DOES NOT RING WHEN YOU RECEIVE A CALL. • Make sure you have too many extension phones on that phone either, the problem is shown, the battery pack needs charging. IN CASE OF DIFFICULTY THE PHONE DOESN'T WORK AT ALL. • Make sure the Power Cord is pugged in. • Make...
... Try unplugging some of range. If you still don't hear a dial tone, disconnect the base unit from the telephone jack and connect a different phone. Call your local telephone company. 23 ADDITIONAL INFORMATION Either move close to another outlet. If the 'LOW BATTERY' message is in your home may ... DOES NOT RING WHEN YOU RECEIVE A CALL. • Make sure you have too many extension phones on that phone either, the problem is shown, the battery pack needs charging. IN CASE OF DIFFICULTY THE PHONE DOESN'T WORK AT ALL. • Make sure the Power Cord is pugged in. • Make...

User Manual
Page 27
... change to give the telecommunications company cause to request the user to be particularly important in rural areas. Any repairs or alterations made by the phone company or Party Lines. Caution: Users should ensure for use in your telephone equipment is used by the device to prevent overloading, The termination on...
... change to give the telecommunications company cause to request the user to be particularly important in rural areas. Any repairs or alterations made by the phone company or Party Lines. Caution: Users should ensure for use in your telephone equipment is used by the device to prevent overloading, The termination on...


