

Owner Manual
Page 2
...and the cylinder should be checked for gas leaks. ƽ Combustible materials should never be within 24 inches of the top, bottom, back or sides of natural gas in a liquid propane unit or liquid propane gas in use . Keep young children away while it is in a natural gas unit...445; Liquid propane gas is not natural gas. Accessible parts of escaping gas from liquid propane cylinder. 2. Do not use a liquid propane cylinder with your Weber Gas Barbecue. ƽ Do not attempt to relight, using the lighting instructions. ƽ Do not use of your fire department. ƽ DANGER Failure...
...and the cylinder should be checked for gas leaks. ƽ Combustible materials should never be within 24 inches of the top, bottom, back or sides of natural gas in a liquid propane unit or liquid propane gas in use . Keep young children away while it is in a natural gas unit...445; Liquid propane gas is not natural gas. Accessible parts of escaping gas from liquid propane cylinder. 2. Do not use a liquid propane cylinder with your Weber Gas Barbecue. ƽ Do not attempt to relight, using the lighting instructions. ƽ Do not use of your fire department. ƽ DANGER Failure...
Owner Manual
Page 3
...in material and workmanship from the date of purchase as follows: Aluminum Castings, lifetime, 1 year paint Porcelain Hood Section, 25 years Stainless Steel Side Table, 25 years Burners, 10 years Igniter, 3 years Cooking Grates, 7 years no rust through All Remaining Parts, 5 years, when ... or you . If you . Customer Service Center 250 South Hicks Road Palatine, IL 60067-6241 USA LP Cylinder The LP cylinder manufacturer is permanently attached to the cylinder. Weber will return parts to you are limited in connection with the sale, installation, use and service and which ...
...in material and workmanship from the date of purchase as follows: Aluminum Castings, lifetime, 1 year paint Porcelain Hood Section, 25 years Stainless Steel Side Table, 25 years Burners, 10 years Igniter, 3 years Cooking Grates, 7 years no rust through All Remaining Parts, 5 years, when ... or you . If you . Customer Service Center 250 South Hicks Road Palatine, IL 60067-6241 USA LP Cylinder The LP cylinder manufacturer is permanently attached to the cylinder. Weber will return parts to you are limited in connection with the sale, installation, use and service and which ...

Owner Manual
Page 4
... Instructions A-5 Exploded View ...A-6 Parts List ...A-10 Assembly Instructions B-1 Installing Work Surfaces, Side Burnerand Gas Connection Guidelines C-1 Operating ...D-1 Lighting ...D-1 Manual Lighting ...D-2 Lighting the side burner D-3 Cooking ...D-4 Storage and/or Nouse D-4 Cleaning ...D-4 Using the Smoker Box D-5 Refilling the LP Cylinder D-6 Safe handling tips for LP Gas Cylinders D-8 Annual Maintenance D-9 General Maintenance D-10 Replacing Main Burners D-11...
... Instructions A-5 Exploded View ...A-6 Parts List ...A-10 Assembly Instructions B-1 Installing Work Surfaces, Side Burnerand Gas Connection Guidelines C-1 Operating ...D-1 Lighting ...D-1 Manual Lighting ...D-2 Lighting the side burner D-3 Cooking ...D-4 Storage and/or Nouse D-4 Cleaning ...D-4 Using the Smoker Box D-5 Refilling the LP Cylinder D-6 Safe handling tips for LP Gas Cylinders D-8 Annual Maintenance D-9 General Maintenance D-10 Replacing Main Burners D-11...
Owner Manual
Page 5
...Do not use combustible materials within 24 inches of the top, bottom, back or sides of the National Fuel Gas Code: ANSI Z 223.1. • The pressure regulator supplied with , if you can take your Weber Gas Barbecue. The valves, orifices, hose and regulator are for use with results that...flavor in a building, garage or any heated surface. ƽ WARNING: Keep the cooking area clear of water column (pressure). • This Weber Gas Barbecue is designed for LP gas only. • Do not use . Do not leave unattended. ƽ WARNING: Keep any electrical supply cord and the fuel supply ...
...Do not use combustible materials within 24 inches of the top, bottom, back or sides of the National Fuel Gas Code: ANSI Z 223.1. • The pressure regulator supplied with , if you can take your Weber Gas Barbecue. The valves, orifices, hose and regulator are for use with results that...flavor in a building, garage or any heated surface. ƽ WARNING: Keep the cooking area clear of water column (pressure). • This Weber Gas Barbecue is designed for LP gas only. • Do not use . Do not leave unattended. ƽ WARNING: Keep any electrical supply cord and the fuel supply ...

Owner Manual
Page 7
...Hardware 40. Spider Stopper Guards 50. Tool Holders 54. Cylinder Panel 60. Flavorizer® Bars 13. Nylon Washer 27. Igniter Button 39. Side Burner 41. Center Burner 44. Manifold Support Bracket 46. Manifold, Hose and regulator (assembled) 49. Plastic Buttons 51. Liquid Propane Cylinder .... Wing Nuts 55. Fuel Guage 57. Cylinder Glides 59. Catch Pan Holder 18. Doors 29. Hubcaps 31. Crossover Tube 42. Right Side Panel 56. Frame Connector A-7 Hinge Pin 3. Catch Pan 19. Door Knobs 30. Rear Frame 53. Warming Rack 10. Frame Connector 22...
...Hardware 40. Spider Stopper Guards 50. Tool Holders 54. Cylinder Panel 60. Flavorizer® Bars 13. Nylon Washer 27. Igniter Button 39. Side Burner 41. Center Burner 44. Manifold Support Bracket 46. Manifold, Hose and regulator (assembled) 49. Plastic Buttons 51. Liquid Propane Cylinder .... Wing Nuts 55. Fuel Guage 57. Cylinder Glides 59. Catch Pan Holder 18. Doors 29. Hubcaps 31. Crossover Tube 42. Right Side Panel 56. Frame Connector A-7 Hinge Pin 3. Catch Pan 19. Door Knobs 30. Rear Frame 53. Warming Rack 10. Frame Connector 22...

Owner Manual
Page 10
You will need: Phillips screwdriver 7/16 open-end or an adjustable wrench 1/2 inch bolts (1/4 x 20 x 1/2 inch bolts) - 4 Nylon Washers - 4 Flavorizer Bars - 5 Left Work Surface - 1 Cooking Grates - 2 Smoker Box - 1 Side Burner - 1 Bottom Shelf - 1 Slide Out Buttom Tray - 1 LP Cylinder - 1 Catch pan holder - 1 Catch Pan - 1 Disposable Drip Pans - 2 A-10
You will need: Phillips screwdriver 7/16 open-end or an adjustable wrench 1/2 inch bolts (1/4 x 20 x 1/2 inch bolts) - 4 Nylon Washers - 4 Flavorizer Bars - 5 Left Work Surface - 1 Cooking Grates - 2 Smoker Box - 1 Side Burner - 1 Bottom Shelf - 1 Slide Out Buttom Tray - 1 LP Cylinder - 1 Catch pan holder - 1 Catch Pan - 1 Disposable Drip Pans - 2 A-10

Owner Manual
Page 11
...(1). (1) B020.a B-1 Slide the catch pan into the catch pan holder with aluminum foil. The front of the catch pan holder must be on the same side as the finger grip(1) of the catch pan holder into the catch pan. It can cause grease fires by trapping the grease and not allowing...
...(1). (1) B020.a B-1 Slide the catch pan into the catch pan holder with aluminum foil. The front of the catch pan holder must be on the same side as the finger grip(1) of the catch pan holder into the catch pan. It can cause grease fires by trapping the grease and not allowing...
Owner Manual
Page 12
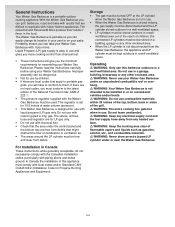
... Bottom shelf. Install Flavorizer® Bars and Cooking Grates You will need: Warm-Up Basket Insert one end of the Weber Warm-Up Basket into the hole at the right side of the inside of the cooking box. Installing the Warm-Up™ Basket You will need: five Flavorizer Bars and two...grate and the inside of the lid, and the other end into the slots at the left side of the cooking box. B-2 Place the Flavorizer Bars side by side in the cooking box with the rounded sides up. Installing Smoker Box Place Smoker box on the flavorizer Bars between the two frame connectors ...
... Bottom shelf. Install Flavorizer® Bars and Cooking Grates You will need: Warm-Up Basket Insert one end of the Weber Warm-Up Basket into the hole at the right side of the inside of the cooking box. Installing the Warm-Up™ Basket You will need: five Flavorizer Bars and two...grate and the inside of the lid, and the other end into the slots at the left side of the cooking box. B-2 Place the Flavorizer Bars side by side in the cooking box with the rounded sides up. Installing Smoker Box Place Smoker box on the flavorizer Bars between the two frame connectors ...

Owner Manual
Page 13
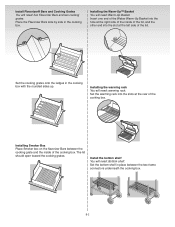
... valves are turned OFF. Tighten bolts with wrench. (1) (2) Check that the side burner valve is in the frame(1). If they do turn , they are off . Proceed to OFF. (1) (2) Install Side Burner Assembly You will need side burner assembly (assembly includes mounting frame), two 1/2 inch bolts, two nylon washers... and a 7/16 inch or adjustable wrench. Note: Remove protective covers from tabs of side burner Insert the side burner tabs in and turn to the next step. If they do not turn continue turning them clockwise until they stop, then ...
... valves are turned OFF. Tighten bolts with wrench. (1) (2) Check that the side burner valve is in the frame(1). If they do turn , they are off . Proceed to OFF. (1) (2) Install Side Burner Assembly You will need side burner assembly (assembly includes mounting frame), two 1/2 inch bolts, two nylon washers... and a 7/16 inch or adjustable wrench. Note: Remove protective covers from tabs of side burner Insert the side burner tabs in and turn to the next step. If they do not turn continue turning them clockwise until they stop, then ...
Owner Manual
Page 14
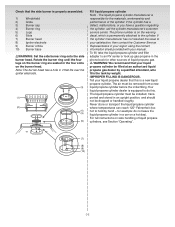
... properly assembled. 1) Windshield 2) Grate 3) Burner cap 4) Burner ring 5) Lugs 6) Slots 7) Burner head 8) Igniter electrode 9) Burner orifice 10) Burner base ƽWARNING: Set the side burner ring onto the side burner head. To fill, take the liquid propane cylinder and filler adapter to an RV center or look up gas-propane in it...
... properly assembled. 1) Windshield 2) Grate 3) Burner cap 4) Burner ring 5) Lugs 6) Slots 7) Burner head 8) Igniter electrode 9) Burner orifice 10) Burner base ƽWARNING: Set the side burner ring onto the side burner head. To fill, take the liquid propane cylinder and filler adapter to an RV center or look up gas-propane in it...
Owner Manual
Page 15
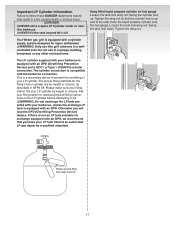
Do not use this barbecue. ƽNEVER fill the tank beyond 80% full. Raises up and to the side. Ask your filling station to read purging and filling instructions on fuel gauge Loosen the tank lock wing nut. If there is equipped with ... with an OPD. C-3 Your Weber gas grill is equipped with a cylinder supply system designed for the filling of your barbecue is equipped with an OPD (Overfilling Prevention Device) and a QCC1 or Type 1 (CGA810) cylinder connection. Swing the cylinder lock up. The LP cylinder supplied with your LP cylinder. Loosen the tank lock...
Do not use this barbecue. ƽNEVER fill the tank beyond 80% full. Raises up and to the side. Ask your filling station to read purging and filling instructions on fuel gauge Loosen the tank lock wing nut. If there is equipped with ... with an OPD. C-3 Your Weber gas grill is equipped with a cylinder supply system designed for the filling of your barbecue is equipped with an OPD (Overfilling Prevention Device) and a QCC1 or Type 1 (CGA810) cylinder connection. Swing the cylinder lock up. The LP cylinder supplied with your LP cylinder. Loosen the tank lock...

Owner Manual
Page 16
...tank valve(1), clockwise, or to tighten the connection. Using a wrench could damage the regulator coupling and could cause a gas leak. Connect the side burner hose as follows: 1) Slide back the collar of the quick disconnect on the manifold. 2) Push the male fitting of connection. Quick disconnect... Hand tighten only. The connection requires tightening by turning clockwise. Slide the collar closed . If it does turn it clockwise. Push the side burner control knob down and turn , continue turning it clockwise until it doesn't turn, the valve is OFF. It tightens clockwise and ...
...tank valve(1), clockwise, or to tighten the connection. Using a wrench could damage the regulator coupling and could cause a gas leak. Connect the side burner hose as follows: 1) Slide back the collar of the quick disconnect on the manifold. 2) Push the male fitting of connection. Quick disconnect... Hand tighten only. The connection requires tightening by turning clockwise. Slide the collar closed . If it does turn it clockwise. Push the side burner control knob down and turn , continue turning it clockwise until it doesn't turn, the valve is OFF. It tightens clockwise and ...
Owner Manual
Page 17
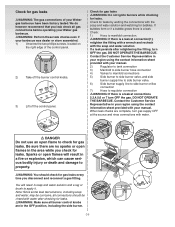
... your manual. 2) Regulator to tank connection 3) Manifold to side burner hose connection 4) Valves to manifold connections 5) Side burner to side burner valve, and side burner supply line to side burner valve. 6) Side burner supply line to side burner orifice connection 7) Hose to manifold connection. ƽWARNING...water solution If a leak persists after checking for leaks. ƽWARNING: Make sure all gas connections before operating your Weber gas barbecue. ƽWARNING: Perform these leak checks even if your manual. We do however recommend that you disconnect and...
... your manual. 2) Regulator to tank connection 3) Manifold to side burner hose connection 4) Valves to manifold connections 5) Side burner to side burner valve, and side burner supply line to side burner valve. 6) Side burner supply line to side burner orifice connection 7) Hose to manifold connection. ƽWARNING...water solution If a leak persists after checking for leaks. ƽWARNING: Make sure all gas connections before operating your Weber gas barbecue. ƽWARNING: Perform these leak checks even if your manual. We do however recommend that you disconnect and...

Owner Manual
Page 18
C-6 Reinstall control panel (after checking for gas leaks) (1) Set the control panel in place over both sides of the burner control knobs onto their valve. (4) Reinstall Side Burner cover. Hold the crossover ignition button up while setting the control panel in the frame brace. Insert screws and tighten with the white plastic plugs in place. (2) Line up the control panel with a Phillips screwdriver until snug. Do not overtighten. (3) Push each of the frame.
C-6 Reinstall control panel (after checking for gas leaks) (1) Set the control panel in place over both sides of the burner control knobs onto their valve. (4) Reinstall Side Burner cover. Hold the crossover ignition button up while setting the control panel in the frame brace. Insert screws and tighten with the white plastic plugs in place. (2) Line up the control panel with a Phillips screwdriver until snug. Do not overtighten. (3) Push each of the frame.

Owner Manual
Page 21
... the off position.), and all main burner control valves are in an explosive flame-up which can cause serious bodily injury or death. D-3 Lighting the Side Burner The side burner has a separate ignition system from the main cooking box. ƽ DANGER Failure to open the lid while igniting the... igniter button several times so it clicks each knob down and turn clockwise). 4) Turn the LP tank valve on a bright sunny day. ƽ WARNING: If the side burner does not light: 1) Turn OFF the side burner control valve. 2) Wait 5 minutes to let the gas clear before you try again or try to ensure...
... the off position.), and all main burner control valves are in an explosive flame-up which can cause serious bodily injury or death. D-3 Lighting the Side Burner The side burner has a separate ignition system from the main cooking box. ƽ DANGER Failure to open the lid while igniting the... igniter button several times so it clicks each knob down and turn clockwise). 4) Turn the LP tank valve on a bright sunny day. ƽ WARNING: If the side burner does not light: 1) Turn OFF the side burner control valve. 2) Wait 5 minutes to let the gas clear before you try again or try to ensure...

Owner Manual
Page 23
... and turkeys, etc., we recommend using the FireSpice Chips because they ignite and create smoke faster. Note - Accomplish this by tapping the sides of the smoker and stirring the ashes so that best suits your smoker, we recommend using FireSpice Chunks because they sift through the bottom ...the smoke. To a lesser degree a "smoke" residue will not adversely affect the function of the smoker. Light the barbecue and preheat with both Weber Firespice™ Wood Chips and Chunks. Cooking As a starting point, place a couple of handfuls of your barbecue. Keep the lid of the smoker....
... and turkeys, etc., we recommend using the FireSpice Chips because they ignite and create smoke faster. Note - Accomplish this by tapping the sides of the smoker and stirring the ashes so that best suits your smoker, we recommend using FireSpice Chunks because they sift through the bottom ...the smoke. To a lesser degree a "smoke" residue will not adversely affect the function of the smoker. Light the barbecue and preheat with both Weber Firespice™ Wood Chips and Chunks. Cooking As a starting point, place a couple of handfuls of your barbecue. Keep the lid of the smoker....
Owner Manual
Page 24
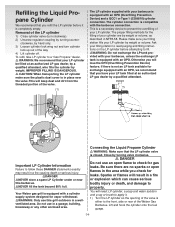
... either to the front, side or rear of your LP cylinder by a qualified attendant. (3) (2) Important LP Cylinder Information Failure to read purging and filling instructions on the LP cylinder before it . 1) Turn the LP cylinder so the opening of the way. 4) Lift cylinder off. This is equipped with an OPD. Your Weber gas grill is a secondary...
... either to the front, side or rear of your LP cylinder by a qualified attendant. (3) (2) Important LP Cylinder Information Failure to read purging and filling instructions on the LP cylinder before it . 1) Turn the LP cylinder so the opening of the way. 4) Lift cylinder off. This is equipped with an OPD. Your Weber gas grill is a secondary...
Owner Manual
Page 27
... Manifold to side burner hose connection 4) Valves to manifold connections 5) Side burner to side burner valve, and side burner supply line to side burner valve. 6) Side burner supply line to side burner orifice ...connection 7) Hose to be slightly corrosive, all gas fittings for leaks. ƽ DANGER Do not use the barbecue. DO NOT OPERATE THE BARBECUE. Contact the Customer Service Representative in your region using only Weber...
... Manifold to side burner hose connection 4) Valves to manifold connections 5) Side burner to side burner valve, and side burner supply line to side burner valve. 6) Side burner supply line to side burner orifice ...connection 7) Hose to be slightly corrosive, all gas fittings for leaks. ƽ DANGER Do not use the barbecue. DO NOT OPERATE THE BARBECUE. Contact the Customer Service Representative in your region using only Weber...

Owner Manual
Page 32
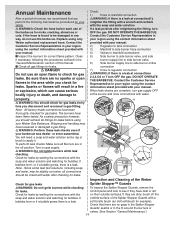
... the OFF position. Flame is very yellow in conjunction with the smell of gas, OR Inspect the Weber Spider Stopper Guard for correct assembly. Check Is gas supply off? See Side Burner Maintenance for possible obstructions. (lockage of holes.) Burner makes popping noise in conjunction with a match...? Cure Turn supply on. Flame is large or erratic. Problem Side Burner does not light. Does burner light with the smell of gas. Is the fuel hose bent or kinked? If match lights burner, ...
... the OFF position. Flame is very yellow in conjunction with the smell of gas, OR Inspect the Weber Spider Stopper Guard for correct assembly. Check Is gas supply off? See Side Burner Maintenance for possible obstructions. (lockage of holes.) Burner makes popping noise in conjunction with a match...? Cure Turn supply on. Flame is large or erratic. Problem Side Burner does not light. Does burner light with the smell of gas. Is the fuel hose bent or kinked? If match lights burner, ...
Owner Manual
Page 33
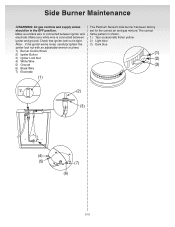
... lock nut with an adjustable wrench or pliers. 1) Burner Control Knob 2) Igniter Button 3) Igniter Lock Nut 4) White Wire 5) Ground 6) Black Wire 7) Electrode (1) The Platinum Series II side burner has been factory set for the correct air and gas mixture. Make sure white wire is connected between igniter and ground.... Side Burner Maintenance ƽWARNING: All gas controls and supply valves should be in the OFF position. Make sure black wire is connected between ...
... lock nut with an adjustable wrench or pliers. 1) Burner Control Knob 2) Igniter Button 3) Igniter Lock Nut 4) White Wire 5) Ground 6) Black Wire 7) Electrode (1) The Platinum Series II side burner has been factory set for the correct air and gas mixture. Make sure white wire is connected between igniter and ground.... Side Burner Maintenance ƽWARNING: All gas controls and supply valves should be in the OFF position. Make sure black wire is connected between ...