

Owner Manual
Page 2
...-STEP SECTION AT THIS TIME Lighting 6 Crossover Ignition System 6 To Extinguish 6 Manual Lighting 7 To Extinguish 7 Lighting the Side Burner 8 Cooking 9 Cleaning 9 Using the Steam-N-Chips Smoker 10 Cleaning the Steam-N-Chips Smoker 10 Maintenance Spider Stopper Guards ...System Operations Troubleshooting Side Burner Troubleshooting Side Burner Maintenance To Clean the Burner Head To reassemble the Burner Head Side Burner Exploded View Exploded Views and Replacement Parts List Platinum Series II 2200 LP Platinum Series II 3200 LP Platinum Series II 3400 LP Patents and ...
...-STEP SECTION AT THIS TIME Lighting 6 Crossover Ignition System 6 To Extinguish 6 Manual Lighting 7 To Extinguish 7 Lighting the Side Burner 8 Cooking 9 Cleaning 9 Using the Steam-N-Chips Smoker 10 Cleaning the Steam-N-Chips Smoker 10 Maintenance Spider Stopper Guards ...System Operations Troubleshooting Side Burner Troubleshooting Side Burner Maintenance To Clean the Burner Head To reassemble the Burner Head Side Burner Exploded View Exploded Views and Replacement Parts List Platinum Series II 2200 LP Platinum Series II 3200 LP Platinum Series II 3400 LP Patents and ...

Owner Manual
Page 3
s Do not store a spare or disconnected LP tank under the barbecue. s Improper assembly may be within 24 inches of the top, bottom, back or sides of your Weber Gas Barbecue. s Do not operate the Weber Gas Barbecue if there is not natural gas. s Combustible materials should never be checked by children. s...s After a period of natural gas in an LP unit or LP gas in the storage area under or near this barbecue. s Do not use an LP tank with your Weber Gas Barbecue. s Your Weber Gas Barbecue should be used by your LP tank may be hazardous and should be thoroughly cleaned ...
s Do not store a spare or disconnected LP tank under the barbecue. s Improper assembly may be within 24 inches of the top, bottom, back or sides of your Weber Gas Barbecue. s Do not operate the Weber Gas Barbecue if there is not natural gas. s Combustible materials should never be checked by children. s...s After a period of natural gas in an LP unit or LP gas in the storage area under or near this barbecue. s Do not use an LP tank with your Weber Gas Barbecue. s Your Weber Gas Barbecue should be used by your LP tank may be hazardous and should be thoroughly cleaned ...

Owner Manual
Page 5
... outdoors in use. s Keep any heated surface. In Canada the installation of the top, bottom, back or sides. The valves, orifices, hose and regulator are free from the Weber Gas Barbecue, the appliance and LP tank must be installed in a well-ventilated area out of the reach of flammable vapors and liquids, such...
... outdoors in use. s Keep any heated surface. In Canada the installation of the top, bottom, back or sides. The valves, orifices, hose and regulator are free from the Weber Gas Barbecue, the appliance and LP tank must be installed in a well-ventilated area out of the reach of flammable vapors and liquids, such...

Owner Manual
Page 6
...TO EXTINGUISH Turn gas supply OFF at the source, then push down and turn clockwise.) For barbecues equipped with a side burner, push the burner control knob in and turn each burner control knob down and turn clockwise to OFF. ...the energy for nicks, cracking, abrasions or cuts. Replace using only Weber authorized replacement manifold assembly. LIGHTING THE MAIN BURNERS Summary lighting instructions are not in the... lighting the barbecue. 5) Push Front burner control knob down and turn on the LP tank valve, the excess flow control will activate, limiting the flow of barbecue for...
...TO EXTINGUISH Turn gas supply OFF at the source, then push down and turn clockwise.) For barbecues equipped with a side burner, push the burner control knob in and turn each burner control knob down and turn clockwise to OFF. ...the energy for nicks, cracking, abrasions or cuts. Replace using only Weber authorized replacement manifold assembly. LIGHTING THE MAIN BURNERS Summary lighting instructions are not in the... lighting the barbecue. 5) Push Front burner control knob down and turn on the LP tank valve, the excess flow control will activate, limiting the flow of barbecue for...

Owner Manual
Page 7
.... Note - Note - F = full. 3) Make sure all burner control knobs are not in the OFF position, when you try again or try to light with a side burner, push the burner control knob in the front of the cooking box. (For closed cart models, open the right door to access the matchlight...the tank valve counterclockwise slowly, and open the valve completely. 5) Strike a match and put the flame into the matchlight hole in and turn on the LP tank valve. Always light the FRONT burner first. DANGER When the excess flow control is activated, a small amount of gas from the FRONT burner. ...
.... Note - Note - F = full. 3) Make sure all burner control knobs are not in the OFF position, when you try again or try to light with a side burner, push the burner control knob in the front of the cooking box. (For closed cart models, open the right door to access the matchlight...the tank valve counterclockwise slowly, and open the valve completely. 5) Strike a match and put the flame into the matchlight hole in and turn on the LP tank valve. Always light the FRONT burner first. DANGER When the excess flow control is activated, a small amount of gas from the FRONT burner. ...

Owner Manual
Page 8
LIGHTING THE SIDE BURNER For the Platinum Series II 3200 & 3400 The side burner has a separate ignition system from the main cooking box. Lighting only the side burner. Figure 3. WARNING: If the side burner does not light: a) Turn off the side burner control valve. CAUTION: Side burner flame may result in an explosive ...5) Push in and turn clockwise), and all main burner control valves are OFF (push down and turn clockwise). 4) Turn the LP tank valve on the side burner should not exceed a maximum of 50 pounds. The container should not exceed 14 inches in diameter. 1) Open the...
LIGHTING THE SIDE BURNER For the Platinum Series II 3200 & 3400 The side burner has a separate ignition system from the main cooking box. Lighting only the side burner. Figure 3. WARNING: If the side burner does not light: a) Turn off the side burner control valve. CAUTION: Side burner flame may result in an explosive ...5) Push in and turn clockwise), and all main burner control valves are OFF (push down and turn clockwise). 4) Turn the LP tank valve on the side burner should not exceed a maximum of 50 pounds. The container should not exceed 14 inches in diameter. 1) Open the...
Owner Manual
Page 10
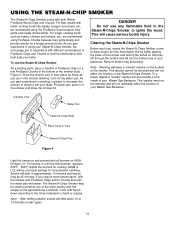
...SMOKER The Steam-N-Chips Smoker cooks with water. To use , empty the Steam-N-Chips Smoker of the smoker body. Accomplish this by lightly tapping the sides of the smoker and stirring the ashes so that best suits your taste. To a lesser degree a "smoke" residue will start again. 10 ... using FireSpice Chunks because they sift through the bottom and fall into the bottom tray of your Steam-N-Chips Smoker, we recommend using your Weber Gas Barbecue. Figure 4. As you can in using the FireSpice Chips because they ignite and create smoke faster. Fill water pan, place ...
...SMOKER The Steam-N-Chips Smoker cooks with water. To use , empty the Steam-N-Chips Smoker of the smoker body. Accomplish this by lightly tapping the sides of the smoker and stirring the ashes so that best suits your taste. To a lesser degree a "smoke" residue will start again. 10 ... using FireSpice Chunks because they sift through the bottom and fall into the bottom tray of your Steam-N-Chips Smoker, we recommend using your Weber Gas Barbecue. Figure 4. As you can in using the FireSpice Chips because they ignite and create smoke faster. Fill water pan, place ...
Owner Manual
Page 12
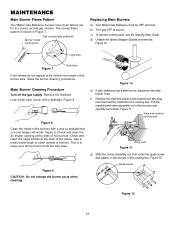
...guide screw and washer in Figure 7. Figure 8. This is shown in the corners of the valves. Figure 10 e) If your barbecue has a side burner, disconnect the side burner hose. Guide screw Figure 12 12 b) Turn gas OFF at the ends of the burner tube, follow the burner cleaning procedures. c) ...ports when cleaning. Figure 12. The correct flame pattern is to the cooking box. Remove the manifold. MAINTENANCE Main Burner Flame Pattern The Weber Gas Barbecue burners have been factory set it down. Pull the manifold and valve assembly out of the burners and carefully set for the...
...guide screw and washer in Figure 7. Figure 8. This is shown in the corners of the valves. Figure 10 e) If your barbecue has a side burner, disconnect the side burner hose. Guide screw Figure 12 12 b) Turn gas OFF at the ends of the burner tube, follow the burner cleaning procedures. c) ...ports when cleaning. Figure 12. The correct flame pattern is to the cooking box. Remove the manifold. MAINTENANCE Main Burner Flame Pattern The Weber Gas Barbecue burners have been factory set it down. Pull the manifold and valve assembly out of the burners and carefully set for the...

Owner Manual
Page 15
...For the Platinum Series II 3200 & 3400 WARNING: Before attempting any troubleshooting steps, all gas controls and supply valves should be in conjunction with a match? Straighten hose. Inspect burner base for correct assembly. 15 Is gas supply off? If match lights burner, check igniter (see Side Burner ...ignition does not work. Does burner light with the smell of gas. Flame is large or erratic. Clean if necessary. See Side Burner Maintenance for obstructions. Flame is low in HIGH position. Is the burner ring correctly installed? Is fuel hose bent or kinked...
...For the Platinum Series II 3200 & 3400 WARNING: Before attempting any troubleshooting steps, all gas controls and supply valves should be in conjunction with a match? Straighten hose. Inspect burner base for correct assembly. 15 Is gas supply off? If match lights burner, check igniter (see Side Burner ...ignition does not work. Does burner light with the smell of gas. Flame is large or erratic. Clean if necessary. See Side Burner Maintenance for obstructions. Flame is low in HIGH position. Is the burner ring correctly installed? Is fuel hose bent or kinked...

Owner Manual
Page 16
...igniter works loose, carefully tighten the igniter lock nut with an adjustable wrench or pliers. (a) burner control Igniter button knob The Platinum Series II side burner has been factory set for the correct air and gas mixture. The correct flame pattern is connected between igniter and electrode. ... Light blue blue Igniter lock nut Figure 18 Views of figures 17 (b) and (c) from under side burner Figure 17 (c) white wire Ground black wire electrode 16 Figure 17 (b) and figure 17 (c). SIDE BURNER MAINTENANCE WARNING: All gas controls and supply valves should be in Figure 18.
...igniter works loose, carefully tighten the igniter lock nut with an adjustable wrench or pliers. (a) burner control Igniter button knob The Platinum Series II side burner has been factory set for the correct air and gas mixture. The correct flame pattern is connected between igniter and electrode. ... Light blue blue Igniter lock nut Figure 18 Views of figures 17 (b) and (c) from under side burner Figure 17 (c) white wire Ground black wire electrode 16 Figure 17 (b) and figure 17 (c). SIDE BURNER MAINTENANCE WARNING: All gas controls and supply valves should be in Figure 18.

Owner Manual
Page 17
... the burner control knob. Figure 19 (b). Soak if necessary. Clean with soap and water. Clean the ignition electrode with soap and water. SIDE BURNER EXPLODED VIEW Windshield Burner cap Windshield Grate (b) Lugs Burner ring Grate Slots (c) Figure 19 Burner head Burner base Burner orifice Burner cap ...grate and the windshield. Figure 19 (c). WARNING: If the flame pattern is a hole in it that fits over the igniter electrode. 17 SIDE BURNER MAINTENANCE To Clean the Burner Head Remove the windshield and grate. The lugs of the burner ring must be in the burner orifice. ...
... the burner control knob. Figure 19 (b). Soak if necessary. Clean with soap and water. Clean the ignition electrode with soap and water. SIDE BURNER EXPLODED VIEW Windshield Burner cap Windshield Grate (b) Lugs Burner ring Grate Slots (c) Figure 19 Burner head Burner base Burner orifice Burner cap ...grate and the windshield. Figure 19 (c). WARNING: If the flame pattern is a hole in it that fits over the igniter electrode. 17 SIDE BURNER MAINTENANCE To Clean the Burner Head Remove the windshield and grate. The lugs of the burner ring must be in the burner orifice. ...

Owner Manual
Page 21
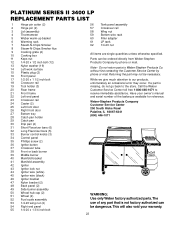
...of the barbecue available for reference. Parts can be ordered directly from Weber-Stephen Products Company by phone or mail. PLATINUM SERIES II 3200 LP REPLACEMENT PARTS LIST 1 Hinge pin cotter (2) 2 Hinge pin (2) 3 Lid (assembly) 4 Thermometer 5 Weber warm-up basket 6 Warming rack 7 Steam-N-Chips Smoker 8 Steam...41 Igniter bracket 42 Igniter 43 Igniter wing nut 44 Igniter wire (white) 45 Igniter wire (black) 46 Plastic bracket (2) 47 Side burner assembly 48 Wheel hub cap (2) 49 Wheel (2) 50 Fuel scale assembly 51 1/4-20 wing nut (2) 52 Tank panel assembly ...
...of the barbecue available for reference. Parts can be ordered directly from Weber-Stephen Products Company by phone or mail. PLATINUM SERIES II 3200 LP REPLACEMENT PARTS LIST 1 Hinge pin cotter (2) 2 Hinge pin (2) 3 Lid (assembly) 4 Thermometer 5 Weber warm-up basket 6 Warming rack 7 Steam-N-Chips Smoker 8 Steam...41 Igniter bracket 42 Igniter 43 Igniter wing nut 44 Igniter wire (white) 45 Igniter wire (black) 46 Plastic bracket (2) 47 Side burner assembly 48 Wheel hub cap (2) 49 Wheel (2) 50 Fuel scale assembly 51 1/4-20 wing nut (2) 52 Tank panel assembly ...
Owner Manual
Page 23
..., IL 60067-6241 (800) 446-1071 WARNING: Use only Weber factory authorized parts.The use of the barbecue available for reference. PLATINUM SERIES II 3400 LP REPLACEMENT PARTS LIST 1 Hinge pin cotter (2) 2 Hinge pin (2) 3 Lid (assembly) 4 Thermometer 5 Weber warm-up basket 6 Warming rack 7 Steam-N-Chips Smoker 8 ...43 Igniter lock nut 44 Igniter wire (white) 45 Igniter wire (black) 46 Igniter bracket 47 Nylon bracket (2) 48 Back panel (2) 49 Side burner assembly 50 Wheel hub cap (2) 51 Wheel (2) 52 Fuel scale assembly 53 1/4-20 wing nut (2) 54 Right end panel 55 1/4-20...
..., IL 60067-6241 (800) 446-1071 WARNING: Use only Weber factory authorized parts.The use of the barbecue available for reference. PLATINUM SERIES II 3400 LP REPLACEMENT PARTS LIST 1 Hinge pin cotter (2) 2 Hinge pin (2) 3 Lid (assembly) 4 Thermometer 5 Weber warm-up basket 6 Warming rack 7 Steam-N-Chips Smoker 8 ...43 Igniter lock nut 44 Igniter wire (white) 45 Igniter wire (black) 46 Igniter bracket 47 Nylon bracket (2) 48 Back panel (2) 49 Side burner assembly 50 Wheel hub cap (2) 51 Wheel (2) 52 Fuel scale assembly 53 1/4-20 wing nut (2) 54 Right end panel 55 1/4-20...