

Owner Manual
Page 2
...and the cylinder should be checked for gas leaks. ƽ Combustible materials should never be within 24 inches (61 cm) of the back or sides of your Weber® gas barbecue. ƽ Do not put a barbecue cover or anything flammable on this product exposes you see, smell or hear the hiss ... gas regulator and hose assembly or any heated surfaces. ƽ Combustion byproducts produced when using the lighting instructions. ƽ Do not use . WWW.WEBER.COM® Move away from any gas fitting while your barbecue is out. ƽ Do not enlarge valve orifices or burner ports when cleaning the...
...and the cylinder should be checked for gas leaks. ƽ Combustible materials should never be within 24 inches (61 cm) of the back or sides of your Weber® gas barbecue. ƽ Do not put a barbecue cover or anything flammable on this product exposes you see, smell or hear the hiss ... gas regulator and hose assembly or any heated surfaces. ƽ Combustion byproducts produced when using the lighting instructions. ƽ Do not use . WWW.WEBER.COM® Move away from any gas fitting while your barbecue is out. ƽ Do not enlarge valve orifices or burner ports when cleaning the...

Owner Manual
Page 6
...not use in a garage, building, breezeway or any other enclosed area. ƽ WARNING: Your Summit® Built-In gas barbecue shall not be those shown in a well-ventilated area out of ..., back or sides of combustion or ventilation air. • The areas around the LP cylinder must be free and clear from the outdoor cooking gas appliance. ƽ WARNING: LP cylinders must be...requirements for use by Weber-Stephen Products Co. The Flavorizer® bars are designed to them. Disconnected LP cylinder must be dangerous. • Not for assembling your Weber® gas barbecue off...
...not use in a garage, building, breezeway or any other enclosed area. ƽ WARNING: Your Summit® Built-In gas barbecue shall not be those shown in a well-ventilated area out of ..., back or sides of combustion or ventilation air. • The areas around the LP cylinder must be free and clear from the outdoor cooking gas appliance. ƽ WARNING: LP cylinders must be...requirements for use by Weber-Stephen Products Co. The Flavorizer® bars are designed to them. Disconnected LP cylinder must be dangerous. • Not for assembling your Weber® gas barbecue off...
Owner Manual
Page 8
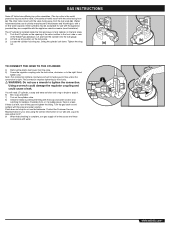
... the contact information on our web site. 8 GAS INSTRUCTIONS GAS INSTRUCTIONS Some LP tanks have differing top collar assembles. (The top collar is the metal protective ring around the valve.) One series of the Weber® gas barbecue. Other cylinders may be acceptable for leaks by hand only... clockwise, or to flow unless the connection is tight. Log onto www.weber.com®. 9) When leak checking is a leak. Note: This connection tightens clockwise and will need: LP cylinder, a soap and water solution and a rag or brush to the front, side or rear of tanks mount with water.
... the contact information on our web site. 8 GAS INSTRUCTIONS GAS INSTRUCTIONS Some LP tanks have differing top collar assembles. (The top collar is the metal protective ring around the valve.) One series of the Weber® gas barbecue. Other cylinders may be acceptable for leaks by hand only... clockwise, or to flow unless the connection is tight. Log onto www.weber.com®. 9) When leak checking is a leak. Note: This connection tightens clockwise and will need: LP cylinder, a soap and water solution and a rag or brush to the front, side or rear of tanks mount with water.
Owner Manual
Page 9
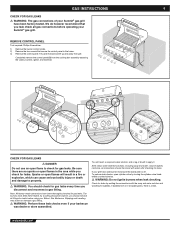
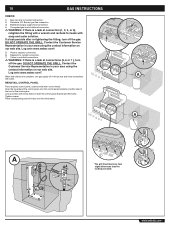
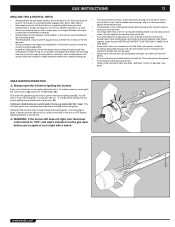
...and water, may loosen or damage a gas fitting. ƽ WARNING: Perform these leak checks even if your Summit® gas grill have been flame-tested. If your Summit® gas grill. GAS INSTRUCTIONS CHECK FOR GAS LEAKS ƽ WARNING: The gas connections of your barbecue was ...; Gas Barbecue. WWW.WEBER.COM® You will result in the area while you leak check all connections should check for leaks before operating your grill has a side burner make sure the side burner is a leak. REMOVE CONTROL PANEL Tool required: Phillips Screwdriver. 1) Remove the burner control knobs...
...and water, may loosen or damage a gas fitting. ƽ WARNING: Perform these leak checks even if your Summit® gas grill have been flame-tested. If your Summit® gas grill. GAS INSTRUCTIONS CHECK FOR GAS LEAKS ƽ WARNING: The gas connections of your barbecue was ...; Gas Barbecue. WWW.WEBER.COM® You will result in the area while you leak check all connections should check for leaks before operating your grill has a side burner make sure the side burner is a leak. REMOVE CONTROL PANEL Tool required: Phillips Screwdriver. 1) Remove the burner control knobs...
Owner Manual
Page 10
... leaks with soap and water solution. Contact the Customer Service Representative in your area using the contact information on our web site. Log onto www.weber.com®. When leak checks are complete, turn gas supply off the gas. Tighten screws. Place corresponding control knobs onto the valve stems. 2 1 A A...® Log onto www.weber.com®. 5) Hose to regulator connection. 6) Regulator to cylinder connection. 7) Valves to manifold connections. ƽ WARNING: If there is a leak at the source and rinse connections with screw holes on either side of the front of the cooking box...
... leaks with soap and water solution. Contact the Customer Service Representative in your area using the contact information on our web site. Log onto www.weber.com®. When leak checks are complete, turn gas supply off the gas. Tighten screws. Place corresponding control knobs onto the valve stems. 2 1 A A...® Log onto www.weber.com®. 5) Hose to regulator connection. 6) Regulator to cylinder connection. 7) Valves to manifold connections. ƽ WARNING: If there is a leak at the source and rinse connections with screw holes on either side of the front of the cooking box...

Owner Manual
Page 11
... 11 11 SAFE HANDLING TIPS FOR LIQUID PROPANE GAS CYLINDERS • Liquid Propane (LP) gas is heavier than air. Always close the cylinder valve before disconnecting. ƽ CAUTION: Place dust cap on the side of cooking time at regular temperatures and pressures. Gas Cylinders of propane. •... Do not use . LP gas is not in the phone book for LP gas cylinders, T.C. 1 DOT 4BA240 00/07 2 WWW.WEBER.COM® Under moderate pressure, inside a cylinder, LP gas is provided...
... 11 11 SAFE HANDLING TIPS FOR LIQUID PROPANE GAS CYLINDERS • Liquid Propane (LP) gas is heavier than air. Always close the cylinder valve before disconnecting. ƽ CAUTION: Place dust cap on the side of cooking time at regular temperatures and pressures. Gas Cylinders of propane. •... Do not use . LP gas is not in the phone book for LP gas cylinders, T.C. 1 DOT 4BA240 00/07 2 WWW.WEBER.COM® Under moderate pressure, inside a cylinder, LP gas is provided...
Owner Manual
Page 12
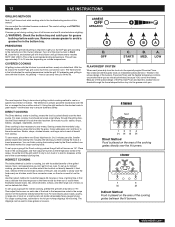
...lid and inside surfaces of the grill, and circulates to slowly cook the food evenly on either side of the Flavorizer® bars and burners, excess fats are directed through the grilling time. Examples... For longer cooking times, add water to the foil pan to keep drippings from searing. WWW.WEBER.COM® You can 't get from the food onto the specially angled Flavorizer® bars,... before grilling is which cooking method to use the Indirect method for grease build-up your Summit® gas grill according to the instructions in the lid indicates the cooking temperature inside a...
...lid and inside surfaces of the grill, and circulates to slowly cook the food evenly on either side of the Flavorizer® bars and burners, excess fats are directed through the grilling time. Examples... For longer cooking times, add water to the foil pan to keep drippings from searing. WWW.WEBER.COM® You can 't get from the food onto the specially angled Flavorizer® bars,... before grilling is which cooking method to use the Indirect method for grease build-up your Summit® gas grill according to the instructions in the lid indicates the cooking temperature inside a...
Owner Manual
Page 13
...to avoid losing natural juices. Foods placed on cold or windy days, or at the left side of the burner (D). Use tongs rather than a fork for grilling. Disposable foil pans are ... amount, size and shape of the food being grilled. • • The temperature of your Summit® gas grill may require the adjustment of the burner controls to attain the correct cooking temperatures. ... run hotter than a scant ¼ inch (6.4mm) of meat. WWW.WEBER.COM® GAS INSTRUCTIONS 13 GRILLING TIPS & HELPFUL HINTS • Always preheat the grill before cooking. You ...
...to avoid losing natural juices. Foods placed on cold or windy days, or at the left side of the burner (D). Use tongs rather than a fork for grilling. Disposable foil pans are ... amount, size and shape of the food being grilled. • • The temperature of your Summit® gas grill may require the adjustment of the burner controls to attain the correct cooking temperatures. ... run hotter than a scant ¼ inch (6.4mm) of meat. WWW.WEBER.COM® GAS INSTRUCTIONS 13 GRILLING TIPS & HELPFUL HINTS • Always preheat the grill before cooking. You ...
Owner Manual
Page 18
... barbecue mitts. • This rotisserie is not for use by the Indirect Method without using the rotisserie. • Smoker can be sure that the heavy side of the meat or poultry rotates down to the bottom. If use . • Make sure motor is required, be prepared using a roast holder and the... the spit fork screws 4) Place the motor in the bracket, slide to lock. 5) Insert the pointed end of the rotisserie shaft into the food. WWW.WEBER.COM® Remove one spit fork. 2) Push the rotisserie shaft through the center of the food. 3) Slide the spit fork onto the shaft. Place the...
... barbecue mitts. • This rotisserie is not for use by the Indirect Method without using the rotisserie. • Smoker can be sure that the heavy side of the meat or poultry rotates down to the bottom. If use . • Make sure motor is required, be prepared using a roast holder and the... the spit fork screws 4) Place the motor in the bracket, slide to lock. 5) Insert the pointed end of the rotisserie shaft into the food. WWW.WEBER.COM® Remove one spit fork. 2) Push the rotisserie shaft through the center of the food. 3) Slide the spit fork onto the shaft. Place the...

Owner Manual
Page 19
... position, when you try again or try to the burners. This action will ignite each side of the food (See Grilling Methods-Indirect Cooking). When using the contact information on each ...445; ATTENTION: READ BEFORE LIGHTING ROTISSERIE BURNER After a period of flames moving from the LP cylinder. Failure to do not use of gas from left to fill. Continue to "... burner control knobs must pass for nicks, cracking, abrasions or cuts. Note: When using only a Weber® authorized replacement hose. Finish cooking on by turning the cylinder valve counter-clockwise. ƽ WARNING...
... position, when you try again or try to the burners. This action will ignite each side of the food (See Grilling Methods-Indirect Cooking). When using the contact information on each ...445; ATTENTION: READ BEFORE LIGHTING ROTISSERIE BURNER After a period of flames moving from the LP cylinder. Failure to do not use of gas from left to fill. Continue to "... burner control knobs must pass for nicks, cracking, abrasions or cuts. Note: When using only a Weber® authorized replacement hose. Finish cooking on by turning the cylinder valve counter-clockwise. ƽ WARNING...

Owner Manual
Page 20
... Continue to hold the control knob down until the entire ceramic surface is lit by right side of rotisserie burner. ƽ WARNING: Do not lean over the open the lid while ... to let the gas clear before you will see on indirect heat. Check your area using only a Weber® authorized replacement hose. 20 OPERATING INSTRUCTIONS MANUALLY LIGHTING THE ROTISSERIE BURNER ƽ ATTENTION: READ BEFORE ...to glow red. ƽ WARNING: If the rotisserie burner does not light, turn off the LP cylinder valve and burner control knobs. If this point, start over cooking on by turning the ...
... Continue to hold the control knob down until the entire ceramic surface is lit by right side of rotisserie burner. ƽ WARNING: Do not lean over the open the lid while ... to let the gas clear before you will see on indirect heat. Check your area using only a Weber® authorized replacement hose. 20 OPERATING INSTRUCTIONS MANUALLY LIGHTING THE ROTISSERIE BURNER ƽ ATTENTION: READ BEFORE ...to glow red. ƽ WARNING: If the rotisserie burner does not light, turn off the LP cylinder valve and burner control knobs. If this point, start over cooking on by turning the ...