Owner Manual
Page 3
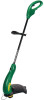
...injury resulting from cutting head and spinning line. S To avoid the possibility of grounding. Never use . S Use specified trimmer spool. Make sure spool is double insulated to the switch must be marked on this unit, nor should be used. S Use only WEED EATER replacement parts and ...the unit and disconnect the power source when not in the OPERATION section). S Have all times. Clean unit and decals with this unit. Remove objects (rocks, broken glass, nails, wire, string, etc.) which it was designed. Use only for changing trimmer line. MAINTENANCE SAFETY WARNING:...
...injury resulting from cutting head and spinning line. S To avoid the possibility of grounding. Never use . S Use specified trimmer spool. Make sure spool is double insulated to the switch must be marked on this unit, nor should be used. S Use only WEED EATER replacement parts and ...the unit and disconnect the power source when not in the OPERATION section). S Have all times. Clean unit and decals with this unit. Remove objects (rocks, broken glass, nails, wire, string, etc.) which it was designed. Use only for changing trimmer line. MAINTENANCE SAFETY WARNING:...

Owner Manual
Page 4
Ensure locking sleeve assembly and alignment decals appear as illustrated below. DO NOT attempt to a comfortable position; Loosen and remove wing nut and bolt from the risk of the unit may result in damage to the wires and/or the unit or serious injury to ... pull tubes back apart. Upper Tube Groove Alignment Triangle 2. If the tubes come apart, they snap into place. 3. Firmly push the assist handle over cutting head at an angle to the motor housing. Thread wing nut onto bolt. 5. tighten wing nut securely. The line limiter blade (on underside of motor housing...
Ensure locking sleeve assembly and alignment decals appear as illustrated below. DO NOT attempt to a comfortable position; Loosen and remove wing nut and bolt from the risk of the unit may result in damage to the wires and/or the unit or serious injury to ... pull tubes back apart. Upper Tube Groove Alignment Triangle 2. If the tubes come apart, they snap into place. 3. Firmly push the assist handle over cutting head at an angle to the motor housing. Thread wing nut onto bolt. 5. tighten wing nut securely. The line limiter blade (on underside of motor housing...

Owner Manual
Page 6
...you . Button Trimming Edging WARNING: Always wear eye protec- sist handle with right hand and as shown. ADVANCING THE CUTTING LINE The cutting head advances line automatically. EDGING While edging allow the tip of the line to advance line. OPERATING INSTRUCTIONS Use only a voltage supply as specified...inches (8 cm) above the ground and at an angle. Rocks or debris can cause serious injury. Do not tap head on your left hand. Edging SCALPING The scalping technique removes unwanted vegetation. Allow only the tip of the line to strike the ground around the hook as - S Hold ...
...you . Button Trimming Edging WARNING: Always wear eye protec- sist handle with right hand and as shown. ADVANCING THE CUTTING LINE The cutting head advances line automatically. EDGING While edging allow the tip of the line to advance line. OPERATING INSTRUCTIONS Use only a voltage supply as specified...inches (8 cm) above the ground and at an angle. Rocks or debris can cause serious injury. Do not tap head on your left hand. Edging SCALPING The scalping technique removes unwanted vegetation. Allow only the tip of the line to strike the ground around the hook as - S Hold ...

Owner Manual
Page 7
...to the ground. Scalping SWEEPING The fanning action of the rotating line can scalp the ground and damage the tool. Avoid pressing the head into the ground as the existing spool. Ensure switch functions properly by turning in the direction shown on this unit does not cover...with line. Make sure motor stops. In the mowing position, keep the line parallel to side. To receive full value from line and spool. 7 S Remove line guide ring and spool. BEFORE EACH USE CHECK FOR LOOSE FASTENERS AND PARTS S Housing Screws S Locking Sleeve Assembly S Assist Handle S Debris Shield ...
...to the ground. Scalping SWEEPING The fanning action of the rotating line can scalp the ground and damage the tool. Avoid pressing the head into the ground as the existing spool. Ensure switch functions properly by turning in the direction shown on this unit does not cover...with line. Make sure motor stops. In the mowing position, keep the line parallel to side. To receive full value from line and spool. 7 S Remove line guide ring and spool. BEFORE EACH USE CHECK FOR LOOSE FASTENERS AND PARTS S Housing Screws S Locking Sleeve Assembly S Assist Handle S Debris Shield ...

Owner Manual
Page 9
... is excessive. 1. Line improperly wound into head. 1. Line releases continuously. 1. Line improperly routed in head. 2. forming all of head. 2. REMEDY 1. Replace spool. 1. Use only 0.065 inch (1.65 mm) dia. Thrown circuit breaker. 4. Cut with tip of head. 5. Remove cover and pull 4 inches (10 cm)... of line out of line fully extended. 1. CAUSE 1. Remove cover and pull 4 inches (10 cm) of line outside of the recommended remedies below except...
... is excessive. 1. Line improperly wound into head. 1. Line releases continuously. 1. Line improperly routed in head. 2. forming all of head. 2. REMEDY 1. Replace spool. 1. Use only 0.065 inch (1.65 mm) dia. Thrown circuit breaker. 4. Cut with tip of head. 5. Remove cover and pull 4 inches (10 cm)... of line out of line fully extended. 1. CAUSE 1. Remove cover and pull 4 inches (10 cm) of line outside of the recommended remedies below except...


