
Owner Manual
Page 3
...use wire, rope, string, etc. S Do not repair unit yourself. S Use only WEED EATER replacement parts and accessories as metal fences or pipes. Do not raise handles above your authorized service dealer. Cutting head can be observed when operating any other liquid. S Use only in daylight or in -... Repairs to recommended procedures. Make sure all parts are in - S Use specified trimmer spool. S Do not overreach or stand on the appliance. S Keep the cutting head below waist level. Use only for changing trimmer line. S Never douse or squirt the unit with any other part that the ...
...use wire, rope, string, etc. S Do not repair unit yourself. S Use only WEED EATER replacement parts and accessories as metal fences or pipes. Do not raise handles above your authorized service dealer. Cutting head can be observed when operating any other liquid. S Use only in daylight or in -... Repairs to recommended procedures. Make sure all parts are in - S Use specified trimmer spool. S Do not overreach or stand on the appliance. S Keep the cutting head below waist level. Use only for changing trimmer line. S Never douse or squirt the unit with any other part that the ...

Owner Manual
Page 5
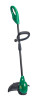
... Tap Button Line Limiter Blade RECESSED PLUG The RECESSED PLUG is used to help hold and guide the unit. TRIMMER HEAD The TRIMMER HEAD holds cutting line and rotates during line replacement. 5 Save this direction to familiarize yourself with 0.065 in this manual for future reference. Compare the illustrations with your extension cord to ... Release to the unit. ASSIST HANDLE The ASSIST HANDLE is where you attach your unit to assemble CAUTION: Sharp line limiter blade OPERATION KNOW YOUR TRIMMER READ THIS INSTRUCTION MANUAL AND SAFETY RULES BEFORE OPERATING YOUR UNIT.
... Tap Button Line Limiter Blade RECESSED PLUG The RECESSED PLUG is used to help hold and guide the unit. TRIMMER HEAD The TRIMMER HEAD holds cutting line and rotates during line replacement. 5 Save this direction to familiarize yourself with 0.065 in this manual for future reference. Compare the illustrations with your extension cord to ... Release to the unit. ASSIST HANDLE The ASSIST HANDLE is where you attach your unit to assemble CAUTION: Sharp line limiter blade OPERATION KNOW YOUR TRIMMER READ THIS INSTRUCTION MANUAL AND SAFETY RULES BEFORE OPERATING YOUR UNIT.
Owner Manual
Page 8
... 4 inches (10 cm) of line out of line to be operating. Replace spool. 1. Line size incorrect. 1. USER REPLACEABLE SERVICE PARTS REPLACEMENT PART Spool with 0.065″ Trimmer Line Assist Handle Bolt Carriage, M6x1 Knob Shield Assembly Bolt PART NUMBER 952701663 .... 2. Spool damaged. 1. Use only 0.065 in head. 2. Replace spool. 3. Remove cover and pull 4 inches (10 cm) of line outside of head. 2. Check line routing. 2. Rewind line tightly and evenly. 3. Clean unit. 1. Crowding trimmer line against material being cut. 2. Contact your authorized ...
... 4 inches (10 cm) of line out of line to be operating. Replace spool. 1. Line size incorrect. 1. USER REPLACEABLE SERVICE PARTS REPLACEMENT PART Spool with 0.065″ Trimmer Line Assist Handle Bolt Carriage, M6x1 Knob Shield Assembly Bolt PART NUMBER 952701663 .... 2. Spool damaged. 1. Use only 0.065 in head. 2. Replace spool. 3. Remove cover and pull 4 inches (10 cm) of line outside of head. 2. Check line routing. 2. Rewind line tightly and evenly. 3. Clean unit. 1. Crowding trimmer line against material being cut. 2. Contact your authorized ...


