
Owner Manual
Page 2
...S To reduce risk of fire, electric shock, and serious injury. Inspect extension cord before using electric gar- If in this manual and on the switch. Operator is responsible for outdoor appliances having electrical rating not less than the other accessories or attachments will .... An undersized extension cord will require the use of electrical shock, this unit. Plug connectors must always be dangerous! Read entire instruction manual before use multiple cords. 2 You and others can be intact with no cracks or deterioration. OPERATOR SAFETY S Dress properly. Never carry...
...S To reduce risk of fire, electric shock, and serious injury. Inspect extension cord before using electric gar- If in this manual and on the switch. Operator is responsible for outdoor appliances having electrical rating not less than the other accessories or attachments will .... An undersized extension cord will require the use of electrical shock, this unit. Plug connectors must always be dangerous! Read entire instruction manual before use multiple cords. 2 You and others can be intact with no cracks or deterioration. OPERATOR SAFETY S Dress properly. Never carry...

Owner Manual
Page 3
...S Do not hang unit so that are securely fastened. sulated appliance must be recommended by an authorized service dealer to this manual performed by the manufacturer. pliance is damaged. Repairs to the switch must be made by qualified service personnel can be diagnosed ... service dealer These include head parts that the trigger switch is properly installed and all service and maintenance not ex- S Use only WEED EATER replacement parts and accessories as metal fences or pipes. S Use cord retainer to prevent disconnection of grounding. S Use specified trimmer spool...
...S Do not hang unit so that are securely fastened. sulated appliance must be recommended by an authorized service dealer to this manual performed by the manufacturer. pliance is damaged. Repairs to the switch must be made by qualified service personnel can be diagnosed ... service dealer These include head parts that the trigger switch is properly installed and all service and maintenance not ex- S Use only WEED EATER replacement parts and accessories as metal fences or pipes. S Use cord retainer to prevent disconnection of grounding. S Use specified trimmer spool...

Owner Manual
Page 5
.... Tighten securely. LINE LIMITER BLADE The LINE LIMITER BLADE cuts the cutting line to assemble OPERATION KNOW YOUR UNIT READ THIS INSTRUCTION MANUAL AND SAFETY RULES BEFORE OPERATING YOUR UNIT. EDGE GUIDE The EDGE GUIDE protects the unit from contacting the ground during operation. Edge ... in . TRIGGER SWITCH The TRIGGER SWITCH is not caught between the shield and the motor housing (see following illustration and in this manual for future reference. TRIMMER HEAD The TRIMMER HEAD holds cutting line and rotates during edging. 5 TWIST AND EDGE BUTTON The TWIST AND...
.... Tighten securely. LINE LIMITER BLADE The LINE LIMITER BLADE cuts the cutting line to assemble OPERATION KNOW YOUR UNIT READ THIS INSTRUCTION MANUAL AND SAFETY RULES BEFORE OPERATING YOUR UNIT. EDGE GUIDE The EDGE GUIDE protects the unit from contacting the ground during operation. Edge ... in . TRIGGER SWITCH The TRIGGER SWITCH is not caught between the shield and the motor housing (see following illustration and in this manual for future reference. TRIMMER HEAD The TRIMMER HEAD holds cutting line and rotates during edging. 5 TWIST AND EDGE BUTTON The TWIST AND...

Owner Manual
Page 6
...8226; Wear eye protection and heavy clothing. • Hold trigger handle with the automatic line feed, refer to be fed out manually. • To operate, press and release manual line feed button while gently pulling on your left hand. • Keep unit below waist level. • Cut only from ... serious injury. then, restart the motor and allow it to reach full speed. • Repeat until the line reaches the line limiter. Manual Line Feed Button Trimming Edging WARNING: Always wear eye protec- sure debris is fed out. ATTACH THE EXTENSION CORD TO YOUR TRIMMER Loop your...
...8226; Wear eye protection and heavy clothing. • Hold trigger handle with the automatic line feed, refer to be fed out manually. • To operate, press and release manual line feed button while gently pulling on your left hand. • Keep unit below waist level. • Cut only from ... serious injury. then, restart the motor and allow it to reach full speed. • Repeat until the line reaches the line limiter. Manual Line Feed Button Trimming Edging WARNING: Always wear eye protec- sure debris is fed out. ATTACH THE EXTENSION CORD TO YOUR TRIMMER Loop your...

Owner Manual
Page 8
... of spool in the direction of hub and spool. 6. WARNING: Never use , inspect complete unit for replacement of 0.065″ (1.65 mm) diameter WEED EATER brand line. Place spool into hub with a clean dry cloth. Remove line from the hub. SERVICE AND ADJUSTMENTS REPLACING THE LINE 1. Push the line into... small hole on this manual. Cut out area of the spool. 10. To receive full value from the warranty, the operator must maintain unit as instructed in the two ...
... of spool in the direction of hub and spool. 6. WARNING: Never use , inspect complete unit for replacement of 0.065″ (1.65 mm) diameter WEED EATER brand line. Place spool into hub with a clean dry cloth. Remove line from the hub. SERVICE AND ADJUSTMENTS REPLACING THE LINE 1. Push the line into... small hole on this manual. Cut out area of the spool. 10. To receive full value from the warranty, the operator must maintain unit as instructed in the two ...

Owner Manual
Page 10
...does not cover predelivery set--up or normal adjustments explained in the instruction manual. THIS WARRANTY GIVES YOU SPECIFIC LEGAL RIGHTS, AND YOU MAY HAVE OTHER RIGHTS WHICH VARY FROM STATE TO STATE. Therefore, WEED EATER reserves the right to change, modify, or discontinue models, designs, ... replacement with proof of purchase, to repair or replace under this warranty any unanswered questions concerning this product. The policy of WEED EATER is to any time without notice or obligation to continuously improve its products. Should you may return it in complete condition, ...
...does not cover predelivery set--up or normal adjustments explained in the instruction manual. THIS WARRANTY GIVES YOU SPECIFIC LEGAL RIGHTS, AND YOU MAY HAVE OTHER RIGHTS WHICH VARY FROM STATE TO STATE. Therefore, WEED EATER reserves the right to change, modify, or discontinue models, designs, ... replacement with proof of purchase, to repair or replace under this warranty any unanswered questions concerning this product. The policy of WEED EATER is to any time without notice or obligation to continuously improve its products. Should you may return it in complete condition, ...

Parts List
Page 1
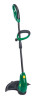
Parts List No. 966047901 Date 02/26/10 NEW WEED EATER R PARTS LIST NOTE : Illustration may differ from actual model due to the Service Reference Indicated for more information.(Located at the END of the IPL) ... Description Assit Handle Knob Bolt Carriage, M6 X 1 Edge Guide Spool with 0.065" Trimmer line Shield Assembly Spool Cap 7 Ref. Part No. 4 5 Description Not Shown 115254026 Manual = New Part Number For This IPL = Refer to design changes. MODEL WE EL-13TNE Page: 1 1 2 3 6 WARNING All repairs, adjustments and maintenance not described in the Operator...
Parts List No. 966047901 Date 02/26/10 NEW WEED EATER R PARTS LIST NOTE : Illustration may differ from actual model due to the Service Reference Indicated for more information.(Located at the END of the IPL) ... Description Assit Handle Knob Bolt Carriage, M6 X 1 Edge Guide Spool with 0.065" Trimmer line Shield Assembly Spool Cap 7 Ref. Part No. 4 5 Description Not Shown 115254026 Manual = New Part Number For This IPL = Refer to design changes. MODEL WE EL-13TNE Page: 1 1 2 3 6 WARNING All repairs, adjustments and maintenance not described in the Operator...