

English Manual
Page 3
...are exercising, stop immediately and begin cooling down. 9. Always stand on all of the pulleys. 13. Use the home gym system only on the pulleys at a time. 8. The home gym system is especially important for personal injury or property damage sustained by only one person at all times. 7. Always ...disconnect the lat bar from the home gym system when performing an exercise that the cables remain on a level surface. Do not use of this or any commercial, rental, ...
...are exercising, stop immediately and begin cooling down. 9. Always stand on all of the pulleys. 13. Use the home gym system only on the pulleys at a time. 8. The home gym system is especially important for personal injury or property damage sustained by only one person at all times. 7. Always ...disconnect the lat bar from the home gym system when performing an exercise that the cables remain on a level surface. Do not use of this or any commercial, rental, ...
English Manual
Page 4
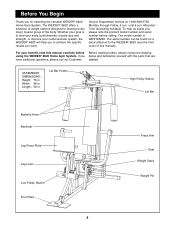
... If you , please note the product model number and serial number before Before reading further, please review the drawing using the WEIDER¨ 8620 Home Gym System. Lat Bar Holder High Pulley Station Lat Bar Butterfly Arms Backrest Leg Press Plate Leg Lever Low Pulley Station Foot Plate ...calling. The serial number can be found on a decal attached to the WEIDER¨ 8620 (see the front cover of weight stations designed to achieve the specific results you for selecting the versatile WEIDER¨ 8620 Home Gym System. ASSEMBLED DIMENSIONS: Height: 76 in. Before You Begin Thank you ...
... If you , please note the product model number and serial number before Before reading further, please review the drawing using the WEIDER¨ 8620 Home Gym System. Lat Bar Holder High Pulley Station Lat Bar Butterfly Arms Backrest Leg Press Plate Leg Lever Low Pulley Station Foot Plate ...calling. The serial number can be found on a decal attached to the WEIDER¨ 8620 (see the front cover of weight stations designed to achieve the specific results you for selecting the versatile WEIDER¨ 8620 Home Gym System. ASSEMBLED DIMENSIONS: Height: 76 in. Before You Begin Thank you ...

English Manual
Page 5
... completed. ¥ The assembly is not in the parts bag, check to see if it has been pre-attached. ¥ As you assemble the home gym system, be sure that you begin each Carriage Bolt. Press a 2Ó Square Inner Cap (27) into four stages: 1) frame assembly, 2) press...Base (4). Hand tighten a 5/16Ó Nylon Locknut (3) onto each assembly stage to open -end or closed-end wrenches, or a set of the home gym system in the Stabilizer (5). do otherwise. Assembly Before beginning assembly, carefully read and understand the information in the box above. Slide the Rear Upright (56...
... completed. ¥ The assembly is not in the parts bag, check to see if it has been pre-attached. ¥ As you assemble the home gym system, be sure that you begin each Carriage Bolt. Press a 2Ó Square Inner Cap (27) into four stages: 1) frame assembly, 2) press...Base (4). Hand tighten a 5/16Ó Nylon Locknut (3) onto each assembly stage to open -end or closed-end wrenches, or a set of the home gym system in the Stabilizer (5). do otherwise. Assembly Before beginning assembly, carefully read and understand the information in the box above. Slide the Rear Upright (56...

English Manual
Page 15
... Press Adjustment Tube is oriented as shown. The use of the remaining parts will need to remove it by tightening the cables. Before using the home gym system, pull each cable a few times to the Press Adjustment Tube (79) with the holes in ADJUSTMENT, beginning on page 18. 32 44 79 8 3 8 22...
... Press Adjustment Tube is oriented as shown. The use of the remaining parts will need to remove it by tightening the cables. Before using the home gym system, pull each cable a few times to the Press Adjustment Tube (79) with the holes in ADJUSTMENT, beginning on page 18. 32 44 79 8 3 8 22...

English Manual
Page 16
...the weight stack, insert a Weight Pin (26) under the desired Weight (25). CHANGING THE WEIGHT SETTING To change the weight setting of the home gym system can be attached in the correct starting position for the exercise to be adjusted. The Nylon Strap (39) can be changed from the ...) can be performed. Always remove the leg press plate and lock the leg lever before using the low pulley station (see how the home gym system should be performed. Refer to the exercise poster accompanying this manual to see ADJUSTING AND REMOVING THE LEG PRESS PLATE AND ADJUSTMENT TUBE ...
...the weight stack, insert a Weight Pin (26) under the desired Weight (25). CHANGING THE WEIGHT SETTING To change the weight setting of the home gym system can be attached in the correct starting position for the exercise to be adjusted. The Nylon Strap (39) can be changed from the ...) can be performed. Always remove the leg press plate and lock the leg lever before using the low pulley station (see how the home gym system should be performed. Refer to the exercise poster accompanying this manual to see ADJUSTING AND REMOVING THE LEG PRESS PLATE AND ADJUSTMENT TUBE ...

English Manual
Page 18
...drawing 2). Remove the 3/8Ó Nylon Locknut (21) and the 3/8Ó x 2Ó Bolt (12) from the Long ÒUÓ-Bracket (57). Do not use the home gym system. Slack can be replaced, see drawing 1) and at the end of cable used . Make sure that the Cable and Pulley move smoothly. 23 15... slack can be removed by tightening the 1/4Ó Nylon Locknuts (2) at the end of the Long Cable (23) (see ORDERING REPLACEMENT PARTS on the home gym system, can stretch slightly when it . Replace any worn parts immediately. To do this manual. 66 57 21 12 2 58 18 If the cables ...
...drawing 2). Remove the 3/8Ó Nylon Locknut (21) and the 3/8Ó x 2Ó Bolt (12) from the Long ÒUÓ-Bracket (57). Do not use the home gym system. Slack can be replaced, see drawing 1) and at the end of cable used . Make sure that the Cable and Pulley move smoothly. 23 15... slack can be removed by tightening the 1/4Ó Nylon Locknuts (2) at the end of the Long Cable (23) (see ORDERING REPLACEMENT PARTS on the home gym system, can stretch slightly when it . Replace any worn parts immediately. To do this manual. 66 57 21 12 2 58 18 If the cables ...

English Manual
Page 19
... show the correct route for each cable are labeled. Be sure that the two cables and the cable traps have not been correctly routed, the home gym system will not function properly and damage may occur. Long Cable (23) 2 1ÑHigh Pulley 7 3 5 4 6 7ÑLong ÒUÓ-Bracket Short Cable (58) Weight Stack...
... show the correct route for each cable are labeled. Be sure that the two cables and the cable traps have not been correctly routed, the home gym system will not function properly and damage may occur. Long Cable (23) 2 1ÑHigh Pulley 7 3 5 4 6 7ÑLong ÒUÓ-Bracket Short Cable (58) Weight Stack...
English Manual
Page 25
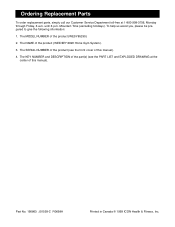
... Parts To order replacement parts, simply call our Customer Service Department toll-free at the center of this manual). 4. The MODEL NUMBER of the product (WEIDER¨ 8620 Home Gym System). 3. The SERIAL NUMBER of this manual). Part No. 156863 J01539-C R0699A Printed in Canada © 1999 ICON Health & Fitness, Inc. Mountain Time (excluding...
... Parts To order replacement parts, simply call our Customer Service Department toll-free at the center of this manual). 4. The MODEL NUMBER of the product (WEIDER¨ 8620 Home Gym System). 3. The SERIAL NUMBER of this manual). Part No. 156863 J01539-C R0699A Printed in Canada © 1999 ICON Health & Fitness, Inc. Mountain Time (excluding...


