

Canadian English Manual
Page 2
TABLE OF CONTENTS IMPORTANT PRECAUTIONS 3 BEFORE YOU BEGIN 4 ASSEMBLY 5 ADJUSTMENTS 22 WEIGHT RESISTANCE CHART 24 TROUBLESHOOTING 25 CABLE DIAGRAMS 26 ORDERING REPLACEMENT PARTS Back Cover FULL 90-DAY WARRANTY Back Cover Note: A PART IDENTIFICATION CHART and a PART LIST/EXPLODED DRAWING are attached in the center of this manual. Remove the PART IDENTIFICATION CHART and the PART LIST/EXPLODED DRAWING before beginning assembly. 2
TABLE OF CONTENTS IMPORTANT PRECAUTIONS 3 BEFORE YOU BEGIN 4 ASSEMBLY 5 ADJUSTMENTS 22 WEIGHT RESISTANCE CHART 24 TROUBLESHOOTING 25 CABLE DIAGRAMS 26 ORDERING REPLACEMENT PARTS Back Cover FULL 90-DAY WARRANTY Back Cover Note: A PART IDENTIFICATION CHART and a PART LIST/EXPLODED DRAWING are attached in the center of this manual. Remove the PART IDENTIFICATION CHART and the PART LIST/EXPLODED DRAWING before beginning assembly. 2

Canadian English Manual
Page 5
... more convenient if you will assemble the arms and the leg lever. Assembly Requires Two Persons For your convenience and safety, assemble the weight system with the help you assemble the weight system, make the task enjoyable, assembly will attach the cables and pulleys that there is... of this page. Important: Wait until assembly is included in a cleared area and remove the packing materials. If a part is enough room to do otherwise. Arm Assembly-During this stage, you will assemble the seat and the backrests. 5 Cable Assembly-During this stage, you will go smoothly...
... more convenient if you will assemble the arms and the leg lever. Assembly Requires Two Persons For your convenience and safety, assemble the weight system with the help you assemble the weight system, make the task enjoyable, assembly will attach the cables and pulleys that there is... of this page. Important: Wait until assembly is included in a cleared area and remove the packing materials. If a part is enough room to do otherwise. Arm Assembly-During this stage, you will assemble the seat and the backrests. 5 Cable Assembly-During this stage, you will go smoothly...
Canadian English Manual
Page 11
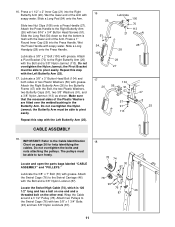
... 100 70 113 21 54 25 28 108 29 27 17 104 26 56 91 57 57 91 113 47 25 CABLE ASSEMBLY 18. Locate and open the parts bags labeled "CABLE ASSEMBLY" and "PULLEYS." 78 74 30 87 Lubricate the 3/8" x 7" Bolt (30) with grease. Attach two Pulleys to the Swivel Carriage (... 46 87 11 Slide a Long Handgrip (28) onto the Press Handle. The pulleys must be able to the Butterfly Frame (47) with grease. Wrap the Cable around a 3 1/2" Pulley (78). Slide two Nut Clips (108) onto a Press Handle (27). Lubricate a 3/8" x 2" Bolt (100) with grease. Attach the Swivel Cage (76) to...
... 100 70 113 21 54 25 28 108 29 27 17 104 26 56 91 57 57 91 113 47 25 CABLE ASSEMBLY 18. Locate and open the parts bags labeled "CABLE ASSEMBLY" and "PULLEYS." 78 74 30 87 Lubricate the 3/8" x 7" Bolt (30) with grease. Attach two Pulleys to the Swivel Carriage (... 46 87 11 Slide a Long Handgrip (28) onto the Press Handle. The pulleys must be able to the Butterfly Frame (47) with grease. Wrap the Cable around a 3 1/2" Pulley (78). Slide two Nut Clips (108) onto a Press Handle (27). Lubricate a 3/8" x 2" Bolt (100) with grease. Attach the Swivel Cage (76) to...

Canadian English Manual
Page 19
... the Weight Tube (43) and the Top Weight (45) and make sure that the Cable Trap is inside of the Pulley. 54. Then, tighten the Nut against the 1/2" Washer (1). Locate and open the parts bag labeled "SEAT ASSEMBLY." Insert the Pad Tube (23) into the square hole in the indicated brack- et... the groove of the groove under a 3 1/2" Pulley 53 (78). Screw the end of the Cable (73) two full turns into the ends of holes from the top in the Seat Upright (9). SEAT ASSEMBLY 56. Slide two Short Pads (20) onto the Leg Lever (10). 55 56 109 19 4 73 118 1 45 43...
... the Weight Tube (43) and the Top Weight (45) and make sure that the Cable Trap is inside of the Pulley. 54. Then, tighten the Nut against the 1/2" Washer (1). Locate and open the parts bag labeled "SEAT ASSEMBLY." Insert the Pad Tube (23) into the square hole in the indicated brack- et... the groove of the groove under a 3 1/2" Pulley 53 (78). Screw the end of the Cable (73) two full turns into the ends of holes from the top in the Seat Upright (9). SEAT ASSEMBLY 56. Slide two Short Pads (20) onto the Leg Lever (10). 55 56 109 19 4 73 118 1 45 43...

Canadian English Manual
Page 26
... chart below shows the ends of each cable and the lengths of the cables. IMPORTANT: If the cables have been assembled correctly. The numbers in the diagrams show the proper routing of the cables. Use the diagrams to make sure that the cables have not been correctly routed, the weight system will not function properly and...
... chart below shows the ends of each cable and the lengths of the cables. IMPORTANT: If the cables have been assembled correctly. The numbers in the diagrams show the proper routing of the cables. Use the diagrams to make sure that the cables have not been correctly routed, the weight system will not function properly and...


