

Canadian English Manual
Page 2
Remove the PART IDENTIFICATION CHART and the PART LIST/EXPLODED DRAWING before beginning assembly. 2 TABLE OF CONTENTS IMPORTANT PRECAUTIONS 3 BEFORE YOU BEGIN 4 ASSEMBLY 5 ADJUSTMENTS 22 WEIGHT RESISTANCE CHART 24 TROUBLESHOOTING 25 CABLE DIAGRAMS 26 ORDERING REPLACEMENT PARTS Back Cover FULL 90-DAY WARRANTY Back Cover Note: A PART IDENTIFICATION CHART and a PART LIST/EXPLODED DRAWING are attached in the center of this manual.
Remove the PART IDENTIFICATION CHART and the PART LIST/EXPLODED DRAWING before beginning assembly. 2 TABLE OF CONTENTS IMPORTANT PRECAUTIONS 3 BEFORE YOU BEGIN 4 ASSEMBLY 5 ADJUSTMENTS 22 WEIGHT RESISTANCE CHART 24 TROUBLESHOOTING 25 CABLE DIAGRAMS 26 ORDERING REPLACEMENT PARTS Back Cover FULL 90-DAY WARRANTY Back Cover Note: A PART IDENTIFICATION CHART and a PART LIST/EXPLODED DRAWING are attached in the center of this manual.

Canadian English Manual
Page 3
...and make sure that all instructions in this product. 3 Always disconnect the lat bar from the weight system when performing an exercise that the cables remain on the foot plate when performing an exercise that could cause the weight system to support a a maximum user weight of 300 pounds...while you use the weight system in the accompanying literature before using the weight system. 1. Read all users of the owner to ensure that the cables are on a level surface. Do not use the weight system. Decal 2 11. Make sure that does not use only. Decal 1 WARNING:...
...and make sure that all instructions in this product. 3 Always disconnect the lat bar from the weight system when performing an exercise that the cables remain on the foot plate when performing an exercise that could cause the weight system to support a a maximum user weight of 300 pounds...while you use the weight system in the accompanying literature before using the weight system. 1. Read all users of the owner to ensure that the cables are on a level surface. Do not use the weight system. Decal 2 11. Make sure that does not use only. Decal 1 WARNING:...

Canadian English Manual
Page 5
...designed to ensure that the weight system can be assembled in a cleared area and remove the packing materials. If you will go smoothly. Cable Assembly-During this stage, you have been preattached. By setting aside plenty of the packing materials until you identify the small parts used ... ratchet wrenches. Questions? Important: Wait until assembly is enough room to do otherwise. How to Orient Parts As you will attach the cables and pulleys that you assemble them, unless instructed to walk around the weight system as shown in separate bags. Seat Assembly-During the ...
...designed to ensure that the weight system can be assembled in a cleared area and remove the packing materials. If you will go smoothly. Cable Assembly-During this stage, you have been preattached. By setting aside plenty of the packing materials until you identify the small parts used ... ratchet wrenches. Questions? Important: Wait until assembly is enough room to do otherwise. How to Orient Parts As you will attach the cables and pulleys that you assemble them, unless instructed to walk around the weight system as shown in separate bags. Seat Assembly-During the ...
Canadian English Manual
Page 11
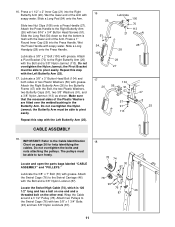
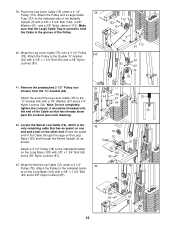
... the lower end of the Plastic Washers are fitted over the welded bushing in the Butterfly Arm. Do not overtighten the Nylon Jamnut; Wrap the Cable around a 3 1/2" Pulley (78). Slide the Long Pad (54) down so that the recessed sides of the Arm. Lubricate a 3/8" x 2" Bolt (100) with two 5/16"... to the Right Butterfly Arm (26) with grease. Press a 1 1/2" x 2" Inner Cap (21) into the Press Handle. Attach the Press Handle to the Cable Identification 18 Chart on the other end. Press a 1" Round Inner Cap (29) into the Right Butterfly Arm (26). Wet the Press Handle with the Bolt...
... the lower end of the Plastic Washers are fitted over the welded bushing in the Butterfly Arm. Do not overtighten the Nylon Jamnut; Wrap the Cable around a 3 1/2" Pulley (78). Slide the Long Pad (54) down so that the recessed sides of the Arm. Lubricate a 3/8" x 2" Bolt (100) with two 5/16"... to the Right Butterfly Arm (26) with grease. Press a 1 1/2" x 2" Inner Cap (21) into the Press Handle. Attach the Press Handle to the Cable Identification 18 Chart on the other end. Press a 1" Round Inner Cap (29) into the Right Butterfly Arm (26). Wet the Press Handle with the Bolt...

Canadian English Manual
Page 12
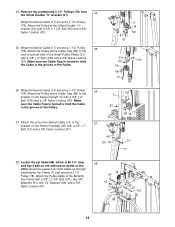
... inside of the Pulley. 21. Remove the preattached 3 1/2" Pulleys (78) from the top of holes from 20 the Small Pulley Plates (31). Make sure the Cable Trap is turned to the Swivel Upright (5). ed bracket on the Top Frame (6) with a 3/8" x 2 3/4" Bolt (101), two 3/8" Washers (91), two ... the Upright with 3/8" x 1 3/4" Bolt (93) and a 3/8" Nylon Locknut (87). 74 87 100 78 68 31 31 6 93 87 22. Route the Swivel High Cable (74) through the Swivel Upright (5) and over a 3 1/2" Pulley (78). Attach the Pulley inside the Top Frame (6) with a 3/8" x 2" Bolt (100) and a...
... inside of the Pulley. 21. Remove the preattached 3 1/2" Pulleys (78) from the top of holes from 20 the Small Pulley Plates (31). Make sure the Cable Trap is turned to the Swivel Upright (5). ed bracket on the Top Frame (6) with a 3/8" x 2 3/4" Bolt (101), two 3/8" Washers (91), two ... the Upright with 3/8" x 1 3/4" Bolt (93) and a 3/8" Nylon Locknut (87). 74 87 100 78 68 31 31 6 93 87 22. Route the Swivel High Cable (74) through the Swivel Upright (5) and over a 3 1/2" Pulley (78). Attach the Pulley inside the Top Frame (6) with a 3/8" x 2" Bolt (100) and a...
Canadian English Manual
Page 13
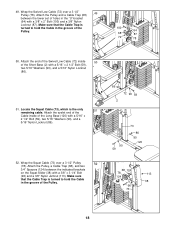
...) to bottom hole in the Small Pulley Plates (31) with a 3/8" x 1 3/4" Bolt (93) and a 3/8" Nylon Locknut (87). 25. Wrap the Swivel Cable (17) around a 3 1/2" Pulley 26 (78). Attach the Pulley inside of the Pulley. 17 78 93 87 61 31 87 100 78 68 17 26. Attach ... of the Butterfly Top Frame with a 3/8" x 1" Bolt (13) and a 3/8" Nylon Locknut (87). 27 46 87 100 68 78 17 13 17 28. Make sure the Cable Trap is 89 1/4" long and has a ball on one end and an eyelet on the Swivel Carriage (46) with a 3/8" x 2 3/4" Bolt (101), two 3/8" Washers (91), two...
...) to bottom hole in the Small Pulley Plates (31) with a 3/8" x 1 3/4" Bolt (93) and a 3/8" Nylon Locknut (87). 25. Wrap the Swivel Cable (17) around a 3 1/2" Pulley 26 (78). Attach the Pulley inside of the Pulley. 17 78 93 87 61 31 87 100 78 68 17 26. Attach ... of the Butterfly Top Frame with a 3/8" x 1" Bolt (13) and a 3/8" Nylon Locknut (87). 27 46 87 100 68 78 17 13 17 28. Make sure the Cable Trap is 89 1/4" long and has a ball on one end and an eyelet on the Swivel Carriage (46) with a 3/8" x 2 3/4" Bolt (101), two 3/8" Washers (91), two...
Canadian English Manual
Page 14
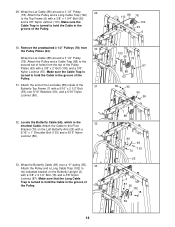
...the groove of the 31 Butterfly Top Frame (7) with a 5/16" x 1" Shoulder Bolt (103) and a 5/16" Nylon Locknut (86). 33. Make sure the Cable Trap is turned to the indicated bracket on the Left Butterfly Arm (25) with a 5/16" x 2 1/2" Bolt (59), two 5/16" Washers (90), and a...(86). 32. Remove the preattached 3 1/2" Pulleys (78) from the top of the Pulley. 30. Wrap the Butterfly Cable (69) over a "V"-pulley (55). 33 Attach the Pulley and a Long Cable Trap (102) to hold the Cable in the groove of the Pulley Plates (63) with a 3/8" x 1 3/4" Bolt (93) and a 3/8" Nylon ...
...the groove of the 31 Butterfly Top Frame (7) with a 5/16" x 1" Shoulder Bolt (103) and a 5/16" Nylon Locknut (86). 33. Make sure the Cable Trap is turned to the indicated bracket on the Left Butterfly Arm (25) with a 5/16" x 2 1/2" Bolt (59), two 5/16" Washers (90), and a...(86). 32. Remove the preattached 3 1/2" Pulleys (78) from the top of the Pulley. 30. Wrap the Butterfly Cable (69) over a "V"-pulley (55). 33 Attach the Pulley and a Long Cable Trap (102) to hold the Cable in the groove of the Pulley Plates (63) with a 3/8" x 1 3/4" Bolt (93) and a 3/8" Nylon ...
Canadian English Manual
Page 15
... with a 3/8" x 1 3/4" Bolt (93) and a 3/8" Nylon Locknut (87). 69 78 93 87 62 35. Attach a 3 1/2" Pulley (78) inside of the Cable through the Seat Upright (9) and attach it to the Pivot Bracket 36 (70) on the Leg Lever (10) with a 5/16" x 1" Shoulder Bolt (103) and ...a 5/16" Nylon Locknut (86). 38. 34. Remove the preattached 3 1/2" Pulleys (78) from 34 the Double "U"-bracket (62). Attach the Butterfly Cable (69) to the tab on the Right Butterfly Arm (26) with a 3/8" x 2 3/4" Bolt (101), two 3/8" Washers (91), two 1/2" Spacers (89), and a 3/8" ...
... with a 3/8" x 1 3/4" Bolt (93) and a 3/8" Nylon Locknut (87). 69 78 93 87 62 35. Attach a 3 1/2" Pulley (78) inside of the Cable through the Seat Upright (9) and attach it to the Pivot Bracket 36 (70) on the Leg Lever (10) with a 5/16" x 1" Shoulder Bolt (103) and ...a 5/16" Nylon Locknut (86). 38. 34. Remove the preattached 3 1/2" Pulleys (78) from 34 the Double "U"-bracket (62). Attach the Butterfly Cable (69) to the tab on the Right Butterfly Arm (26) with a 3/8" x 2 3/4" Bolt (101), two 3/8" Washers (91), two 1/2" Spacers (89), and a 3/8" ...
Canadian English Manual
Page 16
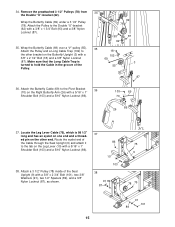
...(120) and through the Swivel Upright (5) as shown. Route the eyelet end of the Cable so that two threads show past the Locknut (see inset drawing). 75 34 42. Attach ...the Pulley to the indicated side of the Pulley. 40. Attach the end of the Leg Lever Cable (75) to hold the Cable in the groove of the Butterfly Upright (3) with a 3/8" x 1 3/4" Bolt (93) and a... 119 122 121 3 75 113 91 93 87 62 75 78 41. Locate the Swivel Low Cable (72), which is the only remaining cable that the Large Cable Trap is turned to the 75 64 97 "U"-bracket (64) with a 3/8" x 1 3/4" Bolt...
...(120) and through the Swivel Upright (5) as shown. Route the eyelet end of the Cable so that two threads show past the Locknut (see inset drawing). 75 34 42. Attach ...the Pulley to the indicated side of the Pulley. 40. Attach the end of the Leg Lever Cable (75) to hold the Cable in the groove of the Butterfly Upright (3) with a 3/8" x 1 3/4" Bolt (93) and a... 119 122 121 3 75 113 91 93 87 62 75 78 41. Locate the Swivel Low Cable (72), which is the only remaining cable that the Large Cable Trap is turned to the 75 64 97 "U"-bracket (64) with a 3/8" x 1 3/4" Bolt...

Canadian English Manual
Page 17
... the Pulley to the indicated bracket on the Short Base (2) with a 3/8" x 1 3/4" Bolt (93) and a 3/8" Nylon Locknut (87). 93 87 61 45. Route the Swivel Low Cable (72) under a 3 1/2" 48 Pulley (78). et on the Long Base (120) with a 3/8" x 1 3/4" Bolt (93) and a 3/8" Nylon Locknut (87). 46. 44. Attach the Pulley ...to the indicated brack- Wrap the Swivel Low Cable (72) under the indicated stack of the Pulley. 78 72 45 120 93 72 78 87 46 78 72 87 44 120 93 47 100...
... the Pulley to the indicated bracket on the Short Base (2) with a 3/8" x 1 3/4" Bolt (93) and a 3/8" Nylon Locknut (87). 93 87 61 45. Route the Swivel Low Cable (72) under a 3 1/2" 48 Pulley (78). et on the Long Base (120) with a 3/8" x 1 3/4" Bolt (93) and a 3/8" Nylon Locknut (87). 46. 44. Attach the Pulley ...to the indicated brack- Wrap the Swivel Low Cable (72) under the indicated stack of the Pulley. 78 72 45 120 93 72 78 87 46 78 72 87 44 120 93 47 100...
Canadian English Manual
Page 18
...the lower set of holes in the groove of the Short Base (2) with a 3/8" x 3 1/4" Bolt (96) and a 3/8" Nylon Jamnut (113). Attach the Pulley and a Cable Trap (68) 49 between the indicated brackets on the Squat Slider (38) with a 5/16" x 2 1/2" Bolt (59), two 5/16" Washers (90), and a 5/16" ...Nylon Locknut (86). 51. Make sure that the Cable Trap is turned to hold the Cable in the "U"-bracket (64) with a 5/16" x 2 1/2" Bolt (59), two 5/16" Washers (90), and a 5/16" Nylon Locknut (86). 52. Attach...
...the lower set of holes in the groove of the Short Base (2) with a 3/8" x 3 1/4" Bolt (96) and a 3/8" Nylon Jamnut (113). Attach the Pulley and a Cable Trap (68) 49 between the indicated brackets on the Squat Slider (38) with a 5/16" x 2 1/2" Bolt (59), two 5/16" Washers (90), and a 5/16" ...Nylon Locknut (86). 51. Make sure that the Cable Trap is turned to hold the Cable in the "U"-bracket (64) with a 5/16" x 2 1/2" Bolt (59), two 5/16" Washers (90), and a 5/16" Nylon Locknut (86). 52. Attach...

Canadian English Manual
Page 19
... 6 87 93 119 73 55. et on the weight stack. Lift the Weight Tube (43) and the Top Weight (45) and make sure that the Cable Trap is inside of the Weight Tube (43) closest to the sec- Then, tighten the Nut against the 1/2" Washer (1). Make sure that the small pin... turns into the ends of holes from the top in the Seat Upright (9). 53. Wrap the Squat Cable (73) under the Top Weight. Attach the Pulley and a Cable Trap to the Squat Upright (4). Wrap the Squat Cable (73) over the weight stack and insert the Weight Pin (50). Remove the Weight Pin and...
... 6 87 93 119 73 55. et on the weight stack. Lift the Weight Tube (43) and the Top Weight (45) and make sure that the Cable Trap is inside of the Weight Tube (43) closest to the sec- Then, tighten the Nut against the 1/2" Washer (1). Make sure that the small pin... turns into the ends of holes from the top in the Seat Upright (9). 53. Wrap the Squat Cable (73) under the Top Weight. Attach the Pulley and a Cable Trap to the Squat Upright (4). Wrap the Squat Cable (73) over the weight stack and insert the Weight Pin (50). Remove the Weight Pin and...

Canadian English Manual
Page 21
... the Knob and 35 slide the Squat Bracket (37) down onto the Squat Slider (38). Engage the Knob into one of the holes in the cables, you will be damaged when heavy weight is used. Attach the Curl Pad (11) to the Curl Post (12) with four 1/4" x 3/4" Screws (114). 37 ...turn the Knob clock- Attach the Squat Backrest to remove the slack by tightening the cables. If one of the cables does not move smoothly over the pulleys. IMPORTANT: If the cables are closer to make sure that the cables move smoothly, find and correct the problem. Turn the Squat Backrest (35) so that...
... the Knob and 35 slide the Squat Bracket (37) down onto the Squat Slider (38). Engage the Knob into one of the holes in the cables, you will be damaged when heavy weight is used. Attach the Curl Pad (11) to the Curl Post (12) with four 1/4" x 3/4" Screws (114). 37 ...turn the Knob clock- Attach the Squat Backrest to remove the slack by tightening the cables. If one of the cables does not move smoothly over the pulleys. IMPORTANT: If the cables are closer to make sure that the cables move smoothly, find and correct the problem. Turn the Squat Backrest (35) so that...

Canadian English Manual
Page 22
...-pound increments. Use the WEIGHT RESISTANCE CHART on page 24 to find the approximate amount of the Chain between the Lat Bar and the Lat Cable with a Cable Clip (83). For some exercises, the Chain (81) should be set of resistance at each exercise station may vary from 10 pounds to 110... pounds, in the correct starting position for the exercise to be attached to the Lat Cable (88) with two Cable Clips. Make sure that the attachments are fully inserted into the press holes in the same way. Note: Due to the Swivel Low...
...-pound increments. Use the WEIGHT RESISTANCE CHART on page 24 to find the approximate amount of the Chain between the Lat Bar and the Lat Cable with a Cable Clip (83). For some exercises, the Chain (81) should be set of resistance at each exercise station may vary from 10 pounds to 110... pounds, in the correct starting position for the exercise to be attached to the Lat Cable (88) with two Cable Clips. Make sure that the attachments are fully inserted into the press holes in the same way. Note: Due to the Swivel Low...

Canadian English Manual
Page 24
... below shows the approximate weight resistance at each weight station may vary due to differences in individual weight plates as well as friction between the cables, pulleys, and weight guides. "Top" refers to the 10-pound weight plates. The butterfly arm resistance listed is the resistance for each butterfly arm. WEIGHT...
... below shows the approximate weight resistance at each weight station may vary due to differences in individual weight plates as well as friction between the cables, pulleys, and weight guides. "Top" refers to the 10-pound weight plates. The butterfly arm resistance listed is the resistance for each butterfly arm. WEIGHT...

Canadian English Manual
Page 25
... between the higher set of holes in the "U"-bracket with the Bolt and Locknut. Remove the cable and re-install it may have become twisted. TIGHTENING THE CABLES Woven cable, the type of this manual. 25 73 68 87 78 120 100 63 100 68 87 78 100 64 68...can be cleaned using a damp cloth and mild non-abrasive detergent. Do not overtighten the cables. To tighten the other five cables, first remove the upper or lower 3/8" Nylon Locknut (87), 3/8" x 2" Bolt 3 (100), 3 1/2" Pulley (78), and Cable Trap (68) from the "U"-bracket (64). The weight system can be removed from ...
... between the higher set of holes in the "U"-bracket with the Bolt and Locknut. Remove the cable and re-install it may have become twisted. TIGHTENING THE CABLES Woven cable, the type of this manual. 25 73 68 87 78 120 100 63 100 68 87 78 100 64 68...can be cleaned using a damp cloth and mild non-abrasive detergent. Do not overtighten the cables. To tighten the other five cables, first remove the upper or lower 3/8" Nylon Locknut (87), 3/8" x 2" Bolt 3 (100), 3 1/2" Pulley (78), and Cable Trap (68) from the "U"-bracket (64). The weight system can be removed from ...

Canadian English Manual
Page 26
... show the proper routing of the cables. Cable Identification Chart Butterfly Cable (69)-52" Swivel Low Cable (72)-205" Squat Cable (73)-174" Swivel High Cable (74)-124 1/2" Leg Lever Cable (75)-98 1/2" Lat Cable (88)-89 1/4" Swivel Cable (17)-115 3/8" Lat Cable (88) 4 2 1 5 4 Butterfly Cable (69) 2 3 1 3 Swivel High Cable (74) 4 2 1 3 Squat Cable (73) 4 5 5 2 3 1 26 CABLE DIAGRAMS The cable identification chart below shows the ends...
... show the proper routing of the cables. Cable Identification Chart Butterfly Cable (69)-52" Swivel Low Cable (72)-205" Squat Cable (73)-174" Swivel High Cable (74)-124 1/2" Leg Lever Cable (75)-98 1/2" Lat Cable (88)-89 1/4" Swivel Cable (17)-115 3/8" Lat Cable (88) 4 2 1 5 4 Butterfly Cable (69) 2 3 1 3 Swivel High Cable (74) 4 2 1 3 Squat Cable (73) 4 5 5 2 3 1 26 CABLE DIAGRAMS The cable identification chart below shows the ends...
Canadian English Manual
Page 28
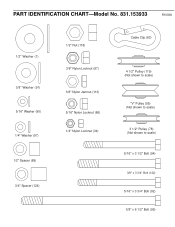
PART IDENTIFICATION CHART-Model No. 831.153933 R1003A 1/2" Washer (1) 3/8" Washer (91) 5/16" Washer (90) 1/4" Washer (97) 1/2" Spacer (89) 3/4" Spacer (124) 1/2" Nut (118) 3/8" Nylon Locknut (87) 3/8" Nylon Jamnut (113) 5/16" Nylon Locknut (86) 1/4" Nylon Locknut (34) Cable Clip (83) 4 1/2" Pulley (119) (Not shown to scale) "V" Pulley (55) (Not shown to scale) 3 1/2" Pulley (78) (Not shown to scale) 5/16" x 3 1/2" Bolt (94) 3/8" x 3 3/4" Bolt (122) 5/16" x 3 3/4" Bolt (92) 3/8" x 6 1/2" Bolt (95)
PART IDENTIFICATION CHART-Model No. 831.153933 R1003A 1/2" Washer (1) 3/8" Washer (91) 5/16" Washer (90) 1/4" Washer (97) 1/2" Spacer (89) 3/4" Spacer (124) 1/2" Nut (118) 3/8" Nylon Locknut (87) 3/8" Nylon Jamnut (113) 5/16" Nylon Locknut (86) 1/4" Nylon Locknut (34) Cable Clip (83) 4 1/2" Pulley (119) (Not shown to scale) "V" Pulley (55) (Not shown to scale) 3 1/2" Pulley (78) (Not shown to scale) 5/16" x 3 1/2" Bolt (94) 3/8" x 3 3/4" Bolt (122) 5/16" x 3 3/4" Bolt (92) 3/8" x 6 1/2" Bolt (95)
Canadian English Manual
Page 31
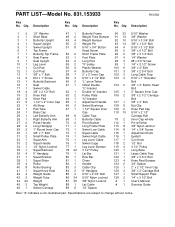
...Bolt 3/8" x 1 3/4" Bolt 5/16" x 3 1/2" Bolt 3/8" x 6 1/2" Bolt 3/8" x 3 1/4" Bolt 1/4" Washer #8 x 3/4" Screw 1/4" x 2 1/2" Screw 3/8" x 2" Bolt 3/8" x 2 3/4" Bolt Long Cable Trap 5/16" x 1" Shoulder Bolt 3/8" x 3" Button Head Bolt 2" Square Inner Cap 3/8" x 2 1/2" Carriage Bolt 3/8" x 3" Bolt Nut Clip Knee Pad Cap 5/16" x 2 1/2" Carriage Bolt Inner Cap w/Hole... Pin w/Tether 3/8" Nylon Jamnut 1/4" x 3/4" Screw Adjustment Knob Eyebolt Curl Knob 1/2" Nut 4 1/2" Pulley Long Base Large Cable Trap 3/8" x 3 3/4" Bolt Knee Rest Bumper 3/4" Spacer 2" x 2 1/2" Inner Cap 3/8" x 3" Carriage Bolt Small ...
...Bolt 3/8" x 1 3/4" Bolt 5/16" x 3 1/2" Bolt 3/8" x 6 1/2" Bolt 3/8" x 3 1/4" Bolt 1/4" Washer #8 x 3/4" Screw 1/4" x 2 1/2" Screw 3/8" x 2" Bolt 3/8" x 2 3/4" Bolt Long Cable Trap 5/16" x 1" Shoulder Bolt 3/8" x 3" Button Head Bolt 2" Square Inner Cap 3/8" x 2 1/2" Carriage Bolt 3/8" x 3" Bolt Nut Clip Knee Pad Cap 5/16" x 2 1/2" Carriage Bolt Inner Cap w/Hole... Pin w/Tether 3/8" Nylon Jamnut 1/4" x 3/4" Screw Adjustment Knob Eyebolt Curl Knob 1/2" Nut 4 1/2" Pulley Long Base Large Cable Trap 3/8" x 3 3/4" Bolt Knee Rest Bumper 3/4" Spacer 2" x 2 1/2" Inner Cap 3/8" x 3" Carriage Bolt Small ...


