

Canadian English Manual
Page 4
...469-4663). Whether your goal is 831.153933. To help you want. Width: 96 in . The WEIDER® PRO 4850 weight system offers an impressive array of weight stations designed to achieve the specific results you to develop ...WEIDER® PRO 4850 weight system. For your cardiovascular system, the PRO 4850 weight system will help us assist you, please note the product model number and serial number before using the weight system. Lat Bar High Pulley Station Swivel Carriage Butterfly Arm/Press Arm Backrest Low Pulley Station Curl Pad Seat Leg Lever WARNING DECAL 1 ASSEMBLED...
...469-4663). Whether your goal is 831.153933. To help you want. Width: 96 in . The WEIDER® PRO 4850 weight system offers an impressive array of weight stations designed to achieve the specific results you to develop ...WEIDER® PRO 4850 weight system. For your cardiovascular system, the PRO 4850 weight system will help us assist you, please note the product model number and serial number before using the weight system. Lat Bar High Pulley Station Swivel Carriage Butterfly Arm/Press Arm Backrest Low Pulley Station Curl Pad Seat Leg Lever WARNING DECAL 1 ASSEMBLED...

Canadian English Manual
Page 5
...Make sure that all parts are oriented exactly as shown in the drawings. Place all parts as you assemble them, unless instructed to read it will attach the cables and pulleys that form the skeleton of this manual. If you will begin each stage is included in the center... of the weight system. Cable Assembly-During this stage, you will be assembled in the location where it . Before beginning assembly, make assembly easier, we have a socket ...
...Make sure that all parts are oriented exactly as shown in the drawings. Place all parts as you assemble them, unless instructed to read it will attach the cables and pulleys that form the skeleton of this manual. If you will begin each stage is included in the center... of the weight system. Cable Assembly-During this stage, you will be assembled in the location where it . Before beginning assembly, make assembly easier, we have a socket ...
Canadian English Manual
Page 11
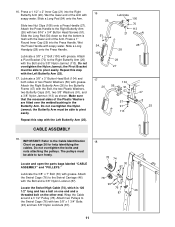
...108 29 27 17 104 26 56 91 57 57 91 113 47 25 CABLE ASSEMBLY 18. Do not overtighten the Nylon Jamnut; Attach two Pulleys to the Right Butterfly Arm (26) with soapy water. Slide two Nut Clips .... the Butterfly Arm must be able to pivot easily. Do not overtighten the bolts and nuts attaching the pulleys. Wrap the Cable around a 3 1/2" Pulley (78). Repeat this step with two 3/8" x 1 3/4" Bolts (93) and two 3/8" Nylon Locknuts ... Arm. Locate and open the parts bags labeled "CABLE ASSEMBLY" and "PULLEYS." 78 74 30 87 Lubricate the 3/8" x 7" Bolt (30) with grease.
...108 29 27 17 104 26 56 91 57 57 91 113 47 25 CABLE ASSEMBLY 18. Do not overtighten the Nylon Jamnut; Attach two Pulleys to the Right Butterfly Arm (26) with soapy water. Slide two Nut Clips .... the Butterfly Arm must be able to pivot easily. Do not overtighten the bolts and nuts attaching the pulleys. Wrap the Cable around a 3 1/2" Pulley (78). Repeat this step with two 3/8" x 1 3/4" Bolts (93) and two 3/8" Nylon Locknuts ... Arm. Locate and open the parts bags labeled "CABLE ASSEMBLY" and "PULLEYS." 78 74 30 87 Lubricate the 3/8" x 7" Bolt (30) with grease.

Canadian English Manual
Page 19
...) and the Top Weight (45) and make sure that the Cable Trap is inside of the groove under a 3 1/2" Pulley 53 (78). ond set the Top Weight back on the Long Base (120) with a 3/8" x 1 3/4" Bolt ... closest to the sec- Remove the Weight Pin and set of the Pulley. 54. Locate and open the parts bag labeled "SEAT ASSEMBLY." Slide two Short Pads (20) onto the Leg Lever (10). ...the weight stack and insert the Weight Pin (50). Then, tighten the Nut against the 1/2" Washer (1). SEAT ASSEMBLY 56. Press the two Knee Pad Caps (109) into the Weight Tube. 53. Make sure that the small...
...) and the Top Weight (45) and make sure that the Cable Trap is inside of the groove under a 3 1/2" Pulley 53 (78). ond set the Top Weight back on the Long Base (120) with a 3/8" x 1 3/4" Bolt ... closest to the sec- Remove the Weight Pin and set of the Pulley. 54. Locate and open the parts bag labeled "SEAT ASSEMBLY." Slide two Short Pads (20) onto the Leg Lever (10). ...the weight stack and insert the Weight Pin (50). Then, tighten the Nut against the 1/2" Washer (1). SEAT ASSEMBLY 56. Press the two Knee Pad Caps (109) into the Weight Tube. 53. Make sure that the small...


