
English Manual
Page 1
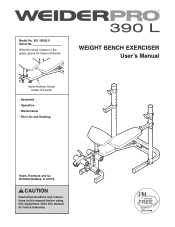
WEIGHT BENCH EXERCISER Userʼs Manual Serial Number Decal (under the seat) • Assembly • Operation • Maintenance • Part List and Drawing Sears, Roebuck and Co. Hoffman Estates, IL 60179 CAUTION Read all precautions and instructions in the space above for future reference. Save this equipment. Model No. 831.15928.0 Serial No. Write the serial number in this manual before using this manual for future reference.
WEIGHT BENCH EXERCISER Userʼs Manual Serial Number Decal (under the seat) • Assembly • Operation • Maintenance • Part List and Drawing Sears, Roebuck and Co. Hoffman Estates, IL 60179 CAUTION Read all precautions and instructions in the space above for future reference. Save this equipment. Model No. 831.15928.0 Serial No. Write the serial number in this manual before using this manual for future reference.

English Manual
Page 2
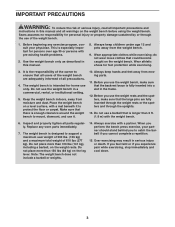
Note: The decal(s) may not be shown at actual size. 2 Apply the decal in the location shown. TABLE OF CONTENTS WARNING DECAL PLACEMENT 2 IMPORTANT PRECAUTIONS 3 BEFORE YOU BEGIN 4 PART IDENTIFICATION CHART 5 ASSEMBLY 6 ADJUSTMENT 13 EXERCISE GUIDELINES 15 PART LIST 17 EXPLODED DRAWING 18 ORDERING REPLACEMENT PARTS Back Cover 90 DAY FULL WARRANTY Back Cover WARNING DECAL PLACEMENT This drawing shows the location(s) of the warning decal(s). If a decal is missing or illegible, call 1-877-992-5999 and request a free replacement decal.
Note: The decal(s) may not be shown at actual size. 2 Apply the decal in the location shown. TABLE OF CONTENTS WARNING DECAL PLACEMENT 2 IMPORTANT PRECAUTIONS 3 BEFORE YOU BEGIN 4 PART IDENTIFICATION CHART 5 ASSEMBLY 6 ADJUSTMENT 13 EXERCISE GUIDELINES 15 PART LIST 17 EXPLODED DRAWING 18 ORDERING REPLACEMENT PARTS Back Cover 90 DAY FULL WARRANTY Back Cover WARNING DECAL PLACEMENT This drawing shows the location(s) of the warning decal(s). If a decal is missing or illegible, call 1-877-992-5999 and request a free replacement decal.
English Manual
Page 3
... Wear appropriate clothes while exercising; The weight bench is especially important for foot protection while exercising. 3. Keep the weight bench indoors, away from moving parts. 11. Before you experience pain while exercising, stop immediately and cool down. 3 Do not place more than 310 lbs (141 kg), including ... are fully inserted through the weight rests or the spotters and through the use the weight bench in this manual and all parts regularly. Replace any exercise program, consult your partner should stand behind you to ensure that is fully inserted into a slot ...
... Wear appropriate clothes while exercising; The weight bench is especially important for foot protection while exercising. 3. Keep the weight bench indoors, away from moving parts. 11. Before you experience pain while exercising, stop immediately and cool down. 3 Do not place more than 310 lbs (141 kg), including ... are fully inserted through the weight rests or the spotters and through the use the weight bench in this manual and all parts regularly. Replace any exercise program, consult your partner should stand behind you to ensure that is fully inserted into a slot ...
English Manual
Page 4
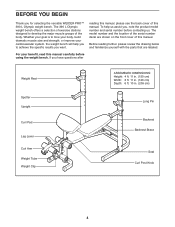
The model number and the location of this manual. If you for selecting the versatile WEIDER PRO™ 390 L Olympic weight bench. BEFORE YOU BEGIN Thank you have questions after Weight Rest Spotter Upright Curl Pad Leg Lever Curl Arm Weight Tube ... the product model number and serial number before using the weight bench. Before reading further, please review the drawing below and familiarize yourself with the parts that are shown on the front cover of the body. Whether your benefit, read this manual carefully before contacting us assist you want.
The model number and the location of this manual. If you for selecting the versatile WEIDER PRO™ 390 L Olympic weight bench. BEFORE YOU BEGIN Thank you have questions after Weight Rest Spotter Upright Curl Pad Leg Lever Curl Arm Weight Tube ... the product model number and serial number before using the weight bench. Before reading further, please review the drawing below and familiarize yourself with the parts that are shown on the front cover of the body. Whether your benefit, read this manual carefully before contacting us assist you want.
English Manual
Page 5
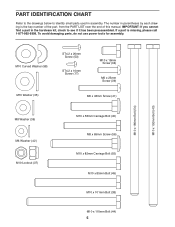
...M10 x 110mm Bolt (44) 5 The number in assembly. To avoid damaging parts, do not use power tools for assembly. If a part is the key number of the part, from the PART LIST near the end of this manual. PART IDENTIFICATION CHART Refer to the drawings below to see if it has been preassembled.... IMPORTANT: If you cannot find a part in the hardware kit, check to identify small parts used in parentheses...
...M10 x 110mm Bolt (44) 5 The number in assembly. To avoid damaging parts, do not use power tools for assembly. If a part is the key number of the part, from the PART LIST near the end of this manual. PART IDENTIFICATION CHART Refer to the drawings below to see if it has been preassembled.... IMPORTANT: If you cannot find a part in the hardware kit, check to identify small parts used in parentheses...
English Manual
Page 6
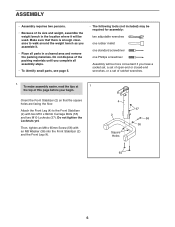
...set of its size and weight, assemble the weight bench in the location where it . • Place all assembly steps. • To identify small parts, see page 5. • The following tools (not included) may be required for assembly: two adjustable wrenches one rubber mallet one standard screwdriver one Phillips... Front Stabilizer (2) and the Front Leg (4). 4 2 Square Holes 37 56 36 55 6 Do not dispose of the packing materials until you complete all parts in a cleared area and remove the packing materials. Then, tighten an M8 x 65mm Screw (56) with two M10 x 82mm Carriage Bolts (55) and...
...set of its size and weight, assemble the weight bench in the location where it . • Place all assembly steps. • To identify small parts, see page 5. • The following tools (not included) may be required for assembly: two adjustable wrenches one rubber mallet one standard screwdriver one Phillips... Front Stabilizer (2) and the Front Leg (4). 4 2 Square Holes 37 56 36 55 6 Do not dispose of the packing materials until you complete all parts in a cleared area and remove the packing materials. Then, tighten an M8 x 65mm Screw (56) with two M10 x 82mm Carriage Bolts (55) and...

English Manual
Page 12
Attach the other Spotter (29) to the underside of a Spotter (29) with an ST4.2 x 10mm Screw (17). 15 11 Hold the Spotter (29) on the indicated side of 29 an Upright (11), and align the Spotter with one of the adjustment holes in the same way. Attach the tether on a Large Pin (13) to the other Upright (11) in the Upright. Make sure that all parts are properly tightened before you use the weight bench. 12 Insert the Large Pin (13) through the Spotter and the Upright. 15. Attach both Spotters at the same height. 11 29 13 17 16.
Attach the other Spotter (29) to the underside of a Spotter (29) with an ST4.2 x 10mm Screw (17). 15 11 Hold the Spotter (29) on the indicated side of 29 an Upright (11), and align the Spotter with one of the adjustment holes in the same way. Attach the tether on a Large Pin (13) to the other Upright (11) in the Upright. Make sure that all parts are properly tightened before you use the weight bench. 12 Insert the Large Pin (13) through the Spotter and the Upright. 15. Attach both Spotters at the same height. 11 29 13 17 16.
English Manual
Page 13
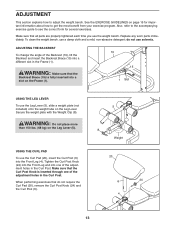
... Post (6). 20 6 24 4 13 Secure the weight plate with the Weight Clip (8). Make sure that all parts are properly tightened each time you use a damp cloth and a mild, non-abrasive detergent; Replace any worn parts immediately. See the EXERCISE GUIDELINES on the Leg Lever (5). 5 8 Weight USING THE CURL PAD To use solvents...
... Post (6). 20 6 24 4 13 Secure the weight plate with the Weight Clip (8). Make sure that all parts are properly tightened each time you use a damp cloth and a mild, non-abrasive detergent; Replace any worn parts immediately. See the EXERCISE GUIDELINES on the Leg Lever (5). 5 8 Weight USING THE CURL PAD To use solvents...
English Manual
Page 15
... performed, the resistance used . • Change the number of repetitions or sets performed. To achieve good results, make exercise a regular and enjoyable part of rest each week to give balance and variety to your muscles by working them to workout. Follow each exercise and move only the appropriate... parts of stretching and light exercise. Muscle Building-Work your muscles near their capacity. Rest for each set. • Weight Loss-Rest for ...
... performed, the resistance used . • Change the number of repetitions or sets performed. To achieve good results, make exercise a regular and enjoyable part of rest each week to give balance and variety to your muscles by working them to workout. Follow each exercise and move only the appropriate... parts of stretching and light exercise. Muscle Building-Work your muscles near their capacity. Rest for each set. • Weight Loss-Rest for ...

English Manual
Page 16
EXERCISE LOG Make copies of your strength and aerobic workouts. Scheduling and recording your workouts will help you to make exercise a regular and enjoyable part of this page, and use the copies to schedule and record your life. Strength Date: Exercise 1. Sets Reps Exercise 6. Exercise Lbs. Sets Reps Exercise 6. 7. 8. 9. 10. ...
EXERCISE LOG Make copies of your strength and aerobic workouts. Scheduling and recording your workouts will help you to make exercise a regular and enjoyable part of this page, and use the copies to schedule and record your life. Strength Date: Exercise 1. Sets Reps Exercise 6. Exercise Lbs. Sets Reps Exercise 6. 7. 8. 9. 10. ...
English Manual
Page 17
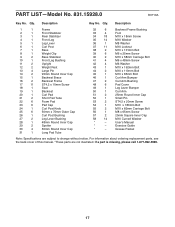
... call 1-877-992-5999. 17 Exercise Guide * - Qty. Qty. Grease Packet Note: Specifications are not illustrated. For information about ordering replacement parts, see the back cover of this manual. *These parts are subject to change without notice. Description 1 1 Frame 2 1 Front Stabilizer 3 1 Rear Stabilizer 4 1 Front Leg 5 1 Leg Lever 6 1 Curl Post...x 180mm Bolt 55 2 M10 x 82mm Carriage Bolt 56 1 M8 x 65mm Screw 57 2 25mm Square Inner Cap 58 14 M10 Curved Washer * - PART LIST-Model No. 831.15928.0 R0710A Key No. Userʼs Manual * -
... call 1-877-992-5999. 17 Exercise Guide * - Qty. Qty. Grease Packet Note: Specifications are not illustrated. For information about ordering replacement parts, see the back cover of this manual. *These parts are subject to change without notice. Description 1 1 Frame 2 1 Front Stabilizer 3 1 Rear Stabilizer 4 1 Front Leg 5 1 Leg Lever 6 1 Curl Post...x 180mm Bolt 55 2 M10 x 82mm Carriage Bolt 56 1 M8 x 65mm Screw 57 2 25mm Square Inner Cap 58 14 M10 Curved Washer * - PART LIST-Model No. 831.15928.0 R0710A Key No. Userʼs Manual * -

English Manual
Page 20
...). Your Home For repair-in material or workmanship within 90 days of the date of your nearest Sears Parts & Repair Center. 1-800-488-1222 Call anytime, day or night (U.S.A. For the replacement parts, accessories, and user's manuals that you may also have other rights which vary from state to state....Sears Brands, LLC 90 DAY FULL WARRANTY If this Weight Bench Exerciser fails due to do-it ! Sears, Roebuck and Co., Hoffman Estates, IL 60179 Part No. 302966 R0710A Printed in items like garage door openers and water heaters. 1-800-4-MY-HOME® (1-800-469-4663) Call anytime, day or...
...). Your Home For repair-in material or workmanship within 90 days of the date of your nearest Sears Parts & Repair Center. 1-800-488-1222 Call anytime, day or night (U.S.A. For the replacement parts, accessories, and user's manuals that you may also have other rights which vary from state to state....Sears Brands, LLC 90 DAY FULL WARRANTY If this Weight Bench Exerciser fails due to do-it ! Sears, Roebuck and Co., Hoffman Estates, IL 60179 Part No. 302966 R0710A Printed in items like garage door openers and water heaters. 1-800-4-MY-HOME® (1-800-469-4663) Call anytime, day or...
English Manual
Page 1
...: 1-800-999-3756 Mon.-Fri., 6 a.m.-6 p.m. Save this equipment. As a manufacturer, we are committed to you have questions, or find that there are missing or damaged parts, we will provide immediate assistance, free of charge to providing complete customer satisfaction. MST CAUTION Read all precautions and instructions in the space above for...
...: 1-800-999-3756 Mon.-Fri., 6 a.m.-6 p.m. Save this equipment. As a manufacturer, we are committed to you have questions, or find that there are missing or damaged parts, we will provide immediate assistance, free of charge to providing complete customer satisfaction. MST CAUTION Read all precautions and instructions in the space above for...

English Manual
Page 2
Remove the PART IDENTIFICATION CHART and the PART LIST/EXPLODED DRAWING before beginning assembly. WEIDER is a registered trademark of this manual. TABLE OF CONTENTS IMPORTANT PRECAUTIONS 3 BEFORE YOU BEGIN 4 ASSEMBLY 5 HOW TO USE THE HOME GYM SYSTEM 22 WEIGHT RESISTANCE CHART 24 TROUBLESHOOTING AND MAINTENANCE 25 CABLE DIAGRAMS 26 ORDERING REPLACEMENT PARTS Back Cover LIMITED WARRANTY Back Cover Note: A PART IDENTIFICATION CHART and a PART LIST/EXPLODED DRAWING are attached to the center of ICON Health & Fitness, Inc. 2
Remove the PART IDENTIFICATION CHART and the PART LIST/EXPLODED DRAWING before beginning assembly. WEIDER is a registered trademark of this manual. TABLE OF CONTENTS IMPORTANT PRECAUTIONS 3 BEFORE YOU BEGIN 4 ASSEMBLY 5 HOW TO USE THE HOME GYM SYSTEM 22 WEIGHT RESISTANCE CHART 24 TROUBLESHOOTING AND MAINTENANCE 25 CABLE DIAGRAMS 26 ORDERING REPLACEMENT PARTS Back Cover LIMITED WARRANTY Back Cover Note: A PART IDENTIFICATION CHART and a PART LIST/EXPLODED DRAWING are attached to the center of ICON Health & Fitness, Inc. 2

English Manual
Page 3
IMPORTANT PRECAUTIONS WARNING: To reduce the risk of all precautions. 8. Read all parts are properly tightened each time you use the home gym system. Always wear athletic shoes for personal injury or property damage sustained by or through ... press upright and military press arm. 13. Do not use of 35 or persons with great force. 11. Always disconnect the lat bar from moving parts. 9. The weights will fall with pre-existing health problems. Read all users of the home gym system are exercising, stop immediately and begin cooling down...
IMPORTANT PRECAUTIONS WARNING: To reduce the risk of all precautions. 8. Read all parts are properly tightened each time you use the home gym system. Always wear athletic shoes for personal injury or property damage sustained by or through ... press upright and military press arm. 13. Do not use of 35 or persons with great force. 11. Always disconnect the lat bar from moving parts. 9. The weights will fall with pre-existing health problems. Read all users of the home gym system are exercising, stop immediately and begin cooling down...

English Manual
Page 4
...dramatic muscle size and strength, or improve your benefit, read this manual). For your cardiovascular system, the PRO 9635 will help us assist you want. Whether your goal is WESY96352. Mountain Time (excluding holidays). The model ...reading further, please review the drawing below and familiarize yourself with the parts that are labeled. The PRO 9635 offers a selection of weight stations designed to the WEIDER® PRO 9635 (see the front cover of the body. Width: 89 in ....before calling. until 6 p.m. If you for selecting the versatile WEIDER® PRO 9635 Home Gym System.
...dramatic muscle size and strength, or improve your benefit, read this manual). For your cardiovascular system, the PRO 9635 will help us assist you want. Whether your goal is WESY96352. Mountain Time (excluding holidays). The model ...reading further, please review the drawing below and familiarize yourself with the parts that are labeled. The PRO 9635 offers a selection of weight stations designed to the WEIDER® PRO 9635 (see the front cover of the body. Width: 89 in ....before calling. until 6 p.m. If you for selecting the versatile WEIDER® PRO 9635 Home Gym System.

English Manual
Page 5
...center of ratchet wrenches. FRAME ASSEMBLY 1. Locate and open the parts bag labeled "FRAME ASSEMBLY." Assembly will also be sure that all parts are oriented as shown in the drawings. • Tighten all parts of the PRO 9635 in a cleared area and remove the packing materials; Press ... the Base (4) to see if it has been pre-attached. • As you assemble the PRO 9635 be needed. Insert six 5/16" x 2 1/2" Carriage Bolts (1) up through the Stabilizer (5). If a part is broken into the end of the packing materials until you begin each stage is packaged separately. ...
...center of ratchet wrenches. FRAME ASSEMBLY 1. Locate and open the parts bag labeled "FRAME ASSEMBLY." Assembly will also be sure that all parts are oriented as shown in the drawings. • Tighten all parts of the PRO 9635 in a cleared area and remove the packing materials; Press ... the Base (4) to see if it has been pre-attached. • As you assemble the PRO 9635 be needed. Insert six 5/16" x 2 1/2" Carriage Bolts (1) up through the Stabilizer (5). If a part is broken into the end of the packing materials until you begin each stage is packaged separately. ...
English Manual
Page 9
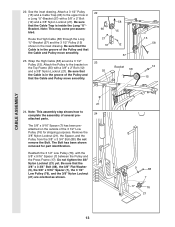
... (96). Attach the Leg Press Arm (96) to the Base (4) with a 5/16" x 6" Bolt (60), two 1/2" x 3/4" Spacers (61), and a 5/16" Nylon Locknut (3). 9. Locate and open the parts bag labeled 10 "ARM ASSEMBLY." Attach the Press Frame (17) to the Stabilizer (5) with one set of the Stabilizer (5). Align the welded tubes on the...
... (96). Attach the Leg Press Arm (96) to the Base (4) with a 5/16" x 6" Bolt (60), two 1/2" x 3/4" Spacers (61), and a 5/16" Nylon Locknut (3). 9. Locate and open the parts bag labeled 10 "ARM ASSEMBLY." Attach the Press Frame (17) to the Stabilizer (5) with one set of the Stabilizer (5). Align the welded tubes on the...

English Manual
Page 11
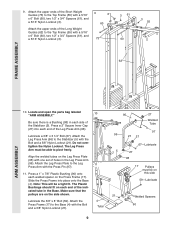
...). Attach the Military Press Arm (84) to the Top Frame (55) with two 5/16" x 2 1/4" Bolts (33) and two 5/16" Nylon Locknuts (3). Locate and open the parts bags labeled "CABLE ASSEMBLY" and "PULLEYS." 16 During steps 16 through 36, refer to turn freely. 17 17. Be sure that the Cable is listed...
...). Attach the Military Press Arm (84) to the Top Frame (55) with two 5/16" x 2 1/4" Bolts (33) and two 5/16" Nylon Locknuts (3). Locate and open the parts bags labeled "CABLE ASSEMBLY" and "PULLEYS." 16 During steps 16 through 36, refer to turn freely. 17 17. Be sure that the Cable is listed...
English Manual
Page 13
Attach a 3 1/2" Pulley (15) and a Cable Trap (66) to the upper hole in the groove of the 3 1/2" Low Pulley (76) for part identification. Be sure that the 3/8" x 3 3/4" Bolt (88), the 3/8" Flat Washer (9), the 5/8" x 9/16" Spacer (7), the 3 1/2" Low Pulley (76), and the 3/8" Nylon ... Long "U"Bracket. Route the High Cable (58) through the Long "U"-Bracket (57) and the 3 1/2" Pulley (15) shown in the groove of several pre- 24 attached parts. Be sure that the Cable is in the inset drawing. Reattach the 3 1/2" Low Pulley (76), with a 3/8" x 2" Bolt (12) and a 3/8" Nylon Locknut ...
Attach a 3 1/2" Pulley (15) and a Cable Trap (66) to the upper hole in the groove of the 3 1/2" Low Pulley (76) for part identification. Be sure that the 3/8" x 3 3/4" Bolt (88), the 3/8" Flat Washer (9), the 5/8" x 9/16" Spacer (7), the 3 1/2" Low Pulley (76), and the 3/8" Nylon ... Long "U"Bracket. Route the High Cable (58) through the Long "U"-Bracket (57) and the 3 1/2" Pulley (15) shown in the groove of several pre- 24 attached parts. Be sure that the Cable is in the inset drawing. Reattach the 3 1/2" Low Pulley (76), with a 3/8" x 2" Bolt (12) and a 3/8" Nylon Locknut ...


