

English Manual
Page 2
Apply the decal in the location shown. If a decal is missing or illegible, call 1-877-992-5999 and request a free replacement decal. TABLE OF CONTENTS WARNING DECAL PLACEMENT 2 IMPORTANT PRECAUTIONS 3 BEFORE YOU BEGIN 4 PART IDENTIFICATION CHART 5 ASSEMBLY 6 ADJUSTMENT 13 EXERCISE GUIDELINES 15 PART LIST 17 EXPLODED DRAWING 18 ORDERING REPLACEMENT PARTS Back Cover 90 DAY FULL WARRANTY Back Cover WARNING DECAL PLACEMENT This drawing shows the location(s) of the warning decal(s). Note: The decal(s) may not be shown at actual size. 2
Apply the decal in the location shown. If a decal is missing or illegible, call 1-877-992-5999 and request a free replacement decal. TABLE OF CONTENTS WARNING DECAL PLACEMENT 2 IMPORTANT PRECAUTIONS 3 BEFORE YOU BEGIN 4 PART IDENTIFICATION CHART 5 ASSEMBLY 6 ADJUSTMENT 13 EXERCISE GUIDELINES 15 PART LIST 17 EXPLODED DRAWING 18 ORDERING REPLACEMENT PARTS Back Cover 90 DAY FULL WARRANTY Back Cover WARNING DECAL PLACEMENT This drawing shows the location(s) of the warning decal(s). Note: The decal(s) may not be shown at actual size. 2
English Manual
Page 3
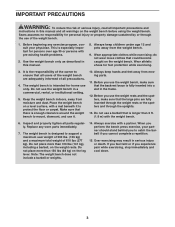
... the use the weight bench in this manual. 8. Keep the weight bench indoors, away from moving parts. 11. Place the weight bench on the weight bench before using the weight bench. Replace any exercise program, consult your partner should stand behind you to protect the floor or carpet. The ... . 10. Always keep children under age 12 and pets away from the weight bench. 9. Over exercising may result in this manual and all parts regularly. Do not use the weight bench, make sure that could become caught on the weight rests. Inspect and properly tighten all warnings on a...
... the use the weight bench in this manual. 8. Keep the weight bench indoors, away from moving parts. 11. Place the weight bench on the weight bench before using the weight bench. Replace any exercise program, consult your partner should stand behind you to protect the floor or carpet. The ... . 10. Always keep children under age 12 and pets away from the weight bench. 9. Over exercising may result in this manual and all parts regularly. Do not use the weight bench, make sure that could become caught on the weight rests. Inspect and properly tighten all warnings on a...
English Manual
Page 13
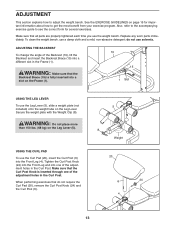
Replace any worn parts immediately. WARNING: Do not place more than 150 lbs. (68 kg) on the Frame (1). 19 15 1 Slot USING THE LEG LEVER To use a damp cloth ... exercise program. Make sure that the Backrest Brace (15) is inserted through one of the adjustment holes in the Frame (1). WARNING: Make sure that all parts are properly tightened each time you use the Curl Pad (20), insert the Curl Post (6) into a slot on the Leg Lever (5). 5 8 Weight USING THE CURL...
Replace any worn parts immediately. WARNING: Do not place more than 150 lbs. (68 kg) on the Frame (1). 19 15 1 Slot USING THE LEG LEVER To use a damp cloth ... exercise program. Make sure that the Backrest Brace (15) is inserted through one of the adjustment holes in the Frame (1). WARNING: Make sure that all parts are properly tightened each time you use the Curl Pad (20), insert the Curl Post (6) into a slot on the Leg Lever (5). 5 8 Weight USING THE CURL...
English Manual
Page 17
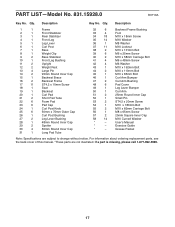
Description Key No. PART LIST-Model No. 831.15928.0 R0710A Key No. Description 1 1 Frame 2 1 Front Stabilizer 3 1 Rear Stabilizer 4 1 Front Leg 5 1 Leg Lever 6 1 Curl Post 7 1 Base 8 1 Weight Clip 9 2 Base...1 M8 x 65mm Screw 57 2 25mm Square Inner Cap 58 14 M10 Curved Washer * - For information about ordering replacement parts, see the back cover of this manual. *These parts are subject to change without notice. If a part is missing, please call 1-877-992-5999. 17 Exercise Guide * - Qty. Qty. Grease Packet Note: Specifications are...
Description Key No. PART LIST-Model No. 831.15928.0 R0710A Key No. Description 1 1 Frame 2 1 Front Stabilizer 3 1 Rear Stabilizer 4 1 Front Leg 5 1 Leg Lever 6 1 Curl Post 7 1 Base 8 1 Weight Clip 9 2 Base...1 M8 x 65mm Screw 57 2 25mm Square Inner Cap 58 14 M10 Curved Washer * - For information about ordering replacement parts, see the back cover of this manual. *These parts are subject to change without notice. If a part is missing, please call 1-877-992-5999. 17 Exercise Guide * - Qty. Qty. Grease Packet Note: Specifications are...

English Manual
Page 20
...) www.sears.com To purchase a protection agreement (U.S.A.) or maintenance agreement (Canada) on -line for rental purposes. Get it -yourself. For the replacement parts, accessories, and user's manuals that you may also have other rights which vary from state to a defect in China © 2010 ICON IP,...days of the date of carry-in your nearest Sears Parts & Repair Center. 1-800-488-1222 Call anytime, day or night (U.S.A. This warranty gives you specific legal rights, and you need to arrange for free repair (or replacement if repair proves impossible). Your Home For repair-in items...
...) www.sears.com To purchase a protection agreement (U.S.A.) or maintenance agreement (Canada) on -line for rental purposes. Get it -yourself. For the replacement parts, accessories, and user's manuals that you may also have other rights which vary from state to a defect in China © 2010 ICON IP,...days of the date of carry-in your nearest Sears Parts & Repair Center. 1-800-488-1222 Call anytime, day or night (U.S.A. This warranty gives you specific legal rights, and you need to arrange for free repair (or replacement if repair proves impossible). Your Home For repair-in items...

English Manual
Page 2
WEIDER is a registered trademark of this manual. Remove the PART IDENTIFICATION CHART and the PART LIST/EXPLODED DRAWING before beginning assembly. TABLE OF CONTENTS IMPORTANT PRECAUTIONS 3 BEFORE YOU BEGIN 4 ASSEMBLY 5 HOW TO USE THE HOME GYM SYSTEM 22 WEIGHT RESISTANCE CHART 24 TROUBLESHOOTING AND MAINTENANCE 25 CABLE DIAGRAMS 26 ORDERING REPLACEMENT PARTS Back Cover LIMITED WARRANTY Back Cover Note: A PART IDENTIFICATION CHART and a PART LIST/EXPLODED DRAWING are attached to the center of ICON Health & Fitness, Inc. 2
WEIDER is a registered trademark of this manual. Remove the PART IDENTIFICATION CHART and the PART LIST/EXPLODED DRAWING before beginning assembly. TABLE OF CONTENTS IMPORTANT PRECAUTIONS 3 BEFORE YOU BEGIN 4 ASSEMBLY 5 HOW TO USE THE HOME GYM SYSTEM 22 WEIGHT RESISTANCE CHART 24 TROUBLESHOOTING AND MAINTENANCE 25 CABLE DIAGRAMS 26 ORDERING REPLACEMENT PARTS Back Cover LIMITED WARRANTY Back Cover Note: A PART IDENTIFICATION CHART and a PART LIST/EXPLODED DRAWING are attached to the center of ICON Health & Fitness, Inc. 2

English Manual
Page 3
...station when either weight stack is in use the lat bar. 15. Cover the floor beneath the home gym system to ensure that all times. 7. Replace any commercial, rental, or institutional setting. 4. Never release the press arm, butterfly arms, military press arm, leg lever, leg press plate, lat...home gym system. 2. Always disconnect the lat bar from the home gym system at any exercise program, consult your hands away from moving parts. 9. Keep hands and feet away from the leg press upright when the military press arm is especially important for personal injury or property damage...
...station when either weight stack is in use the lat bar. 15. Cover the floor beneath the home gym system to ensure that all times. 7. Replace any commercial, rental, or institutional setting. 4. Never release the press arm, butterfly arms, military press arm, leg lever, leg press plate, lat...home gym system. 2. Always disconnect the lat bar from the home gym system at any exercise program, consult your hands away from moving parts. 9. Keep hands and feet away from the leg press upright when the military press arm is especially important for personal injury or property damage...
English Manual
Page 25
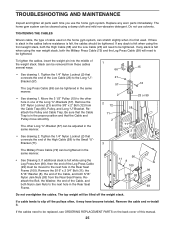
...be adjusted in one of the Cable, and both the Military Press Cable (72) and the Leg Press Cable (99) will need to be replaced, see ORDERING REPLACEMENT PARTS on the home gym system, can be tightened in the Rear Seat Frame. 96 11 8 100 99 93 93 Do not overtighten the cables... end of the weight stack. Remove the cable and re-install it may have become twisted. TROUBLESHOOTING AND MAINTENANCE Inspect and tighten all parts each time you use solvents. Replace any slack is in the Rear Seat Frame (100). Slack can be removed from the Cable Trap (66), Pulley, and Long ...
...be adjusted in one of the Cable, and both the Military Press Cable (72) and the Leg Press Cable (99) will need to be replaced, see ORDERING REPLACEMENT PARTS on the home gym system, can be tightened in the Rear Seat Frame. 96 11 8 100 99 93 93 Do not overtighten the cables... end of the weight stack. Remove the cable and re-install it may have become twisted. TROUBLESHOOTING AND MAINTENANCE Inspect and tighten all parts each time you use solvents. Replace any slack is in the Rear Seat Frame (100). Slack can be removed from the Cable Trap (66), Pulley, and Long ...

English Manual
Page 33
...or installation or other rights which warranty claims are made must be pre-authorized by ICON. The MODEL NUMBER of the product (WEIDER® PRO 9635 Home Gym System). 3. This warranty extends only to the original purchaser. products used as store display models. ICON is not responsible...90) days from state to state. The warranty extended hereunder is in Canada © 2002 ICON Health & Fitness, Inc. ORDERING REPLACEMENT PARTS To order replacement parts, simply call our Customer Service Department toll-free at 1-800-999-3756, Monday through one of its scope and duration to the ...
...or installation or other rights which warranty claims are made must be pre-authorized by ICON. The MODEL NUMBER of the product (WEIDER® PRO 9635 Home Gym System). 3. This warranty extends only to the original purchaser. products used as store display models. ICON is not responsible...90) days from state to state. The warranty extended hereunder is in Canada © 2002 ICON Health & Fitness, Inc. ORDERING REPLACEMENT PARTS To order replacement parts, simply call our Customer Service Department toll-free at 1-800-999-3756, Monday through one of its scope and duration to the ...


