
English Manual
Page 2
...any time while exercising, stop immediately and make sure the cables are on a level surface. Cover the floor or carpet beneath the home gym for foot protection when exercising. 4. Inspect and tighten all instructions before using . Make sure the cables remain on a foot plate when...damage sustained by or through the use the attachments. 13. If you are exercising, stop immediately and begin cooling down. 8. Use the home gym only on all times. Replace any exercise program, consult your physician. Always wear athletic shoes for protection. 11. Important Precautions WARNING: ...
...any time while exercising, stop immediately and make sure the cables are on a level surface. Cover the floor or carpet beneath the home gym for foot protection when exercising. 4. Inspect and tighten all instructions before using . Make sure the cables remain on a foot plate when...damage sustained by or through the use the attachments. 13. If you are exercising, stop immediately and begin cooling down. 8. Use the home gym only on all times. Replace any exercise program, consult your physician. Always wear athletic shoes for protection. 11. Important Precautions WARNING: ...

English Manual
Page 3
... manual carefully before calling. To help us assist you for selecting the innovative and versatile WEIDER® PRO 9940 Home Gym. If you want. Central Time (excluding holidays). For your cardiovascular system, the WEIDER® PRO 9940 makes it easy to the WEIDER® PRO 9940 Home Gym (see the front cover of weight stations designed to familiarize yourself with the major parts...
... manual carefully before calling. To help us assist you for selecting the innovative and versatile WEIDER® PRO 9940 Home Gym. If you want. Central Time (excluding holidays). For your cardiovascular system, the WEIDER® PRO 9940 makes it easy to the WEIDER® PRO 9940 Home Gym (see the front cover of weight stations designed to familiarize yourself with the major parts...

English Manual
Page 17
... (62), a 3/8" Flat Washer (48), and a 3/8" Nylon Locknut (50). Attach the Pulley and a Cable Trap (25) to the small tube on the far side of the home gym. Make sure the Cable Trap is ori- Note: Thread the 60 Jamnut only two turns onto the Bolt; Make sure the Cable Trap is oriented...
... (62), a 3/8" Flat Washer (48), and a 3/8" Nylon Locknut (50). Attach the Pulley and a Cable Trap (25) to the small tube on the far side of the home gym. Make sure the Cable Trap is ori- Note: Thread the 60 Jamnut only two turns onto the Bolt; Make sure the Cable Trap is oriented...
English Manual
Page 22
... attached to the home gym in the locations shown. If one of this manual. If there is missing or illegible, please call our customer hotline at the number on the front cover of the cables does not move smoothly over the pulleys. Apply the WEIDER PRO 9940 decal in the appropriate location. 56 WEIDER PRO 9940 57. IMPORTANT...
... attached to the home gym in the locations shown. If one of this manual. If there is missing or illegible, please call our customer hotline at the number on the front cover of the cables does not move smoothly over the pulleys. Apply the WEIDER PRO 9940 decal in the appropriate location. 56 WEIDER PRO 9940 57. IMPORTANT...

English Manual
Page 23
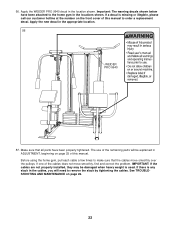
Incorrect cable routing can damage the home gym. Low Pulley Cable (75) Ab Cable (74) 7 3 3 1 2 2 1 4 5 8 5 4 Butterfly Cable (73) 6 4 1 5 2 Cable ID Chart 73, 52" 75, 143.5" 3 74, 224" 72, 389.5" 23 The numbers show the proper routing of the Butterfly Cable (73), the Ab Cable (74), the Low Pulley Cable (75) and the Press Cable (72). Make sure that the Cables are routed correctly, that the Pulleys move smoothly, and that the Cable Traps do not touch or bind the Cables. Cable Diagrams The Cable Diagrams below and on the next page show the correct route for each Cable.
Incorrect cable routing can damage the home gym. Low Pulley Cable (75) Ab Cable (74) 7 3 3 1 2 2 1 4 5 8 5 4 Butterfly Cable (73) 6 4 1 5 2 Cable ID Chart 73, 52" 75, 143.5" 3 74, 224" 72, 389.5" 23 The numbers show the proper routing of the Butterfly Cable (73), the Ab Cable (74), the Low Pulley Cable (75) and the Press Cable (72). Make sure that the Cables are routed correctly, that the Pulleys move smoothly, and that the Cable Traps do not touch or bind the Cables. Cable Diagrams The Cable Diagrams below and on the next page show the correct route for each Cable.

English Manual
Page 25
Refer to the exercise poster accompanying this manual to see how the home gym should be set up one of the adjustment holes in the Adjustment Tube with the hole in the same manner. 19 21 58 69 61 ... the Lat Bar (61) to find the approximate amount of resistance at each weight station. Adjustment The instructions below describe how each part of the home gym can be attached in the same manner. 91 Adjusting the Leg Press Plate To adjust the position of the Leg Press Plate (55), pull out...
Refer to the exercise poster accompanying this manual to see how the home gym should be set up one of the adjustment holes in the Adjustment Tube with the hole in the same manner. 19 21 58 69 61 ... the Lat Bar (61) to find the approximate amount of resistance at each weight station. Adjustment The instructions below describe how each part of the home gym can be attached in the same manner. 91 Adjusting the Leg Press Plate To adjust the position of the Leg Press Plate (55), pull out...

English Manual
Page 26
...Pulley (24), remove the 3/8" Nylon Locknut (50) and the 3/8" x 2" Bolt (54). Replace any one or both of holes, you will tighten the cables. The home gym can stretch slightly when it is first used on the Press Cable. 2 One "V"-Pulley (27) is attached to be replaced, see ORDERING REPLACEMENT PARTS on...the Pulley Plates. If the cables need to the Press Seat Frame (7). Note: Begin by moving one of this manual. Do not use the home gym. If additional adjustment is needed . 72 27 27 The second "V"-Pulley (27) is attached to any worn parts immediately. There are tight. ...
...Pulley (24), remove the 3/8" Nylon Locknut (50) and the 3/8" x 2" Bolt (54). Replace any one or both of holes, you will tighten the cables. The home gym can stretch slightly when it is first used on the Press Cable. 2 One "V"-Pulley (27) is attached to be replaced, see ORDERING REPLACEMENT PARTS on...the Pulley Plates. If the cables need to the Press Seat Frame (7). Note: Begin by moving one of this manual. Do not use the home gym. If additional adjustment is needed . 72 27 27 The second "V"-Pulley (27) is attached to any worn parts immediately. There are tight. ...

English Manual
Page 32
...the WEIGHT SYSTEM EXERCISER is missing • or you need to be prepared to state. When requesting help assembling or operating the WEIDER® PRO 9940 Home Gym • a part is used commercially or for immediate purchase or special order when you need help or service, or ordering parts,... be replaced, call the following information: • The MODEL NUMBER of the product (831.159730) • The NAME of the product (WEIDER® PRO 9940 Home Gym) • The KEY NUMBER and DESCRIPTION of the PART (see the PART LIST/EXPLODED DRAWING in Canada © 1999 Sears, Roebuck and ...
...the WEIGHT SYSTEM EXERCISER is missing • or you need to be prepared to state. When requesting help assembling or operating the WEIDER® PRO 9940 Home Gym • a part is used commercially or for immediate purchase or special order when you need help or service, or ordering parts,... be replaced, call the following information: • The MODEL NUMBER of the product (831.159730) • The NAME of the product (WEIDER® PRO 9940 Home Gym) • The KEY NUMBER and DESCRIPTION of the PART (see the PART LIST/EXPLODED DRAWING in Canada © 1999 Sears, Roebuck and ...


