

User Manual
Page 1
Write the serial number in the location shown below. Patent Pending Visit our website at www.weiderfitness.com new products, prizes, fitness tips, and much more! HOFFMAN ESTATES, IL 60179 CAUTION Read all precautions and instructions in this manual before using this manual for future reference. The serial number is found in the space above. Save this equipment. Serial Number Decal USER'S MANUAL SEARS, ROEBUCK AND CO. Model No. 831.159530 Serial No.
Write the serial number in the location shown below. Patent Pending Visit our website at www.weiderfitness.com new products, prizes, fitness tips, and much more! HOFFMAN ESTATES, IL 60179 CAUTION Read all precautions and instructions in this manual before using this manual for future reference. The serial number is found in the space above. Save this equipment. Serial Number Decal USER'S MANUAL SEARS, ROEBUCK AND CO. Model No. 831.159530 Serial No.

User Manual
Page 3
...9. Always disconnect the lat bar or ab strap from moving parts. 10. Place the decal on the weight system in two locations. Do not use the weight system in a commercial, rental, or institutional setting. 4. Replace any time while exercising, stop immediately and make sure the cables are ...on the pulleys at all precautions. 3. Central Time, to tip. 12. IMPORTANT PRECAUTIONS WARNING: To reduce the risk of each time you use the weight system. Keep hands and feet away from the weight system when performing an exercise that could cause the weight system to order a...
...9. Always disconnect the lat bar or ab strap from moving parts. 10. Place the decal on the weight system in two locations. Do not use the weight system in a commercial, rental, or institutional setting. 4. Replace any time while exercising, stop immediately and make sure the cables are ...on the pulleys at all precautions. 3. Central Time, to tip. 12. IMPORTANT PRECAUTIONS WARNING: To reduce the risk of each time you use the weight system. Keep hands and feet away from the weight system when performing an exercise that could cause the weight system to order a...

User Manual
Page 4
...decal attached to achieve the results you self with the major parts and how they fit together. For your cardiovascular system, the WEIDER® PRO 9950 makes it easy to the weight system (see the front cover of the body. have additional questions, please call our toll-free...number before Please use the drawing below to tone your body, build dramatic muscle size and strength or improve your benefit, read this manual). To help us assist you for selecting the innovative and versatile WEIDER® PRO 9950 weight system. Width: 103 in . The WEIDER® PRO 9950 offers a ...
...decal attached to achieve the results you self with the major parts and how they fit together. For your cardiovascular system, the WEIDER® PRO 9950 makes it easy to the weight system (see the front cover of the body. have additional questions, please call our toll-free...number before Please use the drawing below to tone your body, build dramatic muscle size and strength or improve your benefit, read this manual). To help us assist you for selecting the innovative and versatile WEIDER® PRO 9950 weight system. Width: 103 in . The WEIDER® PRO 9950 offers a ...

User Manual
Page 5
...You will also need grease or petroleum jelly, a small amount of ratchet wrenches. Arm Assembly-During this stage you identify the small parts used . Assembly Requires Two Persons For your convenience and safety, assemble the weight system with the help you will attach the cables and pulleys that..., and clear tape or masking tape. Select a Location for the Weight System Because of its weight and size, the weight system should be used in assembly, we have included a PART IDENTIFICATION CHART in the center of the weight system, the assembly process will be assembled in individual bags...
...You will also need grease or petroleum jelly, a small amount of ratchet wrenches. Arm Assembly-During this stage you identify the small parts used . Assembly Requires Two Persons For your convenience and safety, assemble the weight system with the help you will attach the cables and pulleys that..., and clear tape or masking tape. Select a Location for the Weight System Because of its weight and size, the weight system should be used in assembly, we have included a PART IDENTIFICATION CHART in the center of the weight system, the assembly process will be assembled in individual bags...

User Manual
Page 7
... (74) yet. 5 32 27 31 Weight Tube 28 27 31 6 33 33 67 56 74 67 2 56 Tube 89 Bumper Tube 7 If you will be using Olympic weights with a Locking Pin (31). Do not tighten the Nylon Locknuts (64, 74) yet. 100 64 7 54 64 6 74 74 64 64 76 54...
... (74) yet. 5 32 27 31 Weight Tube 28 27 31 6 33 33 67 56 74 67 2 56 Tube 89 Bumper Tube 7 If you will be using Olympic weights with a Locking Pin (31). Do not tighten the Nylon Locknuts (64, 74) yet. 100 64 7 54 64 6 74 74 64 64 76 54...

User Manual
Page 9
... 66 9 Attach the Butterfly Front Leg (9) to the Butterfly Front Leg (9) with two 5/16" Nylon Locknuts (64). Tighten all of the Nylon Locknuts (64, 74) used in the Press Base (3) 64 with two 5/16" Nylon Locknuts (64). 54 Attach the Press Seat Frame (12) to the Butterfly Front Leg (9) with two...
... 66 9 Attach the Butterfly Front Leg (9) to the Butterfly Front Leg (9) with two 5/16" Nylon Locknuts (64). Tighten all of the Nylon Locknuts (64, 74) used in the Press Base (3) 64 with two 5/16" Nylon Locknuts (64). 54 Attach the Press Seat Frame (12) to the Butterfly Front Leg (9) with two...

User Manual
Page 14
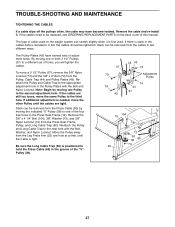
Be sure the Cable Trap is turned to hold the Cable in the Press Seat Frame (12), using a 3/8" x 4 1/4" Bolt (104), a 3/8" Washer (75) and a 3/8" Nylon Locknut (74). Be sure the Cable Trap is turned to hold the Cable in the groove of the Pulley. 7 ...44 74 80 75 37 62 14 Tighten the 3/8" Nylon Locknut (not shown) used in the groove of the Pulley. Attach the Pulley and a Long Cable Trap (50) to the 3/8" x 5" Bolt (61) with a 3/8" x 3 3/4" Bolt (62), a 3/8" Washer (75), and a 3/8" Nylon...
Be sure the Cable Trap is turned to hold the Cable in the Press Seat Frame (12), using a 3/8" x 4 1/4" Bolt (104), a 3/8" Washer (75) and a 3/8" Nylon Locknut (74). Be sure the Cable Trap is turned to hold the Cable in the groove of the Pulley. 7 ...44 74 80 75 37 62 14 Tighten the 3/8" Nylon Locknut (not shown) used in the groove of the Pulley. Attach the Pulley and a Long Cable Trap (50) to the 3/8" x 5" Bolt (61) with a 3/8" x 3 3/4" Bolt (62), a 3/8" Washer (75), and a 3/8" Nylon...

User Manual
Page 22
... the remaining parts will need to make sure that all parts have been properly tightened before using the weight system. If one of this manual. If there is used. Before using the weight system, pull each cable a few times to remove the slack by tightening the cables. See TROUBLE-SHOOTING AND MAINTENANCE on...
... the remaining parts will need to make sure that all parts have been properly tightened before using the weight system. If one of this manual. If there is used. Before using the weight system, pull each cable a few times to remove the slack by tightening the cables. See TROUBLE-SHOOTING AND MAINTENANCE on...

User Manual
Page 23
...hole in the bracket and re-insert the Press Pin. 23 46 Bracket 24 23 22 Do not use the weight system. ADJUSTING THE SEAT To adjust the height of the Press Plate (24), pull out...11). Turn the Adjustment Knob clockwise until tight. Make sure all parts are properly tightened each time you use solvents. Move the Backrest to the desired position in the bracket on the Press Seat Frame (12),...25) on the Leg Press Arm (22). The steps below explain how the weight system can be used with your own weight set (not included). ADJUSTMENTS The weight system is designed to be adjusted in ...
...hole in the bracket and re-insert the Press Pin. 23 46 Bracket 24 23 22 Do not use the weight system. ADJUSTING THE SEAT To adjust the height of the Press Plate (24), pull out...11). Turn the Adjustment Knob clockwise until tight. Make sure all parts are properly tightened each time you use solvents. Move the Backrest to the desired position in the bracket on the Press Seat Frame (12),...25) on the Leg Press Arm (22). The steps below explain how the weight system can be used with your own weight set (not included). ADJUSTMENTS The weight system is designed to be adjusted in ...

User Manual
Page 24
...not shown) in the Butterfly Front Leg (9) when performing exercising that the Lat Bar is not being used. 36 35 52 59 ATTACHING THE LAT BAR Attach the Lat Bar (68) to be attached between...a Weight Sleeve onto each side of weight onto the weight tube on the Weight Carriage (28). USING THE WEIGHT CARRIAGE To use the Curl Pad (36), remove the 2" Square Inner Cap (59) and insert the Curl Post...) or Press Cable (not shown) with two Locking Pins (31). ATTACHING THE CURL PAD To use standard weights (not included), slide the desired amount of the Weight Carriage (28). 9 47 45 47...
...not shown) in the Butterfly Front Leg (9) when performing exercising that the Lat Bar is not being used. 36 35 52 59 ATTACHING THE LAT BAR Attach the Lat Bar (68) to be attached between...a Weight Sleeve onto each side of weight onto the weight tube on the Weight Carriage (28). USING THE WEIGHT CARRIAGE To use the Curl Pad (36), remove the 2" Square Inner Cap (59) and insert the Curl Post...) or Press Cable (not shown) with two Locking Pins (31). ATTACHING THE CURL PAD To use standard weights (not included), slide the desired amount of the Weight Carriage (28). 9 47 45 47...
User Manual
Page 27
... (44) and Pulley Plates (43). By moving the indicated "V"-Pulley (38) to the next hole with the Bolt and Nylon Locknut. The type of cable used . Remove the 3/8" x 4 1/4" Bolt (104), 3/8" Washer (75), and 3/8" Nylon Locknut (74) from the Leg Press Arm (22) one or both 3 1/2" Pulleys (37) to the second adjustment... PARTS on the weight system can be tightened. If the cables need to hold the Press Cable (80) in the cables before resistance is first used on the back cover of the "V"Pulley (38). 37 79 79 43 44 43 74 Adjustment Holes 74 44 37 104 75 12 50 38...
... (44) and Pulley Plates (43). By moving the indicated "V"-Pulley (38) to the next hole with the Bolt and Nylon Locknut. The type of cable used . Remove the 3/8" x 4 1/4" Bolt (104), 3/8" Washer (75), and 3/8" Nylon Locknut (74) from the Leg Press Arm (22) one or both 3 1/2" Pulleys (37) to the second adjustment... PARTS on the weight system can be tightened. If the cables need to hold the Press Cable (80) in the cables before resistance is first used on the back cover of the "V"Pulley (38). 37 79 79 43 44 43 74 Adjustment Holes 74 44 37 104 75 12 50 38...

User Manual
Page 28
When requesting help assembling or operating the WEIDER® PRO 9950 weight system • a part is used commercially or for immediate purchase or special order when you may also have other rights which vary from the date of purchase, if failure occurs...and Co. If you find the location of your nearest SEARS Service Center. This warranty gives you specific legal rights, and you visit your WEIDER® PRO 9950 weight system are available for rental purposes. See the front cover of this SEARS WEIGHT SYSTEM EXERCISER, contact the nearest SEARS Service Center throughout ...
When requesting help assembling or operating the WEIDER® PRO 9950 weight system • a part is used commercially or for immediate purchase or special order when you may also have other rights which vary from the date of purchase, if failure occurs...and Co. If you find the location of your nearest SEARS Service Center. This warranty gives you specific legal rights, and you visit your WEIDER® PRO 9950 weight system are available for rental purposes. See the front cover of this SEARS WEIGHT SYSTEM EXERCISER, contact the nearest SEARS Service Center throughout ...

User Manual
Page 29
Important: Some parts may have been pre-assembled for each part refers to help you identify the small parts used in the center of the part from the PART LIST in assembly. Note: Assembly is provided to the key number of this manual. Wait until ...
Important: Some parts may have been pre-assembled for each part refers to help you identify the small parts used in the center of the part from the PART LIST in assembly. Note: Assembly is provided to the key number of this manual. Wait until ...


