

Uk Manual
Page 1
...: [email protected] CAUTION Read all precautions and instructions in the space above for future reference. If you have questions, or if there are missing parts, please contact us: UK Call: 08457 089 009 From Ireland: 053 92 36102 Website: www.iconsupport.eu Write: ICON Health & Fitness, Ltd. Serial Number Decal...
...: [email protected] CAUTION Read all precautions and instructions in the space above for future reference. If you have questions, or if there are missing parts, please contact us: UK Call: 08457 089 009 From Ireland: 053 92 36102 Website: www.iconsupport.eu Write: ICON Health & Fitness, Ltd. Serial Number Decal...

Uk Manual
Page 2
.... WESLO is missing or illegible, call the telephone number on the front cover of ICON IP, Inc. 2 TABLE OF CONTENTS WARNING DECAL PLACEMENT 2 IMPORTANT PRECAUTIONS 3 BEFORE YOU BEGIN 5 ASSEMBLY 6 OPERATION AND ADJUSTMENT 9 HOW TO FOLD AND MOVE THE TREADMILL 15 TROUBLESHOOTING 16 EXERCISE GUIDELINES 19 PART LIST 20 EXPLODED DRAWING 21 ORDERING REPLACEMENT PARTS Back...
.... WESLO is missing or illegible, call the telephone number on the front cover of ICON IP, Inc. 2 TABLE OF CONTENTS WARNING DECAL PLACEMENT 2 IMPORTANT PRECAUTIONS 3 BEFORE YOU BEGIN 5 ASSEMBLY 6 OPERATION AND ADJUSTMENT 9 HOW TO FOLD AND MOVE THE TREADMILL 15 TROUBLESHOOTING 16 EXERCISE GUIDELINES 19 PART LIST 20 EXPLODED DRAWING 21 ORDERING REPLACEMENT PARTS Back...
Uk Manual
Page 4
... raise, lower, or move the treadmill. 21. Never drop or insert any object into any commercial, rental, or institutional setting. 22. DANGER: 25. This treadmill is not in this manual. Do not attempt to the off position when the treadmill is intended for the location of ...by placing objects under the treadmill. 23. scribed in -home use . (See the drawing on the treadmill. Never remove the motor hood unless instructed to raise, lower, or move the treadmill until it is running. Inspect and properly tighten all parts of the treadmill by an authorized service ...
... raise, lower, or move the treadmill. 21. Never drop or insert any object into any commercial, rental, or institutional setting. 22. DANGER: 25. This treadmill is not in this manual. Do not attempt to the off position when the treadmill is intended for the location of ...by placing objects under the treadmill. 23. scribed in -home use . (See the drawing on the treadmill. Never remove the motor hood unless instructed to raise, lower, or move the treadmill until it is running. Inspect and properly tighten all parts of the treadmill by an authorized service ...

Uk Manual
Page 5
The CADENCE 21.0 treadmill offers a selection of other treadmills. ing this manual, please see the front cover of this manual. BEFORE YOU BEGIN Thank you ʼre not exercising, the unique treadmill can be folded up, requiring less than half the floor space of features designed to ...this manual. Before reading further, please review the drawing below and familiarize yourself with the labeled parts. And when you for selecting the new WESLO® CADENCE 21.0 treadmill. Accessory Tray Handrail Storage Latch Walking Belt Foot Rail Idler Roller Adjustment Bolts Console Key/Clip ...
The CADENCE 21.0 treadmill offers a selection of other treadmills. ing this manual, please see the front cover of this manual. BEFORE YOU BEGIN Thank you ʼre not exercising, the unique treadmill can be folded up, requiring less than half the floor space of features designed to ...this manual. Before reading further, please review the drawing below and familiarize yourself with the labeled parts. And when you for selecting the new WESLO® CADENCE 21.0 treadmill. Accessory Tray Handrail Storage Latch Walking Belt Foot Rail Idler Roller Adjustment Bolts Console Key/Clip ...

Uk Manual
Page 6
...Screw (3)-6 #10 x 1" Tek Screw (83)-2 M10 x 45mm Bolt (2)-4 M10 x 65mm Bolt (1)-4 1. To avoid damaging parts, do not dispose of a second person, carefully tip the treadmill onto its left side. With the help of the packing materials until assembly is completed. Start all packing materials; Note: The ...73 50 80 1 1 6 The number after the parentheses is unplugged. Attach the Base to the top of the part, from the Uprights (73). Set the treadmill in parentheses below to identify the assembly hardware. The number in a cleared area and remove all four Bolts, and ...
...Screw (3)-6 #10 x 1" Tek Screw (83)-2 M10 x 45mm Bolt (2)-4 M10 x 65mm Bolt (1)-4 1. To avoid damaging parts, do not dispose of a second person, carefully tip the treadmill onto its left side. With the help of the packing materials until assembly is completed. Start all packing materials; Note: The ...73 50 80 1 1 6 The number after the parentheses is unplugged. Attach the Base to the top of the part, from the Uprights (73). Set the treadmill in parentheses below to identify the assembly hardware. The number in a cleared area and remove all four Bolts, and ...
Uk Manual
Page 8
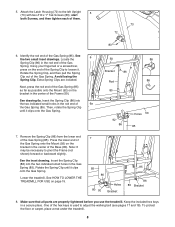
...holes in the center of the Gas Spring. Make sure that all parts are included. Keep the included hex keys in the center of the Gas Spring. See the two small inset drawings. Lower the treadmill. See HOW TO LOWER THE TREADMILL FOR USE on the bracket in the Gas Spring (85). start... 5 both Screws, and then tighten each of 6a the Gas Spring (85). Extra Spring Clips are properly tightened before you use the treadmill. Press the lower end of the Gas Spring onto the Mount (92) on the end of the Gas Spring (85). Locate the 6 Spring Clip (...
...holes in the center of the Gas Spring. Make sure that all parts are included. Keep the included hex keys in the center of the Gas Spring. See the two small inset drawings. Lower the treadmill. See HOW TO LOWER THE TREADMILL FOR USE on the bracket in the Gas Spring (85). start... 5 both Screws, and then tighten each of 6a the Gas Spring (85). Extra Spring Clips are properly tightened before you use the treadmill. Press the lower end of the Gas Spring onto the Mount (92) on the end of the Gas Spring (85). Locate the 6 Spring Clip (...
Uk Manual
Page 19
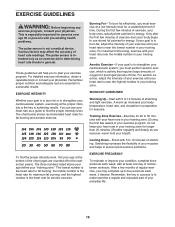
... burn fat effectively, you must exercise at the bottom of your training zone. Aerobic Exercise-If your goal is to make exercise a regular and enjoyable part of the chart (ages are essential for aerobic exercise. A warm-up to five workouts each week, with pre-existing health problems. The pulse sensor is...
... burn fat effectively, you must exercise at the bottom of your training zone. Aerobic Exercise-If your goal is to make exercise a regular and enjoyable part of the chart (ages are essential for aerobic exercise. A warm-up to five workouts each week, with pre-existing health problems. The pulse sensor is...

Uk Manual
Page 20
Key No. For information about ordering replacement parts, see the EXPLODED DRAWING near the end of this manual. Qty. 49 1 50 1 51 1 52 1 53 1 54 1 55 1 56 1 57 1 58 1 59 1 60 1 61 1 62 1 ... 1 91 2 92 2 93 1 94 1 95 2 * - WETL49710.0 R0610A To locate the parts listed below, see the back cover of this manual. *These parts are subject to change without notice. Qty. 1 4 2 4 3 21 4 2 5 18 6 6 7 1 8 4 9 5 10 1 11 9 12 4 13 4 14 2 15 2 16 1 17 2 18 2 19 2 20 2 21 4 22 2 23 4 24 2 25 14 26 4 27 2 28 2 29 6 30 1 31...
Key No. For information about ordering replacement parts, see the EXPLODED DRAWING near the end of this manual. Qty. 49 1 50 1 51 1 52 1 53 1 54 1 55 1 56 1 57 1 58 1 59 1 60 1 61 1 62 1 ... 1 91 2 92 2 93 1 94 1 95 2 * - WETL49710.0 R0610A To locate the parts listed below, see the back cover of this manual. *These parts are subject to change without notice. Qty. 1 4 2 4 3 21 4 2 5 18 6 6 7 1 8 4 9 5 10 1 11 9 12 4 13 4 14 2 15 2 16 1 17 2 18 2 19 2 20 2 21 4 22 2 23 4 24 2 25 14 26 4 27 2 28 2 29 6 30 1 31...

Uk Manual
Page 24
... must be disposed of this manual) RECYCLING INFORMATION This electronic product must not be recycled after its useful life as required by law. Part No. 298502 R0610A Printed in your local city office or the establishment where you require more information about safe and correct disposal methods, ... • the name of the product (see the front cover of this manual) • the key number and description of the replacement part(s) (see the front cover of in municipal waste. If you purchased this type of environmental protection. Please use recycling facilities that are authorized to...
... must be disposed of this manual) RECYCLING INFORMATION This electronic product must not be recycled after its useful life as required by law. Part No. 298502 R0610A Printed in your local city office or the establishment where you require more information about safe and correct disposal methods, ... • the name of the product (see the front cover of this manual) • the key number and description of the replacement part(s) (see the front cover of in municipal waste. If you purchased this type of environmental protection. Please use recycling facilities that are authorized to...


