

English Manual
Page 2
... standing on a level surface, with bare feet, wearing only stockings, or in a garage or covered patio, or near water. 5. Place the treadmill on the walking belt. Never move the walking belt while the power is being administered. 6. Never allow more amps. Do not wear loose clothing that blocks any air openings. Do not...
... standing on a level surface, with bare feet, wearing only stockings, or in a garage or covered patio, or near water. 5. Place the treadmill on the walking belt. Never move the walking belt while the power is being administered. 6. Never allow more amps. Do not wear loose clothing that blocks any air openings. Do not...

English Manual
Page 4
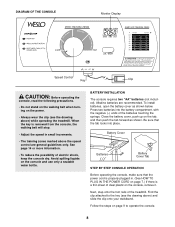
... let you enjoy an excellent form of your benefit, read this manual for selecting the WESLO® CADENCE DL15 treadmill. Speed Control Accessory Tray Handrails Storage Latch Water Bottle Holder (Bottle not included) Console Key/Clip Weights Walking Belt Uprights FRONT Circuit Breaker Foot Rails Power Cord BACK Rear Roller Adjustment Bolts Incline Pin Incline...
... let you enjoy an excellent form of your benefit, read this manual for selecting the WESLO® CADENCE DL15 treadmill. Speed Control Accessory Tray Handrails Storage Latch Water Bottle Holder (Bottle not included) Console Key/Clip Weights Walking Belt Uprights FRONT Circuit Breaker Foot Rails Power Cord BACK Rear Roller Adjustment Bolts Incline Pin Incline...
English Manual
Page 7
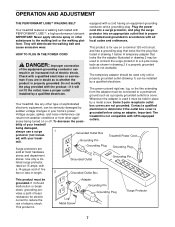
... qualified electrician or serviceman if you are not grounded. OPERATION AND ADJUSTMENT THE PERFORMANT LUBETM WALKING BELT equipped with the product-if it must be held in place Your treadmill, like extending from other ly installed and grounded in drawing 1 below. Grounded Outlet Box Grounding... the surge protector to a permanent ground such as to the walking belt or the walking plat- Contact a qualified electrician to reduce the risk of electric shock. Plug the power Your treadmill features a walking belt coated with a 14-gauge cord of five feet or less in ...
... qualified electrician or serviceman if you are not grounded. OPERATION AND ADJUSTMENT THE PERFORMANT LUBETM WALKING BELT equipped with the product-if it must be held in place Your treadmill, like extending from other ly installed and grounded in drawing 1 below. Grounded Outlet Box Grounding... the surge protector to a permanent ground such as to the walking belt or the walking plat- Contact a qualified electrician to reduce the risk of electric shock. Plug the power Your treadmill features a walking belt coated with a 14-gauge cord of five feet or less in ...
English Manual
Page 8
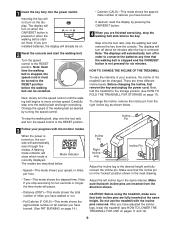
... guidelines only. Next, step onto the foot rails of electric shock, keep the console dry. When the key is removed from the console, the walking belt will stop. • Adjust the speed in . (See HOW TO PLUG IN THE POWER CORD on page 7.) If there is properly plugged in small... Control Key Clip CAUTION: Before operating the console, read the following precautions. • Do not stand on the walking belt when turning on the power. • Always wear the clip (see the drawing above ) while operating the treadmill. See page 14 or more information. • To reduce the possibility of the...
... guidelines only. Next, step onto the foot rails of electric shock, keep the console dry. When the key is removed from the console, the walking belt will stop. • Adjust the speed in . (See HOW TO PLUG IN THE POWER CORD on page 7.) If there is properly plugged in small... Control Key Clip CAUTION: Before operating the console, read the following precautions. • Do not stand on the walking belt when turning on the power. • Always wear the clip (see the drawing above ) while operating the treadmill. See page 14 or more information. • To reduce the possibility of the...
English Manual
Page 9
... the display. If desired, reset the display by turning the speed control. HOW TO CHANGE THE INCLINE OF THE TREADMILL To vary the intensity of your exercise, the incline of the walking belt as shown below . • Speed-This mode shows your progress with the incline pins removed. Before changing the incline... onto the foot rails and turn on when the ON/RESET button is pressed or when the walking belt is stopped, the speed control must be changed. Do not use the treadmill with the monitor modes When the power is in the "locked" position shown in miles per hour. After you are...
... the display. If desired, reset the display by turning the speed control. HOW TO CHANGE THE INCLINE OF THE TREADMILL To vary the intensity of your exercise, the incline of the walking belt as shown below . • Speed-This mode shows your progress with the incline pins removed. Before changing the incline... onto the foot rails and turn on when the ON/RESET button is pressed or when the walking belt is stopped, the speed control must be changed. Do not use the treadmill with the monitor modes When the power is in the "locked" position shown in miles per hour. After you are...
English Manual
Page 13
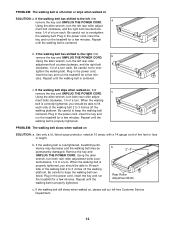
...a turn . Plug in the power cord, insert the key and run the treadmill for a few minutes. c. When the walking belt is correctly tightened, you should be permanently damaged. Plug in length. b. If the walking belt still slows when walked on , first c remove the key and UNPLUG THE POWER...or less in the power cord, insert the key and run the treadmill for a few minutes. Be careful to keep the walking belt centered. If the walking belt has shifted to overtighten the walking belt. PROBLEM: The walking belt is off-center or slips when walked on SOLUTION: a. Be ...
...a turn . Plug in the power cord, insert the key and run the treadmill for a few minutes. c. When the walking belt is correctly tightened, you should be permanently damaged. Plug in length. b. If the walking belt still slows when walked on , first c remove the key and UNPLUG THE POWER...or less in the power cord, insert the key and run the treadmill for a few minutes. Be careful to keep the walking belt centered. If the walking belt has shifted to overtighten the walking belt. PROBLEM: The walking belt is off-center or slips when walked on SOLUTION: a. Be ...
English Manual
Page 18
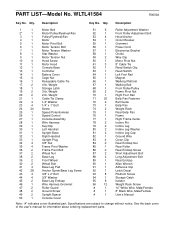
Description 1 1 Motor Belt 2* 1 Motor/Pulley/Flywheel/Fan 3 1 Pulley/Flywheel/Fan 4 1 Motor 5 1 Motor Pivot Bolt 6 1 Motor Tension Bolt 7 1 Motor Tension Washer 8 1 Star Washer 9 1 Motor Tension Nut 10 4 Hood Screw ... Switch Clip 63 1 Reed Switch 64 1 Left Foot Rail 65 1 Magnet 66 1 Walking Platform 67 1 Walking Belt 68 1 Front Roller/Pulley 69 2 Frame Pivot Nut 70 1 Right Foot Rail 71 20 Belly Pan Fastener 72 2 Belt Guide 73 1 Belly Pan 74 2 Weight Rack 75 1 Rear Belly Pan 76 1 Frame 77 1 Right Frame...
Description 1 1 Motor Belt 2* 1 Motor/Pulley/Flywheel/Fan 3 1 Pulley/Flywheel/Fan 4 1 Motor 5 1 Motor Pivot Bolt 6 1 Motor Tension Bolt 7 1 Motor Tension Washer 8 1 Star Washer 9 1 Motor Tension Nut 10 4 Hood Screw ... Switch Clip 63 1 Reed Switch 64 1 Left Foot Rail 65 1 Magnet 66 1 Walking Platform 67 1 Walking Belt 68 1 Front Roller/Pulley 69 2 Frame Pivot Nut 70 1 Right Foot Rail 71 20 Belly Pan Fastener 72 2 Belt Guide 73 1 Belly Pan 74 2 Weight Rack 75 1 Rear Belly Pan 76 1 Frame 77 1 Right Frame...


