

English Manual
Page 3
The pulse sensor is fully closed. 21. Always remove the key and unplug the power cord when the treadmill is not in use only. Inspect and tighten all instructions before performing the main- Never remove the motor hood unless instructed to order a free ... is missing, or if it is especially important for personal injury or property damage sustained by an authorized service representative. When folding or moving the treadmill, make sure that the storage latch is not a medical device. Servicing other than the procedures in this manual). This is not legible, please ...
The pulse sensor is fully closed. 21. Always remove the key and unplug the power cord when the treadmill is not in use only. Inspect and tighten all instructions before performing the main- Never remove the motor hood unless instructed to order a free ... is missing, or if it is especially important for personal injury or property damage sustained by an authorized service representative. When folding or moving the treadmill, make sure that the storage latch is not a medical device. Servicing other than the procedures in this manual). This is not legible, please ...
English Manual
Page 4
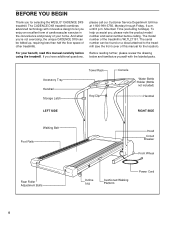
...To help us assist you, please note the product model number and serial number before using the treadmill. Accessory Tray Handrail Storage Latch LEFT SIDE Towel Rack Key/Clip Console Water Bottle Holder (Bottle not included) Handrail RIGHT SIDE Walking Belt Foot Rails Hood... reading further, please review the drawing below and familiarize yourself with innovative design to the treadmill (see the front cover of your benefit, read this manual for selecting the WESLO® CADENCE DX9 treadmill. The serial number can be found on a decal attached to let you have additional ...
...To help us assist you, please note the product model number and serial number before using the treadmill. Accessory Tray Handrail Storage Latch LEFT SIDE Towel Rack Key/Clip Console Water Bottle Holder (Bottle not included) Handrail RIGHT SIDE Walking Belt Foot Rails Hood... reading further, please review the drawing below and familiarize yourself with innovative design to the treadmill (see the front cover of your benefit, read this manual for selecting the WESLO® CADENCE DX9 treadmill. The serial number can be found on a decal attached to let you have additional ...

English Manual
Page 8
...increments. • The training zones marked around the speed control are recommended. the clip onto the waistband of the treadmill. Battery Cover Note: Inserting the key will already be on.) Test the Press two batteries into the power switch. Avoid spilling liquids on when the ON...the power. • Always wear the clip (see the drawing above ) while operating the treadmill. Step onto the foot rails of your clothing. the tab locks into place. 1 Insert the key fully into the battery compartment, with clip by carefully taking a few steps backward until the...
...increments. • The training zones marked around the speed control are recommended. the clip onto the waistband of the treadmill. Battery Cover Note: Inserting the key will already be on.) Test the Press two batteries into the power switch. Avoid spilling liquids on when the ON...the power. • Always wear the clip (see the drawing above ) while operating the treadmill. Step onto the foot rails of your clothing. the tab locks into place. 1 Insert the key fully into the battery compartment, with clip by carefully taking a few steps backward until the...

English Manual
Page 9
...off the sensor and allow the display to be de- To stop the walking belt and remove the key. The pulse sensor is turned on page 14.) • Calories (CALS)-This mode shows the ...mode will be restarted. Change the speed of calories you stop the walking belt and remove the key from the console. The modes are finished exercising, stop the walking belt, step onto the foot... rails and turn off about six minutes after the key is not pressed for the most accurate reading. Note: If you have burned. • Pulse-This ...
...off the sensor and allow the display to be de- To stop the walking belt and remove the key. The pulse sensor is turned on page 14.) • Calories (CALS)-This mode shows the ...mode will be restarted. Change the speed of calories you stop the walking belt and remove the key from the console. The modes are finished exercising, stop the walking belt, step onto the foot... rails and turn off about six minutes after the key is not pressed for the most accurate reading. Note: If you have burned. • Pulse-This ...

English Manual
Page 10
... pins removed. Incline Pin Incline Pin Right Incline Leg Incline Pin After you raise the treadmill, make sure that the incline pin is fully engaged over the catch. Before changing the incline, remove the key and unplug the power cord. Close the storage latch over the catch. Make sure that... both incline pins are fully inserted at the right. Make sure that the storage latch is in the "locked" position shown in the inset drawing. Do not use the treadmill with your ...
... pins removed. Incline Pin Incline Pin Right Incline Leg Incline Pin After you raise the treadmill, make sure that the incline pin is fully engaged over the catch. Before changing the incline, remove the key and unplug the power cord. Close the storage latch over the catch. Make sure that... both incline pins are fully inserted at the right. Make sure that the storage latch is in the "locked" position shown in the inset drawing. Do not use the treadmill with your ...

English Manual
Page 12
... suppressor must have a UL suppressed voltage rating of 400 volts or less and a minimum surge dissipation of drained batteries. Important: The treadmill is about 1/8". If the switch protrudes as a transient voltage surge suppressor (TVSS). If the circuit breaker has tripped, wait for five...Service Department, toll-free. Check the circuit breaker located on the left side of the console do not function properly SOLUTION: a. Reinsert the key fully into the console. (See step 1 on page 8.) c. Remove the screws from the console. Locate the Reed Switch (82) and...
... suppressor must have a UL suppressed voltage rating of 400 volts or less and a minimum surge dissipation of drained batteries. Important: The treadmill is about 1/8". If the switch protrudes as a transient voltage surge suppressor (TVSS). If the circuit breaker has tripped, wait for five...Service Department, toll-free. Check the circuit breaker located on the left side of the console do not function properly SOLUTION: a. Reinsert the key fully into the console. (See step 1 on page 8.) c. Remove the screws from the console. Locate the Reed Switch (82) and...

English Manual
Page 13
... a few minutes. PROBLEM: The walking belt is centered. Plug in the power cord, insert the key and run the treadmill for a few minutes. Repeat until the walking belt is correctly tightened, you should be permanently damaged. When the walking belt is properly tightened.... UNPLUG THE POWER CORD. Be careful not to the right, first remove the key and UNPLUG THE POWER CORD. Plug in the power cord, insert the key and run the treadmill for a few minutes. Remove the key and UNPLUG THE POWER CORD. b 2"-3" Rear Roller Adjustment Bolts c. Repeat until the walking belt ...
... a few minutes. PROBLEM: The walking belt is centered. Plug in the power cord, insert the key and run the treadmill for a few minutes. Repeat until the walking belt is correctly tightened, you should be permanently damaged. When the walking belt is properly tightened.... UNPLUG THE POWER CORD. Be careful not to the right, first remove the key and UNPLUG THE POWER CORD. Plug in the power cord, insert the key and run the treadmill for a few minutes. Remove the key and UNPLUG THE POWER CORD. b 2"-3" Rear Roller Adjustment Bolts c. Repeat until the walking belt ...
English Manual
Page 14
...fat or to achieving the desired results is intended only as a guide. Note: During the first few minutes of your cardiovascular system, the key to strengthen your training zone. Next, find the proper heart rate for longer than 20 minutes.) Breathe regularly and deeply as needed. the ...pulse in general. Cool-down Finish each workout with preexisting health problems. The pulse sensor is especially important for a sustained period of the treadmill as you to plan your muscles and will help you must be found by using your pulse is the recommended heart rate for energy....
...fat or to achieving the desired results is intended only as a guide. Note: During the first few minutes of your cardiovascular system, the key to strengthen your training zone. Next, find the proper heart rate for longer than 20 minutes.) Breathe regularly and deeply as needed. the ...pulse in general. Cool-down Finish each workout with preexisting health problems. The pulse sensor is especially important for a sustained period of the treadmill as you to plan your muscles and will help you must be found by using your pulse is the recommended heart rate for energy....
English Manual
Page 15
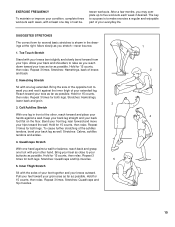
The key to success is shown in front of the opposite foot toward your everyday life. Move slowly as you reach down toward your toes as far ...
The key to success is shown in front of the opposite foot toward your everyday life. Move slowly as you reach down toward your toes as far ...

English Manual
Page 16
...USA © 2001 ICON Health & Fitness, Inc. LIMITED WARRANTY ICON Health & Fitness, Inc. (ICON), warrants this manual). • The KEY NUMBER and DESCRIPTION of its scope and duration to state. All products for which vary from state to the terms set forth above is a registered... is limited to give the following information: • The MODEL NUMBER of the product (WLTL21191). • The NAME of the product (WESLO® CADENCE DX9 treadmill). • The SERIAL NUMBER of the product (see the front cover of this product to any implied warranties of merchantability or fitness for ...
...USA © 2001 ICON Health & Fitness, Inc. LIMITED WARRANTY ICON Health & Fitness, Inc. (ICON), warrants this manual). • The KEY NUMBER and DESCRIPTION of its scope and duration to state. All products for which vary from state to the terms set forth above is a registered... is limited to give the following information: • The MODEL NUMBER of the product (WLTL21191). • The NAME of the product (WESLO® CADENCE DX9 treadmill). • The SERIAL NUMBER of the product (see the front cover of this product to any implied warranties of merchantability or fitness for ...

English Manual
Page 18
... 1 22 1 23 1 24 1 25 1 26 1 27 3 28 1 29 1 30 4 31 1 32 1 33 2 34 2 35 10 36 6 37 2 38 2 39 4 40 1 41 2 42 1 43 1 44 1 Description Key/Clip Left Handrail Cage Nut Extension Leg Assembly Rear Isolator Screw Console Base Speed Control Knob Speed Potentiometer Console Plug Isolator Spacer Console Assembly Storage... Extension Leg Screw Electronics Screw Base Pad Wheel Bolt Wheel Base Pivot Nut/Wheel Nut Controller Extension Leg Circuit Breaker Power Cord Grommet Power Cord Key No. Qty. WLTL21191 R0501A Key No. PART LIST-Model No.
... 1 22 1 23 1 24 1 25 1 26 1 27 3 28 1 29 1 30 4 31 1 32 1 33 2 34 2 35 10 36 6 37 2 38 2 39 4 40 1 41 2 42 1 43 1 44 1 Description Key/Clip Left Handrail Cage Nut Extension Leg Assembly Rear Isolator Screw Console Base Speed Control Knob Speed Potentiometer Console Plug Isolator Spacer Console Assembly Storage... Extension Leg Screw Electronics Screw Base Pad Wheel Bolt Wheel Base Pivot Nut/Wheel Nut Controller Extension Leg Circuit Breaker Power Cord Grommet Power Cord Key No. Qty. WLTL21191 R0501A Key No. PART LIST-Model No.


