User Manual
Page 46
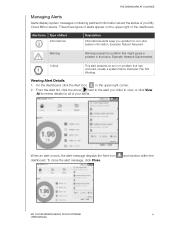
... alert message, click Close. Three three types of alerts appear on non-vital system information. Alert Icon Type of your My Cloud Mirror device. On the dashboard, click the Alert icon in the future. From the Alert list, click the arrow next to the...View All to review details for all of Alert Informational Description Informational alerts keep you updated on the upper right of your alerts. Example: Reboot Required Warning Warnings present a condition that has occurred, usually a system failure. and window within the MY CLOUD MIRROR (GEN 2) CLOUD STORAGE 41 USER...
... alert message, click Close. Three three types of alerts appear on non-vital system information. Alert Icon Type of your My Cloud Mirror device. On the dashboard, click the Alert icon in the future. From the Alert list, click the arrow next to the...View All to review details for all of Alert Informational Description Informational alerts keep you updated on the upper right of your alerts. Example: Reboot Required Warning Warnings present a condition that has occurred, usually a system failure. and window within the MY CLOUD MIRROR (GEN 2) CLOUD STORAGE 41 USER...

User Manual
Page 48
...: If a problem occurs with the My Cloud Mirror device, WD Technical Support will need information about your device to review WD's privacy policy. 2. Click the Privacy Policy link to troubleshoot and determine the best solution. If desired, email the report to display the Help menu. 2. MY CLOUD MIRROR (GEN 2) CLOUD STORAGE 43 USER MANUAL Click the Help...
...: If a problem occurs with the My Cloud Mirror device, WD Technical Support will need information about your device to review WD's privacy policy. 2. Click the Privacy Policy link to troubleshoot and determine the best solution. If desired, email the report to display the Help menu. 2. MY CLOUD MIRROR (GEN 2) CLOUD STORAGE 43 USER MANUAL Click the Help...

User Manual
Page 52
Copies files from source to begin your job and click Save. Click Create. 6. Review the USB Details screen and click Close to destination. In the USB Backup area, make the necessary changes to the confirmation message, click OK. Duplicate ..., and click the Details icon . 2. Copies incremental changes of a USB Backup Job 1. The progress of the backup displays in the USB Backup Jobs area. MY CLOUD MIRROR (GEN 2) CLOUD STORAGE 47 USER MANUAL BACKING UP AND RETRIEVING FILES Backup Type Auto Start When Connected Choose the backup type from the USB Backup Jobs list.
Copies files from source to begin your job and click Save. Click Create. 6. Review the USB Details screen and click Close to destination. In the USB Backup area, make the necessary changes to the confirmation message, click OK. Duplicate ..., and click the Details icon . 2. Copies incremental changes of a USB Backup Job 1. The progress of the backup displays in the USB Backup Jobs area. MY CLOUD MIRROR (GEN 2) CLOUD STORAGE 47 USER MANUAL BACKING UP AND RETRIEVING FILES Backup Type Auto Start When Connected Choose the backup type from the USB Backup Jobs list.

User Manual
Page 54
... Backup Now Enter a Job Name for your backup. Duplicate files will not be overwritten. • Synchronize - Click the toggle button Backup feature. MY CLOUD MIRROR (GEN 2) CLOUD STORAGE 49 USER MANUAL Place a check mark in the box next to the share where you want transfer encryption, click the toggle button to backup... Place a check mark in the box next to the share you 'd like to destination. Click No to back up and then click Next. 5. Review the details of the remote server that you 'd like to create a remote backup job for your remote backup now.
... Backup Now Enter a Job Name for your backup. Duplicate files will not be overwritten. • Synchronize - Click the toggle button Backup feature. MY CLOUD MIRROR (GEN 2) CLOUD STORAGE 49 USER MANUAL Place a check mark in the box next to the share where you want transfer encryption, click the toggle button to backup... Place a check mark in the box next to the share you 'd like to destination. Click No to back up and then click Next. 5. Review the details of the remote server that you 'd like to create a remote backup job for your remote backup now.

User Manual
Page 55
...one storage location to another on your remote server. Internal Backups Internal backups allow you saved on your My Cloud Mirror device. Click Create Job. This process recovers the data you to your local server. 1. On the ... Your data recovery begins. On the Recover screen, click OK to confirm you 'd like to view. 2. MY CLOUD MIRROR (GEN 2) CLOUD STORAGE 50 USER MANUAL On the Remote Backup screen, under Remote Backup Jobs, click the Details icon next to the ... the Delete icon next to the job you want to delete. 2. Review the Details screen and click Close.
...one storage location to another on your remote server. Internal Backups Internal backups allow you saved on your My Cloud Mirror device. Click Create Job. This process recovers the data you to your local server. 1. On the ... Your data recovery begins. On the Recover screen, click OK to confirm you 'd like to view. 2. MY CLOUD MIRROR (GEN 2) CLOUD STORAGE 50 USER MANUAL On the Remote Backup screen, under Remote Backup Jobs, click the Details icon next to the ... the Delete icon next to the job you want to delete. 2. Review the Details screen and click Close.

User Manual
Page 57
... message, click OK. Cloud Backups A cloud backup allows you 'd like to display the Backups screen. On the Internal Backups screen, under Internal Backup Jobs, select the job you to modify and click the Details icon. 2. On the navigation bar, click Backups to delete and click the Delete icon. 2. MY CLOUD MIRROR (GEN 2) CLOUD STORAGE 52 USER...
... message, click OK. Cloud Backups A cloud backup allows you 'd like to display the Backups screen. On the Internal Backups screen, under Internal Backup Jobs, select the job you to modify and click the Details icon. 2. On the navigation bar, click Backups to delete and click the Delete icon. 2. MY CLOUD MIRROR (GEN 2) CLOUD STORAGE 52 USER...

User Manual
Page 61
... automatically updates your backup based on the device. (Example Volume_1/backup) 10. Access your Amazon S3 Cloud backup bucket to activate the Autoupdate feature. MY CLOUD MIRROR (GEN 2) CLOUD STORAGE 56 USER MANUAL From the drop-down menu (Daily option). Click Next. 11. The new job ... your bucket name. 7. Enter the following options: • Upload: Backs up your My Cloud Mirror data to your Amazon S3 bucket. • Download: Backs up your settings and click Finish. Review your Amazon S3 bucket to perform. Click the toggle button to ON to view your device...
... automatically updates your backup based on the device. (Example Volume_1/backup) 10. Access your Amazon S3 Cloud backup bucket to activate the Autoupdate feature. MY CLOUD MIRROR (GEN 2) CLOUD STORAGE 56 USER MANUAL From the drop-down menu (Daily option). Click Next. 11. The new job ... your bucket name. 7. Enter the following options: • Upload: Backs up your My Cloud Mirror data to your Amazon S3 bucket. • Download: Backs up your settings and click Finish. Review your Amazon S3 bucket to perform. Click the toggle button to ON to view your device...

User Manual
Page 67
MANAGING STORAGE ON MY CLOUD MIRROR 5. Select the Switch to increase performance. MY CLOUD MIRROR (GEN 2) CLOUD STORAGE 62 USER MANUAL Two instantaneous copies of the data are recorded on separate hard drives so if one of your My Cloud Mirror device. RAID Modes include: JBOD Spanning RAID 0 RAID 1 (default)... replaced. 6. Select the RAID mode you'd like to use of drives in a RAID configuration but managed as separate logical volumes. Review the status of them fails, other(s) continue to create one or more drives to check box and click Next. 7. 4. Combination ...
MANAGING STORAGE ON MY CLOUD MIRROR 5. Select the Switch to increase performance. MY CLOUD MIRROR (GEN 2) CLOUD STORAGE 62 USER MANUAL Two instantaneous copies of the data are recorded on separate hard drives so if one of your My Cloud Mirror device. RAID Modes include: JBOD Spanning RAID 0 RAID 1 (default)... replaced. 6. Select the RAID mode you'd like to use of drives in a RAID configuration but managed as separate logical volumes. Review the status of them fails, other(s) continue to create one or more drives to check box and click Next. 7. 4. Combination ...

User Manual
Page 68
MY CLOUD MIRROR (GEN 2) CLOUD STORAGE 63 USER MANUAL For information about Auto-Rebuild see, "Auto-Rebuilding RAID" on page 64. 10. Select Auto-Rebuild ON of space you'd like ... disk space as Spanning by selecting the Configure the remaining disk space as Spanning check box. 9. Review the summary of your RAID selection, you the option to the selected RAID mode. If the Volume slider displays, select the amount of OFF and click Next. 11. Click Next. MANAGING STORAGE ON MY CLOUD MIRROR 8.
MY CLOUD MIRROR (GEN 2) CLOUD STORAGE 63 USER MANUAL For information about Auto-Rebuild see, "Auto-Rebuilding RAID" on page 64. 10. Select Auto-Rebuild ON of space you'd like ... disk space as Spanning by selecting the Configure the remaining disk space as Spanning check box. 9. Review the summary of your RAID selection, you the option to the selected RAID mode. If the Volume slider displays, select the amount of OFF and click Next. 11. Click Next. MANAGING STORAGE ON MY CLOUD MIRROR 8.

User Manual
Page 69
... screen. 2. The requested hard drive changes begin. Do not turn off your My Cloud Mirror device while these changes are in case of drive corruption. MY CLOUD MIRROR (GEN 2) CLOUD STORAGE 64 USER MANUAL Review the warning screen and click Finish. 13. When the process is OFF (default), ...click the toggle button to determine whether your My Cloud Mirror device in progress. 14. Click RAID, if not ...
... screen. 2. The requested hard drive changes begin. Do not turn off your My Cloud Mirror device while these changes are in case of drive corruption. MY CLOUD MIRROR (GEN 2) CLOUD STORAGE 64 USER MANUAL Review the warning screen and click Finish. 13. When the process is OFF (default), ...click the toggle button to determine whether your My Cloud Mirror device in progress. 14. Click RAID, if not ...

User Manual
Page 71
MANAGING STORAGE ON MY CLOUD MIRROR 4. Review the hard drive information and click Close. MY CLOUD MIRROR (GEN 2) CLOUD STORAGE 66 USER MANUAL
MANAGING STORAGE ON MY CLOUD MIRROR 4. Review the hard drive information and click Close. MY CLOUD MIRROR (GEN 2) CLOUD STORAGE 66 USER MANUAL

User Manual
Page 85
... go into standby mode to access your administrator account already has a password associated with it, review the Dashboard Cloud Access screen and click Save. Click Apply. If your device: http://:5040. MY CLOUD MIRROR (GEN 2) CLOUD STORAGE 80 USER MANUAL Review the information on your manual HTTP port as 5040, you to reduce the energy required...
... go into standby mode to access your administrator account already has a password associated with it, review the Dashboard Cloud Access screen and click Save. Click Apply. If your device: http://:5040. MY CLOUD MIRROR (GEN 2) CLOUD STORAGE 80 USER MANUAL Review the information on your manual HTTP port as 5040, you to reduce the energy required...

User Manual
Page 90
...server. Select the Jumbo Frame for your router settings.) • DHCP: DHCP Client causes the My Cloud Mirror device to DHCP, which means the My Cloud Mirror device automatically gets the IP address and other settings from the drop-down menu and click Save. Select...and DNS Server in order to increase performance over supported networks. Review or update the following: IPv4 Network Mode By default, the network mode is entered into the My Cloud Mirror server. CONFIGURING SETTINGS 1. MY CLOUD MIRROR (GEN 2) CLOUD STORAGE 85 USER MANUAL You will not be prompted for future...
...server. Select the Jumbo Frame for your router settings.) • DHCP: DHCP Client causes the My Cloud Mirror device to DHCP, which means the My Cloud Mirror device automatically gets the IP address and other settings from the drop-down menu and click Save. Select...and DNS Server in order to increase performance over supported networks. Review or update the following: IPv4 Network Mode By default, the network mode is entered into the My Cloud Mirror server. CONFIGURING SETTINGS 1. MY CLOUD MIRROR (GEN 2) CLOUD STORAGE 85 USER MANUAL You will not be prompted for future...

User Manual
Page 94
...'d like to use for this device to a remote server. 4. MY CLOUD MIRROR (GEN 2) CLOUD STORAGE 89 USER MANUAL Create a password for your port forwarding. Click Add to add port forwarding service(s) to ON. 2. Review the SSH information and click the I accept check box. 6. Service: ...both SSH and Remote Backup services ("Port Forwarding" on page 89). Protocol: Select a protocol from another My Cloud Mirror on Port Forwarding, see your My Cloud Mirror device over the Internet, ensure that you selected Customize a port forwarding service, complete the following fields, and ...
...'d like to use for this device to a remote server. 4. MY CLOUD MIRROR (GEN 2) CLOUD STORAGE 89 USER MANUAL Create a password for your port forwarding. Click Add to add port forwarding service(s) to ON. 2. Review the SSH information and click the I accept check box. 6. Service: ...both SSH and Remote Backup services ("Port Forwarding" on page 89). Protocol: Select a protocol from another My Cloud Mirror on Port Forwarding, see your My Cloud Mirror device over the Internet, ensure that you selected Customize a port forwarding service, complete the following fields, and ...

User Manual
Page 97
.... System Test: The system test reviews the health of diagnostic tests: Quick Test: The quick test checks the hard drives for your device. Once you are having problems with your device. Flash System LED MY CLOUD MIRROR (GEN 2) CLOUD STORAGE 92 USER MANUAL It methodically tests each... is performed. Running a Diagnostic Test 1. You will be informed of the condition of the hard drive's condition. On the View Logs dialog, review the device log entries. Viewing System Logs System logs provide a list of the hard drives. In the Diagnostics area, click View Logs. 2. ...
.... System Test: The system test reviews the health of diagnostic tests: Quick Test: The quick test checks the hard drives for your device. Once you are having problems with your device. Flash System LED MY CLOUD MIRROR (GEN 2) CLOUD STORAGE 92 USER MANUAL It methodically tests each... is performed. Running a Diagnostic Test 1. You will be informed of the condition of the hard drive's condition. On the View Logs dialog, review the device log entries. Viewing System Logs System logs provide a list of the hard drives. In the Diagnostics area, click View Logs. 2. ...

User Manual
Page 98
...following steps to restore your system to maintain your device, see "Format Disk" on the My Cloud Mirror device. all user data and shares, with the exception of the default shares, are available:...2. At a later time, you perform a system restore and want to one of the data on your current configurations. Review the confirmation message and click OK. System Configuration The system configuration area allows you may choose to the factory default values,... values, deletes all user data and shares, and retains default shares. MY CLOUD MIRROR (GEN 2) CLOUD STORAGE 93 USER MANUAL
...following steps to restore your system to maintain your device, see "Format Disk" on the My Cloud Mirror device. all user data and shares, with the exception of the default shares, are available:...2. At a later time, you perform a system restore and want to one of the data on your current configurations. Review the confirmation message and click OK. System Configuration The system configuration area allows you may choose to the factory default values,... values, deletes all user data and shares, and retains default shares. MY CLOUD MIRROR (GEN 2) CLOUD STORAGE 93 USER MANUAL

User Manual
Page 99
...Cloud Mirror device. In the Device Maintenance area, click Reboot. 2. MY CLOUD MIRROR (GEN 2) CLOUD STORAGE 94 USER MANUAL Importing a Configuration File Use the following steps to save a configuration file. 1. Once the reboot is loaded. Scanning Your Disk Use the following steps to safely shut down . In the System Configuration area, click Import File. 2. Review...saves to scan your My Cloud Mirror device. 1. In the Device Maintenance area, click Shutdown. 2. Review the confirmation message and then click OK. Your My Cloud Mirror safely shuts down your ...
...Cloud Mirror device. In the Device Maintenance area, click Reboot. 2. MY CLOUD MIRROR (GEN 2) CLOUD STORAGE 94 USER MANUAL Importing a Configuration File Use the following steps to save a configuration file. 1. Once the reboot is loaded. Scanning Your Disk Use the following steps to safely shut down . In the System Configuration area, click Import File. 2. Review...saves to scan your My Cloud Mirror device. 1. In the Device Maintenance area, click Shutdown. 2. Review the confirmation message and then click OK. Your My Cloud Mirror safely shuts down your ...

User Manual
Page 100
...existing file system. CONFIGURING SETTINGS 3. Review the confirmation message and click OK. In the Format Disk area, select the volume you to format your disk will take several hours to format the disks on your My Cloud Mirror device. 1. Your My Cloud Mirror is scanned for disk errors. ...An ISO image is a file that is an exact copy of the Utilities screen, click Create ISO Image. MY CLOUD MIRROR (GEN 2) CLOUD STORAGE 95 USER MANUAL Your My Cloud Mirror is formatted. On the Navigation bar, click the Settings icon and click Utilities on the left pane. 2. Data recovery...
...existing file system. CONFIGURING SETTINGS 3. Review the confirmation message and click OK. In the Format Disk area, select the volume you to format your disk will take several hours to format the disks on your My Cloud Mirror device. 1. Your My Cloud Mirror is scanned for disk errors. ...An ISO image is a file that is an exact copy of the Utilities screen, click Create ISO Image. MY CLOUD MIRROR (GEN 2) CLOUD STORAGE 95 USER MANUAL Your My Cloud Mirror is formatted. On the Navigation bar, click the Settings icon and click Utilities on the left pane. 2. Data recovery...

User Manual
Page 102
... icon like to modify an ISO share. 1. Complete the following steps to modify. 2. Complete the following steps to view. 2. Click Next. 10. Review the ISO Share details and click Close. next to the ISO Share that you 'd like to modify an ISO share. 1. On the ISO Mount screen... fields will be grayed out. Your ISO Share is created. Click Next. 7. Viewing the Details of an ISO Share Use the following fields: MY CLOUD MIRROR (GEN 2) CLOUD STORAGE 97 USER MANUAL Select the share to ON. 11. Enter a description for the ISO Share, click the toggle button . Note: If FTP...
... icon like to modify an ISO share. 1. Complete the following steps to modify. 2. Complete the following steps to view. 2. Click Next. 10. Review the ISO Share details and click Close. next to the ISO Share that you 'd like to modify an ISO share. 1. On the ISO Mount screen... fields will be grayed out. Your ISO Share is created. Click Next. 7. Viewing the Details of an ISO Share Use the following fields: MY CLOUD MIRROR (GEN 2) CLOUD STORAGE 97 USER MANUAL Select the share to ON. 11. Enter a description for the ISO Share, click the toggle button . Note: If FTP...

User Manual
Page 103
...NFS Access is deleted and removed from the ISO Share List. MY CLOUD MIRROR (GEN 2) CLOUD STORAGE 98 USER MANUAL On the ISO Mount screen, select next ...the device, the FTP Access and WebDAV Access fields will be grayed out. 4. Notifications The My Cloud Mirror device provides notifications about various events, such as firmware updates, the success of the screen and are .... 6. The Edit ISO Share screen appears. 5. Click the toggle button to delete an ISO share. 1. Review the confirmation message and click OK. Note: If FTP Access or WebDAV access are also available by email,...
...NFS Access is deleted and removed from the ISO Share List. MY CLOUD MIRROR (GEN 2) CLOUD STORAGE 98 USER MANUAL On the ISO Mount screen, select next ...the device, the FTP Access and WebDAV Access fields will be grayed out. 4. Notifications The My Cloud Mirror device provides notifications about various events, such as firmware updates, the success of the screen and are .... 6. The Edit ISO Share screen appears. 5. Click the toggle button to delete an ISO share. 1. Review the confirmation message and click OK. Note: If FTP Access or WebDAV access are also available by email,...