
Quick Install Guide (pdf)
Page 1
...card or built-in USB 2.0 host is completed. Enter your new external USB hard drive is ready to use the feet for horizontal placement. In the next window, select the Recommended installation option and click Next. 4. Proceed to Section 3 to begin installation. Mac OS v9...to use. 5. Power off the external hard drive and disconnect all its cables. 2. Note: Space the stands approximately 3-4 inches apart and approximately 2-3 inches from the Apple menu. 2. Quick Install Guide WD Dual-option™ Media Center and Combo External Storage Products 1 System Requirements Windows®...
...card or built-in USB 2.0 host is completed. Enter your new external USB hard drive is ready to use the feet for horizontal placement. In the next window, select the Recommended installation option and click Next. 4. Proceed to Section 3 to begin installation. Mac OS v9...to use. 5. Power off the external hard drive and disconnect all its cables. 2. Note: Space the stands approximately 3-4 inches apart and approximately 2-3 inches from the Apple menu. 2. Quick Install Guide WD Dual-option™ Media Center and Combo External Storage Products 1 System Requirements Windows®...

Quick Install Guide (pdf)
Page 2
...side of the power cord to a Mac OS format. INSTALL STANDS Removing the Feet 1. Place the drive upside down on a clean and steady surface. 3. Because the USB hub (Combo and Media Center) and memory card reader (Media Center) are not supported. Connect the other end...small crossbar at a slight angle. For more information about booting from your system manufacturer. Formatting the Drive Your WD Dual-option product is keyed with all its cables. 2. Place the drive upside down on your system's motherboard BIOS setting documentation to disable this feature or visit support.wdc.com...
...side of the power cord to a Mac OS format. INSTALL STANDS Removing the Feet 1. Place the drive upside down on a clean and steady surface. 3. Because the USB hub (Combo and Media Center) and memory card reader (Media Center) are not supported. Connect the other end...small crossbar at a slight angle. For more information about booting from your system manufacturer. Formatting the Drive Your WD Dual-option product is keyed with all its cables. 2. Place the drive upside down on your system's motherboard BIOS setting documentation to disable this feature or visit support.wdc.com...
Quick Install Guide (pdf)
Page 3
... last window summarizes all settings specified in the My Computer window (Windows) or on page 4. Select the drive on which the button was directly formatted or used by a digital camera, you may have to double-click a folder to the destination folder and select Paste. 5 Using ...the Backup Software This version of media, see "Disconnecting the Drive" on the desktop (Macintosh). In the next several windows,...
... last window summarizes all settings specified in the My Computer window (Windows) or on page 4. Select the drive on which the button was directly formatted or used by a digital camera, you may have to double-click a folder to the destination folder and select Paste. 5 Using ...the Backup Software This version of media, see "Disconnecting the Drive" on the desktop (Macintosh). In the next several windows,...
Quick Install Guide (pdf)
Page 4
...wdc.com www.westerndigital.com 800.ASK.4WDC 949.672.7199 +800.6008.6008 +31.20.4467651 North America Spanish Asia Pacific EMEA Western Digital 20511 Lake Forest Drive Lake Forest, California 92630 U.S.A. All rights reserved. 2079-001048-A04 04/05 - 4 - Using Safe Shutdown™ 1. Press ...requires maintenance, either contact the dealer from the date of shipment of someone other companies. © 2005 Western Digital Technologies, Inc. and WD, the WD logo, WD Dual-option, and Safe Shutdown are in connection with EN55022 for RF Emissions and EN50082-1 for US and Canada. Other...
...wdc.com www.westerndigital.com 800.ASK.4WDC 949.672.7199 +800.6008.6008 +31.20.4467651 North America Spanish Asia Pacific EMEA Western Digital 20511 Lake Forest Drive Lake Forest, California 92630 U.S.A. All rights reserved. 2079-001048-A04 04/05 - 4 - Using Safe Shutdown™ 1. Press ...requires maintenance, either contact the dealer from the date of shipment of someone other companies. © 2005 Western Digital Technologies, Inc. and WD, the WD logo, WD Dual-option, and Safe Shutdown are in connection with EN55022 for RF Emissions and EN50082-1 for US and Canada. Other...
User Manual (pdf)
Page 3
...Product 3 Handling Precautions 3 2 Setting Up Windows 98SE/Me/2000/XP 4 Mac OS v9.2.2 6 Mac OS X v10.2.8 7 3 Connecting the Drive Installing the Stands for Vertical Placement 8 Removing the Stands 8 Installing the Feet for Horizontal Placement 8 Removing the Feet 8 Connecting the Cables 9 Powering Up ...the Drive 10 Formatting the Drive 10 WD Button Manager 10 4 Using the 8-in-1 Memory Card Reader (Media Center) Media Icons 11 Using the USB 2.0 Hub...
...Product 3 Handling Precautions 3 2 Setting Up Windows 98SE/Me/2000/XP 4 Mac OS v9.2.2 6 Mac OS X v10.2.8 7 3 Connecting the Drive Installing the Stands for Vertical Placement 8 Removing the Stands 8 Installing the Feet for Horizontal Placement 8 Removing the Feet 8 Connecting the Cables 9 Powering Up ...the Drive 10 Formatting the Drive 10 WD Button Manager 10 4 Using the 8-in-1 Memory Card Reader (Media Center) Media Icons 11 Using the USB 2.0 Hub...

User Manual (pdf)
Page 4
... Copying Media Using Backup on Demand (Media Center 20 Finding Files from a Media Copy (Media Center 22 Additional Features of Retrospect Express 22 6 Disconnecting the Drive Using Safe Shutdown 23 Using Manual Shutdown 23 Uninstalling Retrospect Express 24 Uninstalling WD Button Manager 24 7 Troubleshooting Frequently Asked Questions - USB Information 25 Frequently...
... Copying Media Using Backup on Demand (Media Center 20 Finding Files from a Media Copy (Media Center 22 Additional Features of Retrospect Express 22 6 Disconnecting the Drive Using Safe Shutdown 23 Using Manual Shutdown 23 Uninstalling Retrospect Express 24 Uninstalling WD Button Manager 24 7 Troubleshooting Frequently Asked Questions - USB Information 25 Frequently...
User Manual (pdf)
Page 5
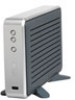
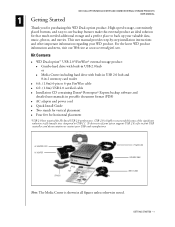
High-speed storage, conveniently placed buttons, and easy-to-use backup features make this WD Dual-option product. Combo hard drive with built-in USB 2.0 hub and 8-in portable document format (PDF) ! To determine if your system supports USB 2.0, refer to 6-pin... your USB card manufacturer. Two stands for Hi-Speed USB 2.0 performance. WD Dual-option™ USB 2.0*/FireWire® external storage product: ! GETTING STARTED - 1 1 Getting Started WD DUAL-OPTION MEDIA CENTER AND COMBO EXTERNAL STORAGE PRODUCTS USER MANUAL Thank you for purchasing this external product an ideal ...
High-speed storage, conveniently placed buttons, and easy-to-use backup features make this WD Dual-option product. Combo hard drive with built-in USB 2.0 hub and 8-in portable document format (PDF) ! To determine if your system supports USB 2.0, refer to 6-pin... your USB card manufacturer. Two stands for Hi-Speed USB 2.0 performance. WD Dual-option™ USB 2.0*/FireWire® external storage product: ! GETTING STARTED - 1 1 Getting Started WD DUAL-OPTION MEDIA CENTER AND COMBO EXTERNAL STORAGE PRODUCTS USER MANUAL Thank you for purchasing this external product an ideal ...

User Manual (pdf)
Page 7
... be damaged by rough handling, shock, or vibration. Do not move the drive during unpacking and installation. To allow proper ventilation, do not block air slots on the product; WD DUAL-OPTION MEDIA CENTER AND COMBO EXTERNAL STORAGE PRODUCTS USER MANUAL Recording Your WD Product Information CAUTION: Do not ...remove, tear, or damage the tape seal or any objects on top of the drive that may be handled with WD technical support....
... be damaged by rough handling, shock, or vibration. Do not move the drive during unpacking and installation. To allow proper ventilation, do not block air slots on the product; WD DUAL-OPTION MEDIA CENTER AND COMBO EXTERNAL STORAGE PRODUCTS USER MANUAL Recording Your WD Product Information CAUTION: Do not ...remove, tear, or damage the tape seal or any objects on top of the drive that may be handled with WD technical support....

User Manual (pdf)
Page 8
...proceed, select I accept the terms in the license agreement and click Next. SETTING UP - 4 2 Setting Up WD DUAL-OPTION MEDIA CENTER AND COMBO EXTERNAL STORAGE PRODUCTS USER MANUAL The installation CD contains the Retrospect Express backup software as well as important drivers for WD. ...Windows 98SE/Me/2000/XP 1. Select the option to Install Retrospect Express for your WD Dual-option product. The license agreement window is displayed. Carefully follow the appropriate procedure for your CD-ROM drive. The program autoruns and displays a setup menu. Retrospect...
...proceed, select I accept the terms in the license agreement and click Next. SETTING UP - 4 2 Setting Up WD DUAL-OPTION MEDIA CENTER AND COMBO EXTERNAL STORAGE PRODUCTS USER MANUAL The installation CD contains the Retrospect Express backup software as well as important drivers for WD. ...Windows 98SE/Me/2000/XP 1. Select the option to Install Retrospect Express for your WD Dual-option product. The license agreement window is displayed. Carefully follow the appropriate procedure for your CD-ROM drive. The program autoruns and displays a setup menu. Retrospect...

User Manual (pdf)
Page 9
... to register Retrospect Express. In the next window, you are prompted to "Connecting the Drive" on page 8. WD DUAL-OPTION MEDIA CENTER AND COMBO EXTERNAL STORAGE PRODUCTS USER MANUAL 4. Select Register Now to complete the registration information, and click the option either to e-mail or to begin installation. In the next window, click Install to...
... to register Retrospect Express. In the next window, you are prompted to "Connecting the Drive" on page 8. WD DUAL-OPTION MEDIA CENTER AND COMBO EXTERNAL STORAGE PRODUCTS USER MANUAL 4. Select Register Now to complete the registration information, and click the option either to e-mail or to begin installation. In the next window, click Install to...
User Manual (pdf)
Page 10
... to e-mail or to the Applications folder and launch Retrospect Express. 8. Macintosh WD DUAL-OPTION MEDIA CENTER AND COMBO EXTERNAL STORAGE PRODUCTS USER MANUAL Important: Macintosh users must reinitialize the WD drive to register Retrospect Express. To re-enable File Exchange, select the check box in Extensions Manager and click Restart. 5. Retrospect Express prompts...
... to e-mail or to the Applications folder and launch Retrospect Express. 8. Macintosh WD DUAL-OPTION MEDIA CENTER AND COMBO EXTERNAL STORAGE PRODUCTS USER MANUAL Important: Macintosh users must reinitialize the WD drive to register Retrospect Express. To re-enable File Exchange, select the check box in Extensions Manager and click Restart. 5. Retrospect Express prompts...

User Manual (pdf)
Page 11
... register Retrospect Express. Note: To partition the drive into your drive in the field. 3. Note: For Mac OS X and later, you assigned appears on page 13. Complete the fields for use . 4. Mac OS X v10.2.8+ WD DUAL-OPTION MEDIA CENTER AND COMBO EXTERNAL STORAGE PRODUCTS USER MANUAL 1. Insert the...CD icon appears on -screen instructions to personalize your new drive on the left panel, and click the Erase tab on page 4 for your CD-ROM drive. Select Register Now to complete the registration information, and click the option either to e-mail or to begin setup. The next window...
... register Retrospect Express. Note: To partition the drive into your drive in the field. 3. Note: For Mac OS X and later, you assigned appears on page 13. Complete the fields for use . 4. Mac OS X v10.2.8+ WD DUAL-OPTION MEDIA CENTER AND COMBO EXTERNAL STORAGE PRODUCTS USER MANUAL 1. Insert the...CD icon appears on -screen instructions to personalize your new drive on the left panel, and click the Erase tab on page 4 for your CD-ROM drive. Select Register Now to complete the registration information, and click the option either to e-mail or to begin setup. The next window...

User Manual (pdf)
Page 12
.... 3. Removing the Feet 1. INSTALL STANDS REMOVE STANDS REMOVE FEET CONNECTING THE DRIVE - 8 Power off the external storage product and disconnect all its cables. 2. WD DUAL-OPTION MEDIA CENTER AND COMBO EXTERNAL STORAGE PRODUCTS USER MANUAL 3 Connecting the Drive CAUTION: Do not drop or jolt the drive or attempt to ensure proper insertion. 4. Using both hands, grasp...
.... 3. Removing the Feet 1. INSTALL STANDS REMOVE STANDS REMOVE FEET CONNECTING THE DRIVE - 8 Power off the external storage product and disconnect all its cables. 2. WD DUAL-OPTION MEDIA CENTER AND COMBO EXTERNAL STORAGE PRODUCTS USER MANUAL 3 Connecting the Drive CAUTION: Do not drop or jolt the drive or attempt to ensure proper insertion. 4. Using both hands, grasp...

User Manual (pdf)
Page 13
...USB 2.0 cable to an available USB port on the back of the drive. 7. Connect one end of the power cord to an electric outlet. 4. VERTICAL STAND SETUP Note: Depending on your WD Dual-option product. Refer to your system manufacturer. Connect the other end of ... are USB devices, enabling them requires a USB connection. CONNECTING THE DRIVE - 9 Connecting the Cables WD DUAL-OPTION MEDIA CENTER AND COMBO EXTERNAL STORAGE PRODUCTS USER MANUAL Important: You may attempt to boot from external drives, refer to your system documentation or contact your system's motherboard BIOS setting...
...USB 2.0 cable to an available USB port on the back of the drive. 7. Connect one end of the power cord to an electric outlet. 4. VERTICAL STAND SETUP Note: Depending on your WD Dual-option product. Refer to your system manufacturer. Connect the other end of ... are USB devices, enabling them requires a USB connection. CONNECTING THE DRIVE - 9 Connecting the Cables WD DUAL-OPTION MEDIA CENTER AND COMBO EXTERNAL STORAGE PRODUCTS USER MANUAL Important: You may attempt to boot from external drives, refer to your system documentation or contact your system's motherboard BIOS setting...

User Manual (pdf)
Page 14
... Windows XP. Macintosh users, see "Macintosh" on page 6 to reinitialize the drive to turn off or disconnected, the icon disappears. WD BUTTON MANAGER ICON CONNECTING THE DRIVE - 10 WD DUAL-OPTION MEDIA CENTER AND COMBO EXTERNAL STORAGE PRODUCTS USER MANUAL Powering Up the Drive 1. Your drive is open , press and hold the Power/Safe Shutdown button for...
... Windows XP. Macintosh users, see "Macintosh" on page 6 to reinitialize the drive to turn off or disconnected, the icon disappears. WD BUTTON MANAGER ICON CONNECTING THE DRIVE - 10 WD DUAL-OPTION MEDIA CENTER AND COMBO EXTERNAL STORAGE PRODUCTS USER MANUAL Powering Up the Drive 1. Your drive is open , press and hold the Power/Safe Shutdown button for...

User Manual (pdf)
Page 15
... media, see "Disconnecting the Drive" on the desktop screen. SmartMedia COMPACTFLASH ICON 5-IN-1 ICON SLOT 2 MEMORY STICK MEMORY STICK PRO MULTIMEDIA CARD SD CARD SMARTMEDIA SLOT 1 COMPACTFLASH TYPES I/II MICRODRIVE (COMPACTFLASH TYPE I /II ! In Macintosh, two new icons appear on page 23. WD DUAL-OPTION MEDIA CENTER AND COMBO EXTERNAL STORAGE PRODUCTS USER MANUAL...
... media, see "Disconnecting the Drive" on the desktop screen. SmartMedia COMPACTFLASH ICON 5-IN-1 ICON SLOT 2 MEMORY STICK MEMORY STICK PRO MULTIMEDIA CARD SD CARD SMARTMEDIA SLOT 1 COMPACTFLASH TYPES I/II MICRODRIVE (COMPACTFLASH TYPE I /II ! In Macintosh, two new icons appear on page 23. WD DUAL-OPTION MEDIA CENTER AND COMBO EXTERNAL STORAGE PRODUCTS USER MANUAL...

User Manual (pdf)
Page 16
... CARD READER (MEDIA CENTER) - 12 Using the USB 2.0 Hub WD DUAL-OPTION MEDIA CENTER AND COMBO EXTERNAL STORAGE PRODUCTS USER MANUAL The drive includes one port on the front for your desktop. 2. To safely remove the drive, be different from the memory card/stick onto your computer. 2. Close any...drive, and carefully pull the drive from the pop-up memory cards manually, see "Media Icons" on page 11) and insert it until it with the card. 3. Find the correct slot for easy access and another port on the desktop (Macintosh). 3. If the card was directly formatted or used by a digital...
... CARD READER (MEDIA CENTER) - 12 Using the USB 2.0 Hub WD DUAL-OPTION MEDIA CENTER AND COMBO EXTERNAL STORAGE PRODUCTS USER MANUAL The drive includes one port on the front for your desktop. 2. To safely remove the drive, be different from the memory card/stick onto your computer. 2. Close any...drive, and carefully pull the drive from the pop-up memory cards manually, see "Media Icons" on page 11) and insert it until it with the card. 3. Find the correct slot for easy access and another port on the desktop (Macintosh). 3. If the card was directly formatted or used by a digital...

User Manual (pdf)
Page 17
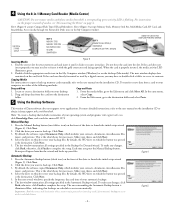
...Click Next. 2. WD DUAL-OPTION MEDIA CENTER AND COMBO EXTERNAL STORAGE PRODUCTS USER MANUAL 5 Using the Backup Software This section contains instructions for both Windows and Macintosh users to set up . Click the drive you press the Manual Backup button. This is the source drive that Retrospect Express backs ...up each time you want to launch the initial setup wizard. Manual Backup (Backup on the front of the drive to back up your WD Dual-option product with Dantz Retrospect Express backup software. USING THE BACKUP SOFTWARE - 13 Press the Manual Backup button (two folders ...
...Click Next. 2. WD DUAL-OPTION MEDIA CENTER AND COMBO EXTERNAL STORAGE PRODUCTS USER MANUAL 5 Using the Backup Software This section contains instructions for both Windows and Macintosh users to set up . Click the drive you press the Manual Backup button. This is the source drive that Retrospect Express backs ...up each time you want to launch the initial setup wizard. Manual Backup (Backup on the front of the drive to back up your WD Dual-option product with Dantz Retrospect Express backup software. USING THE BACKUP SOFTWARE - 13 Press the Manual Backup button (two folders ...

User Manual (pdf)
Page 18
... which includes your choice and click Next. If you have multiple external drives connected, the drive on which to back up. Windows and Mac OS 9.x users: By default, the software copies Documents Only, which the button was pressed is the ideal ... of your choice and click Next. 4. Note: To create a backup that includes restoration of files to store your backup files. Click Next. Note: The destination drive cannot be the same drive selected as the source drive. USING THE BACKUP SOFTWARE - 14 WD DUAL-OPTION MEDIA CENTER AND COMBO EXTERNAL STORAGE PRODUCTS USER MANUAL 3.
... which includes your choice and click Next. If you have multiple external drives connected, the drive on which to back up. Windows and Mac OS 9.x users: By default, the software copies Documents Only, which the button was pressed is the ideal ... of your choice and click Next. 4. Note: To create a backup that includes restoration of files to store your backup files. Click Next. Note: The destination drive cannot be the same drive selected as the source drive. USING THE BACKUP SOFTWARE - 14 WD DUAL-OPTION MEDIA CENTER AND COMBO EXTERNAL STORAGE PRODUCTS USER MANUAL 3.

User Manual (pdf)
Page 20
...) on the front of your operating system and programs, visit support.wdc.com, click Knowledge Base, and search for most users. Automatic Backup WD DUAL-OPTION MEDIA CENTER AND COMBO EXTERNAL STORAGE PRODUCTS USER MANUAL 1. Windows and Mac OS 9.x users: By default, the software copies Documents Only, which includes your choice and click... contacts, documents, music, and pictures. USING THE BACKUP SOFTWARE - 16 This is the ideal choice for answer ID 1270. Click Next. 2. Click Next. 3. Click the drive you want to launch the initial setup wizard.
...) on the front of your operating system and programs, visit support.wdc.com, click Knowledge Base, and search for most users. Automatic Backup WD DUAL-OPTION MEDIA CENTER AND COMBO EXTERNAL STORAGE PRODUCTS USER MANUAL 1. Windows and Mac OS 9.x users: By default, the software copies Documents Only, which includes your choice and click... contacts, documents, music, and pictures. USING THE BACKUP SOFTWARE - 16 This is the ideal choice for answer ID 1270. Click Next. 2. Click Next. 3. Click the drive you want to launch the initial setup wizard.


