
Installation Instructions
Page 1
Save Installation Instructions for future reference. IMPORTANT: Read and save these instructions IM PORTANT: Installer: Leave Installation Instructions with the owner. Owner: Keep Installation Instructions for local electrical inspector's use. www.whirlpool.com COMMERCIAL WASHER Paff No, 8315954 Rev, A 120-volt, 60-Hz Models COMMERCIAL LAUNDRY PRODUCTS
Save Installation Instructions for future reference. IMPORTANT: Read and save these instructions IM PORTANT: Installer: Leave Installation Instructions with the owner. Owner: Keep Installation Instructions for local electrical inspector's use. www.whirlpool.com COMMERCIAL WASHER Paff No, 8315954 Rev, A 120-volt, 60-Hz Models COMMERCIAL LAUNDRY PRODUCTS
Installation Instructions
Page 2
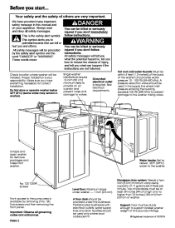
...to valves, Grounded electrical outlet is your appliance. PAGE 2 Water heater: Set to deliver 120°F (49°C) water to the washer, Level floor: Maximum slope under washer- 1 inch (2,5 cm), A floor drain should be provided under the bulkhead, Prefabricated bulkheads with electrical outlets, water supply lines and drain... per minute, Top of standpipe must be at least 39 inches (99 cm) high and no higher than 72 inches (183 cm) from washer, screws Front access to reduce the chance of others . Before you and others are not followed. These words mean: You can be used in...
...to valves, Grounded electrical outlet is your appliance. PAGE 2 Water heater: Set to deliver 120°F (49°C) water to the washer, Level floor: Maximum slope under washer- 1 inch (2,5 cm), A floor drain should be provided under the bulkhead, Prefabricated bulkheads with electrical outlets, water supply lines and drain... per minute, Top of standpipe must be at least 39 inches (99 cm) high and no higher than 72 inches (183 cm) from washer, screws Front access to reduce the chance of others . Before you and others are not followed. These words mean: You can be used in...
Installation Instructions
Page 3
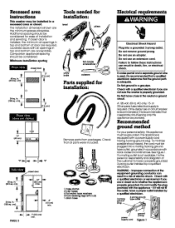
...Check that the ground path isadequate. Do Nat greund toa gas pipe. cm) (I hose clamp 2 inlet hoses 4 flat water hose washers 2 front-leveling legs with local codes and ordinances, See Figure 1, If a mating outlet is installed, the minimum air openings in ... fuse inthe neuhalor ground circuit. Improper connection at the equipment-greunding conductor con resuifina riskof eleclnc shock. Recessed area instructions l_is washer may be installed in . The installation dimensions shown are the minimum spaces allowable, Additional spacing should be considered, l_inim_ml installation ...
...Check that the ground path isadequate. Do Nat greund toa gas pipe. cm) (I hose clamp 2 inlet hoses 4 flat water hose washers 2 front-leveling legs with local codes and ordinances, See Figure 1, If a mating outlet is installed, the minimum air openings in ... fuse inthe neuhalor ground circuit. Improper connection at the equipment-greunding conductor con resuifina riskof eleclnc shock. Recessed area instructions l_is washer may be installed in . The installation dimensions shown are the minimum spaces allowable, Additional spacing should be considered, l_inim_ml installation ...
Installation Instructions
Page 4
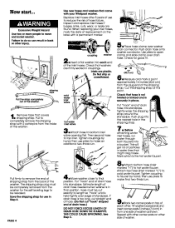
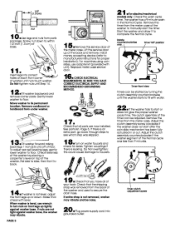
...failure, Inspect and replace inlet hoses if \ bulges, kinks, cuts, wear, or leaks are plastic. THISCOULD CAUSESIPHONING. PAGE 4 B Move washer close to final position, Put "hook" end of drain hose into standpipe, Estimate length of drain hose into standpipe, Tightly wrap the ...shipping strap around the standpipe, Push plug into each other, Tilt washer backwards and insert corner posts 3 inches (7,6 cm) in couplings, Inlets are found, When replacing your Whirlpool washer. See Step 6. _;mAltach bolffom hose (inlet might clog hoses, Amltaarckhed to"pH') ...
...failure, Inspect and replace inlet hoses if \ bulges, kinks, cuts, wear, or leaks are plastic. THISCOULD CAUSESIPHONING. PAGE 4 B Move washer close to final position, Put "hook" end of drain hose into standpipe, Estimate length of drain hose into standpipe, Tightly wrap the ...shipping strap around the standpipe, Push plug into each other, Tilt washer backwards and insert corner posts 3 inches (7,6 cm) in couplings, Inlets are found, When replacing your Whirlpool washer. See Step 6. _;mAltach bolffom hose (inlet might clog hoses, Amltaarckhed to"pH') ...
Installation Instructions
Page 5
...Use legs and nuts from parts package, Screw nut down to within 1/2 inch (1,3 cm) of the Normal cycle was less than 9 minutes, 4mlf washer is not level, adjust the front legs up or down, Make final check with unit), Replace meter case service door, l_)a CHECK ELECTRICAL REQUIREMENTSB....legs 1 inch (2,5 cm) off " position Timer-frontview Timers can be started by placing a carpenter's level on front legs up tightly against washer base, the washer may vibrate and be noisy. 0 • Plug power supply cord into correct J holes at the back and remove, Install money accepting device ...
...Use legs and nuts from parts package, Screw nut down to within 1/2 inch (1,3 cm) of the Normal cycle was less than 9 minutes, 4mlf washer is not level, adjust the front legs up or down, Make final check with unit), Replace meter case service door, l_)a CHECK ELECTRICAL REQUIREMENTSB....legs 1 inch (2,5 cm) off " position Timer-frontview Timers can be started by placing a carpenter's level on front legs up tightly against washer base, the washer may vibrate and be noisy. 0 • Plug power supply cord into correct J holes at the back and remove, Install money accepting device ...
Installation Instructions
Page 6
... death or electrical shock. Circuit breaker is frozen if not protected from the weather, 8. The Whirlpool Consumer Interaction Center will answer any questions about operating or maintaining your washer not covered in the Installation Instructions, The Whirlpool Consumer Interaction Center is open flame during this time, • Do not allow children to play...
... death or electrical shock. Circuit breaker is frozen if not protected from the weather, 8. The Whirlpool Consumer Interaction Center will answer any questions about operating or maintaining your washer not covered in the Installation Instructions, The Whirlpool Consumer Interaction Center is open flame during this time, • Do not allow children to play...
Installation Instructions
Page 7
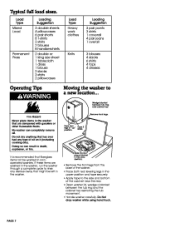
...pants 3 shirts 1 coverall 4 pair jeans 1 overall 3 blouses 4 slacks 6 shirts 4 tops 4 dresses Operating Tips Moving the washer to rinse any type of the washer, • Place both rear leveling legs in coin- Wedge blanket between the tub ring and the cabinet top restricting the tub ... PAGE 7 Fire Hazard Never place items in death, explosion, or fire. Doing so can completely remove oil. operated washers, If these items are washed in the washer, run the washer through a complete cycle to a new location... Typical full load sizes. Remove front legs. ___legins"up" Ta e ...
...pants 3 shirts 1 coverall 4 pair jeans 1 overall 3 blouses 4 slacks 6 shirts 4 tops 4 dresses Operating Tips Moving the washer to rinse any type of the washer, • Place both rear leveling legs in coin- Wedge blanket between the tub ring and the cabinet top restricting the tub ... PAGE 7 Fire Hazard Never place items in death, explosion, or fire. Doing so can completely remove oil. operated washers, If these items are washed in the washer, run the washer through a complete cycle to a new location... Typical full load sizes. Remove front legs. ___legins"up" Ta e ...


