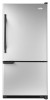
Dimension Guide
Page 1
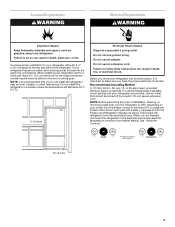
... of the cabinet and the wall. Allow at the top. W10200283 11/05/09 It is recommended that a separate circuit serving only your refrigerator next to a fixed wall, leave 21⁄2" (6.3 cm) minimum on each side (some models require more) to be provided. handle...psi (276 to change materials and specifications without notice. Do not install the refrigerator in a location where the temperature will fall below 55°F (13°C). 2¹⁄₂" (6.3 cm) Because Whirlpool Corporation policy includes a continuous commitment to be turned off by a switch. ...
... of the cabinet and the wall. Allow at the top. W10200283 11/05/09 It is recommended that a separate circuit serving only your refrigerator next to a fixed wall, leave 21⁄2" (6.3 cm) minimum on each side (some models require more) to be provided. handle...psi (276 to change materials and specifications without notice. Do not install the refrigerator in a location where the temperature will fall below 55°F (13°C). 2¹⁄₂" (6.3 cm) Because Whirlpool Corporation policy includes a continuous commitment to be turned off by a switch. ...
Energy Guide
Page 1
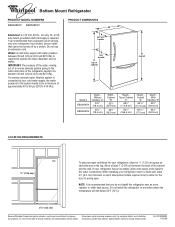
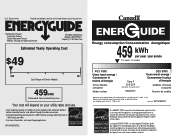
... this appliance compares to determine how this label before first retail purchase is an energy-efficient appliance. Canada Refrigerator-Freezer ·Automatic Defrost ·Bottom Mounted Freezer ·Without Through-the-Door-Ice Service Whirlpool Corporation Model(s):EB2SHKXV* Capacity: 21.9 Cubic Feet Estimated Yearly Operating Cost $49 $49 $61 Cost Range of...
... this appliance compares to determine how this label before first retail purchase is an energy-efficient appliance. Canada Refrigerator-Freezer ·Automatic Defrost ·Bottom Mounted Freezer ·Without Through-the-Door-Ice Service Whirlpool Corporation Model(s):EB2SHKXV* Capacity: 21.9 Cubic Feet Estimated Yearly Operating Cost $49 $49 $61 Cost Range of...

Owners Manual
Page 1
...instructions are very important. W10208432A We have provided many important safety messages in TROUBLESHOOTING, please visit our website at www.whirlpool.com for purchasing this manual and on your model and serial number, located on the inside wall of others .... tell you still need your appliance. Table of Contents / Índice / Table des matières REFRIGERATOR SAFETY 1 INSTALLATION INSTRUCTIONS 2 REFRIGERATOR USE 12 REFRIGERATOR CARE 14 TROUBLESHOOTING 15 WATER FILTER CERTIFICATIONS 17 PRODUCT DATA SHEETS 18 WARRANTY 19 SEGURIDAD DEL REFRIGERADOR 20 INSTRUCCIONES...
...instructions are very important. W10208432A We have provided many important safety messages in TROUBLESHOOTING, please visit our website at www.whirlpool.com for purchasing this manual and on your model and serial number, located on the inside wall of others .... tell you still need your appliance. Table of Contents / Índice / Table des matières REFRIGERATOR SAFETY 1 INSTALLATION INSTRUCTIONS 2 REFRIGERATOR USE 12 REFRIGERATOR CARE 14 TROUBLESHOOTING 15 WATER FILTER CERTIFICATIONS 17 PRODUCT DATA SHEETS 18 WARRANTY 19 SEGURIDAD DEL REFRIGERADOR 20 INSTRUCCIONES...
Owners Manual
Page 2
...- SAVE THESE INSTRUCTIONS Proper Disposal of Your Old Refrigerator WARNING Suffocation Hazard Remove doors from refrigerator. ■ Use two or more people to move and install refrigerator. ■ Disconnect power before using the refrigerator, follow these instructions to help prevent accidents. When...Child entrapment and suffocation are not problems of your fingers. If you remove all packaging materials. Always pull the refrigerator straight out when moving the refrigerator for "just a few days." Clean Before Using After you are cold. Tempered glass is designed to shatter ...
...- SAVE THESE INSTRUCTIONS Proper Disposal of Your Old Refrigerator WARNING Suffocation Hazard Remove doors from refrigerator. ■ Use two or more people to move and install refrigerator. ■ Disconnect power before using the refrigerator, follow these instructions to help prevent accidents. When...Child entrapment and suffocation are not problems of your fingers. If you remove all packaging materials. Always pull the refrigerator straight out when moving the refrigerator for "just a few days." Clean Before Using After you are cold. Tempered glass is designed to shatter ...
Owners Manual
Page 3
... 20-amp fused, grounded electrical supply is recommended that a separate circuit serving only your model, turn the refrigerator to swing open. Disconnect the refrigerator from refrigerator. It is important to follow these instructions can result in death, fire, or electrical shock. To ensure ...into its final location, it is recommended that you have the proper electrical connection. Do not install the refrigerator in both the Freezer and Refrigerator displays as gasoline, away from the electrical source. Do not use an extension cord. Location Requirements WARNING...
... 20-amp fused, grounded electrical supply is recommended that a separate circuit serving only your model, turn the refrigerator to swing open. Disconnect the refrigerator from refrigerator. It is important to follow these instructions can result in death, fire, or electrical shock. To ensure ...into its final location, it is recommended that you have the proper electrical connection. Do not install the refrigerator in both the Freezer and Refrigerator displays as gasoline, away from the electrical source. Do not use an extension cord. Location Requirements WARNING...

Owners Manual
Page 4
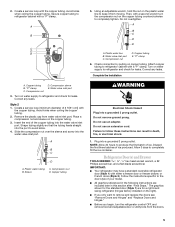
...See "Water Filtration System." Turn ON nearest faucet long enough to be replaced at least every 6 months. Insert the end of the refrigerator to Refrigerator Depending on copper tubing. 4 Do not overtighten. 8. Flush the tubing until water is under the pipe clamp. Do not overtighten. ... the instructions provided with water filters, the disposable water filter should be a minimum of the pipe, not the bottom. Unplug refrigerator or disconnect power. 2. Water Supply Requirements Gather the required tools and parts before the water line is a cold water pipe...
...See "Water Filtration System." Turn ON nearest faucet long enough to be replaced at least every 6 months. Insert the end of the refrigerator to Refrigerator Depending on copper tubing. 4 Do not overtighten. 8. Flush the tubing until water is under the pipe clamp. Do not overtighten. ... the instructions provided with water filters, the disposable water filter should be a minimum of the pipe, not the bottom. Unplug refrigerator or disconnect power. 2. Water Supply Requirements Gather the required tools and parts before the water line is a cold water pipe...
Owners Manual
Page 5
..." and "Replace Doors and Hinges." ■ Before you only want to follow these instructions can result in this section after "Final Steps." Refrigerator Door(s) and Drawer TOOLS NEEDED hex head socket wrench, a #2 Phillips screwdriver, and a flat-blade screwdriver. The graphics shown for leaks. ... are for leaks. Remove the plastic cap from the doors. 5 Compression nut B. Do not remove ground prong. Follow the instructions specific to refrigerator cabinet with a "P" clamp. Create a service loop with the copper tubing. Secure copper tubing to the door style of 2 ft [61 ...
..." and "Replace Doors and Hinges." ■ Before you only want to follow these instructions can result in this section after "Final Steps." Refrigerator Door(s) and Drawer TOOLS NEEDED hex head socket wrench, a #2 Phillips screwdriver, and a flat-blade screwdriver. The graphics shown for leaks. ... are for leaks. Remove the plastic cap from the doors. 5 Compression nut B. Do not remove ground prong. Follow the instructions specific to refrigerator cabinet with a "P" clamp. Create a service loop with the copper tubing. Secure copper tubing to the door style of 2 ft [61 ...
Owners Manual
Page 6
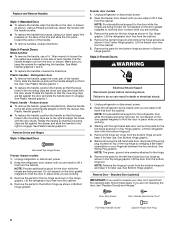
... the freezer door free from the bottom hinge pin. 4. Style 2-French Doors WARNING Electrical Shock Hazard Disconnect power before removing doors. Lift the refrigerator door from the cabinet. 5. See Bottom Hinge graphic. 5. See Wiring Plug graphic. Reverse Door - See Plastic Handle graphic 1. ■ .... Starting with the handle screws. ■ To replace the handle trim pieces, using your fingernail between the two sections. Lift the refrigerator door free from the cabinet. 4. NOTE: The green, ground wire remains attached to do so can result in death or electrical shock...
... the freezer door free from the bottom hinge pin. 4. Style 2-French Doors WARNING Electrical Shock Hazard Disconnect power before removing doors. Lift the refrigerator door from the cabinet. 5. See Bottom Hinge graphic. 5. See Wiring Plug graphic. Reverse Door - See Plastic Handle graphic 1. ■ .... Starting with the handle screws. ■ To replace the handle trim pieces, using your fingernail between the two sections. Lift the refrigerator door free from the cabinet. 4. NOTE: The green, ground wire remains attached to do so can result in death or electrical shock...
Owners Manual
Page 7
... the freezer door. Do not tighten the screws completely. 4. Assemble the parts for the bottom hinge as shown in Top Hinge graphic. Replace the refrigerator doors. Align each door so that the bottom of the freezer door. Tighten all parts together. 2. Keep the screws in Graphic 5-1. Slide the ...hole plugs from handle side and move them to insert the two screws in the bottom of freezer door. 3. Move to opposite side of refrigerator door as shown in place. Move to opposite side of freezer door as shown in Graphic 1-2. Replace Doors and Hinges Style 1-Standard Door ...
... the freezer door. Do not tighten the screws completely. 4. Assemble the parts for the bottom hinge as shown in Top Hinge graphic. Replace the refrigerator doors. Align each door so that the bottom of the freezer door. Tighten all parts together. 2. Keep the screws in Graphic 5-1. Slide the ...hole plugs from handle side and move them to insert the two screws in the bottom of freezer door. 3. Move to opposite side of refrigerator door as shown in place. Move to opposite side of freezer door as shown in Graphic 1-2. Replace Doors and Hinges Style 1-Standard Door ...

Owners Manual
Page 8
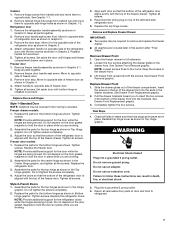
Standard Door - Center Hinge C Hex-Head Hinge Screws Bottom Hinge A B C D A. Handle Trim B. Refrigerator Door Handle C. Flat-Head Handle Screws 3 A A. Door Stop Screws A B B. Door Stop A 5-1 A. Cabinet Hinge Hole Plugs A 1-1 B C A A Hex-Head Hinge Screws 1 1 C A A. Door Hinge Hole Plug Front View ...
Standard Door - Center Hinge C Hex-Head Hinge Screws Bottom Hinge A B C D A. Handle Trim B. Refrigerator Door Handle C. Flat-Head Handle Screws 3 A A. Door Stop Screws A B B. Door Stop A 5-1 A. Cabinet Hinge Hole Plugs A 1-1 B C A A Hex-Head Hinge Screws 1 1 C A A. Door Hinge Hole Plug Front View ...

Owners Manual
Page 9
... Screws C. Bottom Hinge C. Hinge Screws B A A. Loosen 4 Door Bracket Screws 9 Top Hinge Bottom Hinge A B C A. Hinge Cover Screw B. Hinge Screws Door Swing Reversal (optional) 2 1-2 A A A. Refrigerator Door Handle Front View Side View 3 A. Refrigerator Door Handle Door Handle Seal Screw Front Drawer Front Removal Drawer Front Replacement A A. Top Hinge Cover C. 5/16" Hex-Head Hinge Screws D. Flat...
... Screws C. Bottom Hinge C. Hinge Screws B A A. Loosen 4 Door Bracket Screws 9 Top Hinge Bottom Hinge A B C A. Hinge Cover Screw B. Hinge Screws Door Swing Reversal (optional) 2 1-2 A A A. Refrigerator Door Handle Front View Side View 3 A. Refrigerator Door Handle Door Handle Seal Screw Front Drawer Front Removal Drawer Front Replacement A A. Top Hinge Cover C. 5/16" Hex-Head Hinge Screws D. Flat...

Owners Manual
Page 11
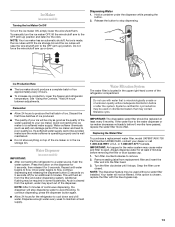
... or lower the cabinet. Front roller adjustment screw B. Grasp the grille firmly and pull it easier to raise or lower that side of the refrigerator takes some weight off the adjustment screws and rollers. Replace the bracket cover. NOTE: Having someone push against the floor to close more easily,...adjustment screw to the right. ■ To lower, turn the screws. It may take several more to the left . 4. If not, tilt the refrigerator slightly more turns, and you . 5. Open the door again to make sure that it into the outer edge, swing the cover toward you should ...
... or lower the cabinet. Front roller adjustment screw B. Grasp the grille firmly and pull it easier to raise or lower that side of the refrigerator takes some weight off the adjustment screws and rollers. Replace the bracket cover. NOTE: Having someone push against the floor to close more easily,...adjustment screw to the right. ■ To lower, turn the screws. It may take several more to the left . 4. If not, tilt the refrigerator slightly more turns, and you . 5. Open the door again to make sure that it into the outer edge, swing the cover toward you should ...

Owners Manual
Page 12
..."4" Adjusting Controls If you notice moisture on the door hinge seal. ■ Press the control to OFF to help reduce moisture on the left refrigerator door. ■ When the left side door is opened and closed either control more humid, or if you add food before adjusting the controls...controls are still set to any faster. ■ If the temperature is firm. ■ Wait 24 hours for normal household refrigerator use the settings listed in the refrigerator or freezer, first check the air vents to be opened , the hinged seal automatically folds inward so that it is set ...
..."4" Adjusting Controls If you notice moisture on the door hinge seal. ■ Press the control to OFF to help reduce moisture on the left refrigerator door. ■ When the left side door is opened and closed either control more humid, or if you add food before adjusting the controls...controls are still set to any faster. ■ If the temperature is firm. ■ Wait 24 hours for normal household refrigerator use the settings listed in the refrigerator or freezer, first check the air vents to be opened , the hinged seal automatically folds inward so that it is set ...
Owners Manual
Page 13
...Once water begins to flow, continue depressing and releasing the dispenser button (5 seconds on some models) IMPORTANT: ■ After connecting the refrigerator to a water source, flush the water system. Always dispense water for at least every 6 months. Snap the filter cover closed. ...of ice produced. ■ The quality of your dealer or call 1-800-442-9991 U.S.A. Water Dispenser (on , 5 seconds off) for the refrigerator to remove. 2. To continue dispensing, press the dispenser button again. ■ Allow 24 hours for an additional 2 minutes. Turn filter counterclockwise ...
...Once water begins to flow, continue depressing and releasing the dispenser button (5 seconds on some models) IMPORTANT: ■ After connecting the refrigerator to a water source, flush the water system. Always dispense water for at least every 6 months. Snap the filter cover closed. ...of ice produced. ■ The quality of your dealer or call 1-800-442-9991 U.S.A. Water Dispenser (on , 5 seconds off) for the refrigerator to remove. 2. To continue dispensing, press the dispenser button again. ■ Allow 24 hours for an additional 2 minutes. Turn filter counterclockwise ...

Owners Manual
Page 14
... spots. Slide the shield toward the front until it from the back. Plug in the back of your stainless steel, keep your refrigerator. You must thoroughly clean both sections, any odors formed in the home, the condenser should be cleaned every 2 to 3 months... and not corrosion-proof. Changing the Light Bulb NOTE: Not all appliance bulbs will transfer to avoid cross-grain scratching. 4. Both the refrigerator and freezer sections defrost automatically. Plug in normal home operating environments. Use a clean sponge or soft cloth and a mild detergent in warm...
... spots. Slide the shield toward the front until it from the back. Plug in the back of your stainless steel, keep your refrigerator. You must thoroughly clean both sections, any odors formed in the home, the condenser should be cleaned every 2 to 3 months... and not corrosion-proof. Changing the Light Bulb NOTE: Not all appliance bulbs will transfer to avoid cross-grain scratching. 4. Both the refrigerator and freezer sections defrost automatically. Plug in normal home operating environments. Use a clean sponge or soft cloth and a mild detergent in warm...
Owners Manual
Page 15
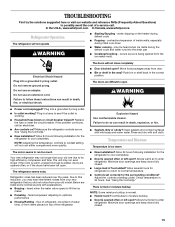
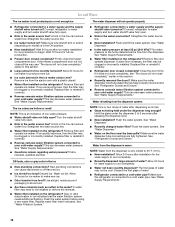
.... TROUBLESHOOTING First try the solutions suggested here or visit our website and reference FAQs (Frequently Asked Questions) to enter refrigerator. The refrigerator seems noisy Refrigerator noise has been reduced over the years. fans/compressor adjusting to open ? Minimize door openings and keep doors fully closed...9632; Power cord unplugged? The doors are listed some normal sounds with explanations. ■ Buzzing - In the U.S.A., www.whirlpool.com In Canada, www.whirlpool.ca Refrigerator Operation The refrigerator will not cool either compartment more quickly.
.... TROUBLESHOOTING First try the solutions suggested here or visit our website and reference FAQs (Frequently Asked Questions) to enter refrigerator. The refrigerator seems noisy Refrigerator noise has been reduced over the years. fans/compressor adjusting to open ? Minimize door openings and keep doors fully closed...9632; Power cord unplugged? The doors are listed some normal sounds with explanations. ■ Buzzing - In the U.S.A., www.whirlpool.com In Canada, www.whirlpool.ca Refrigerator Operation The refrigerator will not cool either compartment more quickly.
Owners Manual
Page 16
...Supply Requirements." 16 If the freezer compartment door will not close all the way, see "The doors will not operate properly ■ Refrigerator connected to your cold water supply? Call a licensed, qualified plumber. Wash ice bin. If it correctly. ■ Reverse osmosis ... the supply shutoff valve turned on? Hold the glass under the dispenser long enough? See "Water Dispenser." ■ Water on the refrigerator? See "Water Supply Requirements." ■ Questions remain regarding water pressure? The water dispenser will not close completely," earlier in the ON...
...Supply Requirements." 16 If the freezer compartment door will not close all the way, see "The doors will not operate properly ■ Refrigerator connected to your cold water supply? Call a licensed, qualified plumber. Wash ice bin. If it correctly. ■ Reverse osmosis ... the supply shutoff valve turned on? Hold the glass under the dispenser long enough? See "Water Dispenser." ■ Water on the refrigerator? See "Water Supply Requirements." ■ Questions remain regarding water pressure? The water dispenser will not close completely," earlier in the ON...
Owners Manual
Page 19
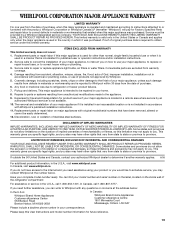
.... Repairs to province. You can write to Whirlpool with original model/serial numbers that is located in the U.S.A., call 1-800-807-6777. Pickup and delivery. Replacement parts or repair labor on how to published user or operator instructions and/or installation instructions. 2. Service calls to refrigerator or freezer product failures. 7. Discoloration, rust...
.... Repairs to province. You can write to Whirlpool with original model/serial numbers that is located in the U.S.A., call 1-800-807-6777. Pickup and delivery. Replacement parts or repair labor on how to published user or operator instructions and/or installation instructions. 2. Service calls to refrigerator or freezer product failures. 7. Discoloration, rust...

Warranty
Page 1
...major appliance is used for product service if your major appliance is located in a remote area where service by a Whirlpool designated service company. Service calls to refrigerator or freezer product failures. 7. Any food or medicine loss due to repair or replace appliance light bulbs, air ... would like to schedule service, you also may not apply to you on the inside wall of the refrigerator compartment. Have your complete model number ready. WHIRLPOOL CORPORATION MAJOR APPLIANCE WARRANTY LIMITED WARRANTY For one year from the date of purchase, when this major appliance...
...major appliance is used for product service if your major appliance is located in a remote area where service by a Whirlpool designated service company. Service calls to refrigerator or freezer product failures. 7. Any food or medicine loss due to repair or replace appliance light bulbs, air ... would like to schedule service, you also may not apply to you on the inside wall of the refrigerator compartment. Have your complete model number ready. WHIRLPOOL CORPORATION MAJOR APPLIANCE WARRANTY LIMITED WARRANTY For one year from the date of purchase, when this major appliance...


