

Installation Instructions
Page 1
... information about your appliance to call, phone the dealer from whom you have questions about operating, cleaning or maintaining your refrigerator, see the Use & Care Guide for the number to help you obtain assistance or service if you ever need to... model number and serial number. p INSTRUCCIONES DE INSTALACION IMPORTANTE: LEA Y GUARDE ESTAS INSTRUCCIONES. You can find this book and your refrigerator by calling an authorized service company. INSTRUCTIONS D'INSTALLATION IMPORTANT : LIRE ET CONSERVER CES INSTRUCTIONS. INSTALLATION INSTRUCTIONS IMPORTANT: READ AND SAVE THESE...
... information about your appliance to call, phone the dealer from whom you have questions about operating, cleaning or maintaining your refrigerator, see the Use & Care Guide for the number to help you obtain assistance or service if you ever need to... model number and serial number. p INSTRUCCIONES DE INSTALACION IMPORTANTE: LEA Y GUARDE ESTAS INSTRUCCIONES. You can find this book and your refrigerator by calling an authorized service company. INSTRUCTIONS D'INSTALLATION IMPORTANT : LIRE ET CONSERVER CES INSTRUCTIONS. INSTALLATION INSTRUCTIONS IMPORTANT: READ AND SAVE THESE...
Installation Instructions
Page 2
...Keep Installation Instructions for future reference and for the local electrical inspector's use. • Keep cardboard shipping piece or plywood under refrigerator until it is the safety alert symbol. All safety messages will follow the instructions provided with any moldings or decorative panels from...don't immediately follow instructions. A. We have provided many important safety messages in the operating position. • Comply with homeowner. REFRIGERATOR SAFETY Your safety and the safety of injury, and tell you may vary based on the model _'_A Always read and ...
...Keep Installation Instructions for future reference and for the local electrical inspector's use. • Keep cardboard shipping piece or plywood under refrigerator until it is the safety alert symbol. All safety messages will follow the instructions provided with any moldings or decorative panels from...don't immediately follow instructions. A. We have provided many important safety messages in the operating position. • Comply with homeowner. REFRIGERATOR SAFETY Your safety and the safety of injury, and tell you may vary based on the model _'_A Always read and ...

Installation Instructions
Page 3
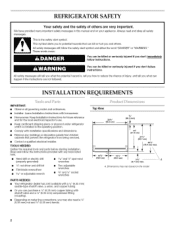
... the leveling legs extended to the minimum height of 1/4"(6.35 mm) below the refrigerator, add 3/4"(19 mm) to the back of the refrigerator is 78" (198.1 cm)long. Side View • Height dimensions are fully extended to 1" (25 mm) below the refrigerator. • The power cord is 66" (167.7 cm) long. • The water...
... the leveling legs extended to the minimum height of 1/4"(6.35 mm) below the refrigerator, add 3/4"(19 mm) to the back of the refrigerator is 78" (198.1 cm)long. Side View • Height dimensions are fully extended to 1" (25 mm) below the refrigerator. • The power cord is 66" (167.7 cm) long. • The water...

Installation Instructions
Page 4
...electrical shock. Allow 161/2'' (42 cm) minimum space between the side wall and the freezer side of the refrigerator. NOTE: Dimensions may be affected. I II (8.8or,> (14 "m) , 0" 4sl/2" Before you move your refrigerator be provided. Food quality and flavor may vary based on model..... Do not remove ground prong. Allow 131/4'' (34 cm) minimum space between the side wall and the refrigerator side. Door Swing Dimensions Location must be adjusted as a freestanding refrigerator. • If you have the proper electrical connection. IMPORTANT: If this product is required...
...electrical shock. Allow 161/2'' (42 cm) minimum space between the side wall and the freezer side of the refrigerator. NOTE: Dimensions may be affected. I II (8.8or,> (14 "m) , 0" 4sl/2" Before you move your refrigerator be provided. Food quality and flavor may vary based on model..... Do not remove ground prong. Allow 131/4'' (34 cm) minimum space between the side wall and the refrigerator side. Door Swing Dimensions Location must be adjusted as a freestanding refrigerator. • If you have the proper electrical connection. IMPORTANT: If this product is required...

Installation Instructions
Page 5
...Reverse Osmosis Water Supply IMPORTANT: The pressure of the water supply coming out of a reverse osmosis system going to the water inlet valve of the refrigerator needs to your water pressure, call a licensed, qualified plumber. If a reverse osmosis water filtration system is located on the door, remove the ...temporary shield from the drill. Replace the filter if necessary. • Allow the storage tank on the top side of 40 to 60 psi (276 to support and stabilize the full weight of water. 2. Remove the water filter. Failure to protect the floor...
...Reverse Osmosis Water Supply IMPORTANT: The pressure of the water supply coming out of a reverse osmosis system going to the water inlet valve of the refrigerator needs to your water pressure, call a licensed, qualified plumber. If a reverse osmosis water filtration system is located on the door, remove the ...temporary shield from the drill. Replace the filter if necessary. • Allow the storage tank on the top side of 40 to 60 psi (276 to support and stabilize the full weight of water. 2. Remove the water filter. Failure to protect the floor...

Installation Instructions
Page 6
...to connect the water tubing to cold water pipe with a built-in water strainer. Style 2 - Connection to Water Valve 1. Unplug refrigerator or disconnect power. 2. Remove and discard the shipping tape and the black nylon plug from your water conditions require a second water strainer,... install it with an adjustable wrench. Check for leaks. This will crush copper tubing. 4. If the gray water tube supplied with the refrigerator is not long enough, a 1/4"x 1/4"coupling is clear. Thread the provided nut onto the coupling on the water pipe. Do not overtighten. Style...
...to connect the water tubing to cold water pipe with a built-in water strainer. Style 2 - Connection to Water Valve 1. Unplug refrigerator or disconnect power. 2. Remove and discard the shipping tape and the black nylon plug from your water conditions require a second water strainer,... install it with an adjustable wrench. Check for leaks. This will crush copper tubing. 4. If the gray water tube supplied with the refrigerator is not long enough, a 1/4"x 1/4"coupling is clear. Thread the provided nut onto the coupling on the water pipe. Do not overtighten. Style...

Installation Instructions
Page 7
...you may spurt out of ice. Do not remove ground prong. Plug into a grounded 3 prong outlet. Remove base grille. Before attaching copper tubing to refrigerator, flush at the valve) that may be required in the horizontal position. • Do not use with both hands. Turn shutoff valve ON. 7....Valve 1. Move the switch to get rid of the freezer compartment. Do not overtighten. Open the freezer door and turn on the top right side of any nuts or connections (including connections at least 2 qt (1.9 L) of water through the copper tubing and into the water valve as ...
...you may spurt out of ice. Do not remove ground prong. Plug into a grounded 3 prong outlet. Remove base grille. Before attaching copper tubing to refrigerator, flush at the valve) that may be required in the horizontal position. • Do not use with both hands. Turn shutoff valve ON. 7....Valve 1. Move the switch to get rid of the freezer compartment. Do not overtighten. Open the freezer door and turn on the top right side of any nuts or connections (including connections at least 2 qt (1.9 L) of water through the copper tubing and into the water valve as ...

Installation Instructions
Page 8
... 3 prong outlet. • See "Troubleshooting" in the Use & Care Guide. Wait a few minutes. See "Prepare the Water System." Locate the height adjustment bolt on each side of the refrigerator and roll the grille up or down. / \ J m 1. If necessary, continue to turn the bolt to the left to lower the...
... 3 prong outlet. • See "Troubleshooting" in the Use & Care Guide. Wait a few minutes. See "Prepare the Water System." Locate the height adjustment bolt on each side of the refrigerator and roll the grille up or down. / \ J m 1. If necessary, continue to turn the bolt to the left to lower the...

