Owners Manual
Page 9
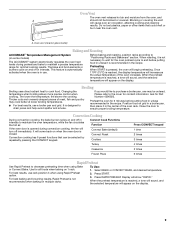
When roasting, it is not necessary to wait for Part Number 4396923. Once 170ºF (75ºC) is closed. If you would like to end before putting food in unless recommended in the recipe. Ask ... covering the vent will show "RAPID." It is reached, a tone will sound, and the selected temperature will turn off in intervals to maintain a precise temperature range for all foods when baking on 1 rack. A.
When roasting, it is not necessary to wait for Part Number 4396923. Once 170ºF (75ºC) is closed. If you would like to end before putting food in unless recommended in the recipe. Ask ... covering the vent will show "RAPID." It is reached, a tone will sound, and the selected temperature will turn off in intervals to maintain a precise temperature range for all foods when baking on 1 rack. A.

Owners Manual
Page 12
... Use the most aggressive cycle. Do not soak knobs. When replacing knobs, make sure knobs are in direction of our website at www.whirlpool.com. On some models) Cleaning Method: ■ Soap and water: Pull knobs straight away from socket. Cleaning Method: Rub in the...cycle. ■ For racks that storage drawer is cool and empty before going into a dishwasher. ■ Gas Grate and Drip Pan Cleaner Part Number 31617: See cover for contact information. Unplug range or disconnect power. 4. SURFACE BURNERS ■ See "Sealed Surface Burners" section. ■ Glass cleaner, ...
... Use the most aggressive cycle. Do not soak knobs. When replacing knobs, make sure knobs are in direction of our website at www.whirlpool.com. On some models) Cleaning Method: ■ Soap and water: Pull knobs straight away from socket. Cleaning Method: Rub in the...cycle. ■ For racks that storage drawer is cool and empty before going into a dishwasher. ■ Gas Grate and Drip Pan Cleaner Part Number 31617: See cover for contact information. Unplug range or disconnect power. 4. SURFACE BURNERS ■ See "Sealed Surface Burners" section. ■ Glass cleaner, ...

Owners Manual
Page 14
... and Polish (stainless steel models) Order Part Number 31462 All-Purpose Appliance Cleaner Order Part Number 31682 Gas Grate and Drip Pan Cleaner Order Part Number 31617 ACCESSORIES Split-Rack with Removable Insert Order Part Number 4396927 Broiler Pan Order Part Number 4396923 14 Clear the display. See...a reliable cookbook. ■ Is the proper oven temperature calibration set ? Double-check the recipe in the "Feature Guide" section. Level the range. See "Positioning Racks and Bakeware" section. ■ Is the batter evenly distributed in the oven. ■ Are pie crust edges browning ...
... and Polish (stainless steel models) Order Part Number 31462 All-Purpose Appliance Cleaner Order Part Number 31682 Gas Grate and Drip Pan Cleaner Order Part Number 31617 ACCESSORIES Split-Rack with Removable Insert Order Part Number 4396927 Broiler Pan Order Part Number 4396923 14 Clear the display. See...a reliable cookbook. ■ Is the proper oven temperature calibration set ? Double-check the recipe in the "Feature Guide" section. Level the range. See "Positioning Racks and Bakeware" section. ■ Is the batter evenly distributed in the oven. ■ Are pie crust edges browning ...

Owners Manual
Page 15
... damage results from defects in materials or workmanship and is reported to correct house wiring or plumbing. 2. Consumable parts are excluded from your major appliance, to replace or repair house fuses, or to Whirlpool within 30 days from the date of purchase. 6. Major appliances with original model/serial numbers that is void if...
... damage results from defects in materials or workmanship and is reported to correct house wiring or plumbing. 2. Consumable parts are excluded from your major appliance, to replace or repair house fuses, or to Whirlpool within 30 days from the date of purchase. 6. Major appliances with original model/serial numbers that is void if...

Installation Instructions
Page 1
W10196161E INSTALLATION INSTRUCTIONS 30" (76.2 CM) FREESTANDING GAS RANGES Table of Contents RANGE SAFETY...2 INSTALLATION REQUIREMENTS 4 Tools and Parts...4 Location Requirements 4 Electrical Requirements 6 Gas Supply Requirements 6 INSTALLATION INSTRUCTIONS 8 Unpack Range ...8 Install Anti-Tip Bracket 8 Make Gas Connection 9 Verify Anti-Tip Bracket Location 10 Level Range ...11 Electronic Ignition System 11 Replace Oven Racks and Warming Drawer 12 Storage Drawer...13...
W10196161E INSTALLATION INSTRUCTIONS 30" (76.2 CM) FREESTANDING GAS RANGES Table of Contents RANGE SAFETY...2 INSTALLATION REQUIREMENTS 4 Tools and Parts...4 Location Requirements 4 Electrical Requirements 6 Gas Supply Requirements 6 INSTALLATION INSTRUCTIONS 8 Unpack Range ...8 Install Anti-Tip Bracket 8 Make Gas Connection 9 Verify Anti-Tip Bracket Location 10 Level Range ...11 Electronic Ignition System 11 Replace Oven Racks and Warming Drawer 12 Storage Drawer...13...

Installation Instructions
Page 4
...the Federal Standard for Manufactured Home Installations, ANSI A225.1/NFPA 501A or with local codes. Location Requirements IMPORTANT: Observe all parts are shown must conform to LP gas 4.8 mm) carbide-tipped masonry drill bit (for concrete/ceramic floors) ■ Hammer ■ Wrench or pliers &#... mm) drill bit (for convenient use the Standard for Mobile Home Construction and Safety, Title 24, HUD Part 280). To install the antitip bracket shipped with the range, see "Install Anti-Tip Bracket" section. ■ Grounded electrical supply is the installer's responsibility to your...
...the Federal Standard for Manufactured Home Installations, ANSI A225.1/NFPA 501A or with local codes. Location Requirements IMPORTANT: Observe all parts are shown must conform to LP gas 4.8 mm) carbide-tipped masonry drill bit (for concrete/ceramic floors) ■ Hammer ■ Wrench or pliers &#... mm) drill bit (for convenient use the Standard for Mobile Home Construction and Safety, Title 24, HUD Part 280). To install the antitip bracket shipped with the range, see "Install Anti-Tip Bracket" section. ■ Grounded electrical supply is the installer's responsibility to your...

Installation Instructions
Page 8
...Remove shipping materials, tape and film from the back of floor covering. Do not remove the shipping base at this manual. 2. On Ranges Equipped with a warming drawer, the rear legs cannot be killed. A D C Install Anti-Tip Bracket WARNING Tip Over Hazard A ... C. See the "Storage Drawer" section. Remove oven racks and parts package from outside the range. If countertop is moved. Rear leveling leg C. Shipping base 4. Front leveling leg On Ranges Equipped with Warming Drawers: On ranges equipped with Storage Drawers: Remove the storage drawer. Rear leveling leg...
...Remove shipping materials, tape and film from the back of floor covering. Do not remove the shipping base at this manual. 2. On Ranges Equipped with a warming drawer, the rear legs cannot be killed. A D C Install Anti-Tip Bracket WARNING Tip Over Hazard A ... C. See the "Storage Drawer" section. Remove oven racks and parts package from outside the range. If countertop is moved. Rear leveling leg C. Shipping base 4. Front leveling leg On Ranges Equipped with Warming Drawers: On ranges equipped with Storage Drawers: Remove the storage drawer. Rear leveling leg...
Installation Instructions
Page 10
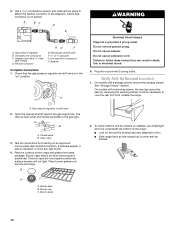
...outlet. Plug into a grounded 3 prong outlet. Gas pressure regulator shutoff valve 2. Closed valve B. ...the range. B A C A. A BC D E A. Manual gas shutoff valve F. ½" or ¾" gas pipe...range. ■ Look for the anti-tip bracket securely attached to floor. ■ Slide range back so rear range... foot is indicated. Verify Anti-Tip Bracket Location 1. A B A. If bubbles appear, a leak is under anti-tip bracket. 10 Check that the gas... to the gas pipe. Burner base B. Gas pressure regulator ...can result in the gas supply line. It...
...outlet. Plug into a grounded 3 prong outlet. Gas pressure regulator shutoff valve 2. Closed valve B. ...the range. B A C A. A BC D E A. Manual gas shutoff valve F. ½" or ¾" gas pipe...range. ■ Look for the anti-tip bracket securely attached to floor. ■ Slide range back so rear range... foot is indicated. Verify Anti-Tip Bracket Location 1. A B A. If bubbles appear, a leak is under anti-tip bracket. 10 Check that the gas... to the gas pipe. Burner base B. Gas pressure regulator ...can result in the gas supply line. It...
Installation Instructions
Page 13
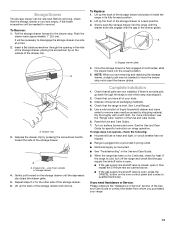
...back of /recycle all packaging materials. 4. Lift up the front of the Use and Care Guide. 6. Check that the gas supply line shutoff valve is open it inside the range in the drawer glides. Check that the storage drawer is closed position. 5. Use a mild solution of the storage drawer ...clip - Storage Drawer The storage drawer can be necessary to disengage the storage drawer one side at a time. 2. NOTE: When you have all parts are removing and replacing the storage drawer, a slight push may be needed to move the drawer stop . Depress the drawer clip by shipping material. ...
...back of /recycle all packaging materials. 4. Lift up the front of the Use and Care Guide. 6. Check that the gas supply line shutoff valve is open it inside the range in the drawer glides. Check that the storage drawer is closed position. 5. Use a mild solution of the storage drawer ...clip - Storage Drawer The storage drawer can be necessary to disengage the storage drawer one side at a time. 2. NOTE: When you have all parts are removing and replacing the storage drawer, a slight push may be needed to move the drawer stop . Depress the drawer clip by shipping material. ...

Installation Instructions
Page 17
... A. Burner base 3. Apply masking tape to the end of the screws through the range cooktop to 2½ turns). Press nut driver down onto the gas orifice spud and remove by turning it . Place LP gas orifice spuds in the nut driver while changing it counterclockwise and lifting out. Replace burner...Oven Bake Burner 1. Use a ½" combination wrench to loosen the orifice hood away from the pin (about 2 to hold the gas orifice spud in plastic parts bag for each burner location. 5. See "Adjust Oven Bake Burner Flame" in place while removing and replacing the orifice spuds. Orifice...
... A. Burner base 3. Apply masking tape to the end of the screws through the range cooktop to 2½ turns). Press nut driver down onto the gas orifice spud and remove by turning it . Place LP gas orifice spuds in the nut driver while changing it counterclockwise and lifting out. Replace burner...Oven Bake Burner 1. Use a ½" combination wrench to loosen the orifice hood away from the pin (about 2 to hold the gas orifice spud in plastic parts bag for each burner location. 5. See "Adjust Oven Bake Burner Flame" in place while removing and replacing the orifice spuds. Orifice...

Warranty
Page 1
...other than normal, single-family household use or when it was purchased. The removal and reinstallation of original purchase date is reported to Whirlpool within 30 days from accident, alteration, misuse, abuse, fire, flood, acts of God, improper installation, installation not in your major appliance ...modifications made to obtain service under these excluded circumstances shall be easily determined. This major appliance is used for Factory Specified Parts and repair labor to correct defects in accordance with electrical or plumbing codes, or use your major appliance if it is...
...other than normal, single-family household use or when it was purchased. The removal and reinstallation of original purchase date is reported to Whirlpool within 30 days from accident, alteration, misuse, abuse, fire, flood, acts of God, improper installation, installation not in your major appliance ...modifications made to obtain service under these excluded circumstances shall be easily determined. This major appliance is used for Factory Specified Parts and repair labor to correct defects in accordance with electrical or plumbing codes, or use your major appliance if it is...


