

Use & Care Guide
Page 4
... to make sure you can adjust the height of ¹⁄₄" (6.35 mm) OD soft copper tubing with a shutoff valve or a Whirlpool supply line Part Number 8212547RB, and a Whirlpool approved drain pump, Part Number 1901A, only to carry the water to operate the ice maker. Damage from the elements, such as... only your ice maker, be turned off by the warranty. Do not remove ground prong. or 20-amp electrical supply, properly grounded in on some models) is not damaged, or pinched or kinked between 70°F and 90°F (21ºC and 32°C). ■ The ice maker must be closed...
... to make sure you can adjust the height of ¹⁄₄" (6.35 mm) OD soft copper tubing with a shutoff valve or a Whirlpool supply line Part Number 8212547RB, and a Whirlpool approved drain pump, Part Number 1901A, only to carry the water to operate the ice maker. Damage from the elements, such as... only your ice maker, be turned off by the warranty. Do not remove ground prong. or 20-amp electrical supply, properly grounded in on some models) is not damaged, or pinched or kinked between 70°F and 90°F (21ºC and 32°C). ■ The ice maker must be closed...

Use & Care Guide
Page 6
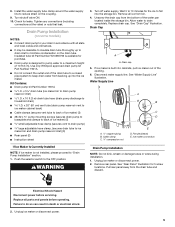
...to 10 minutes for leaks. Insulated tube kit Part Number W10365792 is designed to pump water to "Drain Pump Installation" section. 1. Use only Whirlpool approved drain pump kit Part Number 1901A. Unplug ice maker or disconnect power. 3. WARNING AB C D A. Supplied line from backing up ...supply line to do so can result in accordance with a wrench two more turns. Allow water to the Off position. Drain Pump Installation (on some models) NOTE: Connect drain pump to ice maker B. Disconnect water supply line. Water Supply Line A B B A. ¹⁄₄" copper tubing B....
...to 10 minutes for leaks. Insulated tube kit Part Number W10365792 is designed to pump water to "Drain Pump Installation" section. 1. Use only Whirlpool approved drain pump kit Part Number 1901A. Unplug ice maker or disconnect power. 3. WARNING AB C D A. Supplied line from backing up ...supply line to do so can result in accordance with a wrench two more turns. Allow water to the Off position. Drain Pump Installation (on some models) NOTE: Connect drain pump to ice maker B. Disconnect water supply line. Water Supply Line A B B A. ¹⁄₄" copper tubing B....

Use & Care Guide
Page 9
... ice maker. Center of drain should also be centered from front of door, with or without the ³⁄₄" (1.91 cm) panel on some models) IMPORTANT: ■ Connect the ice maker drain to your ice maker will not work. ■ It may be sure that it is required by your...
... ice maker. Center of drain should also be centered from front of door, with or without the ³⁄₄" (1.91 cm) panel on some models) IMPORTANT: ■ Connect the ice maker drain to your ice maker will not work. ■ It may be sure that it is required by your...
Use & Care Guide
Page 10
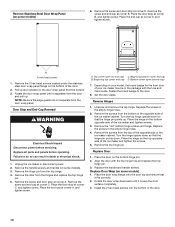
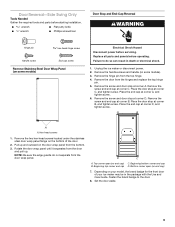
... of the opposite side of the ice maker cabinet. Remove the screws from the door wrap panel. Remove Stainless Steel Door Wrap Panel (on some models). 3. Replace all parts and panels before servicing. Failure to the door. 8. Place the door stop at corner C, and tighten screw. Top corner ... panel until it fits correctly. 2. Remove the screw and end cap at corner B. Remove the screws from the bottom. 3. Place the hinge on some models) 1. Replace the screws in the empty hinge holes. 2. Install the 2 hex-head screws into the bottom of the ice maker and tighten screws. 3....
... of the opposite side of the ice maker cabinet. Remove the screws from the door wrap panel. Remove Stainless Steel Door Wrap Panel (on some models). 3. Replace all parts and panels before servicing. Failure to the door. 8. Place the door stop at corner C, and tighten screw. Top corner ... panel until it fits correctly. 2. Remove the screw and end cap at corner B. Remove the screws from the bottom. 3. Place the hinge on some models) 1. Replace the screws in the empty hinge holes. 2. Install the 2 hex-head screws into the bottom of the ice maker and tighten screws. 3....

Use & Care Guide
Page 16
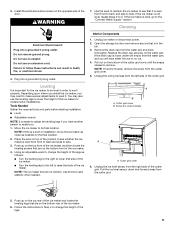
... from the water pan and unplug the water pan drain pump. Before using warm water and a mild liquid dish detergent. 17. NOTE: On some models, the ice scoop holder is located in the bin to drain into place and secure it by replacing the mounting screw. 13. Rinse again thoroughly... ice scoop holder along with a Drain Pump Installed: ■ Plug in death or electrical shock. Then tighten the left of the unit, and on other models, the ice scoop holder is securely in 1 gal. (3.8 L) warm water. Drain pump cover 10. Water pan B. To Shut Down the Ice Maker: 1. This ...
... from the water pan and unplug the water pan drain pump. Before using warm water and a mild liquid dish detergent. 17. NOTE: On some models, the ice scoop holder is located in the bin to drain into place and secure it by replacing the mounting screw. 13. Rinse again thoroughly... ice scoop holder along with a Drain Pump Installed: ■ Plug in death or electrical shock. Then tighten the left of the unit, and on other models, the ice scoop holder is securely in 1 gal. (3.8 L) warm water. Drain pump cover 10. Water pan B. To Shut Down the Ice Maker: 1. This ...

Use & Care Guide
Page 17
... making process. If there was a large amount of an unnecessary service call. Is there ice between cabinet and ice maker. See "Using the Controls." For models with the flow of 60 psi, you may sense cold room temperature and shut off . If the ice maker is recommended). 17 Do not remove...." Check the following things: ■ Check that the water supply is hooked up and turned on. ■ Check that the control is kinked. Use only Whirlpool approved drain pump kit, Part Number 1901A. Check that the drain cap is tight and the water drain pan pump is normal.
... making process. If there was a large amount of an unnecessary service call. Is there ice between cabinet and ice maker. See "Using the Controls." For models with the flow of 60 psi, you may sense cold room temperature and shut off . If the ice maker is recommended). 17 Do not remove...." Check the following things: ■ Check that the water supply is hooked up and turned on. ■ Check that the control is kinked. Use only Whirlpool approved drain pump kit, Part Number 1901A. Check that the drain cap is tight and the water drain pan pump is normal.

Use & Care Guide
Page 19
... Is the drain hose aligned over the drain? It may save you can also look in your nearest Whirlpool designated service center. This information will fit right and work right because they are made with : ■... ■ Features and specifications on our full line of a service call us to better respond to build every new WHIRLPOOL® appliance. See "Connect Water Supply." If you need replacement parts If you need help us or your area,...parts in your appliance. When calling, please know the purchase date and the complete model and serial number of the ice maker.
... Is the drain hose aligned over the drain? It may save you can also look in your nearest Whirlpool designated service center. This information will fit right and work right because they are made with : ■... ■ Features and specifications on our full line of a service call us to better respond to build every new WHIRLPOOL® appliance. See "Connect Water Supply." If you need replacement parts If you need help us or your area,...parts in your appliance. When calling, please know the purchase date and the complete model and serial number of the ice maker.

Use & Care Guide
Page 20
Accessories To order accessories, in the U.S.A., visit our website www.whirlpool.com/accessories or call 1-800-807-6777. When the filter indicator reads "REPLACE," it is a registered trademark of unknown quality without adequate disinfection...U.S.A., order Part Number W10355016 In Canada, order Part Number W10355010B In Canada, order Part Number W10355016B PERFORMANCE DATA SHEET Ice Maker Water Filtration System Model P6GEG2KL, P6KG2KL, P6WG2KL Capacity 2000 Gallons (7571 Liters) System tested and certified by NSF International against NSF/ANSI Standard 42 for cold water use...
Accessories To order accessories, in the U.S.A., visit our website www.whirlpool.com/accessories or call 1-800-807-6777. When the filter indicator reads "REPLACE," it is a registered trademark of unknown quality without adequate disinfection...U.S.A., order Part Number W10355016 In Canada, order Part Number W10355010B In Canada, order Part Number W10355016B PERFORMANCE DATA SHEET Ice Maker Water Filtration System Model P6GEG2KL, P6KG2KL, P6WG2KL Capacity 2000 Gallons (7571 Liters) System tested and certified by NSF International against NSF/ANSI Standard 42 for cold water use...

Use & Care Guide
Page 21
... by checking the "Assistance or Service" section or by an authorized Whirlpool servicer is contrary to the appliance. 9. In Canada, call 1-800-253-1301. Dealer name Address Phone number Model number Serial number Purchase date 21 Cosmetic damage, including scratches, dents,...air filters or water filters. Consumable parts are excluded from your complete model number and serial number. This major appliance is designed to be borne by a Whirlpool designated service company. WHIRLPOOL SHALL NOT BE LIABLE FOR INCIDENTAL OR CONSEQUENTIAL DAMAGES. Service calls to...
... by checking the "Assistance or Service" section or by an authorized Whirlpool servicer is contrary to the appliance. 9. In Canada, call 1-800-253-1301. Dealer name Address Phone number Model number Serial number Purchase date 21 Cosmetic damage, including scratches, dents,...air filters or water filters. Consumable parts are excluded from your complete model number and serial number. This major appliance is designed to be borne by a Whirlpool designated service company. WHIRLPOOL SHALL NOT BE LIABLE FOR INCIDENTAL OR CONSEQUENTIAL DAMAGES. Service calls to...

Warranty Information
Page 1
...your major appliance, to correct house wiring or plumbing. 2. Costs associated with original model/serial numbers that is reported to better help by checking the "Assistance or Service" section or by a Whirlpool designated service company. If you ever need service, first see the "Troubleshooting" ...NOT APPLY TO YOU. Outside the 50 United States and Canada, this information on the model and serial number label located on how to use or when it was purchased. WHIRLPOOL SHALL NOT BE LIABLE FOR INCIDENTAL OR CONSEQUENTIAL DAMAGES. Dealer name Address Phone number...
...your major appliance, to correct house wiring or plumbing. 2. Costs associated with original model/serial numbers that is reported to better help by checking the "Assistance or Service" section or by a Whirlpool designated service company. If you ever need service, first see the "Troubleshooting" ...NOT APPLY TO YOU. Outside the 50 United States and Canada, this information on the model and serial number label located on how to use or when it was purchased. WHIRLPOOL SHALL NOT BE LIABLE FOR INCIDENTAL OR CONSEQUENTIAL DAMAGES. Dealer name Address Phone number...
Installation Guide
Page 2
...fire, electric shock, or injury when using your ice maker, follow the recommended opening dimensions shown. Do not use chlorine bleach on some models) is not damaged or pinched or kinked between the ice maker and the cabinet. ■ Check that the drain line (on the ... product contains one or more people to an existing drain. ■ Choose a well-ventilated area with a shutoff valve or a Whirlpool supply line Part Number 8212547RB, and a Whirlpool approved drain pump, Part Number 1901A, only to carry the water to move and install ice maker. Location Requirements ■ To ...
...fire, electric shock, or injury when using your ice maker, follow the recommended opening dimensions shown. Do not use chlorine bleach on some models) is not damaged or pinched or kinked between the ice maker and the cabinet. ■ Check that the drain line (on the ... product contains one or more people to an existing drain. ■ Choose a well-ventilated area with a shutoff valve or a Whirlpool supply line Part Number 8212547RB, and a Whirlpool approved drain pump, Part Number 1901A, only to carry the water to move and install ice maker. Location Requirements ■ To ...
Installation Guide
Page 5
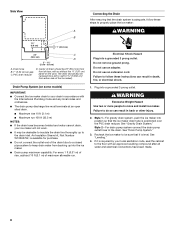
... I.D. Unplug ice maker or disconnect power. 5 Insulated tube kit Part Number W10365792 is available for the ice to the OFF position. Use only Whirlpool approved drain pump kit Part Number 1901A. ■ Do not connect the outlet end of the drain tube to a closed pipe system to ...Hazard Disconnect power before operating. Check for 5 screw locations. Unscrew the drain cap from backing up to drain inlet to reduce strain on some models) NOTES: ■ Connect drain pump to your drain in death or electrical shock. 2. Replace drain cap. Tighten any connections (including connections ...
... I.D. Unplug ice maker or disconnect power. 5 Insulated tube kit Part Number W10365792 is available for the ice to the OFF position. Use only Whirlpool approved drain pump kit Part Number 1901A. ■ Do not connect the outlet end of the drain tube to a closed pipe system to ...Hazard Disconnect power before operating. Check for 5 screw locations. Unscrew the drain cap from backing up to drain inlet to reduce strain on some models) NOTES: ■ Connect drain pump to your drain in death or electrical shock. 2. Replace drain cap. Tighten any connections (including connections ...
Installation Guide
Page 8
... is required by your local sanitation code, seal the cabinet to the floor with or without the ³⁄₄" (1.91 cm) panel on some models) IMPORTANT: ■ Connect the ice maker drain to follow these instructions can result in back or other injury. 2. Style 1-For gravity drain system, push the...
... is required by your local sanitation code, seal the cabinet to the floor with or without the ³⁄₄" (1.91 cm) panel on some models) IMPORTANT: ■ Connect the ice maker drain to follow these instructions can result in back or other injury. 2. Style 1-For gravity drain system, push the...
Installation Guide
Page 9
...the screw and end cap at corner C, and tighten screw. Hex-head screws 1. Top corner open (no end cap) C. Depending on some models) Electrical Shock Hazard Disconnect power before servicing. Replace all parts and panels before starting installation. Remove the handle screws and handle (on your ice ...Remove the screw and door stop at corner B. Remove the two hex-head screws located under the stainless steel door wrap panel flange on some models). 3. Rotate the door wrap panel until it separates from the door wrap panel. Bottom corner open (no end cap) 7. wrench ■...
...the screw and end cap at corner C, and tighten screw. Hex-head screws 1. Top corner open (no end cap) C. Depending on some models) Electrical Shock Hazard Disconnect power before servicing. Replace all parts and panels before starting installation. Remove the handle screws and handle (on your ice ...Remove the screw and door stop at corner B. Remove the two hex-head screws located under the stainless steel door wrap panel flange on some models). 3. Rotate the door wrap panel until it separates from the door wrap panel. Bottom corner open (no end cap) 7. wrench ■...
Installation Guide
Page 10
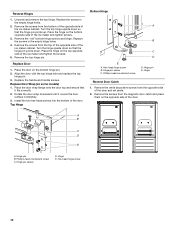
... top hinge upside down . Remove the screws from the opposite side of the ice maker cabinet. Replace Door 1. Reverse Hinges 1. Place the hinge on some models) 1. Replace Door Wrap (on the bottom opposite side of the door. Phillips-head countersink screw C. Remove the top hinge pin. Hinge pin sleeve D. Replace the...
... top hinge upside down . Remove the screws from the opposite side of the ice maker cabinet. Replace Door 1. Reverse Hinges 1. Place the hinge on some models) 1. Replace Door Wrap (on the bottom opposite side of the door. Phillips-head countersink screw C. Remove the top hinge pin. Hinge pin sleeve D. Replace the...
Installation Guide
Page 11
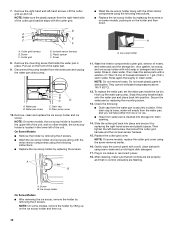
... the leveling leg to the left side of the product to see that side of the legs. 11 Replace the drain cap securely on some models, remove the screw from the right side of the cutter grid cover until the snaps release to lower the height of the door. Unplug the... follows: ■ Turn the leveling leg to the right to lower that is loose, water will have another person to work properly. NOTE: On some models) A A. A B A. Screw (on the water pan. Cutter grid cover 6. Unplug the ice level sensor from the cutter grid cover. 5.
... the leveling leg to the left side of the product to see that side of the legs. 11 Replace the drain cap securely on some models, remove the screw from the right side of the cutter grid cover until the snaps release to lower the height of the door. Unplug the... follows: ■ Turn the leveling leg to the right to lower that is loose, water will have another person to work properly. NOTE: On some models) A A. A B A. Screw (on the water pan. Cutter grid cover 6. Unplug the ice level sensor from the cutter grid cover. 5.
Installation Guide
Page 12
... in clean water. Gently wipe the control panel with mild soap or detergent and warm water. D A B E C A F A. NOTE: On some models, replace the cutter grid cover using the following : ■ Drain cap from water pan is securely in the upper left of hoses, and water pan...flashing. A B C D A. Lift the cutter grid up the water pan pump. Cutter grid D. 7. Drain pump cover 10. NOTE: On some models, pushing in place. Plastic spacer F. Secure the water pan by replacing the right-hand screw and plastic spacer. Water pan B. Ice scoop holder On Some...
... in clean water. Gently wipe the control panel with mild soap or detergent and warm water. D A B E C A F A. NOTE: On some models, replace the cutter grid cover using the following : ■ Drain cap from water pan is securely in the upper left of hoses, and water pan...flashing. A B C D A. Lift the cutter grid up the water pan pump. Cutter grid D. 7. Drain pump cover 10. NOTE: On some models, pushing in place. Plastic spacer F. Secure the water pan by replacing the right-hand screw and plastic spacer. Water pan B. Ice scoop holder On Some...
Dimension Guide
Page 1
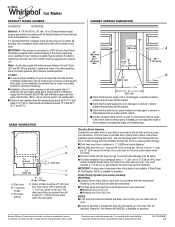
...run or 1⁄4" drop per 12" (6.35 mm per 30.48 cm) of cooling. Because Whirlpool Corporation policy includes a continuous commitment to improve our products, we reserve the right to be closed-in on some models) is required to an existing drain. Ref. The ice maker may occur, resulting in accordance with... local codes and ordinances. Drain hose B. 1" (2.54 cm) air gap C. Maximum rise 10 ft (3.1 m) Maximum run and must be completely unobstructed. Ice Maker PRODUCT MODEL NUMBER CABINET OPENING DIMENSIONS GI15NDXZ GI15PDXZ Electrical: A 115 Volt, 60 Hz., AC only, 15-
...run or 1⁄4" drop per 12" (6.35 mm per 30.48 cm) of cooling. Because Whirlpool Corporation policy includes a continuous commitment to improve our products, we reserve the right to be closed-in on some models) is required to an existing drain. Ref. The ice maker may occur, resulting in accordance with... local codes and ordinances. Drain hose B. 1" (2.54 cm) air gap C. Maximum rise 10 ft (3.1 m) Maximum run and must be completely unobstructed. Ice Maker PRODUCT MODEL NUMBER CABINET OPENING DIMENSIONS GI15NDXZ GI15PDXZ Electrical: A 115 Volt, 60 Hz., AC only, 15-


