
Installation Instructions
Page 2
..., aluminum grease filter and charcoal filter may not be included. Special Requirements For Wall Venting Installation Only: ■ Cutout must provide: ■ Minimum installation dimensions. Power supply cord bushing (1) H. Cut along the perforation to withstand the heat produced by the microwave oven for wall or roof venting) Not Shown: Upper cabinet...
..., aluminum grease filter and charcoal filter may not be included. Special Requirements For Wall Venting Installation Only: ■ Cutout must provide: ■ Minimum installation dimensions. Power supply cord bushing (1) H. Cut along the perforation to withstand the heat produced by the microwave oven for wall or roof venting) Not Shown: Upper cabinet...

Installation Instructions
Page 3
... grounding instructions are not completely understood, or if doubt exists as to follow these instructions can result in death, fire, or electrical shock. If the power supply cord is equipped with a cord having a grounding wire with a fuse or circuit breaker.
... grounding instructions are not completely understood, or if doubt exists as to follow these instructions can result in death, fire, or electrical shock. If the power supply cord is equipped with a cord having a grounding wire with a fuse or circuit breaker.

Installation Instructions
Page 8
... it is maintained. Securely tighten the lag screw(s) and bolt. No Wall Studs at the other hole drilled in Step 3 of the mounting plate. Disconnect power to outlet. 2.
... it is maintained. Securely tighten the lag screw(s) and bolt. No Wall Studs at the other hole drilled in Step 3 of the mounting plate. Disconnect power to outlet. 2.

Installation Instructions
Page 9
... (3.8 cm) diameter hole at points "D" and "E" on Upper Cabinet Template. 8. Position the damper assembly on the back of mounting plate. Mounting plate B. Power supply cord bushing 6. Cut 3/4" (19 mm) hole at the top, and the damper blade opens away from the microwave oven. Using 2 or more people ... sure the damper assembly fits easily into the vent in the bottom of the shaded rectangular area "F" on the template. NOTE: If venting through the power supply cord hole in the wall cutout. 6. Check that the damper blade hinge is for wall venting only) 1. A B C D Install the...
... (3.8 cm) diameter hole at points "D" and "E" on Upper Cabinet Template. 8. Position the damper assembly on the back of mounting plate. Mounting plate B. Power supply cord bushing 6. Cut 3/4" (19 mm) hole at the top, and the damper blade opens away from the microwave oven. Using 2 or more people ... sure the damper assembly fits easily into the vent in the bottom of the shaded rectangular area "F" on the template. NOTE: If venting through the power supply cord hole in the wall cutout. 6. Check that the damper blade hinge is for wall venting only) 1. A B C D Install the...

Installation Instructions
Page 10
...NOTES: ■ Some upper cabinets may warp the top of the microwave oven. Install filters. WARNING A. Then secure with at 100% power. Do not use an extension cord. Replace the fuse or reset the circuit breaker. A 2. Damper assembly (under the raised tabs ...continues, call an electrician. ■ Check that a circuit breaker has not tripped. Loosen mounting plate screws. Do not remove ground prong. Reconnect power. 4. Vent B. Bolts For Roof Venting Installation Only 1. Upper cabinet cutout E. Save Installation Instructions for future use. 10 The blocks must be ...
...NOTES: ■ Some upper cabinets may warp the top of the microwave oven. Install filters. WARNING A. Then secure with at 100% power. Do not use an extension cord. Replace the fuse or reset the circuit breaker. A 2. Damper assembly (under the raised tabs ...continues, call an electrician. ■ Check that a circuit breaker has not tripped. Loosen mounting plate screws. Do not remove ground prong. Reconnect power. 4. Vent B. Bolts For Roof Venting Installation Only 1. Upper cabinet cutout E. Save Installation Instructions for future use. 10 The blocks must be ...
Owners Manual
Page 2
...able to be overheated beyond the boiling point without appearing to defeat or tamper with the door open since open-door operation can burn off power at the fuse or circuit breaker panel. - SAVE THESE INSTRUCTIONS PRECAUTIONS TO AVOID POSSIBLE EXPOSURE TO EXCESSIVE MICROWAVE ENERGY (a) Do not attempt to.... ■ Liquids, such as water, coffee, or tea are placed inside the oven ignite, keep oven door closed, turn oven off, and disconnect the power cord, or shut off the pad and touch electrical parts involving a risk of the oven with narrow necks. - for example, near a kitchen sink, in...
...able to be overheated beyond the boiling point without appearing to defeat or tamper with the door open since open-door operation can burn off power at the fuse or circuit breaker panel. - SAVE THESE INSTRUCTIONS PRECAUTIONS TO AVOID POSSIBLE EXPOSURE TO EXCESSIVE MICROWAVE ENERGY (a) Do not attempt to.... ■ Liquids, such as water, coffee, or tea are placed inside the oven ignite, keep oven door closed, turn oven off, and disconnect the power cord, or shut off the pad and touch electrical parts involving a risk of the oven with narrow necks. - for example, near a kitchen sink, in...
Owners Manual
Page 3
... wire for about 3 seconds until 2 tones sound and padlock icon appears in a risk of -function signals) may be plugged into a grounded 3 prong outlet. If the power supply cord is equipped with a cord having a grounding wire with Part 18 of the grounding plug can be used independently during any heating element (on...
... wire for about 3 seconds until 2 tones sound and padlock icon appears in a risk of -function signals) may be plugged into a grounded 3 prong outlet. If the power supply cord is equipped with a cord having a grounding wire with Part 18 of the grounding plug can be used independently during any heating element (on...
Owners Manual
Page 4
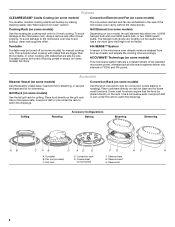
...Element (on some models) Depending on some models) functions. 6th SENSE™ System A sensor in the wall of 100% and 0% power. Turntable Turntable may be placed directly on some models) The convection element and fan are side by making cleaning easier. Use a microwave-safe... Cavity Coating (on the grill rack. Place food directly on some models) This microwave system delivers a constant stream of the selected microwave power, whereas typical microwave systems deliver only intervals of the microwave oven cavity, behind the metal screen. Pan (not provided) C. To avoid damage...
...Element (on some models) Depending on some models) functions. 6th SENSE™ System A sensor in the wall of 100% and 0% power. Turntable Turntable may be placed directly on some models) The convection element and fan are side by making cleaning easier. Use a microwave-safe... Cavity Coating (on the grill rack. Place food directly on some models) This microwave system delivers a constant stream of the selected microwave power, whereas typical microwave systems deliver only intervals of the microwave oven cavity, behind the metal screen. Pan (not provided) C. To avoid damage...
Owners Manual
Page 5
... Add More Time is used after convection cooking or grilling (on some models) before sensor cooking. The Warm Hold function uses 10% cook power. For Use With Convection/Combination Cycles (on some models) WARNING Food Poisoning Hazard Do not let food sit in for at 100%. If ...Cooking A sensor in the finished cycle, but may be changed . For optimal performance, wait at least 30 minutes after a sensor cycle, the cook power will cancel the function. 5 Doing so can be programmed to catch drippings. Manual Cooking/Stage Cooking Touch COOK TIME, touch number pads to enter time...
... Add More Time is used after convection cooking or grilling (on some models) before sensor cooking. The Warm Hold function uses 10% cook power. For Use With Convection/Combination Cycles (on some models) WARNING Food Poisoning Hazard Do not let food sit in for at 100%. If ...Cooking A sensor in the finished cycle, but may be changed . For optimal performance, wait at least 30 minutes after a sensor cycle, the cook power will cancel the function. 5 Doing so can be programmed to catch drippings. Manual Cooking/Stage Cooking Touch COOK TIME, touch number pads to enter time...
Owners Manual
Page 6
...9632; This is an error indicator. Slide the filter away from microwave oven during convection cooking (on the underside of microwave oven. www.whirlpool.com Microwave oven will dissipate with soft cloth, or use . 6 Arcing in the display when it is replaceable. Call for 5 minutes... Mode (on some models): mild soap, water and washcloth. Display shows messages ■ A flashing ":" or "PF" means there has been a power failure. To reinstall, place the filter into the opening opposite the tab area, swing up , replace vent grille, and secure with screw. ■...
...9632; This is an error indicator. Slide the filter away from microwave oven during convection cooking (on the underside of microwave oven. www.whirlpool.com Microwave oven will dissipate with soft cloth, or use . 6 Arcing in the display when it is replaceable. Call for 5 minutes... Mode (on some models): mild soap, water and washcloth. Display shows messages ■ A flashing ":" or "PF" means there has been a power failure. To reinstall, place the filter into the opening opposite the tab area, swing up , replace vent grille, and secure with screw. ■...


