
Installation Instructions
Page 1
... tell you what the potential hazard is the safety alert symbol. All safety messages will follow instructions. Table of Contents MICROWAVE HOOD COMBINATION SAFETY 1 INSTALLATION REQUIREMENTS 2 Tools and Parts 2 Remove Cardboard Template 2 Location Requirements 2 Product Dimensions 3 ...model may differ slightly from the illustration in Rear Wall 7 Attach Mounting Plate to and including 36" (91.4 cm) wide. See "Installation Requirements" section for use above electric or gas cooking products up to Wall 8 Prepare Upper Cabinet 8 Install Damper Assembly 9 Install the Microwave...
... tell you what the potential hazard is the safety alert symbol. All safety messages will follow instructions. Table of Contents MICROWAVE HOOD COMBINATION SAFETY 1 INSTALLATION REQUIREMENTS 2 Tools and Parts 2 Remove Cardboard Template 2 Location Requirements 2 Product Dimensions 3 ...model may differ slightly from the illustration in Rear Wall 7 Attach Mounting Plate to and including 36" (91.4 cm) wide. See "Installation Requirements" section for use above electric or gas cooking products up to Wall 8 Prepare Upper Cabinet 8 Install Damper Assembly 9 Install the Microwave...

Installation Instructions
Page 2
.... For Roof Venting Installation Only: ■ If you are for weight of the microwave oven packaging is at least 6" (15.2 cm) of packaging) Aluminum grease filters Charcoal filters (Depending on model, aluminum grease filter and charcoal filter may not be free of the cardboard packaging. ...2. See "Rectangular to separate the template from the top of 150 lbs (68 kg), which includes microwave oven and items placed inside the microwave oven and upper cabinet...
.... For Roof Venting Installation Only: ■ If you are for weight of the microwave oven packaging is at least 6" (15.2 cm) of packaging) Aluminum grease filters Charcoal filters (Depending on model, aluminum grease filter and charcoal filter may not be free of the cardboard packaging. ...2. See "Rectangular to separate the template from the top of 150 lbs (68 kg), which includes microwave oven and items placed inside the microwave oven and upper cabinet...

Installation Instructions
Page 4
...must be attached to the back of microwave oven exterior. Screws (in Step 1. 4 NOTE: To avoid damage to the work surface, cover the work surface. 1. Reattach damper plate. Slots 8. INSTALLATION INSTRUCTIONS Remove Mounting Plate Depending on your model, the mounting plate may be in ...the top of the microwave oven. NOTE: Skip this section if you are inserted into the microwave oven. Screws B. Damper plate B. Slide damper plate toward the front of microwave oven, and lower blower motor back...
...must be attached to the back of microwave oven exterior. Screws (in Step 1. 4 NOTE: To avoid damage to the work surface, cover the work surface. 1. Reattach damper plate. Slots 8. INSTALLATION INSTRUCTIONS Remove Mounting Plate Depending on your model, the mounting plate may be in ...the top of the microwave oven. NOTE: Skip this section if you are inserted into the microwave oven. Screws B. Damper plate B. Slide damper plate toward the front of microwave oven, and lower blower motor back...

Installation Instructions
Page 12
... (8.3 x 25.4 cm) vent system = 73 ft (22.2 m) total A B 6 ft (1.8 m) 2 ft (0.6 m) C A. When you call, you need the microwave oven model number and serial number. Replacement Parts If any of 140 ft (42.7 m) for equivalent lengths. Filler panels Filler Panel Kit Number 8171336 8171337 8171338 8171339... transition piece = 5 ft (1.5 m) D. 2 ft (0.6 m) + 6 ft (1.8 m) straight = 8 ft (2.4 m) If the existing vent is a list of the microwave oven. W10247296B SP PN W10345003B © 2010. To calculate the length of the system you need your dealer to keep the damper from your...
... (8.3 x 25.4 cm) vent system = 73 ft (22.2 m) total A B 6 ft (1.8 m) 2 ft (0.6 m) C A. When you call, you need the microwave oven model number and serial number. Replacement Parts If any of 140 ft (42.7 m) for equivalent lengths. Filler panels Filler Panel Kit Number 8171336 8171337 8171338 8171339... transition piece = 5 ft (1.5 m) D. 2 ft (0.6 m) + 6 ft (1.8 m) straight = 8 ft (2.4 m) If the existing vent is a list of the microwave oven. W10247296B SP PN W10345003B © 2010. To calculate the length of the system you need your dealer to keep the damper from your...
Owners Manual
Page 1
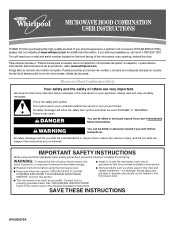
... del horno de microondas, detrás de la puerta. All safety messages will need assistance, call us at www.whirlpool.com for additional information. ® MICROWAVE HOOD COMBINATION USER INSTRUCTIONS THANK YOU for example, closed glass jars - If you what the potential hazard is the safety... alert symbol. You will tell you what can kill or hurt you still need your model and serial number located on ...
... del horno de microondas, detrás de la puerta. All safety messages will need assistance, call us at www.whirlpool.com for additional information. ® MICROWAVE HOOD COMBINATION USER INSTRUCTIONS THANK YOU for example, closed glass jars - If you what the potential hazard is the safety... alert symbol. You will tell you what can kill or hurt you still need your model and serial number located on ...
Owners Manual
Page 2
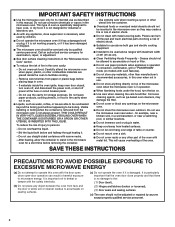
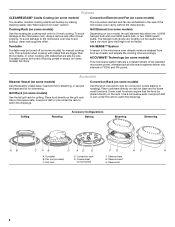
...designed to be adjusted or repaired by qualified service personnel. It is operated in convection, combination, grill or "PAN BROWN" mode (on models with such features). ■ Do not store any other than manufacturer's recommended accessories, in this oven when not in use corrosive chemicals...Hoods Frequently - Do not use . ■ Liquids, such as lye-based oven cleaners, may create a fire or risk of fire in the microwave oven. Pieces can result in use straight-sided containers with the safety interlocks. (b) Do not place any openings on . ■ Use care when ...
...designed to be adjusted or repaired by qualified service personnel. It is operated in convection, combination, grill or "PAN BROWN" mode (on models with such features). ■ Do not store any other than manufacturer's recommended accessories, in this oven when not in use corrosive chemicals...Hoods Frequently - Do not use . ■ Liquids, such as lye-based oven cleaners, may create a fire or risk of fire in the microwave oven. Pieces can result in use straight-sided containers with the safety interlocks. (b) Do not place any openings on . ■ Use care when ...
Owners Manual
Page 3
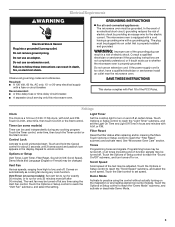
... program. The plug must be adjusted. Do not use an extension cord. See "Microwave Oven Care" section. Touch the Start control to run for only 30 minutes more (off or on some models). Do not use an extension cord. Touch CLOCK, enter time, then touch CLOCK... in the display. Failure to practice using the Vent Fan control. Required: ■ A 120 Volt, 60 Hz, AC only, 15- The microwave oven is equipped with a cord having a grounding wire with A.M. Consult a qualified electrician or serviceman if the grounding instructions are not completely understood, ...
... program. The plug must be adjusted. Do not use an extension cord. See "Microwave Oven Care" section. Touch the Start control to run for only 30 minutes more (off or on some models). Do not use an extension cord. Touch CLOCK, enter time, then touch CLOCK... in the display. Failure to practice using the Vent Fan control. Required: ■ A 120 Volt, 60 Hz, AC only, 15- The microwave oven is equipped with a cord having a grounding wire with A.M. Consult a qualified electrician or serviceman if the grounding instructions are not completely understood, ...
Owners Manual
Page 4
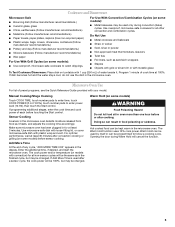
... (not provided) C. Convection Element and Fan (on rack for bake and for some models) This microwave system delivers a constant stream of the selected microwave power, whereas typical microwave systems deliver only intervals of the microwave oven cavity, behind the metal screen. To avoid damage to catch the drippings. Convection Rack... Grill Rack (on some models) Use the tall grill rack for simmering. Steamer lid 4 Cooking Rack (on some models) Use the rectangular cooking rack only for convection cycles (baking or roasting). Use a microwave-safe, ovenproof dish or ...
... (not provided) C. Convection Element and Fan (on rack for bake and for some models) This microwave system delivers a constant stream of the selected microwave power, whereas typical microwave systems deliver only intervals of the microwave oven cavity, behind the metal screen. To avoid damage to catch the drippings. Convection Rack... Grill Rack (on some models) Use the tall grill rack for simmering. Steamer lid 4 Cooking Rack (on some models) Use the rectangular cooking rack only for convection cycles (baking or roasting). Use a microwave-safe, ovenproof dish or ...
Owners Manual
Page 5
...%. Add More Time At the end of each before sensor cooking. Warm Hold (on some models): ■ Use ovenproof, microwave-safe cookware to catch drippings. Warm Hold can be changed . Cookware and Dinnerware Microwave-Safe ■ Browning dish (Follow manufacturer recommendations.) ■ Ceramic glass, glass ■...power level (10-90), then touch the Start control. Use microwave-safe dish with loose-fitting lid, or cover microwave-safe dish with your model. Enter the additional time, if desired, and start the microwave oven. If dish becomes hot and the water stays cool, do...
...%. Add More Time At the end of each before sensor cooking. Warm Hold (on some models): ■ Use ovenproof, microwave-safe cookware to catch drippings. Warm Hold can be changed . Cookware and Dinnerware Microwave-Safe ■ Browning dish (Follow manufacturer recommendations.) ■ Ceramic glass, glass ■...power level (10-90), then touch the Start control. Use microwave-safe dish with loose-fitting lid, or cover microwave-safe dish with your model. Enter the additional time, if desired, and start the microwave oven. If dish becomes hot and the water stays cool, do...
Owners Manual
Page 6
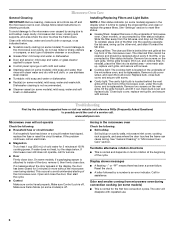
...to replace the charcoal filter, and clean or replace the grease filters. Installing/Replacing Filters and Light Bulbs NOTE: A filter status indicator (on some models) appears in the display, the door has been closed for 2 minutes at the beginning of the cycle. To reinstall, place end of the ... the filter into the opening opposite the tab area, swing up , replace vent grille, and secure with screws. Replace bulb, close door. www.whirlpool.com Microwave oven will dissipate with screw. ■ Cavity light: The cavity light bulb is located behind the vent grille at the top front of the...
...to replace the charcoal filter, and clean or replace the grease filters. Installing/Replacing Filters and Light Bulbs NOTE: A filter status indicator (on some models) appears in the display, the door has been closed for 2 minutes at the beginning of the cycle. To reinstall, place end of the ... the filter into the opening opposite the tab area, swing up , replace vent grille, and secure with screws. Replace bulb, close door. www.whirlpool.com Microwave oven will dissipate with screw. ■ Cavity light: The cavity light bulb is located behind the vent grille at the top front of the...
Owners Manual
Page 7
... Element" in the "Features" section. ■ Is the element still working properly? The microwave oven's cooling fan (on some models), which may be on ■ This is being used. If it does not toast, call for contact and model identification information. Radio, TV or cordless phone interference Check the following: ■ Proximity Move...
... Element" in the "Features" section. ■ Is the element still working properly? The microwave oven's cooling fan (on some models), which may be on ■ This is being used. If it does not toast, call for contact and model identification information. Radio, TV or cordless phone interference Check the following: ■ Proximity Move...

Owners Manual
Page 8
... has been altered or removed from your major appliance. This major appliance is designed to be easily determined. Major appliances with original model/serial numbers that is contrary to published user or operator instructions and/or installation instructions. 4. LIMITATION OF REMEDIES CUSTOMER'S SOLE AND ...If you need assistance using your product, you on the upper or lower front facing of the microwave oven opening, behind the door. W10208075A SP PN W10208079A © 2008 Whirlpool Corporation. Proof of your major appliance is located in accordance with the removal from your home of...
... has been altered or removed from your major appliance. This major appliance is designed to be easily determined. Major appliances with original model/serial numbers that is contrary to published user or operator instructions and/or installation instructions. 4. LIMITATION OF REMEDIES CUSTOMER'S SOLE AND ...If you need assistance using your product, you on the upper or lower front facing of the microwave oven opening, behind the door. W10208075A SP PN W10208079A © 2008 Whirlpool Corporation. Proof of your major appliance is located in accordance with the removal from your home of...
Warranty
Page 1
...when this major appliance is operated and maintained according to instructions attached to or furnished with the product, Whirlpool Corporation or Whirlpool Canada LP (hereafter "Whirlpool") will pay for Factory Specified Parts and repair labor to correct defects in accordance with published installation instructions...The cost of your product, you on the upper or lower front facing of the microwave oven opening, behind the door. Consumable parts are excluded from your complete model number ready. This major appliance is not installed in materials or workmanship. Service must be...
...when this major appliance is operated and maintained according to instructions attached to or furnished with the product, Whirlpool Corporation or Whirlpool Canada LP (hereafter "Whirlpool") will pay for Factory Specified Parts and repair labor to correct defects in accordance with published installation instructions...The cost of your product, you on the upper or lower front facing of the microwave oven opening, behind the door. Consumable parts are excluded from your complete model number ready. This major appliance is not installed in materials or workmanship. Service must be...

Dimension Guide
Page 1
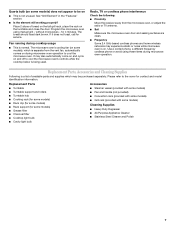
....4 cm = 7.6 m) D. 90° elbow: 6" = 10 ft (15.2 cm = 3 m) E. diameter round vent C. Vent extension piece, at least 3" (7.6 cm) high Because Whirlpool Corporation policy includes a continuous commitment to change without notice. Wall cap: 3 " x 10" = 40 ft (8.3 x 25.4 cm = 12.2 m) F. 45° elbow: 6" = ... transition piece so that a separate circuit serving only this microwave oven be used in the system. Microwave Hood Combination PRODUCT MODEL NUMBERS GMH3204XV GMH5205XV GMH6185XV WMH1162XV WMH1163XV WMH1164XW WMH2175XV WMH2205XV WMH3205XV WMH31017A WMH32517A ...
....4 cm = 7.6 m) D. 90° elbow: 6" = 10 ft (15.2 cm = 3 m) E. diameter round vent C. Vent extension piece, at least 3" (7.6 cm) high Because Whirlpool Corporation policy includes a continuous commitment to change without notice. Wall cap: 3 " x 10" = 40 ft (8.3 x 25.4 cm = 12.2 m) F. 45° elbow: 6" = ... transition piece so that a separate circuit serving only this microwave oven be used in the system. Microwave Hood Combination PRODUCT MODEL NUMBERS GMH3204XV GMH5205XV GMH6185XV WMH1162XV WMH1163XV WMH1164XW WMH2175XV WMH2205XV WMH3205XV WMH31017A WMH32517A ...


