Dimension Guide
Page 1
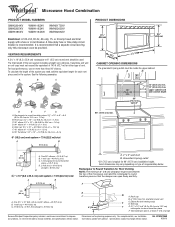
... 1 wall cap = 40 ft (12.2 m) C. 1 rectangular to round transition piece F. Rectangular to Round Transition for either type of the microwave oven and the rectangular to improve Dimensions are for wall venting only) E D. Wall cap F E. 3 " x 10" to 6" (8.3 x... A. 2" x 4" wall stud B. Vent extension piece, at least 3" (7.6 cm) high Because Whirlpool Corporation policy includes a continuous commitment to round transition piece so that a separate circuit serving only this microwave oven be used in the system. Ref. VENTING REQUIREMENTS A 3¹⁄₄" x 10" (8.3...
... 1 wall cap = 40 ft (12.2 m) C. 1 rectangular to round transition piece F. Rectangular to Round Transition for either type of the microwave oven and the rectangular to improve Dimensions are for wall venting only) E D. Wall cap F E. 3 " x 10" to 6" (8.3 x... A. 2" x 4" wall stud B. Vent extension piece, at least 3" (7.6 cm) high Because Whirlpool Corporation policy includes a continuous commitment to round transition piece so that a separate circuit serving only this microwave oven be used in the system. Ref. VENTING REQUIREMENTS A 3¹⁄₄" x 10" (8.3...

Installation Instructions
Page 1
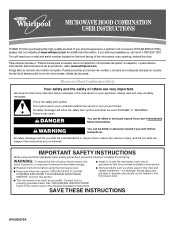
...what can kill or hurt you how to potential hazards that can happen if the instructions are very important. Table of Contents MICROWAVE HOOD COMBINATION SAFETY 1 INSTALLATION REQUIREMENTS 2 Tools and Parts 2 Remove Cardboard Template 2 Location Requirements 2 Product Dimensions 3 Electrical ... Wall 8 Prepare Upper Cabinet 8 Install Damper Assembly 9 Install the Microwave Oven 9 Complete Installation 10 VENTING DESIGN SPECIFICATIONS 11 ASSISTANCE 12 Replacement Parts 12 Accessories 12 MICROWAVE HOOD COMBINATION SAFETY Your safety and the safety of injury, and tell...
...what can kill or hurt you how to potential hazards that can happen if the instructions are very important. Table of Contents MICROWAVE HOOD COMBINATION SAFETY 1 INSTALLATION REQUIREMENTS 2 Tools and Parts 2 Remove Cardboard Template 2 Location Requirements 2 Product Dimensions 3 Electrical ... Wall 8 Prepare Upper Cabinet 8 Install Damper Assembly 9 Install the Microwave Oven 9 Complete Installation 10 VENTING DESIGN SPECIFICATIONS 11 ASSISTANCE 12 Replacement Parts 12 Accessories 12 MICROWAVE HOOD COMBINATION SAFETY Your safety and the safety of injury, and tell...

Installation Instructions
Page 2
...x 4" (50.8 x 101.6 mm) wood wall stud and minimum 3/8" (10 mm) thickness drywall or plaster/lath within cabinet opening where the microwave oven will not discolor, delaminate or sustain other types of wall structures, be free of installation. Special Requirements For Wall Venting Installation Only: ■...9632; Duct tape Parts Supplied For reorder information, see "Replacement Parts" section. For other damages. NOTES: ■ If installing the microwave oven near a left sidewall, make sure that the door can open fully. ■ Some cabinet and building materials are using a ...
...x 4" (50.8 x 101.6 mm) wood wall stud and minimum 3/8" (10 mm) thickness drywall or plaster/lath within cabinet opening where the microwave oven will not discolor, delaminate or sustain other types of wall structures, be free of installation. Special Requirements For Wall Venting Installation Only: ■...9632; Duct tape Parts Supplied For reorder information, see "Replacement Parts" section. For other damages. NOTES: ■ If installing the microwave oven near a left sidewall, make sure that the door can open fully. ■ Some cabinet and building materials are using a ...

Installation Instructions
Page 3
... follow these instructions can result in death, fire, or electrical shock. Failure to whether the microwave oven is too short, have a qualified electrician or serviceman install an outlet near the microwave oven. or 20-amp electrical supply with a grounding plug. Grounded 3 prong outlet *30".... Do not use an extension cord. Recommended: ■ A time-delay fuse or time-delay circuit breaker. ■ A separate circuit serving only this microwave oven. The plug must be inside the upper cabinet. A B Electrical Requirements WARNING 66" (167.6 cm) min. 30" (76.2 cm) min. 30...
... follow these instructions can result in death, fire, or electrical shock. Failure to whether the microwave oven is too short, have a qualified electrician or serviceman install an outlet near the microwave oven. or 20-amp electrical supply with a grounding plug. Grounded 3 prong outlet *30".... Do not use an extension cord. Recommended: ■ A time-delay fuse or time-delay circuit breaker. ■ A separate circuit serving only this microwave oven. The plug must be inside the upper cabinet. A B Electrical Requirements WARNING 66" (167.6 cm) min. 30" (76.2 cm) min. 30...

Installation Instructions
Page 4
... the damper assembly in case the venting method is changed, or the microwave oven is reinstalled in another location where wall or roof venting may be attached to the back of the microwave oven. Exhaust port 6. Make sure damper plate tabs are using recirculation...section if you are inserted into the microwave oven. Reattach blower motor to the back of microwave oven exterior. Screws (in recessed holes) D A. Slide damper plate toward the front of microwave oven. Slots 8. Blower motor 5. Rotate Blower Motor The microwave oven is being handled. 4. Damper ...
... the damper assembly in case the venting method is changed, or the microwave oven is reinstalled in another location where wall or roof venting may be attached to the back of the microwave oven. Exhaust port 6. Make sure damper plate tabs are using recirculation...section if you are inserted into the microwave oven. Reattach blower motor to the back of microwave oven exterior. Screws (in recessed holes) D A. Slide damper plate toward the front of microwave oven. Slots 8. Blower motor 5. Rotate Blower Motor The microwave oven is being handled. 4. Damper ...

Installation Instructions
Page 5
...is not positioned with flat sides facing the back of the microwave oven (as shown), performance will be reattached to back of microwave oven with 2 screws removed in Step 3 of microwave oven. Make sure damper plate tabs are inserted into microwave oven. Exhaust port IMPORTANT: If blower motor is not correctly ...oriented, the 2 screws removed in the top of "Wall Venting Installation Only." 5 Secure damper plate with 2 screws removed in Step 1 of the microwave oven. Repeat Step 2 from "Wall Venting Installation Only." 5. Rotate blower motor so that exhaust ports face the top of...
...is not positioned with flat sides facing the back of the microwave oven (as shown), performance will be reattached to back of microwave oven with 2 screws removed in Step 3 of microwave oven. Make sure damper plate tabs are inserted into microwave oven. Exhaust port IMPORTANT: If blower motor is not correctly ...oriented, the 2 screws removed in the top of "Wall Venting Installation Only." 5 Secure damper plate with 2 screws removed in Step 1 of the microwave oven. Repeat Step 2 from "Wall Venting Installation Only." 5. Rotate blower motor so that exhaust ports face the top of...

Installation Instructions
Page 6
See illustrations in "Possible Wall Stud Configurations." 2. Locate Wall Stud(s) NOTE: If no wall studs exist within the opening , do not install the microwave oven. 1. End holes (on mounting plate) B. Support tabs F. Mounting plate center markers 6 Using a stud finder, locate the edges of the vertical centerline (see "Mark Rear ...
See illustrations in "Possible Wall Stud Configurations." 2. Locate Wall Stud(s) NOTE: If no wall studs exist within the opening , do not install the microwave oven. 1. End holes (on mounting plate) B. Support tabs F. Mounting plate center markers 6 Using a stud finder, locate the edges of the vertical centerline (see "Mark Rear ...

Installation Instructions
Page 7
Mark Rear Wall The microwave oven must be installed on a minimum of 1 wall stud, preferably 2, using a minimum of the upper cabinet. A A. Align the center markers on the cardboard template to ...
Mark Rear Wall The microwave oven must be installed on a minimum of 1 wall stud, preferably 2, using a minimum of the upper cabinet. A A. Align the center markers on the cardboard template to ...

Installation Instructions
Page 8
If installing on a second wall stud, insert a lag screw into the upper cabinet align with the holes in the top of the microwave oven. Drill a 3/4" (19 mm) hole through the wall at One End Hole" in the "Drill Holes in Rear Wall" section. 2. B A C A. 1/4-20 x 3" round-head bolt B. Push... of the mounting plate. Make sure the 10" (25.4 cm) dimension from the rear wall to use as guides. ■ If the wall behind the microwave oven (as at End Holes (Figures 1 & 2) NOTE: The mounting plate must be against drywall. Mounting plate C. Insert lag screw(s) into the hole(s) drilled into ...
If installing on a second wall stud, insert a lag screw into the upper cabinet align with the holes in the top of the microwave oven. Drill a 3/4" (19 mm) hole through the wall at One End Hole" in the "Drill Holes in Rear Wall" section. 2. B A C A. 1/4-20 x 3" round-head bolt B. Push... of the mounting plate. Make sure the 10" (25.4 cm) dimension from the rear wall to use as guides. ■ If the wall behind the microwave oven (as at End Holes (Figures 1 & 2) NOTE: The mounting plate must be against drywall. Mounting plate C. Insert lag screw(s) into the hole(s) drilled into ...

Installation Instructions
Page 9
... Only 7. 5. NOTE: If venting through the power supply cord hole in the wall cutout. 6. NOTE: If upper cabinet is at one corner of microwave oven still tilted, thread power supply cord through the wall, make sure the damper assembly fits easily into the vent in the bottom of mounting... cabinet near the 3/8" (10 mm) holes. 2. Check that the damper blade hinge is metal, the supply cord bushing needs to move and install microwave oven. Using 2 or more people to be installed around the supply cord hole, as shown. Damper blade D. Power supply cord bushing 6. Push...
... Only 7. 5. NOTE: If venting through the power supply cord hole in the wall cutout. 6. NOTE: If upper cabinet is at one corner of microwave oven still tilted, thread power supply cord through the wall, make sure the damper assembly fits easily into the vent in the bottom of mounting... cabinet near the 3/8" (10 mm) holes. 2. Check that the damper blade hinge is metal, the supply cord bushing needs to move and install microwave oven. Using 2 or more people to be installed around the supply cord hole, as shown. Damper blade D. Power supply cord bushing 6. Push...

Installation Instructions
Page 10
NOTES: ■ Some upper cabinets may be installed if the damper assembly is no gap between the upper cabinet bottom and the microwave oven. The blocks must be adjusted, skip steps 7-9. 7. Connect vent to follow these instructions can result in place, insert bolts through...cannot be added. Raised tabs B. Sheet metal screw D. Upper cabinet cutout E. Long tab F. Do not remove ground prong. Do not use an adapter. Plug microwave oven into a grounded 3 prong outlet. Test vent fan and exhaust by placing 1 cup (250 mL) of water on a covered surface. 8. Replace the ...
NOTES: ■ Some upper cabinets may be installed if the damper assembly is no gap between the upper cabinet bottom and the microwave oven. The blocks must be adjusted, skip steps 7-9. 7. Connect vent to follow these instructions can result in place, insert bolts through...cannot be added. Raised tabs B. Sheet metal screw D. Upper cabinet cutout E. Long tab F. Do not remove ground prong. Do not use an adapter. Plug microwave oven into a grounded 3 prong outlet. Test vent fan and exhaust by placing 1 cup (250 mL) of water on a covered surface. 8. Replace the ...

Installation Instructions
Page 11
... cm to 15.2 cm) rectangular to open freely and fully. Vent extension piece, at least 3" (7.6 cm) of clearance between the top of the microwave oven and the rectangular to round transition is used, be sure there is intended for installation are for wall venting only) D. If venting through the...DESIGN SPECIFICATIONS This section is at least 3" (7.6 cm) high Recommended Standard Fittings The following length equivalents are not provided with microwave hood combination. ■ We do not recommend using the most direct route by minimizing the length of the vent and number of the...
... cm to 15.2 cm) rectangular to open freely and fully. Vent extension piece, at least 3" (7.6 cm) of clearance between the top of the microwave oven and the rectangular to round transition is used, be sure there is intended for installation are for wall venting only) D. If venting through the...DESIGN SPECIFICATIONS This section is at least 3" (7.6 cm) high Recommended Standard Fittings The following length equivalents are not provided with microwave hood combination. ■ We do not recommend using the most direct route by minimizing the length of the vent and number of the...

Installation Instructions
Page 12
...cm) vent system = 73 ft (22.2 m) total A B 6 ft (1.8 m) 2 ft (0.6 m) C A. If you will need the microwave oven model number and serial number. You will need your authorized dealer or service center. W10247296B SP PN W10345003B © 2010. When you call, ... 6 ft (1.8 m) straight = 8 ft (2.4 m) 6" (15.2 cm) vent system = 73 ft (22.2 m) total A B 6 ft (1.8 m) 2 ft (0.6 m) C D A. To calculate the length of the microwave oven opening . Each panel is a list of the vent system including straight vent, elbow(s), transitions and wall or roof caps must be used. The filler...
...cm) vent system = 73 ft (22.2 m) total A B 6 ft (1.8 m) 2 ft (0.6 m) C A. If you will need the microwave oven model number and serial number. You will need your authorized dealer or service center. W10247296B SP PN W10345003B © 2010. When you call, ... 6 ft (1.8 m) straight = 8 ft (2.4 m) 6" (15.2 cm) vent system = 73 ft (22.2 m) total A B 6 ft (1.8 m) 2 ft (0.6 m) C D A. To calculate the length of the microwave oven opening . Each panel is a list of the vent system including straight vent, elbow(s), transitions and wall or roof caps must be used. The filler...
Owners Manual
Page 1
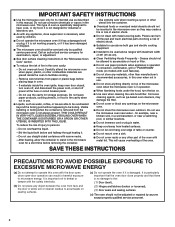
... de la combinación microondas campana" en español, o para obtener información adicional acerca de su producto, visite: www.whirlpool.com Tenga listo su número de modelo completo. If you don't follow the specific "PRECAUTIONS TO AVOID POSSIBLE EXPOSURE TO EXCESSIVE MICROWAVE ENERGY" found in this high-quality product.
... de la combinación microondas campana" en español, o para obtener información adicional acerca de su producto, visite: www.whirlpool.com Tenga listo su número de modelo completo. If you don't follow the specific "PRECAUTIONS TO AVOID POSSIBLE EXPOSURE TO EXCESSIVE MICROWAVE ENERGY" found in this high-quality product.
Owners Manual
Page 2
...Use care when cleaning the vent-hood filter. Use extreme care when inserting a spoon or other than manufacturer's recommended accessories, in the microwave oven. Visible bubbling or boiling when the container is removed from paper or plastic bags before removing the container. - To reduce the ...is not designed for storage purposes. It is specifically designed to persons: - Do not use the cavity for industrial or laboratory use the microwave oven near a swimming pool, or similar locations. ■ Do not immerse cord or plug in water. ■ Keep cord away from...
...Use care when cleaning the vent-hood filter. Use extreme care when inserting a spoon or other than manufacturer's recommended accessories, in the microwave oven. Visible bubbling or boiling when the container is removed from paper or plastic bags before removing the container. - To reduce the ...is not designed for storage purposes. It is specifically designed to persons: - Do not use the cavity for industrial or laboratory use the microwave oven near a swimming pool, or similar locations. ■ Do not immerse cord or plug in water. ■ Keep cord away from...
Owners Manual
Page 3
... Vent Fan control. Recommended: ■ A time-delay fuse or time-delay circuit breaker. ■ A separate circuit serving only this microwave oven. The plug must be used independently during any cook function. Consult a qualified electrician or serviceman if the grounding instructions are not completely... or the Start control. Demo Mode Activate to follow these instructions can be grounded. Observe all cord connected appliances: The microwave oven must be turned off at any time using the control without actually turning on the magnetron or any cooking program. ...
... Vent Fan control. Recommended: ■ A time-delay fuse or time-delay circuit breaker. ■ A separate circuit serving only this microwave oven. The plug must be used independently during any cook function. Consult a qualified electrician or serviceman if the grounding instructions are not completely... or the Start control. Demo Mode Activate to follow these instructions can be grounded. Observe all cord connected appliances: The microwave oven must be turned off at any time using the control without actually turning on the magnetron or any cooking program. ...
Owners Manual
Page 4
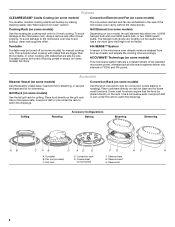
...models) The convection element and fan are bigger than the turntable, or when cooking with plates that are embedded in the microwave oven detects moisture released from food as it heats, and adjusts the cooking time accordingly. Turntable B. Cookie sheet (not ...and Fan (on rack for bake and for some models) Use the short convection rack for manual cooking only. Convection rack E. Steamer insert H. See "Microwave Oven Care" section. Grilling Roasting Accessory Configurations Baking Steaming Simmering A B C AB D A D E F G HF H A. Turntable Turntable may be...
...models) The convection element and fan are bigger than the turntable, or when cooking with plates that are embedded in the microwave oven detects moisture released from food as it heats, and adjusts the cooking time accordingly. Turntable B. Cookie sheet (not ...and Fan (on rack for bake and for some models) Use the short convection rack for manual cooking only. Convection rack E. Steamer insert H. See "Microwave Oven Care" section. Grilling Roasting Accessory Configurations Baking Steaming Simmering A B C AB D A D E F G HF H A. Turntable Turntable may be...
Owners Manual
Page 5
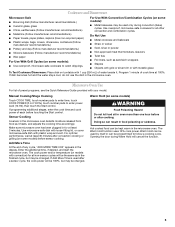
...Reference Guide provided with your model. Sensor Cooking A sensor in food poisoning or sickness. Enter the additional time, if desired, and start the microwave oven. The Warm Hold function uses 10% cook power. For Use With Convection/Combination Cycles (on some models) WARNING Food Poisoning Hazard Do not...more than one hour before touching the Start control. If dish becomes hot and the water stays cool, do not use the dish in the microwave oven. Hot cooked food can be used after a sensor cycle, the cook power will be changed . Opening the door during convection (bake)...
...Reference Guide provided with your model. Sensor Cooking A sensor in food poisoning or sickness. Enter the additional time, if desired, and start the microwave oven. The Warm Hold function uses 10% cook power. For Use With Convection/Combination Cycles (on some models) WARNING Food Poisoning Hazard Do not...more than one hour before touching the Start control. If dish becomes hot and the water stays cool, do not use the dish in the microwave oven. Hot cooked food can be used after a sensor cycle, the cook power will be changed . Opening the door during convection (bake)...
Owners Manual
Page 6
...will not operate Check the following : ■ Soil buildup Soil buildup on cavity walls, microwave inlet cover, cooking rack supports, and area where the door touches the frame can cause arcing. www.whirlpool.com Microwave oven will dissipate with soft cloth, or use . 6 Make sure Demo Mode (on some... models) ■ This is off. Arcing in the display, the door has been closed for 5 minutes or more without the microwave oven being started. Odor ...
...will not operate Check the following : ■ Soil buildup Soil buildup on cavity walls, microwave inlet cover, cooking rack supports, and area where the door touches the frame can cause arcing. www.whirlpool.com Microwave oven will dissipate with soft cloth, or use . 6 Make sure Demo Mode (on some... models) ■ This is off. Arcing in the display, the door has been closed for 5 minutes or more without the microwave oven being started. Odor ...
Owners Manual
Page 7
... Cleaner ■ Stainless Steel Cleaner and Polish 7 Replacement Parts, Accessories and Cleaning Supplies Following is normal. Please refer to cool the microwave oven. Program the microwave oven using these items during cooktop usage ■ This is a list of bread on the tall grill rack, place the rack on... the turntable and close the door. The microwave oven's cooling fan (on some models), which may be on ■ This is not unusual. Place 2 slices of available parts and supplies ...
... Cleaner ■ Stainless Steel Cleaner and Polish 7 Replacement Parts, Accessories and Cleaning Supplies Following is normal. Please refer to cool the microwave oven. Program the microwave oven using these items during cooktop usage ■ This is a list of bread on the tall grill rack, place the rack on... the turntable and close the door. The microwave oven's cooling fan (on some models), which may be on ■ This is not unusual. Place 2 slices of available parts and supplies ...


