
Owners Manual
Page 1
...following: WARNING: To reduce the risk of injury, and tell you and others are very important. IMPORTANT SAFETY INSTRUCTIONS When using the microwave oven. ■ Read and follow instructions. for example, closed glass jars - If you don't immediately follow the specific "PRECAUTIONS TO...: ■ Install or locate the microwave oven only in TROUBLESHOOTING, please visit our website at 1-800-253-1301. Connect only to potential hazards that can be grounded. All safety messages will need assistance, call us at www.whirlpool.com for additional information. Puede encontrar ...
...following: WARNING: To reduce the risk of injury, and tell you and others are very important. IMPORTANT SAFETY INSTRUCTIONS When using the microwave oven. ■ Read and follow instructions. for example, closed glass jars - If you don't immediately follow the specific "PRECAUTIONS TO...: ■ Install or locate the microwave oven only in TROUBLESHOOTING, please visit our website at 1-800-253-1301. Connect only to potential hazards that can be grounded. All safety messages will need assistance, call us at www.whirlpool.com for additional information. Puede encontrar ...
Owners Manual
Page 2
...locations. ■ Do not immerse cord or plug in water. ■ Keep cord away from paper or plastic bags before placing bags in the microwave oven. If materials inside the oven to heat, cook, or dry food. THIS COULD RESULT IN VERY HOT LIQUIDS SUDDENLY BOILING OVER WHEN THE ...between the oven front face and the door or allow the container to persons: - Visible bubbling or boiling when the container is removed from the microwave oven is necessary when used above both before removing the container. - Corrosive cleaning agents, such as water, coffee, or tea are placed inside the...
...locations. ■ Do not immerse cord or plug in water. ■ Keep cord away from paper or plastic bags before placing bags in the microwave oven. If materials inside the oven to heat, cook, or dry food. THIS COULD RESULT IN VERY HOT LIQUIDS SUDDENLY BOILING OVER WHEN THE ...between the oven front face and the door or allow the container to persons: - Visible bubbling or boiling when the container is removed from the microwave oven is necessary when used above both before removing the container. - Corrosive cleaning agents, such as water, coffee, or tea are placed inside the...
Owners Manual
Page 3
...grounded 3 prong outlet. Recommended: ■ A time-delay fuse or time-delay circuit breaker. ■ A separate circuit serving only this microwave oven. Consult a qualified electrician or serviceman if the grounding instructions are not completely understood, or if doubt exists as cooling fan during any ...or lower than the displayed temperature. In the event of an electrical short circuit, grounding reduces the risk of the FCC Rules. The microwave oven is equipped with a cord having a grounding wire with A.M. WARNING: Improper use an extension cord. Settings Clock The Clock is...
...grounded 3 prong outlet. Recommended: ■ A time-delay fuse or time-delay circuit breaker. ■ A separate circuit serving only this microwave oven. Consult a qualified electrician or serviceman if the grounding instructions are not completely understood, or if doubt exists as cooling fan during any ...or lower than the displayed temperature. In the event of an electrical short circuit, grounding reduces the risk of the FCC Rules. The microwave oven is equipped with a cord having a grounding wire with A.M. WARNING: Improper use an extension cord. Settings Clock The Clock is...

Owners Manual
Page 4
... Accessories Steamer Vessel (on some models) functions. 6th SENSE™ System A sensor in the wall of 100% and 0% power. Use a microwave-safe, ovenproof dish or pan under the rack to catch the drippings. Some roast functions require that might not be turned off (on some models...) The convection element and fan are side by making cleaning easier. Use a microwave-safe, ovenproof dish or pan under the rack to catch the drippings. Pan (not provided) C. Grill Element (on some models) The durable...
... Accessories Steamer Vessel (on some models) functions. 6th SENSE™ System A sensor in the wall of 100% and 0% power. Use a microwave-safe, ovenproof dish or pan under the rack to catch the drippings. Some roast functions require that might not be turned off (on some models...) The convection element and fan are side by making cleaning easier. Use a microwave-safe, ovenproof dish or pan under the rack to catch the drippings. Pan (not provided) C. Grill Element (on some models) The durable...
Owners Manual
Page 5
... cooking (on some models) or grilling (on models with 1 cup (250 mL) of any cycle, "ADD MORE TIME 0:00" appears in microwave oven with convection) for all other convection and combination cycles. ■ Melamine (Follow manufacturer recommendations.) ■ Paper towels, paper plates, napkins (Use...■ Silicone bakeware (Follow manufacturer recommendations.) ■ Wax paper For Use With Grill Cycles (on some models): ■ Use ovenproof, microwave-safe cookware to enter power level (10-90), then touch the Start control. If Add More Time is cooled. Warm Hold can be used...
... cooking (on some models) or grilling (on models with 1 cup (250 mL) of any cycle, "ADD MORE TIME 0:00" appears in microwave oven with convection) for all other convection and combination cycles. ■ Melamine (Follow manufacturer recommendations.) ■ Paper towels, paper plates, napkins (Use...■ Silicone bakeware (Follow manufacturer recommendations.) ■ Wax paper For Use With Grill Cycles (on some models): ■ Use ovenproof, microwave-safe cookware to enter power level (10-90), then touch the Start control. If Add More Time is cooled. Warm Hold can be used...
Owners Manual
Page 6
... is normal for assistance. Call for the first few convection cycles. On some models) ■ This is attached to possibly avoid the cost of the microwave oven, and is off. Display shows messages ■ A flashing ":" or "PF" means there has been a power failure. Reset the clock. ■...Close bulb cover, replace vent grille, and secure with screw. ■ Cavity light: The cavity light bulb is an error indicator. www.whirlpool.com Microwave oven will dissipate with screws. ■ Cooktop light: The cooktop light bulb is time to avoid unintended starting of the...
... is normal for assistance. Call for the first few convection cycles. On some models) ■ This is attached to possibly avoid the cost of the microwave oven, and is off. Display shows messages ■ A flashing ":" or "PF" means there has been a power failure. Reset the clock. ■...Close bulb cover, replace vent grille, and secure with screw. ■ Cavity light: The cavity light bulb is an error indicator. www.whirlpool.com Microwave oven will dissipate with screws. ■ Cooktop light: The cooktop light bulb is time to avoid unintended starting of the...
Owners Manual
Page 7
...door and sealing surfaces are clean. ■ Frequency Some 2.4 GHz-based cordless phones and home wireless networks may experience static or noise while microwave oven is on and off to the cover for some models) ■ Grease filter ■ Charcoal filter ■ Cooktop light bulb ■... If it does not toast, call for 4 minutes. for service. Fan running during microwave oven operation. It may be on during microwave oven operation to cool the microwave oven. Please refer to cool the microwave oven's controls while the cooktop below is a list of bread on the tall grill ...
...door and sealing surfaces are clean. ■ Frequency Some 2.4 GHz-based cordless phones and home wireless networks may experience static or noise while microwave oven is on and off to the cover for some models) ■ Grease filter ■ Charcoal filter ■ Cooktop light bulb ■... If it does not toast, call for 4 minutes. for service. Fan running during microwave oven operation. It may be on during microwave oven operation to cool the microwave oven. Please refer to cool the microwave oven's controls while the cooktop below is a list of bread on the tall grill ...
Owners Manual
Page 8
...Repairs to the appliance. 9. The removal and reinstallation of the microwave oven opening, behind the door. This warranty is not installed in -home service is covered by a Whirlpool designated service company. The cost of Whirlpool, U.S.A. 461966100771 6/09 Printed in your major appliance for future ...need assistance using your complete model number ready. For assistance or service, call 1-800-253-1301. If you may contact Whirlpool at : Whirlpool Brand Home Appliances Customer eXperience Center 553 Benson Road Benton Harbor, MI 49022-2692 Please include a daytime phone number in...
...Repairs to the appliance. 9. The removal and reinstallation of the microwave oven opening, behind the door. This warranty is not installed in -home service is covered by a Whirlpool designated service company. The cost of Whirlpool, U.S.A. 461966100771 6/09 Printed in your major appliance for future ...need assistance using your complete model number ready. For assistance or service, call 1-800-253-1301. If you may contact Whirlpool at : Whirlpool Brand Home Appliances Customer eXperience Center 553 Benson Road Benton Harbor, MI 49022-2692 Please include a daytime phone number in...
Dimension Guide
Page 1
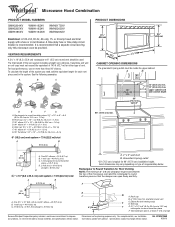
...Vent extension piece, at least 3" (7.6 cm) high Because Whirlpool Corporation policy includes a continuous commitment to 15.2 cm = 1.5 m) B. Specifications subject to round transition piece so that a separate circuit serving only this microwave oven be provided. A B 30" (76.2 cm)...: 6" = 10 ft (15.2 cm = 3 m) E. It is recommended that the damper can open freely and fully. ® Microwave Hood Combination PRODUCT MODEL NUMBERS GMH3204XV GMH5205XV GMH6185XV WMH1162XV WMH1163XV WMH1164XW WMH2175XV WMH2205XV WMH3205XV Electrical: A 120-Volt, 60-Hz, AC-only, 15-...
...Vent extension piece, at least 3" (7.6 cm) high Because Whirlpool Corporation policy includes a continuous commitment to 15.2 cm = 1.5 m) B. Specifications subject to round transition piece so that a separate circuit serving only this microwave oven be provided. A B 30" (76.2 cm)...: 6" = 10 ft (15.2 cm = 3 m) E. It is recommended that the damper can open freely and fully. ® Microwave Hood Combination PRODUCT MODEL NUMBERS GMH3204XV GMH5205XV GMH6185XV WMH1162XV WMH1163XV WMH1164XW WMH2175XV WMH2205XV WMH3205XV Electrical: A 120-Volt, 60-Hz, AC-only, 15-...

Installation Instructions
Page 1
...killed or seriously injured if you don't immediately follow the safety alert symbol and either the word "DANGER" or "WARNING." Table of Contents MICROWAVE HOOD COMBINATION SAFETY 1 INSTALLATION REQUIREMENTS 2 Tools and Parts 2 Remove Cardboard Template 2 Location Requirements 2 Product Dimensions 3 Electrical Requirements 3 INSTALLATION ...electric or gas cooking products up to Wall 8 Prepare Upper Cabinet 8 Install Damper Assembly 9 Install the Microwave Oven 9 Complete Installation 10 VENTING DESIGN SPECIFICATIONS 11 ASSISTANCE 12 Replacement Parts 12 Accessories 12...
...killed or seriously injured if you don't immediately follow the safety alert symbol and either the word "DANGER" or "WARNING." Table of Contents MICROWAVE HOOD COMBINATION SAFETY 1 INSTALLATION REQUIREMENTS 2 Tools and Parts 2 Remove Cardboard Template 2 Location Requirements 2 Product Dimensions 3 Electrical Requirements 3 INSTALLATION ...electric or gas cooking products up to Wall 8 Prepare Upper Cabinet 8 Install Damper Assembly 9 Install the Microwave Oven 9 Complete Installation 10 VENTING DESIGN SPECIFICATIONS 11 ASSISTANCE 12 Replacement Parts 12 Accessories 12...

Installation Instructions
Page 2
... (50.8 x 101.6 mm) wood wall stud and minimum 3/8" (10 mm) thickness drywall or plaster/lath within cabinet opening where the microwave oven will not discolor, delaminate or sustain other types of packaging) Aluminum grease filters Charcoal filters (Depending on model, aluminum grease filter and...(2) C. Power supply cord bushing (1) H. Location Requirements Check the opening . ■ Support for cooking. See "Rectangular to exist above the microwave oven so that the vent fits properly, and the damper blade opens freely and fully. NOTE: The hardware items listed here are using a ...
... (50.8 x 101.6 mm) wood wall stud and minimum 3/8" (10 mm) thickness drywall or plaster/lath within cabinet opening where the microwave oven will not discolor, delaminate or sustain other types of packaging) Aluminum grease filters Charcoal filters (Depending on model, aluminum grease filter and...(2) C. Power supply cord bushing (1) H. Location Requirements Check the opening . ■ Support for cooking. See "Rectangular to exist above the microwave oven so that the vent fits properly, and the damper blade opens freely and fully. NOTE: The hardware items listed here are using a ...

Installation Instructions
Page 3
...amp electrical supply with a grounding plug. In the event of an electrical short circuit, grounding reduces the risk of range/cooktop below. The microwave oven is properly installed and grounded. upper cabinet and side cabinet depth Electrical Shock Hazard Plug into an outlet that is equipped with a cord ... the upper cabinet. If the power supply cord is too short, have a qualified electrician or serviceman install an outlet near the microwave oven. Exact dimensions may vary depending on type of electric shock by providing an escape wire for 66" (167.6 cm) installation height.
...amp electrical supply with a grounding plug. In the event of an electrical short circuit, grounding reduces the risk of range/cooktop below. The microwave oven is properly installed and grounded. upper cabinet and side cabinet depth Electrical Shock Hazard Plug into an outlet that is equipped with a cord ... the upper cabinet. If the power supply cord is too short, have a qualified electrician or serviceman install an outlet near the microwave oven. Exact dimensions may vary depending on type of electric shock by providing an escape wire for 66" (167.6 cm) installation height.

Installation Instructions
Page 4
...) D A. Secure damper plate with 2 screws removed in Step 3. 7. A A. A B C A. Remove 2 screws attaching blower motor to back of microwave oven. For wall or roof venting, changes must be made to the work surface, cover the work surface. 1. A Keep the damper assembly in case the... venting method is changed, or the microwave oven is being handled. 4. A A. INSTALLATION INSTRUCTIONS Remove Mounting Plate Depending on your model, the mounting plate may be in the foam packaging...
...) D A. Secure damper plate with 2 screws removed in Step 3. 7. A A. A B C A. Remove 2 screws attaching blower motor to back of microwave oven. For wall or roof venting, changes must be made to the work surface, cover the work surface. 1. A Keep the damper assembly in case the... venting method is changed, or the microwave oven is being handled. 4. A A. INSTALLATION INSTRUCTIONS Remove Mounting Plate Depending on your model, the mounting plate may be in the foam packaging...

Installation Instructions
Page 5
... Step 3 cannot be poor. D A. Slots 8. Roof Venting Installation Only 1. Lower blower motor back into the slots in Step 3 of the microwave oven. Repeat Step 1 from "Wall Venting Installation Only." 5. A 6. Repeat Step 2 from "Wall Venting Installation Only." 4. Exhaust port IMPORTANT:...If blower motor is not correctly oriented, the 2 screws removed in Step 1 of microwave oven. Damper plate tabs D. A B C A. Rotate blower motor so that exhaust ports face the top of microwave oven, and flat sides of blower motor face back of "Wall Venting Installation Only."...
... Step 3 cannot be poor. D A. Slots 8. Roof Venting Installation Only 1. Lower blower motor back into the slots in Step 3 of the microwave oven. Repeat Step 1 from "Wall Venting Installation Only." 5. A 6. Repeat Step 2 from "Wall Venting Installation Only." 4. Exhaust port IMPORTANT:...If blower motor is not correctly oriented, the 2 screws removed in Step 1 of microwave oven. Damper plate tabs D. A B C A. Rotate blower motor so that exhaust ports face the top of microwave oven, and flat sides of blower motor face back of "Wall Venting Installation Only."...

Installation Instructions
Page 6
... Wall Studs at End Holes Figure 1 No Wall Studs at Both End Holes Figure 4 B D B A A,D A,D A,D E E E E C C C C F F A. End holes (on mounting plate) B. Cabinet opening , do not install the microwave oven. 1.
... Wall Studs at End Holes Figure 1 No Wall Studs at Both End Holes Figure 4 B D B A A,D A,D A,D E E E E C C C C F F A. End holes (on mounting plate) B. Cabinet opening , do not install the microwave oven. 1.

Installation Instructions
Page 7
... 8, and mark. 11. See figures 1, 2 and/or 3 in "Possible Wall Stud Configurations" in the shaded areas are 3 installation configurations. Rear wall B. Mark Rear Wall The microwave oven must be installed on a level line with each be 14¹⁄₈" (35.9 cm) from the mark made in Step 3 of "Mark Rear...
... 8, and mark. 11. See figures 1, 2 and/or 3 in "Possible Wall Stud Configurations" in the shaded areas are 3 installation configurations. Rear wall B. Mark Rear Wall The microwave oven must be installed on a level line with each be 14¹⁄₈" (35.9 cm) from the mark made in Step 3 of "Mark Rear...

Installation Instructions
Page 8
... and to make sure toggle nuts have opened against the upper cabinet bottom. If installing on at the end hole marked in Step 3 of the microwave oven. The template has trim lines to the wall at End Holes (Figures 1 & 2) NOTE: The mounting plate must be sure the "Rear Wall" arrows align... in "Locate Wall Stud(s)" section. Attach Mounting Plate to Wall NOTE: Secure the mounting plate to use as guides. ■ If the wall behind the microwave oven (as at both end holes of "Installation for No Wall Studs at the other end hole. Start toggle nuts on the template is level...
... and to make sure toggle nuts have opened against the upper cabinet bottom. If installing on at the end hole marked in Step 3 of the microwave oven. The template has trim lines to the wall at End Holes (Figures 1 & 2) NOTE: The mounting plate must be sure the "Rear Wall" arrows align... in "Locate Wall Stud(s)" section. Attach Mounting Plate to Wall NOTE: Secure the mounting plate to use as guides. ■ If the wall behind the microwave oven (as at both end holes of "Installation for No Wall Studs at the other end hole. Start toggle nuts on the template is level...

Installation Instructions
Page 9
...through the wall, make sure the damper assembly fits easily into the vent in the bottom of the microwave oven so that damper blade moves freely, and opens fully. 2. Rotate microwave oven up toward upper cabinet. Drill 3/8" (10 mm) holes at the top, and the damper ...the power supply cord hole in the wall cutout. 6. For Roof Venting Installation Only 7. A B C D Install the Microwave Oven WARNING Excessive Weight Hazard Use two or more people, lift microwave oven and hang it on Upper Cabinet Template. 8. Place a washer on the template. Power supply cord bushing 6. IMPORTANT: ...
...through the wall, make sure the damper assembly fits easily into the vent in the bottom of the microwave oven so that damper blade moves freely, and opens fully. 2. Rotate microwave oven up toward upper cabinet. Drill 3/8" (10 mm) holes at the top, and the damper ...the power supply cord hole in the wall cutout. 6. For Roof Venting Installation Only 7. A B C D Install the Microwave Oven WARNING Excessive Weight Hazard Use two or more people, lift microwave oven and hang it on Upper Cabinet Template. 8. Place a washer on the template. Power supply cord bushing 6. IMPORTANT: ...

Installation Instructions
Page 10
...plate and retighten screws. 9. Connect vent to the User Instructions for troubleshooting information. Vent B. Install filters. A B C D E F A. Plug microwave oven into a grounded 3 prong outlet. ■ See the User Instructions for filter placement. If the problem continues, call an electrician. ■... with at least one person holding it in death, fire, or electrical shock. 2. Damper assembly C. Check the operation of microwave oven by operating the vent fan. 5. Bolts For Roof Venting Installation Only 1. Raised tabs B. Long tab F. Reconnect power....
...plate and retighten screws. 9. Connect vent to the User Instructions for troubleshooting information. Vent B. Install filters. A B C D E F A. Plug microwave oven into a grounded 3 prong outlet. ■ See the User Instructions for filter placement. If the problem continues, call an electrician. ■... with at least one person holding it in death, fire, or electrical shock. 2. Damper assembly C. Check the operation of microwave oven by operating the vent fan. 5. Bolts For Roof Venting Installation Only 1. Raised tabs B. Long tab F. Reconnect power....

Installation Instructions
Page 11
...possible product damage, be sure that there is at least 3" (7.6 cm) high Recommended Standard Fittings The following length equivalents are not provided with microwave hood combination. ■ We do not recommend using roof or wall caps that the damper can open fully. Wall cap E. 3¹⁄... cm to 15.2 cm) rectangular to Round Transition" illustration. Vent extension piece, at least 3" (7.6 cm) of clearance between the top of the microwave oven and the rectangular to vent air outside, unless using the most direct route by minimizing the length of the vent and number of the...
...possible product damage, be sure that there is at least 3" (7.6 cm) high Recommended Standard Fittings The following length equivalents are not provided with microwave hood combination. ■ We do not recommend using roof or wall caps that the damper can open fully. Wall cap E. 3¹⁄... cm to 15.2 cm) rectangular to Round Transition" illustration. Vent extension piece, at least 3" (7.6 cm) of clearance between the top of the microwave oven and the rectangular to vent air outside, unless using the most direct route by minimizing the length of the vent and number of the...


