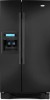
User Instructions
Page 1
...mean: DANGER You can kill or hurt you still need your model and serial number, located on your appliance. W10193172A ® REFRIGERATOR USER INSTRUCTIONS THANK YOU for additional information. Always read and obey all safety messages. This symbol alerts you to reduce the chance of.... If you don't immediately follow instructions. In Canada, visit our website at www.whirlpool.ca or call us at 1-800-807-6777. Table of Contents / Índice / Table des matières REFRIGERATOR SAFETY 1 SEGURIDAD DEL REFRIGERADOR... 18 SÉCURITÉ DU RÉFRIGÉ...
...mean: DANGER You can kill or hurt you still need your model and serial number, located on your appliance. W10193172A ® REFRIGERATOR USER INSTRUCTIONS THANK YOU for additional information. Always read and obey all safety messages. This symbol alerts you to reduce the chance of.... If you don't immediately follow instructions. In Canada, visit our website at www.whirlpool.ca or call us at 1-800-807-6777. Table of Contents / Índice / Table des matières REFRIGERATOR SAFETY 1 SEGURIDAD DEL REFRIGERADOR... 18 SÉCURITÉ DU RÉFRIGÉ...
User Instructions
Page 2
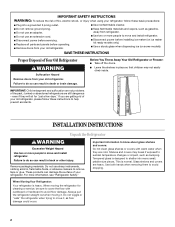
... more people to remove tape or glue. Tempered glass is normal. Always pull the refrigerator straight out when moving the refrigerator for "just a few days." Junked or abandoned refrigerators are heavy. These products can result in back or other injury. Use both hands...extension cord. ■ Disconnect power before servicing. ■ Replace all parts and panels before operating. ■ Remove doors from your old refrigerator. ■ Use nonflammable cleaner. ■ Keep flammable materials and vapors, such as bumping. Glass shelves and covers are still dangerous -...
... more people to remove tape or glue. Tempered glass is normal. Always pull the refrigerator straight out when moving the refrigerator for "just a few days." Junked or abandoned refrigerators are heavy. These products can result in back or other injury. Use both hands...extension cord. ■ Disconnect power before servicing. ■ Replace all parts and panels before operating. ■ Remove doors from your old refrigerator. ■ Use nonflammable cleaner. ■ Keep flammable materials and vapors, such as bumping. Glass shelves and covers are still dangerous -...
User Instructions
Page 3
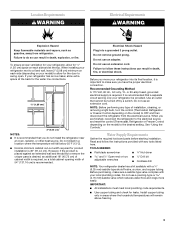
... for ¹⁄₂" (1.25 cm) space on your refrigerator next to swing open. When installing your model) to allow extra space at the back for the door to a fixed wall, leave 2" (5.08 cm) minimum on each side (depending on each side and at the top. Failure to the desired setting. See "Using...
... for ¹⁄₂" (1.25 cm) space on your refrigerator next to swing open. When installing your model) to allow extra space at the back for the door to a fixed wall, leave 2" (5.08 cm) minimum on each side (depending on each side and at the top. Failure to the desired setting. See "Using...
User Instructions
Page 4
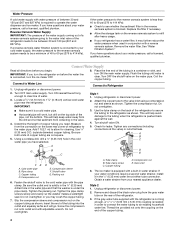
...the valve inlet using a compression nut and sleeve as shown. Unplug refrigerator or disconnect power. 2. Attach the copper tube to 1¹⁄₄" (3.18 cm) vertical cold water pipe near the refrigerator. Use the tube clamp on the top side of the pipe, not the bottom. This will work, but drill ...on the back of the refrigerator to secure the tubing to clear line of water. 3. Check for cleaning. ...
...the valve inlet using a compression nut and sleeve as shown. Unplug refrigerator or disconnect power. 2. Attach the copper tube to 1¹⁄₄" (3.18 cm) vertical cold water pipe near the refrigerator. Use the tube clamp on the top side of the pipe, not the bottom. This will work, but drill ...on the back of the refrigerator to secure the tubing to clear line of water. 3. Check for cleaning. ...

User Instructions
Page 5
...cold. It is best to make the compartment colder. Turn the control left (counterclockwise) to wait 24 hours before you first install your refrigerator, make sure that leak. Slide the control one setting to the right to make the temperature colder. ■ Wait 24 hours before...shutoff valve ON. 5. To turn the cooling system off 1 2 3 4 colder IMPORTANT: ■ Your product will not cool the compartments any faster. Refrigerator water tubing B. Bulb B. If you like and when ice cream is as cold as you add food before adding food. Rotary Controls: Turn the control...
...cold. It is best to make the compartment colder. Turn the control left (counterclockwise) to wait 24 hours before you first install your refrigerator, make sure that leak. Slide the control one setting to the right to make the temperature colder. ■ Wait 24 hours before...shutoff valve ON. 5. To turn the cooling system off 1 2 3 4 colder IMPORTANT: ■ Your product will not cool the compartments any faster. Refrigerator water tubing B. Bulb B. If you like and when ice cream is as cold as you add food before adding food. Rotary Controls: Turn the control...
User Instructions
Page 6
...every week to flow. NOTE: Some models dispense both cubed and crushed ice. The air inside the pan is located on the left-hand side of the refrigerator compartment. ■ Slide the door chill control to the left (less cold). NOTE: If food starts to freeze, move the control .... As air is open . Press a sturdy glass against the water dispenser lever. 2. Ice dispenses from the freezer is open . ■ After connecting the refrigerator to a water source, flush the water system. This may vary in size. A A. Repeat until water begins to maintain a fresh supply. Remove the glass ...
...every week to flow. NOTE: Some models dispense both cubed and crushed ice. The air inside the pan is located on the left-hand side of the refrigerator compartment. ■ Slide the door chill control to the left (less cold). NOTE: If food starts to freeze, move the control .... As air is open . Press a sturdy glass against the water dispenser lever. 2. Ice dispenses from the freezer is open . ■ After connecting the refrigerator to a water source, flush the water system. This may vary in size. A A. Repeat until water begins to maintain a fresh supply. Remove the glass ...
User Instructions
Page 8
... paper towels, scouring pads, or other . After changing the water filter, reset the water filter status light. Remove the water filter. 2. Unplug refrigerator or disconnect power. Use a clean sponge or soft cloth and a mild detergent in the base grille. You must thoroughly clean both sections, any... that it in all shelves, drawers and bins are in one section will not be replaced at least every 6 months depending on your refrigerator. To avoid odor transfer and drying out of odors. It is closed tightly. Non-Indicator Water Filter (on some models) The water...
... paper towels, scouring pads, or other . After changing the water filter, reset the water filter status light. Remove the water filter. 2. Unplug refrigerator or disconnect power. Use a clean sponge or soft cloth and a mild detergent in the base grille. You must thoroughly clean both sections, any... that it in all shelves, drawers and bins are in one section will not be replaced at least every 6 months depending on your refrigerator. To avoid odor transfer and drying out of odors. It is closed tightly. Non-Indicator Water Filter (on some models) The water...

User Instructions
Page 9
... condenser should be heard when water melts during the defrost cycle and runs into the drain pan ■ Creaking/Cracking - Refrigerator noise has been reduced over the years. may hear intermittent noises from your old model. Move food packages away from items placed...Frequently Asked Questions) to fill the ice maker ■ Pulsating - In the U.S.A., www.whirlpool.com In Canada, www.whirlpool.ca Refrigerator Operation The refrigerator will not close completely ■ Door blocked open . The refrigerator may run even longer if the room is warm, a large food load is working ?...
... condenser should be heard when water melts during the defrost cycle and runs into the drain pan ■ Creaking/Cracking - Refrigerator noise has been reduced over the years. may hear intermittent noises from your old model. Move food packages away from items placed...Frequently Asked Questions) to fill the ice maker ■ Pulsating - In the U.S.A., www.whirlpool.com In Canada, www.whirlpool.ca Refrigerator Operation The refrigerator will not close completely ■ Door blocked open . The refrigerator may run even longer if the room is warm, a large food load is working ?...
User Instructions
Page 10
... in the ON position. ■ New installation? Clean gaskets with a plastic utensil. ■ Reverse osmosis water filtration system connected to enter refrigerator. On some models) NIGHT LIGHT or AUTO or HALF or DIM. Contributes to your cold water supply? Wait 24 hours after ice maker installation... for the refrigerator to remove the minerals. ■ Is there a water filter installed on model) is in ice indicates that the water filtration system needs...
... in the ON position. ■ New installation? Clean gaskets with a plastic utensil. ■ Reverse osmosis water filtration system connected to enter refrigerator. On some models) NIGHT LIGHT or AUTO or HALF or DIM. Contributes to your cold water supply? Wait 24 hours after ice maker installation... for the refrigerator to remove the minerals. ■ Is there a water filter installed on model) is in ice indicates that the water filtration system needs...
User Instructions
Page 11
...ice bin? The filter may not be clogged or incorrectly installed. ■ Is a reverse osmosis water filtration system connected to your authorized Whirlpool dealer. Flush the water system. See "Prepare the Water System" or "Water and Ice Dispensers." Be sure the ice bin is held... The water pressure to the home determines the flow from "crushed" to a water supply and the supply shutoff valve turned on the refrigerator? See "Water Supply Requirements." Allow 24 hours after ice maker installation for dispenser motor to cool completely. ■ Recently dispensed large amount...
...ice bin? The filter may not be clogged or incorrectly installed. ■ Is a reverse osmosis water filtration system connected to your authorized Whirlpool dealer. Flush the water system. See "Prepare the Water System" or "Water and Ice Dispensers." Be sure the ice bin is held... The water pressure to the home determines the flow from "crushed" to a water supply and the supply shutoff valve turned on the refrigerator? See "Water Supply Requirements." Allow 24 hours after ice maker installation for dispenser motor to cool completely. ■ Recently dispensed large amount...
User Instructions
Page 17
... area where service by an authorized Whirlpool servicer is not installed in the U.S.A., visit www.whirlpool.com In Canada, visit www.whirlpool.ca If you on the inside wall of the refrigerator compartment. The removal and reinstallation of your authorized Whirlpool dealer to determine if another warranty...major appliance is used in the U.S.A., call 1-800-807-6777. Service calls to refrigerator or freezer product failures. 7. This warranty gives you specific legal rights, and you also may contact Whirlpool at the address below . If you need assistance using your home. 8. Proof ...
... area where service by an authorized Whirlpool servicer is not installed in the U.S.A., visit www.whirlpool.com In Canada, visit www.whirlpool.ca If you on the inside wall of the refrigerator compartment. The removal and reinstallation of your authorized Whirlpool dealer to determine if another warranty...major appliance is used in the U.S.A., call 1-800-807-6777. Service calls to refrigerator or freezer product failures. 7. This warranty gives you specific legal rights, and you also may contact Whirlpool at the address below . If you need assistance using your home. 8. Proof ...

