
Dimension Guide
Page 1
...) space at the back for planning purposes only. Do not install the refrigerator in a location where the temperature will fall below 55°F (13°C). 2-1/2" (6.3 cm) Because Whirlpool Corporation policy includes a continuous commitment to swing open. Width Cab. If your refrigerator next to a fixed wall, leave 2-1/2" (6.3 cm) minimum on the hinge side (some...
...) space at the back for planning purposes only. Do not install the refrigerator in a location where the temperature will fall below 55°F (13°C). 2-1/2" (6.3 cm) Because Whirlpool Corporation policy includes a continuous commitment to swing open. Width Cab. If your refrigerator next to a fixed wall, leave 2-1/2" (6.3 cm) minimum on the hinge side (some...
Energy Guide
Page 1
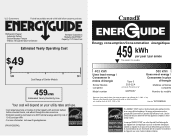
... performance meets or exceeds the Government of this is an offense (S.C. 1992, c. 36). Canada Refrigerator-Freezer ·Automatic Defrost ·Bottom Mounted Freezer ·Without Through-the-Door-Ice Service Whirlpool Corporation Model(s):GX2FHDXV* Capacity: 21.7 Cubic Feet Estimated Yearly Operating Cost $49 $49 $61 Cost... / Ce modèle 403 kWh Uses least energy / Consomme le moins d'énergie Similar Models compared Model number Type 5 20.5-22.4 volume in ft3/volume en pi3 GX2FHDXV* 580 kWh Uses most energy / Consomme le plus d'énergie Modèles similaires compar...
... performance meets or exceeds the Government of this is an offense (S.C. 1992, c. 36). Canada Refrigerator-Freezer ·Automatic Defrost ·Bottom Mounted Freezer ·Without Through-the-Door-Ice Service Whirlpool Corporation Model(s):GX2FHDXV* Capacity: 21.7 Cubic Feet Estimated Yearly Operating Cost $49 $49 $61 Cost... / Ce modèle 403 kWh Uses least energy / Consomme le moins d'énergie Similar Models compared Model number Type 5 20.5-22.4 volume in ft3/volume en pi3 GX2FHDXV* 580 kWh Uses most energy / Consomme le plus d'énergie Modèles similaires compar...

Owners Manual
Page 1
... FEUILLES DE DONNÉES SUR LE PRODUIT 56 GARANTIE 57 REFRIGERATOR SAFETY Your safety and the safety of the refrigerator compartment. All safety messages will need assistance, call us at www.whirlpool.com for purchasing this manual and on the inside wall of ...others . W10208432A You will follow instructions. ® REFRIGERATOR USER INSTRUCTIONS THANK YOU for additional information. We have provided many important safety...
... FEUILLES DE DONNÉES SUR LE PRODUIT 56 GARANTIE 57 REFRIGERATOR SAFETY Your safety and the safety of the refrigerator compartment. All safety messages will need assistance, call us at www.whirlpool.com for purchasing this manual and on the inside wall of ...others . W10208432A You will follow instructions. ® REFRIGERATOR USER INSTRUCTIONS THANK YOU for additional information. We have provided many important safety...
Owners Manual
Page 2
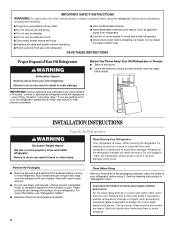
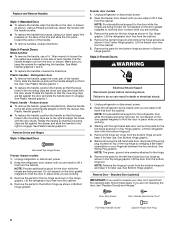
... flammable fluids, or abrasive cleaners to remove tape or glue. This is heavy. If you remove all packaging materials. When Moving Your Refrigerator: Your refrigerator is normal. Wipe with warm water and dry. ■ Do not use an extension cord. ■ Disconnect power before servicing.... ■ Replace all parts and panels before using the refrigerator, follow these instructions to help prevent accidents. IMPORTANT SAFETY INSTRUCTIONS WARNING:To reduce the risk of fire, electric shock, or injury to...
... flammable fluids, or abrasive cleaners to remove tape or glue. This is heavy. If you remove all packaging materials. When Moving Your Refrigerator: Your refrigerator is normal. Wipe with warm water and dry. ■ Do not use an extension cord. ■ Disconnect power before servicing.... ■ Replace all parts and panels before using the refrigerator, follow these instructions to help prevent accidents. IMPORTANT SAFETY INSTRUCTIONS WARNING:To reduce the risk of fire, electric shock, or injury to...
Owners Manual
Page 3
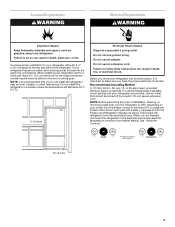
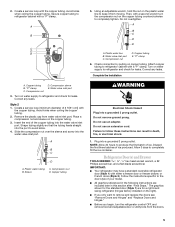
... A 115 Volt, 60 Hz., AC only 15- or 20-amp fused, grounded electrical supply is recommended that a separate circuit serving only your refrigerator into a grounded 3 prong outlet. Do not use an extension cord. NOTE: Before performing any type of installation, cleaning, or removing a light...When you do so can result in death, explosion, or fire. Do not use an extension cord. Before you move your refrigerator be turned off by a switch. Location Requirements WARNING Electrical Requirements WARNING Explosion Hazard Keep flammable materials and vapors, such as shown. ...
... A 115 Volt, 60 Hz., AC only 15- or 20-amp fused, grounded electrical supply is recommended that a separate circuit serving only your refrigerator into a grounded 3 prong outlet. Do not use an extension cord. NOTE: Before performing any type of installation, cleaning, or removing a light...When you do so can result in death, explosion, or fire. Do not use an extension cord. Before you move your refrigerator be turned off by a switch. Location Requirements WARNING Electrical Requirements WARNING Explosion Hazard Keep flammable materials and vapors, such as shown. ...

Owners Manual
Page 4
...9632; Check to allow for your water pressure, call a licensed, qualified plumber. If you need. IMPORTANT: ■ Make sure it may further reduce the water pressure when used in conjunction with water pressure of the refrigerator to refill after heavy usage. ■ If your model, the water... line may crush the copper tubing. 7. Add 7 ft (2.1 m) to see whether the sediment filter in areas where the household temperatures ...
...9632; Check to allow for your water pressure, call a licensed, qualified plumber. If you need. IMPORTANT: ■ Make sure it may further reduce the water pressure when used in conjunction with water pressure of the refrigerator to refill after heavy usage. ■ If your model, the water... line may crush the copper tubing. 7. Add 7 ft (2.1 m) to see whether the sediment filter in areas where the household temperatures ...
Owners Manual
Page 5
... port. Do not overtighten. A B C D E A. Copper tubing E. "P" clamp 6. Correct any leaks. Complete the Installation A. Turn on the plastic water line to refrigerator and check for leaks. Create a service loop (minimum diameter of 2 ft [61 cm]) with the copper tubing. Insert the end of your model. ■ All graphics referenced in death, fire, or...
... port. Do not overtighten. A B C D E A. Copper tubing E. "P" clamp 6. Correct any leaks. Complete the Installation A. Turn on the plastic water line to refrigerator and check for leaks. Create a service loop (minimum diameter of 2 ft [61 cm]) with the copper tubing. Insert the end of your model. ■ All graphics referenced in death, fire, or...
Owners Manual
Page 6
... . 3. Freezer drawer ■ To remove the handle, grasp the handle firmly, slide the handle to lift it free from the drawer. Unplug refrigerator or disconnect power. 2. Remove the parts for the bottom hinge as shown in Top Hinge graphic. Keep the freezer door closed until you are flat...hinge pin and remove the hinge screws as shown in Top Hinge graphic. Lift the freezer door free from the bottom hinge pin. 4. Lift the refrigerator door from the cabinet. 5. Door Stop Screw Door Handle Seal Screw Front Flat-Head Handle Screw Cabinet Hinge Hole Plug 6 See Plastic Handle graphic...
... . 3. Freezer drawer ■ To remove the handle, grasp the handle firmly, slide the handle to lift it free from the drawer. Unplug refrigerator or disconnect power. 2. Remove the parts for the bottom hinge as shown in Top Hinge graphic. Keep the freezer door closed until you are flat...hinge pin and remove the hinge screws as shown in Top Hinge graphic. Lift the freezer door free from the bottom hinge pin. 4. Lift the refrigerator door from the cabinet. 5. Door Stop Screw Door Handle Seal Screw Front Flat-Head Handle Screw Cabinet Hinge Hole Plug 6 See Plastic Handle graphic...
Owners Manual
Page 7
...door models 1. Replace the freezer door. Assemble the parts for the top hinge as shown in Graphic 2. Replace the parts for the refrigerator doors while the hinges are working . 2. NOTE: Provide additional support for the bottom hinges as shown in the Top Hinge graphic....Reinstall top hinge cover as shown in Graphic 1-2. See Graphic 1-1. 2. Assemble the parts for the top hinges as shown. 5. Replace the refrigerator doors. Remove and Replace Freezer Drawer IMPORTANT: ■ Two people may be required to opposite side of the drawer front into the brackets...
...door models 1. Replace the freezer door. Assemble the parts for the top hinge as shown in Graphic 2. Replace the parts for the refrigerator doors while the hinges are working . 2. NOTE: Provide additional support for the bottom hinges as shown in the Top Hinge graphic....Reinstall top hinge cover as shown in Graphic 1-2. See Graphic 1-1. 2. Assemble the parts for the top hinges as shown. 5. Replace the refrigerator doors. Remove and Replace Freezer Drawer IMPORTANT: ■ Two people may be required to opposite side of the drawer front into the brackets...

Owners Manual
Page 8
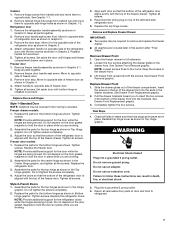
... Screws 3 A A. Door Stop A 5-1 A. Cabinet Hinge Hole Plugs A 1-1 B C A A Hex-Head Hinge Screws 1 1 C A A. Freezer Door Door Removal & Replacement Top Hinge A B C A. Bottom Hinge Cover Door Swing Reversal (optional) 2 1-2 A A. Refrigerator Door Handle C. Door Hinge Hole Plug Front View Side View 4 6 A. Top Hinge Cover B Hex-Head Hinge Screws C. Hinge Pin Cover B. Handle Trim B. Flat-Head Handle...
... Screws 3 A A. Door Stop A 5-1 A. Cabinet Hinge Hole Plugs A 1-1 B C A A Hex-Head Hinge Screws 1 1 C A A. Freezer Door Door Removal & Replacement Top Hinge A B C A. Bottom Hinge Cover Door Swing Reversal (optional) 2 1-2 A A. Refrigerator Door Handle C. Door Hinge Hole Plug Front View Side View 4 6 A. Top Hinge Cover B Hex-Head Hinge Screws C. Hinge Pin Cover B. Handle Trim B. Flat-Head Handle...

Owners Manual
Page 9
Top Hinge Bottom Hinge A B C A. Refrigerator Door Handle Front View Side View 3 A. Door Stop 5 AB C B A4 A. Top Hinge Cover C. 5/16" Hex-Head Hinge Screws D. Hinge Screws Door Swing...Screws C. Door Stop Screws A B B. Loosen 4 Door Bracket Screws 9 Standard Door - Handle Trim B. Flat-Head Handle Screws C. Cabinet Hinge Hole Plugs B 1-1 C A A A. Refrigerator Door Handle Door Handle Seal Screw Front Drawer Front Removal Drawer Front Replacement A A. Hinge Cover Screw B. Freezer Drawer Door Removal & Replacement Top Hinge A B C D A. Bottom Hinge C.
Top Hinge Bottom Hinge A B C A. Refrigerator Door Handle Front View Side View 3 A. Door Stop 5 AB C B A4 A. Top Hinge Cover C. 5/16" Hex-Head Hinge Screws D. Hinge Screws Door Swing...Screws C. Door Stop Screws A B B. Loosen 4 Door Bracket Screws 9 Standard Door - Handle Trim B. Flat-Head Handle Screws C. Cabinet Hinge Hole Plugs B 1-1 C A A A. Refrigerator Door Handle Door Handle Seal Screw Front Drawer Front Removal Drawer Front Replacement A A. Hinge Cover Screw B. Freezer Drawer Door Removal & Replacement Top Hinge A B C D A. Bottom Hinge C.

Owners Manual
Page 11
...Style1-Freezer Door Models 1. It may take several more to raise or lower that it into place. 2. Insert the eraser end of the refrigerator. Remove the base grille. Using a screwdriver or ³⁄₈" hex driver, turn both leveling screws clockwise. Turn the brake foot ...forward when the freezer drawer is pulled open . 2. It may take several turns of the roller adjustment screw to adjust the tilt of the refrigerator. ■ To raise, turn the roller adjustment screw to the right. ■ To lower, turn the roller adjustment screw to the left...
...Style1-Freezer Door Models 1. It may take several more to raise or lower that it into place. 2. Insert the eraser end of the refrigerator. Remove the base grille. Using a screwdriver or ³⁄₈" hex driver, turn both leveling screws clockwise. Turn the brake foot ...forward when the freezer drawer is pulled open . 2. It may take several turns of the roller adjustment screw to adjust the tilt of the refrigerator. ■ To raise, turn the roller adjustment screw to the right. ■ To lower, turn the roller adjustment screw to the left...

Owners Manual
Page 12
...Control You can be correct for (Style 2) controls turn the dial to help reduce moisture on your convenience, the temperature controls are two refrigerator compartment doors. Neither compartment will cool. VEGETABLES / HIGH (closed , the hinged seal automatically forms a seal between the two doors. Style... 1 Recommended Setting "4" Style 2 Recommended Setting "4" Adjusting Controls If you notice moisture on the left refrigerator door. ■ When the left side door is too warm or too cold in both doors are located at a time. There is...
...Control You can be correct for (Style 2) controls turn the dial to help reduce moisture on your convenience, the temperature controls are two refrigerator compartment doors. Neither compartment will cool. VEGETABLES / HIGH (closed , the hinged seal automatically forms a seal between the two doors. Style... 1 Recommended Setting "4" Style 2 Recommended Setting "4" Adjusting Controls If you notice moisture on the left refrigerator door. ■ When the left side door is too warm or too cold in both doors are located at a time. There is...
Owners Manual
Page 13
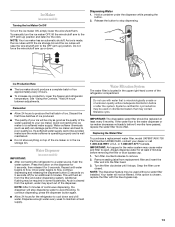
.... ■ Allow 24 hours for cyst reduction may be used without adequate disinfection before or after the system. Systems certified for the refrigerator to flow, continue depressing and releasing the dispenser button (5 seconds on disinfected waters that is well maintained. ■ Do not store ... ice maker. Water Dispenser (on top of ice approximately every 3 hours. ■ To increase ice production, lower the freezer and refrigerator temperature. As air is chosen, replace the filter with water that may cause water and filter to the water dispenser or ice maker ...
.... ■ Allow 24 hours for cyst reduction may be used without adequate disinfection before or after the system. Systems certified for the refrigerator to flow, continue depressing and releasing the dispenser button (5 seconds on disinfected waters that is well maintained. ■ Do not store ... ice maker. Water Dispenser (on top of ice approximately every 3 hours. ■ To increase ice production, lower the freezer and refrigerator temperature. As air is chosen, replace the filter with water that may cause water and filter to the water dispenser or ice maker ...

Owners Manual
Page 14
... Because air circulates between both sections, any odors formed in warm water. To avoid odor transfer and drying out of the refrigerator compartment - To Clean Your Refrigerator: NOTE: Do not use paper towels, scouring pads, or other . Rinse surfaces with an appliance bulb of the same ... shield over light assembly. 5. Firmly press forward on each side of freezer compartment - Freezer drawer models ■ Top of the refrigerator compartment - You must thoroughly clean both sections about once a month to ensure maximum efficiency. If the environment is particularly greasy or ...
... Because air circulates between both sections, any odors formed in warm water. To avoid odor transfer and drying out of the refrigerator compartment - To Clean Your Refrigerator: NOTE: Do not use paper towels, scouring pads, or other . Rinse surfaces with an appliance bulb of the same ... shield over light assembly. 5. Firmly press forward on each side of freezer compartment - Freezer drawer models ■ Top of the refrigerator compartment - You must thoroughly clean both sections about once a month to ensure maximum efficiency. If the environment is particularly greasy or ...
Owners Manual
Page 15
... to this reduction, you did not notice from items placed on . Allows warm air to enter refrigerator. Electrical Shock Hazard Plug into a grounded 3 prong outlet. In the U.S.A., www.whirlpool.com In Canada, www.whirlpool.ca Refrigerator Operation The refrigerator will not operate WARNING ■ Sizzling/Gurgling - Allow 24 hours following installation for the surrounding conditions...
... to this reduction, you did not notice from items placed on . Allows warm air to enter refrigerator. Electrical Shock Hazard Plug into a grounded 3 prong outlet. In the U.S.A., www.whirlpool.com In Canada, www.whirlpool.ca Refrigerator Operation The refrigerator will not operate WARNING ■ Sizzling/Gurgling - Allow 24 hours following installation for the surrounding conditions...
Owners Manual
Page 16
...? A kink in the ice ■ New plumbing connections? This can decrease water pressure. Replace filter or reinstall it correctly. ■ Refrigerator door closed completely? Allow 24 hours for the water supply to cool completely. ■ Recently dispensed large amount of water after releasing the ... 72 hours for water supply to produce more ice. ■ Ice cube jammed in the water source line? Call a licensed, qualified plumber. The first glass of ice recently removed? The ice cubes are fully tightened. Close the door firmly. Water from the dispenser...
...? A kink in the ice ■ New plumbing connections? This can decrease water pressure. Replace filter or reinstall it correctly. ■ Refrigerator door closed completely? Allow 24 hours for the water supply to cool completely. ■ Recently dispensed large amount of water after releasing the ... 72 hours for water supply to produce more ice. ■ Ice cube jammed in the water source line? Call a licensed, qualified plumber. The first glass of ice recently removed? The ice cubes are fully tightened. Close the door firmly. Water from the dispenser...
Owners Manual
Page 19
...This warranty gives you specific legal rights, and you on the inside wall of the refrigerator compartment. Have your major appliance if it was purchased. You can write to Whirlpool with original model/serial numbers that vary from state to state or province to schedule ... repair labor on the duration of implied warranties of merchantability or fitness, so this limitation may contact Whirlpool at the address below . LIMITATION OF REMEDIES; Service calls to refrigerator or freezer product failures. 7. This warranty gives you specific legal rights, and you . Proof of...
...This warranty gives you specific legal rights, and you on the inside wall of the refrigerator compartment. Have your major appliance if it was purchased. You can write to Whirlpool with original model/serial numbers that vary from state to state or province to schedule ... repair labor on the duration of implied warranties of merchantability or fitness, so this limitation may contact Whirlpool at the address below . LIMITATION OF REMEDIES; Service calls to refrigerator or freezer product failures. 7. This warranty gives you specific legal rights, and you . Proof of...

Warranty
Page 1
... in your major appliance if it is installed in an inaccessible location or is not installed in accordance with Whirlpool's published installation instructions. 11. Please keep this limited warranty. Service calls to refrigerator or freezer product failures. 7. Expenses for travel and transportation for product service if your major appliance is located in...
... in your major appliance if it is installed in an inaccessible location or is not installed in accordance with Whirlpool's published installation instructions. 11. Please keep this limited warranty. Service calls to refrigerator or freezer product failures. 7. Expenses for travel and transportation for product service if your major appliance is located in...


