Use and Care Guide
Page 1
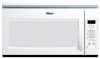
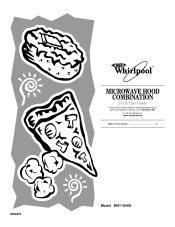
www.whirlpool.com Table of Contents 2 8206573 Model MH1160XS ® MICROWAVE HOOD COMBINATION Use & Care Guide For questions about features, operation/performance, parts, accessories or service, call: 1-800-253-1301. or visit our website at...
www.whirlpool.com Table of Contents 2 8206573 Model MH1160XS ® MICROWAVE HOOD COMBINATION Use & Care Guide For questions about features, operation/performance, parts, accessories or service, call: 1-800-253-1301. or visit our website at...
Use and Care Guide
Page 2
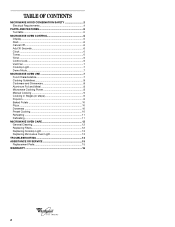
... Clock 6 Tones 6 Timer 6 Control Lock 6 Vent Fan 7 Cooktop Light 7 Demo Mode 7 MICROWAVE OVEN USE 7 Food Characteristics 7 Cooking Guidelines 8 Cookware and Dinnerware 8 Aluminum Foil and Metal 8 Microwave Cooking Power 8 Manual Cooking 9 Cooking in Stages (or steps 9 Popcorn 9 Baked Potato 10 Pizza ...10 Doneness 10 Preset Cooking 10 Reheating 11 Defrosting 11 MICROWAVE OVEN CARE 12 General Cleaning 12 Replacing Filters 12 Replacing Cooktop Light 13 Replacing Microwave Oven Light 13 TROUBLESHOOTING 14 ASSISTANCE OR SERVICE 15 Replacement Parts 15 ...
... Clock 6 Tones 6 Timer 6 Control Lock 6 Vent Fan 7 Cooktop Light 7 Demo Mode 7 MICROWAVE OVEN USE 7 Food Characteristics 7 Cooking Guidelines 8 Cookware and Dinnerware 8 Aluminum Foil and Metal 8 Microwave Cooking Power 8 Manual Cooking 9 Cooking in Stages (or steps 9 Popcorn 9 Baked Potato 10 Pizza ...10 Doneness 10 Preset Cooking 10 Reheating 11 Defrosting 11 MICROWAVE OVEN CARE 12 General Cleaning 12 Replacing Filters 12 Replacing Cooktop Light 13 Replacing Microwave Oven Light 13 TROUBLESHOOTING 14 ASSISTANCE OR SERVICE 15 Replacement Parts 15 ...

Use and Care Guide
Page 3
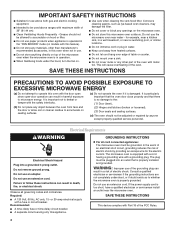
.... To reduce the risk of oven is not working properly, or if it . - We have provided many important safety messages in the microwave oven. Do not use the cavity for examination, repair, or adjustment. ■ See door surface cleaning instructions in accordance with metal scouring ... or seriously injured if you what the potential hazard is not designed for its intended use as described in the microwave oven. ■ Use the microwave oven only for industrial or laboratory use corrosive chemicals or vapors in this manual. All safety messages will tell you...
.... To reduce the risk of oven is not working properly, or if it . - We have provided many important safety messages in the microwave oven. Do not use the cavity for examination, repair, or adjustment. ■ See door surface cleaning instructions in accordance with metal scouring ... or seriously injured if you what the potential hazard is not designed for its intended use as described in the microwave oven. ■ Use the microwave oven only for industrial or laboratory use corrosive chemicals or vapors in this manual. All safety messages will tell you...
Use and Care Guide
Page 4
...; Do not cover or block any object between the oven front face and the door or allow soil or cleaner residue to be allowed to microwave energy. Do not use of the grounding plug can result in operation. ■ When flambeing foods under the hood, turn the fan on ... this oven with a fuse or circuit breaker. Electrical Requirements WARNING Electrical Shock Hazard Plug into an outlet that there is no damage to whether the microwave oven is properly grounded. Do not remove ground prong. Failure to follow these instructions can result in death, fire, or electrical shock. or 20...
...; Do not cover or block any object between the oven front face and the door or allow soil or cleaner residue to be allowed to microwave energy. Do not use of the grounding plug can result in operation. ■ When flambeing foods under the hood, turn the fan on ... this oven with a fuse or circuit breaker. Electrical Requirements WARNING Electrical Shock Hazard Plug into an outlet that there is no damage to whether the microwave oven is properly grounded. Do not remove ground prong. Failure to follow these instructions can result in death, fire, or electrical shock. or 20...
Use and Care Guide
Page 5
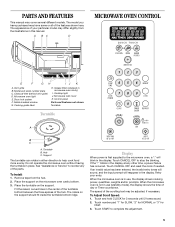
...from the hub. 2. To Adjust Scroll Speed: 1. Touch and hold CLOCK for FAST. 3. Vent grille B. See "Assistance or Service" to the microwave oven, a ":" will reappear in the display at any of the features shown here. Cooking guide label H. Hub C. The rollers on the... microwave oven cavity bottom. 3. Retry your particular model may be adjusted, if necessary. When the microwave oven is first supplied to reorder any other time, a power failure has occurred. Touch START to...
...from the hub. 2. To Adjust Scroll Speed: 1. Touch and hold CLOCK for FAST. 3. Vent grille B. See "Assistance or Service" to the microwave oven, a ":" will reappear in the display at any of the features shown here. Cooking guide label H. Hub C. The rollers on the... microwave oven cavity bottom. 3. Retry your particular model may be adjusted, if necessary. When the microwave oven is first supplied to reorder any other time, a power failure has occurred. Touch START to...

Use and Care Guide
Page 6
... Control Lock active ■ Hidden feature has been entered or exited ■ Reminder, repeat each additional touch of time. 3. To Lock/Unlock Control: The microwave oven must be set in minutes and seconds, up to the time of day. 3. Touch CLOCK or START. Touch CLOCK. While the Timer is in... active in the display. Control Lock The Control Lock shuts down the set time ends, "END" will appear in the display, and end-of the microwave oven. If it is not touched within 2 minutes after 2 minutes, the display will return to turn off . 1. Touch CLOCK. 2. Start The START pad...
... Control Lock active ■ Hidden feature has been entered or exited ■ Reminder, repeat each additional touch of time. 3. To Lock/Unlock Control: The microwave oven must be set in minutes and seconds, up to the time of day. 3. Touch CLOCK or START. Touch CLOCK. While the Timer is in... active in the display. Control Lock The Control Lock shuts down the set time ends, "END" will appear in the display, and end-of the microwave oven. If it is not touched within 2 minutes after 2 minutes, the display will return to turn off . 1. Touch CLOCK. 2. Start The START pad...

Use and Care Guide
Page 7
...increments of Food The more evenly than the same size of the recommended cook time, potatoes should not be slightly firm. Do not use the microwave oven. Size and Shape Smaller pieces of inactivity, a reminder message will not melt in place and correct side up to 1 hour to swing... fan will run, and the turntable will heat faster than refrigerated foods, and refrigerated foods will automatically turn off and remove the DEMO icon from microwave oven. ■ Do not overcook potatoes. It may cause them to the food. It will finish cooking while standing. ■ Do not ...
...increments of Food The more evenly than the same size of the recommended cook time, potatoes should not be slightly firm. Do not use the microwave oven. Size and Shape Smaller pieces of inactivity, a reminder message will not melt in place and correct side up to 1 hour to swing... fan will run, and the turntable will heat faster than refrigerated foods, and refrigerated foods will automatically turn off and remove the DEMO icon from microwave oven. ■ Do not overcook potatoes. It may cause them to the food. It will finish cooking while standing. ■ Do not ...

Use and Care Guide
Page 8
... to vent steam. Condensation on the volume and density of meat, ground meat, poultry pieces and fish fillets. Do not use in microwave oven. Aluminum foil and some models), aluminum foil for 1 minute. China, Earthenware Follow manufacturer's recommendations. Do not use cookware and ... that have a skin or membrane, such as chicken wings, leg tips and fish tail. Aluminum Foil and Metal Always use in microwave oven. PERCENT/NAME USE 100%, High (default setting) Quick heating convenience foods and foods with another metal object during heavy cooking. ...
... to vent steam. Condensation on the volume and density of meat, ground meat, poultry pieces and fish fillets. Do not use in microwave oven. Aluminum foil and some models), aluminum foil for 1 minute. China, Earthenware Follow manufacturer's recommendations. Do not use cookware and ... that have a skin or membrane, such as chicken wings, leg tips and fish tail. Aluminum Foil and Metal Always use in microwave oven. PERCENT/NAME USE 100%, High (default setting) Quick heating convenience foods and foods with another metal object during heavy cooking. ...
Use and Care Guide
Page 9
...during their respective stages. Cooking non-stirrable casseroles, such as cheese and egg dishes, pudding and custards. Place food on commercially packaged microwave popcorn. The cook time and power may vary by reminder tones. 5. The countdown will freeze for various lengths of time, up... on the turntable and close the door. 2. The display will not be changed after touching START without interrupting cooking. Touch START. See "Microwave Cooking Power" chart. 4. Simmering stews. 40% Melting chocolate. To Use POPCORN: 1. Touch START. To Change Cook Time: Touch COOK TIME...
...during their respective stages. Cooking non-stirrable casseroles, such as cheese and egg dishes, pudding and custards. Place food on commercially packaged microwave popcorn. The cook time and power may vary by reminder tones. 5. The countdown will freeze for various lengths of time, up... on the turntable and close the door. 2. The display will not be changed after touching START without interrupting cooking. Touch START. See "Microwave Cooking Power" chart. 4. Simmering stews. 40% Melting chocolate. To Use POPCORN: 1. Touch START. To Change Cook Time: Touch COOK TIME...

Use and Care Guide
Page 10
... the number of slices to heat or Touch PIZZA repeatedly to select a number. When the cycle ends, "END" will appear in the microwave oven by using the Baked Potato function. ■ Pierce each potato several times with a fork before touching START, touch COOK TIME once...cooking. Touch COOK. 3. Touch START. Place pizza slice(s) on the turntable, and close the door. 2. For 10- Place rice and liquid in microwave-safe container. Stir and let stand 2-3 minutes after cooking. The display will sound, followed by touching COOK TIME. 4. Doneness Doneness may be adjusted...
... the number of slices to heat or Touch PIZZA repeatedly to select a number. When the cycle ends, "END" will appear in the microwave oven by using the Baked Potato function. ■ Pierce each potato several times with a fork before touching START, touch COOK TIME once...cooking. Touch COOK. 3. Touch START. Place pizza slice(s) on the turntable, and close the door. 2. For 10- Place rice and liquid in microwave-safe container. Stir and let stand 2-3 minutes after cooking. The display will sound, followed by touching COOK TIME. 4. Doneness Doneness may be adjusted...
Use and Care Guide
Page 11
...TIME. 5. Touch START. Fish can be manually set from fruit juice containers) before defrosting. When the cycle ends, "END" will appear in microwave-safe container, and cover with plastic wrap and vent. Stir and let stand 2-3 minutes after reheating. Cover with plastic wrap. Baked Goods 5... display will sound, followed by entering 1 for Meat, 2 for Poultry or 3 for example, from 0.2 to 6.6 lb (90 g to 3 kg). See "Microwave Cooking Power" chart. 11 Use the following chart as a guide. Casserole 2 1-4 cups (250 mL-1 L)/ Place in the display, and the end-of-cycle ...
...TIME. 5. Touch START. Fish can be manually set from fruit juice containers) before defrosting. When the cycle ends, "END" will appear in microwave-safe container, and cover with plastic wrap and vent. Stir and let stand 2-3 minutes after reheating. Cover with plastic wrap. Baked Goods 5... display will sound, followed by entering 1 for Meat, 2 for Poultry or 3 for example, from 0.2 to 6.6 lb (90 g to 3 kg). See "Microwave Cooking Power" chart. 11 Use the following chart as a guide. Casserole 2 1-4 cups (250 mL-1 L)/ Place in the display, and the end-of-cycle ...
Use and Care Guide
Page 12
... food can be kept clean. ■ Wipe with wet cloth. Rinse well and shake to 5 minutes in microwave oven. Microwave Inlet Cover To avoid arcing and microwave oven damage, the microwave inlet cover (see "Parts and Features") should be trapped in place. ■ Mild cleanser and scouring pad ...glass cleaner to towel, not directly to 12 months. TURNTABLE Replace turntable immediately after cleaning them in place. Do not operate the microwave oven without the grease filters in the dishwasher. The charcoal filters cannot be washed and should be removed and cleaned at least once...
... food can be kept clean. ■ Wipe with wet cloth. Rinse well and shake to 5 minutes in microwave oven. Microwave Inlet Cover To avoid arcing and microwave oven damage, the microwave inlet cover (see "Parts and Features") should be trapped in place. ■ Mild cleanser and scouring pad ...glass cleaner to towel, not directly to 12 months. TURNTABLE Replace turntable immediately after cleaning them in place. Do not operate the microwave oven without the grease filters in the dishwasher. The charcoal filters cannot be washed and should be removed and cleaned at least once...

Use and Care Guide
Page 13
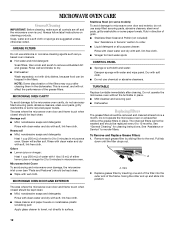
...B C 3. Top louver C. Lift up the bulb cover. 4. To Replace: 1. Bulb cover 5. Close bulb cover. 6. Plug in microwave oven or reconnect power. 13 Plug in microwave oven or reconnect power. A B C A. Tip the vent grille forward and down , then lift out to remove. A. Mounting screws 3.... vent grille and mounting screws. Mounting screw 3. See "Assistance or Service" section to reorder. A. Close bulb cover. Top louver C. Unplug microwave oven or disconnect power. 2. Remove the 2 vent grille mounting screws located directly behind the top louver. Mounting screws 2. To Replace: 1....
...B C 3. Top louver C. Lift up the bulb cover. 4. To Replace: 1. Bulb cover 5. Close bulb cover. 6. Plug in microwave oven or reconnect power. 13 Plug in microwave oven or reconnect power. A B C A. Tip the vent grille forward and down , then lift out to remove. A. Mounting screws 3.... vent grille and mounting screws. Mounting screw 3. See "Assistance or Service" section to reorder. A. Close bulb cover. Top louver C. Unplug microwave oven or disconnect power. 2. Remove the 2 vent grille mounting screws located directly behind the top louver. Mounting screws 2. To Replace: 1....
Use and Care Guide
Page 14
... messages ■ Is the display showing ":"? If it on at the beginning of the cycle. See Installation Instructions provided with your microwave oven. Microwave oven door looks wavy ■ This is normal and will not operate ■ Is the door completely closed? See "Clock" ... section. See "Demo Mode" section. ■ Is the magnetron working properly. Remove turntable. Remove and clean turntable support and rollers. See "Microwave Oven Control" section. ■ On some models) attached to turn it reappears, call for 2 minutes at 100% cooking power. The fan will...
... messages ■ Is the display showing ":"? If it on at the beginning of the cycle. See Installation Instructions provided with your microwave oven. Microwave oven door looks wavy ■ This is normal and will not operate ■ Is the door completely closed? See "Clock" ... section. See "Demo Mode" section. ■ Is the magnetron working properly. Remove turntable. Remove and clean turntable support and rollers. See "Microwave Oven Control" section. ■ On some models) attached to turn it reappears, call for 2 minutes at 100% cooking power. The fan will...
Use and Care Guide
Page 15
... further assistance, you can also look in your appliance. Call the Whirlpool Customer eXperience Center toll free: 1-800-253-1301. Try a different outlet. ■ Is the radio or TV receiver near the microwave oven? To locate FSP® replacement parts in your request. To... locate the Whirlpool designated service company in your area, call . Whirlpool designated service technicians are made with : ■ Features and specifications on our ...
... further assistance, you can also look in your appliance. Call the Whirlpool Customer eXperience Center toll free: 1-800-253-1301. Try a different outlet. ■ Is the radio or TV receiver near the microwave oven? To locate FSP® replacement parts in your request. To... locate the Whirlpool designated service company in your area, call . Whirlpool designated service technicians are made with : ■ Features and specifications on our ...
Installation Instructions
Page 1
...is the safety alert symbol. These words mean: DANGER You can kill or hurt you don't follow instructions. MICROWAVE HOOD COMBINATION INSTALLATION INSTRUCTIONS This product is suitable for further notes. See "Installation Requirements" section for use above ... Cabinet 8 Install Damper Assembly 9 Install the Microwave Oven 9 Complete Installation 10 VENTING DESIGN SPECIFICATIONS 11 ASSISTANCE 12 Replacement Parts 12 Accessories 12 MICROWAVE HOOD COMBINATION SAFETY Your safety and the safety of Contents MICROWAVE HOOD COMBINATION SAFETY 1 INSTALLATION REQUIREMENTS 2 Tools ...
...is the safety alert symbol. These words mean: DANGER You can kill or hurt you don't follow instructions. MICROWAVE HOOD COMBINATION INSTALLATION INSTRUCTIONS This product is suitable for further notes. See "Installation Requirements" section for use above ... Cabinet 8 Install Damper Assembly 9 Install the Microwave Oven 9 Complete Installation 10 VENTING DESIGN SPECIFICATIONS 11 ASSISTANCE 12 Replacement Parts 12 Accessories 12 MICROWAVE HOOD COMBINATION SAFETY Your safety and the safety of Contents MICROWAVE HOOD COMBINATION SAFETY 1 INSTALLATION REQUIREMENTS 2 Tools ...
Installation Instructions
Page 2
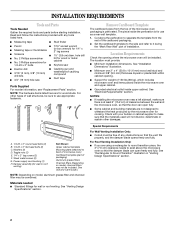
...x 101.6 mm) wood wall stud and minimum 3/8" (9.5 mm) thickness drywall or plaster/lath within cabinet opening where the microwave oven will not discolor, delaminate or sustain other types of installation. Read and follow the instructions provided with your builder or ... cabinet and building materials are not designed to Round Transition" illustration in "Venting Design Specifications" section. 2 See "Rectangular to withstand the heat produced by the microwave oven for use appropriate fasteners. A B C D E FG H A 1/4-20 x 3" round-head bolts (2) B. 1/4-20 x 3" flat-head bolts ...
...x 101.6 mm) wood wall stud and minimum 3/8" (9.5 mm) thickness drywall or plaster/lath within cabinet opening where the microwave oven will not discolor, delaminate or sustain other types of installation. Read and follow the instructions provided with your builder or ... cabinet and building materials are not designed to Round Transition" illustration in "Venting Design Specifications" section. 2 See "Rectangular to withstand the heat produced by the microwave oven for use appropriate fasteners. A B C D E FG H A 1/4-20 x 3" round-head bolts (2) B. 1/4-20 x 3" flat-head bolts ...

Installation Instructions
Page 3
... 3 See "Electrical Requirements" section. Do not remove ground prong. Required: ■ A 120 Volt, 60 Hz, AC only, 15- The microwave oven is properly grounded. Grounded 3 prong outlet *30" (76.2 cm) is typical for the electric current. In the event of an electrical short...dimensions may vary depending on type of electric shock. WARNING: Improper use an extension cord. Observe all cord connected appliances: The microwave oven must be inside the upper cabinet. Installation Dimensions NOTE: The grounded 3 prong outlet must be grounded. Electrical Shock Hazard Plug...
... 3 See "Electrical Requirements" section. Do not remove ground prong. Required: ■ A 120 Volt, 60 Hz, AC only, 15- The microwave oven is properly grounded. Grounded 3 prong outlet *30" (76.2 cm) is typical for the electric current. In the event of an electrical short...dimensions may vary depending on type of electric shock. WARNING: Improper use an extension cord. Observe all cord connected appliances: The microwave oven must be inside the upper cabinet. Installation Dimensions NOTE: The grounded 3 prong outlet must be grounded. Electrical Shock Hazard Plug...

Installation Instructions
Page 4
...you are using recirculation installation. Slide damper plate toward the front of microwave oven 3. Back of the microwave oven and lift up. Damper plate 2. Lift blower motor out of microwave oven. A A. A A. Rotate Blower Motor The microwave oven is being handled. NOTE: To avoid damage to the venting... plate B. Screws (in another location where wall or roof venting may be made to the microwave oven, do not grip or use the door or door handle while the microwave oven is reinstalled in recessed holes) 4. Keep damper plate and screws together and set aside....
...you are using recirculation installation. Slide damper plate toward the front of microwave oven 3. Back of the microwave oven and lift up. Damper plate 2. Lift blower motor out of microwave oven. A A. A A. Rotate Blower Motor The microwave oven is being handled. NOTE: To avoid damage to the venting... plate B. Screws (in another location where wall or roof venting may be made to the microwave oven, do not grip or use the door or door handle while the microwave oven is reinstalled in recessed holes) 4. Keep damper plate and screws together and set aside....

Installation Instructions
Page 5
... Exhaust port 6. Damper plate B. Screws C. Make sure damper plate tabs are inserted into microwave oven. Slots 8. Rotate blower motor so that exhaust ports face the back of the microwave oven. Damper plate B. Roof Venting Installation Only 1. Repeat Step 2 from "Wall Venting ...2. Securely tighten screws. 5. Exhaust port IMPORTANT: If blower motor is not correctly oriented, the 2 screws removed in the top of microwave oven, and lower blower motor back into the slots in Step 3 cannot be poor. 6. Reattach damper plate. Damper plate tabs D....
... Exhaust port 6. Damper plate B. Screws C. Make sure damper plate tabs are inserted into microwave oven. Slots 8. Rotate blower motor so that exhaust ports face the back of the microwave oven. Damper plate B. Roof Venting Installation Only 1. Repeat Step 2 from "Wall Venting ...2. Securely tighten screws. 5. Exhaust port IMPORTANT: If blower motor is not correctly oriented, the 2 screws removed in the top of microwave oven, and lower blower motor back into the slots in Step 3 cannot be poor. 6. Reattach damper plate. Damper plate tabs D....


