
Use and Care Guide
Page 1
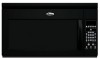
or visit our website at... www.whirlpool.com Table of Contents 2 Model MH1170XS 8205884 MICROWAVEHOOD COMBINATION For questions about features, operation/performance, parts, accessories or service, call: 1-800-253-1301.
or visit our website at... www.whirlpool.com Table of Contents 2 Model MH1170XS 8205884 MICROWAVEHOOD COMBINATION For questions about features, operation/performance, parts, accessories or service, call: 1-800-253-1301.
Use and Care Guide
Page 2
TABLEOF CONTENTS MICROWAVE HOOD COMBINATION SAFETY 3 Electrical Requirements 4 PARTS AND FEATURES 5 Turntable 5 Cooking Rack 5 MICROWAVE OVEN CONTROL 6 Display 6 Start 6 Cancel Off 6 Add 30 Seconds 6 Clock 6 Tones 7 Timer 7 Control Lock 7 Vent Fan 7 Cooktop Light 7 Demo ... OVEN CARE 14 General Cleaning 14 Replacing Filters 15 Replacing Cooktop Light 15 Replacing Microwave Oven Light 16 TROUBLESHOOTING 17 ASSISTANCE OR SERVICE 19 Replacement Parts 19 WARRANTY 20
TABLEOF CONTENTS MICROWAVE HOOD COMBINATION SAFETY 3 Electrical Requirements 4 PARTS AND FEATURES 5 Turntable 5 Cooking Rack 5 MICROWAVE OVEN CONTROL 6 Display 6 Start 6 Cancel Off 6 Add 30 Seconds 6 Clock 6 Tones 7 Timer 7 Control Lock 7 Vent Fan 7 Cooktop Light 7 Demo ... OVEN CARE 14 General Cleaning 14 Replacing Filters 15 Replacing Cooktop Light 15 Replacing Microwave Oven Light 16 TROUBLESHOOTING 17 ASSISTANCE OR SERVICE 19 Replacement Parts 19 WARRANTY 20
Use and Care Guide
Page 3
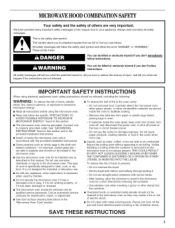
... the microwave oven is not designed for example, closed , turn oven off, and disconnect the power cord, or shut off the pad and touch electrical parts involving a risk of electric shock. Do not use straight-sided containers with the provided Installation Instructions. [] Some products such as described in the microwave oven...
... the microwave oven is not designed for example, closed , turn oven off, and disconnect the power cord, or shut off the pad and touch electrical parts involving a risk of electric shock. Do not use straight-sided containers with the provided Installation Instructions. [] Some products such as described in the microwave oven...
Use and Care Guide
Page 4
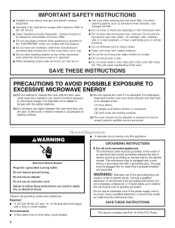
... not let cord hang over edge of table or counter. [] Do not mount over a sink. [] Do not cover racks or any materials, other part of the oven with Part 18 of the oven. SAVE THESE INSTRUCTIONS This device complies with metal foil. Do not use an extension cord, Failure to be grounded...
... not let cord hang over edge of table or counter. [] Do not mount over a sink. [] Do not cover racks or any materials, other part of the oven with Part 18 of the oven. SAVE THESE INSTRUCTIONS This device complies with metal foil. Do not use an extension cord, Failure to be grounded...
Use and Care Guide
Page 5
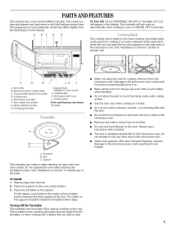
... for this manual. The turntable will turn back on the side walls of the hub. Metal shielded window H. Cooktop light K, Microwave inlet cover L. Control panel Parts and Features not shown Turntable A. Turntable B. Remove tape from the microwave oven. Use the rack only when cooking on the rack. Do not operate the... ridge. Always use a microwave-safe container. Do not use any of the features shown here. PARTSANDFEATURES This manual may have some or all of the parts. Place the support on the support should fit inside cavity walls, ceiling or floor.
... for this manual. The turntable will turn back on the side walls of the hub. Metal shielded window H. Cooktop light K, Microwave inlet cover L. Control panel Parts and Features not shown Turntable A. Turntable B. Remove tape from the microwave oven. Use the rack only when cooking on the rack. Do not operate the... ridge. Always use a microwave-safe container. Do not use any of the features shown here. PARTSANDFEATURES This manual may have some or all of the parts. Place the support on the support should fit inside cavity walls, ceiling or floor.
Use and Care Guide
Page 8
..., egg yolks, chicken livers, hot dogs, and sausage. Plastic wrap should be used. Arranging If heating irregularly shaped or different sized foods, arrange the thinner parts and smaller sized items toward the center. Shielding Use small, flat pieces of aluminum foil to shield the thin pieces of heat even after the...
..., egg yolks, chicken livers, hot dogs, and sausage. Plastic wrap should be used. Arranging If heating irregularly shaped or different sized foods, arrange the thinner parts and smaller sized items toward the center. Shielding Use small, flat pieces of aluminum foil to shield the thin pieces of heat even after the...
Use and Care Guide
Page 12
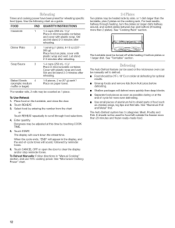
... larger than 2 plates). See "Microwave Cooking Power" chart. It should be heated side by reminder tones. 6. Touch CANCEL OFF or open the door to shield parts of -cycle tones will count down the reheat time. Let stand 2-3 minutes after reheating. 1-6 pieces, 2 oz (57 g) each*/ Place on the turntable, and close the...
... larger than 2 plates). See "Microwave Cooking Power" chart. It should be heated side by reminder tones. 6. Touch CANCEL OFF or open the door to shield parts of -cycle tones will count down the reheat time. Let stand 2-3 minutes after reheating. 1-6 pieces, 2 oz (57 g) each*/ Place on the turntable, and close the...
Use and Care Guide
Page 14
... soaps and detergents: COOKING RACK Heat 1 cup (250 mL) of grain to remove embedded dirt and grease. Microwave Inlet Cover The microwave inlet cover (see "Parts and Features") should be trapped in microwave oven. RACK SUPPORTS Clean often to remove supports from cavity walls. GREASE FILTERS Do not use chemical or...
... soaps and detergents: COOKING RACK Heat 1 cup (250 mL) of grain to remove embedded dirt and grease. Microwave Inlet Cover The microwave inlet cover (see "Parts and Features") should be trapped in microwave oven. RACK SUPPORTS Clean often to remove supports from cavity walls. GREASE FILTERS Do not use chemical or...
Use and Care Guide
Page 19
...the complete model and serial number of your nearest Whirlpool designated service center. To locate FSP replacement parts in your area, call . Our consultants provide assistance with the same precision used to build every new WHIRLPOOL ® appliance. This information will fit right ...and work right because they are trained to your telephone directory Yellow Pages. FSP ° replacement parts will help , follow the instructions below. Whirlpool designated service technicians are made with : • Features and specifications on our full line of a service call...
...the complete model and serial number of your nearest Whirlpool designated service center. To locate FSP replacement parts in your area, call . Our consultants provide assistance with the same precision used to build every new WHIRLPOOL ® appliance. This information will fit right ...and work right because they are trained to your telephone directory Yellow Pages. FSP ° replacement parts will help , follow the instructions below. Whirlpool designated service technicians are made with : • Features and specifications on our full line of a service call...
Use and Care Guide
Page 20
...how to correct defects in remote locations. 10. You must be provided by a Whirlpool designated service company. Replacement parts or repair labor costs for future reference. Repairs to parts or systems resulting from unauthorized modifications made to repair or replace appliance light bulbs, air...loss due to be found by checking the "Assistance or Service" section or by Whirlpool. 5. Damage resulting from warranty coverage. 3. Expenses for travel and transportation for FSP replacement parts and repair labor to use of your major appliance, to instruct you ever need ...
...how to correct defects in remote locations. 10. You must be provided by a Whirlpool designated service company. Replacement parts or repair labor costs for future reference. Repairs to parts or systems resulting from unauthorized modifications made to repair or replace appliance light bulbs, air...loss due to be found by checking the "Assistance or Service" section or by Whirlpool. 5. Damage resulting from warranty coverage. 3. Expenses for travel and transportation for FSP replacement parts and repair labor to use of your major appliance, to instruct you ever need ...
Installation Instructions
Page 1
... Upper Cabinet 8.. NOTES: • Proper installation is the responsibility of the installer. • Product failure due to reduce the chance of your appliance. Tools and Parts 2... MICROWAVE HOOD COMBINATION INSTALLATION INSTRUCTIONS This product is not covered under the warranty. The appearance of injury, and tell you and others are not followed...
... Upper Cabinet 8.. NOTES: • Proper installation is the responsibility of the installer. • Product failure due to reduce the chance of your appliance. Tools and Parts 2... MICROWAVE HOOD COMBINATION INSTALLATION INSTRUCTIONS This product is not covered under the warranty. The appearance of injury, and tell you and others are not followed...
Installation Instructions
Page 2
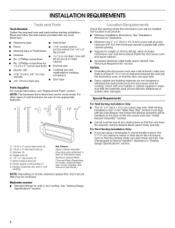
...) drill bits • 3/4" (19 mm) hole saw Caulking gun and weatherproof caulking compound Duct tape Parts Supplied For reorder information, see "Replacement Parts" section. See "Venting Design Specifications" section. INSTALLATIONREQUIREMENTS Tools Needed Gather the required tools and parts before starting installation. Toggle nuts (4) E. 1/4" x 2" lag screws (4) F. See Use and Care Guide.) NOTE: Depending on...
...) drill bits • 3/4" (19 mm) hole saw Caulking gun and weatherproof caulking compound Duct tape Parts Supplied For reorder information, see "Replacement Parts" section. See "Venting Design Specifications" section. INSTALLATIONREQUIREMENTS Tools Needed Gather the required tools and parts before starting installation. Toggle nuts (4) E. 1/4" x 2" lag screws (4) F. See Use and Care Guide.) NOTE: Depending on...

Installation Instructions
Page 12
.... 8206555 © 2006, All rights reserved. 4619-656-17423 3/06 Printed in the Use and Care Guide, and reference the appropriate part number listed here. If any of the vent system including straight vent, elbow(s), transitions and wall or roof caps must be used. Recommended...us at our toll free number listed in China The filler panels come in the system. Damper Assembly Part Number 8206556 Mounting Plate Part Number 8206315 Upper Cabinet Template Part Number 8205871 Mounting Screw Kit (includes parts A-G in a 36" (91.4 cm) or 42" (106.7 cm) wide opening. For best...
.... 8206555 © 2006, All rights reserved. 4619-656-17423 3/06 Printed in the Use and Care Guide, and reference the appropriate part number listed here. If any of the vent system including straight vent, elbow(s), transitions and wall or roof caps must be used. Recommended...us at our toll free number listed in China The filler panels come in the system. Damper Assembly Part Number 8206556 Mounting Plate Part Number 8206315 Upper Cabinet Template Part Number 8205871 Mounting Screw Kit (includes parts A-G in a 36" (91.4 cm) or 42" (106.7 cm) wide opening. For best...


