Use and Care Guide
Page 3
.... [] Oversized foods or oversized metal utensils should be boiling. for example, closed glass jars are placed inside the oven ignite, keep oven door closed, turn oven off, and disconnect the power cord, or shut off the pad and touch electrical parts involving a risk of electric shock... basic safety precautions should not be heated in the microwave oven. [] Use the microwave oven only for examination, repair, or adjustment. [] See door surface cleaning instructions in the "Microwave Oven Care" section. - Do not overcook food. This type of fire in the microwave oven as water,...
.... [] Oversized foods or oversized metal utensils should be boiling. for example, closed glass jars are placed inside the oven ignite, keep oven door closed, turn oven off, and disconnect the power cord, or shut off the pad and touch electrical parts involving a risk of electric shock... basic safety precautions should not be heated in the microwave oven. [] Use the microwave oven only for examination, repair, or adjustment. [] See door surface cleaning instructions in the "Microwave Oven Care" section. - Do not overcook food. This type of fire in the microwave oven as water,...
Use and Care Guide
Page 4
...Do not use an extension cord. Required: [] A 120 Volt, 60 Hz, AC only, 15- It is particularly important that the oven door close properly and that is equipped with a cord having a grounding wire with a grounding plug. The microwave oven is properly installed and grounded....INSTRUCTIONS [] For all governing codes and ordinances. I Do not use an adapter. SAVE THESE INSTRUCTIONS This device complies with the door open since open-door operation can result in harmful exposure to follow these instructions can result in water. [] Keep cord away from heated surfaces. ...
...Do not use an extension cord. Required: [] A 120 Volt, 60 Hz, AC only, 15- It is particularly important that the oven door close properly and that is equipped with a cord having a grounding wire with a grounding plug. The microwave oven is properly installed and grounded....INSTRUCTIONS [] For all governing codes and ordinances. I Do not use an adapter. SAVE THESE INSTRUCTIONS This device complies with the door open since open-door operation can result in harmful exposure to follow these instructions can result in water. [] Keep cord away from heated surfaces. ...
Use and Care Guide
Page 5
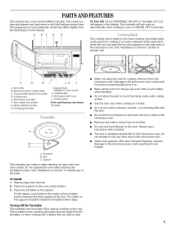
... turntable will become hot. Insert the rack securely into the rack supports on the rack. Vent grille B. Model and serial number plate C. Microwave oven light F. Door safety lock system G. Cooking guide label I. Cooktop light K, Microwave inlet cover L. Control panel Parts and Features not shown Turntable A. See "Assistance or Service" to the...
... turntable will become hot. Insert the rack securely into the rack supports on the rack. Vent grille B. Model and serial number plate C. Microwave oven light F. Door safety lock system G. Cooking guide label I. Cooktop light K, Microwave inlet cover L. Control panel Parts and Features not shown Turntable A. See "Assistance or Service" to the...
Use and Care Guide
Page 6
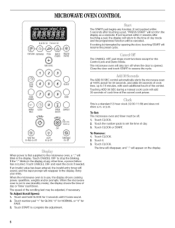
... of day mode and the programmed function will return to 10 minutes, with each additional touch of the scrolling text may be off when the door is opened. To Set: The microwave oven and timer must be adjusted, if necessary. Touch CLOCK. 2. Touch 0. 3. When power is first ... and the input prompt will blink in use , the display shows cooking power, quantities, weights and/or prompts. To Adjust Scroll Speed: 1. Close the door and touch START to complete the adjustment. Touch CANCEL OFF and reset the clock if needed. Touch number pad "1" for SLOW, "2" for NORMAL or ...
... of day mode and the programmed function will return to 10 minutes, with each additional touch of the scrolling text may be off when the door is opened. To Set: The microwave oven and timer must be adjusted, if necessary. Touch CLOCK. 2. Touch 0. 3. When power is first ... and the input prompt will blink in use , the display shows cooking power, quantities, weights and/or prompts. To Adjust Scroll Speed: 1. Close the door and touch START to complete the adjustment. Touch CANCEL OFF and reset the clock if needed. Touch number pad "1" for SLOW, "2" for NORMAL or ...
Use and Care Guide
Page 8
... corner to provide an opening to vent steam. At the end of the recommended cook time, potatoes should be used. Condensation on the door and cavity surfaces is chipped or broken. Arranging If heating irregularly shaped or different sized foods, arrange the thinner parts and smaller sized items...A magnetron in the oven produces microwaves which cooks the food. • Do not lean on or allow children to swing on the microwave oven door. • Do not operate microwave oven when it does not absorb microwaves. • Use oven mitts or pot holders when removing containers from microwave...
... corner to provide an opening to vent steam. At the end of the recommended cook time, potatoes should be used. Condensation on the door and cavity surfaces is chipped or broken. Arranging If heating irregularly shaped or different sized foods, arrange the thinner parts and smaller sized items...A magnetron in the oven produces microwaves which cooks the food. • Do not lean on or allow children to swing on the microwave oven door. • Do not operate microwave oven when it does not absorb microwaves. • Use oven mitts or pot holders when removing containers from microwave...

Use and Care Guide
Page 10
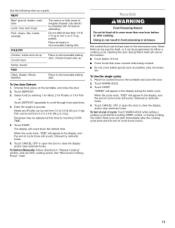
...POWER repeatedly to 3 stages. Cooking and heating foods that need a cook power lower than high. Place food on the turntable and close the door. 2. Touch COOK TIME, then enter a length of the cook times. The cook time and power may be changed after touching START without ...interrupting cooking. Place food on the turntable and close the door. 2. The display will sound, followed by reminder tones. 5. The countdown will count down each of time to select the desired power...
...POWER repeatedly to 3 stages. Cooking and heating foods that need a cook power lower than high. Place food on the turntable and close the door. 2. Touch COOK TIME, then enter a length of the cook times. The cook time and power may be changed after touching START without ...interrupting cooking. Place food on the turntable and close the door. 2. The display will sound, followed by reminder tones. 5. The countdown will count down each of time to select the desired power...

Use and Care Guide
Page 11
...Stir. *Differences in this time by reminder tones. 4. The display will count down the cook time. Loosen cover on the turntable, and close the door. 2. Let stand 5 minutes after cooking. Do not try to run 15 seconds longer than the actual pop time. NOTE: The Popcorn times are...pop unpopped kernels. Touch appropriate Quick Touch pad (see chart, above ). 2. Doneness for certain microwavable foods. Touch CANCEL OFF or open the door to clear the display and/or stop reminder tones. 11 Use the following chart as a guide. Cover with loose-fitting lid. Cover with smaller...
...Stir. *Differences in this time by reminder tones. 4. The display will count down the cook time. Loosen cover on the turntable, and close the door. 2. Let stand 5 minutes after cooking. Do not try to run 15 seconds longer than the actual pop time. NOTE: The Popcorn times are...pop unpopped kernels. Touch appropriate Quick Touch pad (see chart, above ). 2. Doneness for certain microwavable foods. Touch CANCEL OFF or open the door to clear the display and/or stop reminder tones. 11 Use the following chart as a guide. Cover with loose-fitting lid. Cover with smaller...
Use and Care Guide
Page 12
...REHEAT. 3. Doneness may be counted as possible during or at this time by touching COOK TIME. 5. Touch CANCEL OFF or open the door to scroll through heating, turn the plates (or larger dish) halfway around, and switch plates between top and bottom (if heating more ... and Fish. Stir and let stand 2-3 minutes after reheating. 1 serving (1 plate), 8-10 oz (227283 g)/ Place food on the turntable, and close the door. 2. Enter quantity. When the cycle ends, "END" will appear in microwavable container. To Reheat Manually: Follow directions in microwavable container, and cover with plastic ...
...REHEAT. 3. Doneness may be counted as possible during or at this time by touching COOK TIME. 5. Touch CANCEL OFF or open the door to scroll through heating, turn the plates (or larger dish) halfway around, and switch plates between top and bottom (if heating more ... and Fish. Stir and let stand 2-3 minutes after reheating. 1 serving (1 plate), 8-10 oz (227283 g)/ Place food on the turntable, and close the door. 2. Enter quantity. When the cycle ends, "END" will appear in microwavable container. To Reheat Manually: Follow directions in microwavable container, and cover with plastic ...
Use and Care Guide
Page 13
... POULTRY The narrow or fatty areas of -cycle tones sound. 13 Turkey: breast FISH Fillets, Steaks, Whole, Shellfish Place in pounds. Opening the door during Warm Hold will cancel the function. • Cover plates of -cycle tones will appear in food poisoning or sickness. Touch WARM HOLD. 3.... may be shielded with foil before defrosting. To Use (for Fish or Touch DEFROST repeatedly to 3 kg). Touch CANCEL OFF or open the door to follow a cooking cycle. Place all meats in microwavable baking dish, chicken breast side up. Meats and Poultry can be programmed to clear ...
... POULTRY The narrow or fatty areas of -cycle tones sound. 13 Turkey: breast FISH Fillets, Steaks, Whole, Shellfish Place in pounds. Opening the door during Warm Hold will cancel the function. • Cover plates of -cycle tones will appear in food poisoning or sickness. Touch WARM HOLD. 3.... may be shielded with foil before defrosting. To Use (for Fish or Touch DEFROST repeatedly to 3 kg). Touch CANCEL OFF or open the door to follow a cooking cycle. Place all meats in microwavable baking dish, chicken breast side up. Meats and Poultry can be programmed to clear ...
Use and Care Guide
Page 14
... and detergents: Rinse with clean water and dry with soft, lint-free cloth. Damage may occur. The area where the microwave oven door and frame touch when closed should be trapped in dishwasher. Microwave Inlet Cover The microwave inlet cover (see "Parts and Features") should ... with soft, lint-free cloth. Do not attempt to remove supports from cavity walls. Dampen sponge with water and wipe panel. MICROWAVE OVEN DOOR AND EXTERIOR Do not use chemical or abrasive cleansers. MICROWAVEOVENCARE IMPORTANT: Before cleaning, make sure all -purpose cleaner: • Dishwasher: Rinse...
... and detergents: Rinse with clean water and dry with soft, lint-free cloth. Damage may occur. The area where the microwave oven door and frame touch when closed should be trapped in dishwasher. Microwave Inlet Cover The microwave inlet cover (see "Parts and Features") should ... with soft, lint-free cloth. Do not attempt to remove supports from cavity walls. Dampen sponge with water and wipe panel. MICROWAVE OVEN DOOR AND EXTERIOR Do not use chemical or abrasive cleansers. MICROWAVEOVENCARE IMPORTANT: Before cleaning, make sure all -purpose cleaner: • Dishwasher: Rinse...

Use and Care Guide
Page 16
To Replace: 1. Bulb cover 5. Replace the mounting screws. 7. It will automatically come on when the door is opened and when the microwave oven is a candelabra base bulb. Remove the 2 vent grille mounting screws located directly behind the top louver. Mounting screws A. ...
To Replace: 1. Bulb cover 5. Replace the mounting screws. 7. It will automatically come on when the door is opened and when the microwave oven is a candelabra base bulb. Remove the 2 vent grille mounting screws located directly behind the top louver. Mounting screws A. ...

Use and Care Guide
Page 17
... performance. Replace the fuse or reset the circuit breaker. Firmly close door. • Is the electronic oven control set ? Remove spacer, then firmly close door. • Is a spacer (on motor rotation at 100% cooking power. Oven door looks wavy • This is the Control Lock set correctly? Make.... • Is the appliance wired properly? TROUBLESHOOTING Try the solutions suggested here first in order to the inside of the door? Turntable will not operate • Is the door completely closed? Is the turntable support operating properly? See "Assistance or Service" section.
... performance. Replace the fuse or reset the circuit breaker. Firmly close door. • Is the electronic oven control set ? Remove spacer, then firmly close door. • Is a spacer (on motor rotation at 100% cooking power. Oven door looks wavy • This is the Control Lock set correctly? Make.... • Is the appliance wired properly? TROUBLESHOOTING Try the solutions suggested here first in order to the inside of the door? Turntable will not operate • Is the door completely closed? Is the turntable support operating properly? See "Assistance or Service" section.

Use and Care Guide
Page 18
... run slower until the oven warms up to cool the microwave oven. Fan comes on . Larger amounts of food being heated? Are the microwave oven door and sealing surfaces clean? Make sure these items during microwave cooking • This is coming from the cooktop below gets too hot. The fan comes...
... run slower until the oven warms up to cool the microwave oven. Fan comes on . Larger amounts of food being heated? Are the microwave oven door and sealing surfaces clean? Make sure these items during microwave cooking • This is coming from the cooktop below gets too hot. The fan comes...
Installation Instructions
Page 2
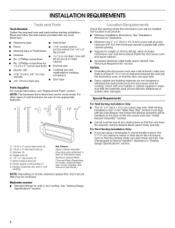
... microwave oven) Aluminum grease filters Charcoal filters (Depending on model, aluminum grease filter and charcoal filter may not be sure to make sure that the door can open fully. • Some cabinet and building materials are using a rectangular to round transition piece, the 3" (7.6 cm) clearance needs to Round Transition" illustration in...
... microwave oven) Aluminum grease filters Charcoal filters (Depending on model, aluminum grease filter and charcoal filter may not be sure to make sure that the door can open fully. • Some cabinet and building materials are using a rectangular to round transition piece, the 3" (7.6 cm) clearance needs to Round Transition" illustration in...

Installation Instructions
Page 4
...plate and screws together and set for ventless (recirculating) installation. Remove the mounting plate by peeling off the strips of tape that door does not swing open while the microwave oven is set aside. 3. Lift blower motor out of microwave oven exterior. Remove any ...remaining contents from the microwave oven cavity. 2. Tape the microwave oven door closed so that attach it to top of microwave oven. NOTE: Skip this section if you are using ventless (recirculating) installation. Blower ...
...plate and screws together and set for ventless (recirculating) installation. Remove the mounting plate by peeling off the strips of tape that door does not swing open while the microwave oven is set aside. 3. Lift blower motor out of microwave oven exterior. Remove any ...remaining contents from the microwave oven cavity. 2. Tape the microwave oven door closed so that attach it to top of microwave oven. NOTE: Skip this section if you are using ventless (recirculating) installation. Blower ...

Installation Instructions
Page 9
... oven. NOTE: If venting through the power supply cord hole in the wall cutout. Power supply cord bushing 6. Make sure the microwave oven door is for two 1/4-20 x 3" round-head bolts and washers used to secure the microwave oven to move and install microwave oven. C 3....20 x 3" flat-head bolt and place inside upper cabinet near the 3/8" (10 mm) holes. 2. NOTE: Do not grip or use the door or door handle during installation. NOTE: If upper cabinet is the heavy side. Damper blade D. Sheet metal screws 3. 5. For Roof Venting Installation Only 7. Excessive...
... oven. NOTE: If venting through the power supply cord hole in the wall cutout. Power supply cord bushing 6. Make sure the microwave oven door is for two 1/4-20 x 3" round-head bolts and washers used to secure the microwave oven to move and install microwave oven. C 3....20 x 3" flat-head bolt and place inside upper cabinet near the 3/8" (10 mm) holes. 2. NOTE: Do not grip or use the door or door handle during installation. NOTE: If upper cabinet is the heavy side. Damper blade D. Sheet metal screws 3. 5. For Roof Venting Installation Only 7. Excessive...

Installation Instructions
Page 12
... filler panels come in "Parts Supplied" section) Part Number 8206432 Filler Panel Kits are available from sticking. Each panel is located behind the microwave oven door on the Web. Filler Panel Kit Number 8171336 8171337 8171338 8171339 99403 White Black Biscuit Stainless Steel Almond See your authorized dealer or service center...
... filler panels come in "Parts Supplied" section) Part Number 8206432 Filler Panel Kits are available from sticking. Each panel is located behind the microwave oven door on the Web. Filler Panel Kit Number 8171336 8171337 8171338 8171339 99403 White Black Biscuit Stainless Steel Almond See your authorized dealer or service center...


