
Service Guide
Page 11
Listed, CSA 57 lbs. 1-7 8205887 8206433 In Use & Care Guide 8205889 Lb LITERATURE Use & Care Guide Installation Instructions Warranty Tech Sheet Specifications M H 2175XS SENSOR Cooking White, Black, Biscuit and Stainless Electronic 99 Min. 99 Sec. ft. 21" W x 9 1/2" H x...and Reflective) Top Feed w/ Stirrer One standard Three Door/Latch Operated (Primary, secondary and monitor) Four - 1 Magnetron, 1 Oven Cavity, 1 Hood, 1 Wave Guide Convertible Recirculation or Exhaust Vertical/Horizontal 3 1/4"H x 10"W 112 221 4 Speed YES : 60° C, 140°F 67dBA Yes (2)-low cost Yes (2) Two...
Listed, CSA 57 lbs. 1-7 8205887 8206433 In Use & Care Guide 8205889 Lb LITERATURE Use & Care Guide Installation Instructions Warranty Tech Sheet Specifications M H 2175XS SENSOR Cooking White, Black, Biscuit and Stainless Electronic 99 Min. 99 Sec. ft. 21" W x 9 1/2" H x...and Reflective) Top Feed w/ Stirrer One standard Three Door/Latch Operated (Primary, secondary and monitor) Four - 1 Magnetron, 1 Oven Cavity, 1 Hood, 1 Wave Guide Convertible Recirculation or Exhaust Vertical/Horizontal 3 1/4"H x 10"W 112 221 4 Speed YES : 60° C, 140°F 67dBA Yes (2)-low cost Yes (2) Two...

Service Guide
Page 12
...Two Stage (Capacitive and Reflective) Top Feed w/o Stirrer One standard Three Door/Latch Operated Primary, secondary and monitor Four - 1 Magnetron, 1 Oven Cavity, 1 Hood, 1 Wave Guide Convertible Recirculation or Exhaust Vertical/Horizontal 3 1/4"H x 10"W 112 221 2 Speed YES : 60° C, 140°F Sound Power Level: 70 dB(A) Yes (2) Yes (1)... Type Duct Outlet Size Recirculation CFM Out Exhaust CFM Out Touch Control Exhaust Fan Auto ON - Lb LITERATURE Use & Care Guide Installation Instructions Warranty Tech Sheet JobAid M H 1160XSB/Q Basic Non Sensor Black, White Electronic 99 Min. 99 Sec.
...Two Stage (Capacitive and Reflective) Top Feed w/o Stirrer One standard Three Door/Latch Operated Primary, secondary and monitor Four - 1 Magnetron, 1 Oven Cavity, 1 Hood, 1 Wave Guide Convertible Recirculation or Exhaust Vertical/Horizontal 3 1/4"H x 10"W 112 221 2 Speed YES : 60° C, 140°F Sound Power Level: 70 dB(A) Yes (2) Yes (1)... Type Duct Outlet Size Recirculation CFM Out Exhaust CFM Out Touch Control Exhaust Fan Auto ON - Lb LITERATURE Use & Care Guide Installation Instructions Warranty Tech Sheet JobAid M H 1160XSB/Q Basic Non Sensor Black, White Electronic 99 Min. 99 Sec.
Service Guide
Page 14
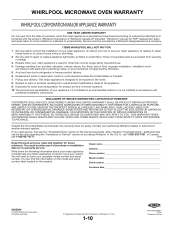
...installed in an inaccessible location or is not installed in accordance with published installation... Whirlpool. 5. Pickup and delivery. WHIRLPOOL ... Whirlpool Corporation. Service must provide proof of purchase or installation...of God, improper installation, installation not in remote.../TM Trademark of Whirlpool, U.S.A. 1-10...about your authorized Whirlpool dealer to ...if it . ITEMS WHIRLPOOL WILL NOT PAY ... by calling Whirlpool. Service calls...Whirlpool designated service company. Whirlpool Microwave Oven Warranty WHIRLPOOL... Whirlpool Corporation or Whirlpool Canada LP (hereafter "Whirlpool...
...installed in an inaccessible location or is not installed in accordance with published installation... Whirlpool. 5. Pickup and delivery. WHIRLPOOL ... Whirlpool Corporation. Service must provide proof of purchase or installation...of God, improper installation, installation not in remote.../TM Trademark of Whirlpool, U.S.A. 1-10...about your authorized Whirlpool dealer to ...if it . ITEMS WHIRLPOOL WILL NOT PAY ... by calling Whirlpool. Service calls...Whirlpool designated service company. Whirlpool Microwave Oven Warranty WHIRLPOOL... Whirlpool Corporation or Whirlpool Canada LP (hereafter "Whirlpool...

Installation Instructions
Page 2
... and weatherproof caulking compound ■ Duct tape Parts Supplied For reorder information, see "Replacement Parts" section. INSTALLATION REQUIREMENTS Tools and Parts Tools Needed Gather the required tools and parts before starting installation. See Use and Care Guide.) NOTE: Depending on model, charcoal filters may be included. hole drill ■ No. 2 Phillips screwdriver bit...
... and weatherproof caulking compound ■ Duct tape Parts Supplied For reorder information, see "Replacement Parts" section. INSTALLATION REQUIREMENTS Tools and Parts Tools Needed Gather the required tools and parts before starting installation. See Use and Care Guide.) NOTE: Depending on model, charcoal filters may be included. hole drill ■ No. 2 Phillips screwdriver bit...
Installation Instructions
Page 8
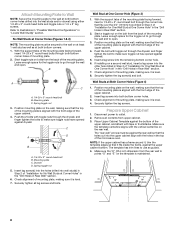
...section. 6. Refer to points "D" and "E" on the wall, making sure it is level. 8. No Wall Studs at least 1 wall stud as well as guides. 4. With the support tabs of the mounting plate facing forward, insert 1/4-20 x 3" round-head bolts through the wall and open . 3. Leave enough space ...for No Wall Studs at both bottom corners. 1. Position mounting plate on the template is level. 4. Push the 2 bolts with the front edge of "Installation for the toggle nut to go through the wall and to go through both bottom corner holes. 3. C D A B A. 1/4-20 x 3" round-head bolt ...
...section. 6. Refer to points "D" and "E" on the wall, making sure it is level. 8. No Wall Studs at least 1 wall stud as well as guides. 4. With the support tabs of the mounting plate facing forward, insert 1/4-20 x 3" round-head bolts through the wall and open . 3. Leave enough space ...for No Wall Studs at both bottom corners. 1. Position mounting plate on the template is level. 4. Push the 2 bolts with the front edge of "Installation for the toggle nut to go through the wall and to go through both bottom corner holes. 3. C D A B A. 1/4-20 x 3" round-head bolt ...
Installation Instructions
Page 10
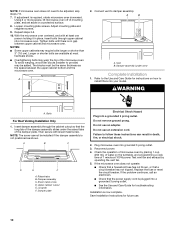
... assembly is plugged into your model. A 2. Connect vent to the Use and Care Guide for future use. 10 Then secure with at 100% power. A B C D E F A. Do not use an adapter. Installation is required, rotate microwave oven downward. Raised tabs B. Do not use an extension cord...; Overtightening bolts may warp the top of mounting plate, and set aside on how to install filters into a grounded 3 prong outlet. ■ See the Use and Care Guide for troubleshooting information. Insert damper assembly through upper cabinet into microwave oven. Damper assembly C. ...
... assembly is plugged into your model. A 2. Connect vent to the Use and Care Guide for future use. 10 Then secure with at 100% power. A B C D E F A. Do not use an adapter. Installation is required, rotate microwave oven downward. Raised tabs B. Do not use an extension cord...; Overtightening bolts may warp the top of mounting plate, and set aside on how to install filters into a grounded 3 prong outlet. ■ See the Use and Care Guide for troubleshooting information. Insert damper assembly through upper cabinet into microwave oven. Damper assembly C. ...

Installation Instructions
Page 12
...(0.6 m) C D A. In addition, a rectangular 3" (7.6 cm) extension vent between the damper assembly and rectangular to round transition piece must be installed to round transition piece must not exceed the equivalent of 140 ft (42.7 m) for equivalent lengths. Filler panels Filler Panel Kit Number 8171336 8171337 ...8206442 Mounting Plate Part Number W10110277 Upper Cabinet Template Part Number 8205871 Mounting Screw Kit (includes parts A-G in the Use and Care Guide, and reference the appropriate part number listed here. Recommended Vent Length A 3¹⁄₄" x 10" (8.3 x 25.4 ...
...(0.6 m) C D A. In addition, a rectangular 3" (7.6 cm) extension vent between the damper assembly and rectangular to round transition piece must be installed to round transition piece must not exceed the equivalent of 140 ft (42.7 m) for equivalent lengths. Filler panels Filler Panel Kit Number 8171336 8171337 ...8206442 Mounting Plate Part Number W10110277 Upper Cabinet Template Part Number 8205871 Mounting Screw Kit (includes parts A-G in the Use and Care Guide, and reference the appropriate part number listed here. Recommended Vent Length A 3¹⁄₄" x 10" (8.3 x 25.4 ...


