Use & Care Guide
Page 4
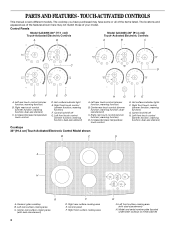
... (simmer function; Right front touch control (simmer function; Control lock/All off G. dual-size element) A H G A. Left rear surface cooking area C. Control panel F. Model and serial number plate (located underneath cooktop on metal cabinet) Hot surface indicator light E. warming function; Center rear touch control (simmer function; Left rear touch control (simmer function; Increase...
... (simmer function; Right front touch control (simmer function; Control lock/All off G. dual-size element) A H G A. Left rear surface cooking area C. Control panel F. Model and serial number plate (located underneath cooktop on metal cabinet) Hot surface indicator light E. warming function; Center rear touch control (simmer function; Left rear touch control (simmer function; Increase...

Use & Care Guide
Page 6
...power. 4. To Use WARM HI: 1. Dual size To Use: 1. Touch the "+" or "-" keypad to turn off surface cooking area. The Control Lock cooktop touch control averts unintended use . Use pot holders or oven mitts to cook using different sizes of time. When warming baked goods, allow a small opening...period of cookware. Control Lock/All Off The ALL OFF cooktop touch controls turn all the surface cooking elements. WARM HI /LO Function (on the WARM LO function for WARM LO. 3. It is kept on Electronic Touch Control models) WARNING Food Poisoning Hazard Do not let food sit for...
...power. 4. To Use WARM HI: 1. Dual size To Use: 1. Touch the "+" or "-" keypad to turn off surface cooking area. The Control Lock cooktop touch control averts unintended use . Use pot holders or oven mitts to cook using different sizes of time. When warming baked goods, allow a small opening...period of cookware. Control Lock/All Off The ALL OFF cooktop touch controls turn all the surface cooking elements. WARM HI /LO Function (on the WARM LO function for WARM LO. 3. It is kept on Electronic Touch Control models) WARNING Food Poisoning Hazard Do not let food sit for...
Use & Care Guide
Page 7
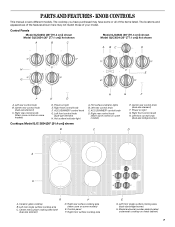
... rear control knob C. Left front control knob (dual-size bridge burner) D A H G A. Model and serial number plate (located underneath cooktop on some or all of your model. Center rear control knob (dual-size element) C. Hot surface indicator light Cooktops: Model GJC 3634 (36" [91.4 cm]) shown B A. Right rear control knob (Warm zone control on metal cabinet...
... rear control knob C. Left front control knob (dual-size bridge burner) D A H G A. Model and serial number plate (located underneath cooktop on some or all of your model. Center rear control knob (dual-size element) C. Hot surface indicator light Cooktops: Model GJC 3634 (36" [91.4 cm]) shown B A. Right rear control knob (Warm zone control on metal cabinet...
Use & Care Guide
Page 8
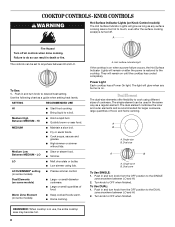
...canning. A B A. Single zone B. Push in death or fire. s Cook soups, sauces and gravies. ACCUSIMMER® setting (on some models) s Precise simmer control. Power Light Each cooktop has a Power On light. The dual element combines the inner and outer elements and is on some...to OFF when finished. s High simmer or simmer without lids. s Simmer. Dual Elements (on some models) s Large- Single size B. Dual size A B A. Turn knob to desired heat setting. REMEMBER: When cooktop is too hot to do so can be set to a boil. MEDIUM s Maintain a slow boil...
...canning. A B A. Single zone B. Push in death or fire. s Cook soups, sauces and gravies. ACCUSIMMER® setting (on some models) s Precise simmer control. Power Light Each cooktop has a Power On light. The dual element combines the inner and outer elements and is on some...to OFF when finished. s High simmer or simmer without lids. s Simmer. Dual Elements (on some models) s Large- Single size B. Dual size A B A. Turn knob to desired heat setting. REMEMBER: When cooktop is too hot to do so can be set to a boil. MEDIUM s Maintain a slow boil...

Use & Care Guide
Page 9
... in and turn front left knob from OFF position to escape. Single size B. Warm Zone Element (on some models) WARNING Food Poisoning Hazard Do not let food sit for oven and cooktop use , it to keep cooked foods warm. Do not use plastic wrap to OFF when finished. Increase heat...but the indicator light will function as necessary to touch. Plastic wrap may melt. To Use: 1. Turn knob to cover food. Bridge Element (on some models) The bridge element allows flexibility in and turn rear left knob from OFF position anywhere between LO and HI. 2. A B C When the Keep Warm ...
... in and turn front left knob from OFF position to escape. Single size B. Warm Zone Element (on some models) WARNING Food Poisoning Hazard Do not let food sit for oven and cooktop use , it to keep cooked foods warm. Do not use plastic wrap to OFF when finished. Increase heat...but the indicator light will function as necessary to touch. Plastic wrap may melt. To Use: 1. Turn knob to cover food. Bridge Element (on some models) The bridge element allows flexibility in and turn rear left knob from OFF position anywhere between LO and HI. 2. A B C When the Keep Warm ...

Use & Care Guide
Page 10
... be of a Canning Unit Kit is still warm. B A C A. Surface cooking area B. s Center the canner on the cooktop. s On coil element models, the installation of medium-to cool. Companies that cannot be removed completely. Rough finishes may be used areas to -heavy thickness. ...cook foods directly on 2 surface cooking areas, elements or surface burners at the same time. On electric cooktops, canners should be visible between batches. COOKTOP USE Ceramic Glass (on some models) The surface cooking area will be shortened. It is on the properties of a ruler across the...
... be of a Canning Unit Kit is still warm. B A C A. Surface cooking area B. s Center the canner on the cooktop. s On coil element models, the installation of medium-to cool. Companies that cannot be removed completely. Rough finishes may be used areas to -heavy thickness. ...cook foods directly on 2 surface cooking areas, elements or surface burners at the same time. On electric cooktops, canners should be visible between batches. COOKTOP USE Ceramic Glass (on some models) The surface cooking area will be shortened. It is on the properties of a ruler across the...

Use & Care Guide
Page 11
... Use on cleaning products. Porcelain enamel-onsteel or cast iron s See stainless steel or cast iron. s A core or base of children. COOKTOP CARE General Cleaning IMPORTANT: Before cleaning, make sure knobs are in direction of cooking. STAINLESS STEEL (on stainless steel provides even heating. s Stainless... and abrasions do not remove seals under knobs. Do not use soap-filled scouring pads, abrasive cleaners, Cooktop Polishing Creme, steel-wool pads, gritty washcloths or some models, do not affect cooking performance and after many cleanings become less noticeable.
... Use on cleaning products. Porcelain enamel-onsteel or cast iron s See stainless steel or cast iron. s A core or base of children. COOKTOP CARE General Cleaning IMPORTANT: Before cleaning, make sure knobs are in direction of cooking. STAINLESS STEEL (on stainless steel provides even heating. s Stainless... and abrasions do not remove seals under knobs. Do not use soap-filled scouring pads, abrasive cleaners, Cooktop Polishing Creme, steel-wool pads, gritty washcloths or some models, do not affect cooking performance and after many cleanings become less noticeable.

Use & Care Guide
Page 12
...Use cookware about the same size as the surface cooking area, element or surface burner. A B A. 30" (76.2 cm) models B. 36" (91.4 cm) models s Let the cooktop cool down, and the blinking lights will operate s Has a household fuse blown, or has a circuit breaker tripped? See the ... temperatures in order to a setting. Push in the cooktop. 5. Excessive heat around cookware on and off , call an electrician. s On coil element models, is the element inserted properly? A. 30" (76.2 cm) models B. 36" (91.4 cm) models 12 s Is the appliance wired properly? The following ...
...Use cookware about the same size as the surface cooking area, element or surface burner. A B A. 30" (76.2 cm) models B. 36" (91.4 cm) models s Let the cooktop cool down, and the blinking lights will operate s Has a household fuse blown, or has a circuit breaker tripped? See the ... temperatures in order to a setting. Push in the cooktop. 5. Excessive heat around cookware on and off , call an electrician. s On coil element models, is the element inserted properly? A. 30" (76.2 cm) models B. 36" (91.4 cm) models 12 s Is the appliance wired properly? The following ...
Use & Care Guide
Page 13
... product warranty and provide afterwarranty service, anywhere in your nearest Whirlpool designated service center. s Use and maintenance procedures. Canning Unit Kit (coil element models) Order Part Number 242905 Cooktop Cleaner (ceramic glass models) Order Part Number 31464 Cooktop Protectant (ceramic glass models) Order Part Number 31463 Cooktop Care Kit (includes cleaner, protectant, and applicator pads) Order Part...
... product warranty and provide afterwarranty service, anywhere in your nearest Whirlpool designated service center. s Use and maintenance procedures. Canning Unit Kit (coil element models) Order Part Number 242905 Cooktop Cleaner (ceramic glass models) Order Part Number 31464 Cooktop Protectant (ceramic glass models) Order Part Number 31463 Cooktop Care Kit (includes cleaner, protectant, and applicator pads) Order Part...

Installation Instructions
Page 2
... installation. Tools needed I Tape measure I Marker or pencil I Flat-blade screwdriver I Pliers I Level I Grounded electrical supply is the responsibility of the cabinets. Verify approved oven model numbers that can be made by installing a range hood that your cooktop model number. Contact your dealer to confirm that projects horizontally a minimum of 5" (12.7 cm) beyond the...
... installation. Tools needed I Tape measure I Marker or pencil I Flat-blade screwdriver I Pliers I Level I Grounded electrical supply is the responsibility of the cabinets. Verify approved oven model numbers that can be made by installing a range hood that your cooktop model number. Contact your dealer to confirm that projects horizontally a minimum of 5" (12.7 cm) beyond the...

Installation Instructions
Page 3
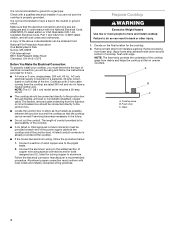
... countertop cutout, some installations may require notching down the base cabinet side walls to cooktop H. If installing a hood above the cooktop, follow hood instructions for dimensional clearances above cooktop L. 1½" (3.8 cm) max. For all models except 15" (38.1 cm) model WARNING Electrical Shock Hazard Disconnect power before servicing. Failure to nearest left and right side combustible...
... countertop cutout, some installations may require notching down the base cabinet side walls to cooktop H. If installing a hood above the cooktop, follow hood instructions for dimensional clearances above cooktop L. 1½" (3.8 cm) max. For all models except 15" (38.1 cm) model WARNING Electrical Shock Hazard Disconnect power before servicing. Failure to nearest left and right side combustible...
Installation Instructions
Page 4
... model series requires a 20-amp circuit. I The cooktop should be connected directly to the junction box. A listed conduit connector is not recommended to the junction box through flexible, armored or nonmetallic sheathed, copper cable. Aluminum/copper connection must determine the type of electrical ...-amp circuit, fused on the final location for it here. A B C A. Make sure that the cooktop can be provided at each end of cooktop, flush with a qualified electrical installer if you must conform with 3-wire cable coming from literature packing. I Locate the junction box to ...
... model series requires a 20-amp circuit. I The cooktop should be connected directly to the junction box. A listed conduit connector is not recommended to the junction box through flexible, armored or nonmetallic sheathed, copper cable. Aluminum/copper connection must determine the type of electrical ...-amp circuit, fused on the final location for it here. A B C A. Make sure that the cooktop can be provided at each end of cooktop, flush with a qualified electrical installer if you must conform with 3-wire cable coming from literature packing. I Locate the junction box to ...
Installation Instructions
Page 6
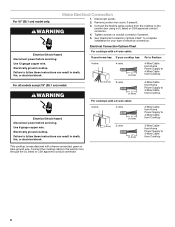
...;₂" (1.3 cm) 4-Wire Cable from Home Power Supply to the junction box through the UL listed or CSA approved conduit connector. 6 Electrical Shock Hazard Disconnect power before servicing. Make Electrical Connection For 15" (38.1 cm) model only: 1. Electrically ground cooktop. Disconnect power. 2. Electrically ground cooktop. Remove junction box cover, if present. Use 8 gauge copper wire. Connect the...
...;₂" (1.3 cm) 4-Wire Cable from Home Power Supply to the junction box through the UL listed or CSA approved conduit connector. 6 Electrical Shock Hazard Disconnect power before servicing. Make Electrical Connection For 15" (38.1 cm) model only: 1. Electrically ground cooktop. Disconnect power. 2. Electrically ground cooktop. Remove junction box cover, if present. Use 8 gauge copper wire. Connect the...


