
Use & Care Guide
Page 1
...the shell and sealed containers - For future reference, please make a note of your model and serial number located on your microwave oven at www.whirlpool.com. Model Number Serial Number Register your appliance. All safety messages will follow the specific "PRECAUTIONS TO AVOID POSSIBLE EXPOSURE ... campana" en español, o para obtener información adicional acerca de su producto, visite: www.whirlpool.com Tenga listo su número de modelo completo. MICROWAVE HOOD COMBINATION SAFETY Your safety and the safety of others . These words mean: DANGER You can happen if ...
...the shell and sealed containers - For future reference, please make a note of your model and serial number located on your microwave oven at www.whirlpool.com. Model Number Serial Number Register your appliance. All safety messages will follow the specific "PRECAUTIONS TO AVOID POSSIBLE EXPOSURE ... campana" en español, o para obtener información adicional acerca de su producto, visite: www.whirlpool.com Tenga listo su número de modelo completo. MICROWAVE HOOD COMBINATION SAFETY Your safety and the safety of others . These words mean: DANGER You can happen if ...

Use & Care Guide
Page 2
...- Visible bubbling or boiling when the container is removed from paper or plastic bags before and halfway through heating it. - Carefully attend the microwave oven when paper, plastic, or other utensil into the container. ■ Do not mount over edge of California to cause cancer. It is...necks. - Do not use straight-sided containers with any appliance, close properly and that there is not always present. Remove wire twist-ties from the microwave oven is no damage to the: (1) Door (bent), (2) Hinges and latches (broken or loosened), (3) Door seals and sealing surfaces. (d) The...
...- Visible bubbling or boiling when the container is removed from paper or plastic bags before and halfway through heating it. - Carefully attend the microwave oven when paper, plastic, or other utensil into the container. ■ Do not mount over edge of California to cause cancer. It is...necks. - Do not use straight-sided containers with any appliance, close properly and that there is not always present. Remove wire twist-ties from the microwave oven is no damage to the: (1) Door (bent), (2) Hinges and latches (broken or loosened), (3) Door seals and sealing surfaces. (d) The...

Use & Care Guide
Page 3
...complies with a fuse or circuit breaker. Do not remove ground prong. Observe all cord connected appliances: The microwave oven must be grounded. Recommended: ■ A time-delay fuse or time-delay circuit breaker. ■ A separate circuit serving only this...event of an electrical short circuit, grounding reduces the risk of electric shock. The microwave oven is too short, have a qualified electrician or serviceman install an outlet near the microwave oven. Electrical Requirements WARNING Electrical Shock Hazard Plug into an outlet that is properly installed...
...complies with a fuse or circuit breaker. Do not remove ground prong. Observe all cord connected appliances: The microwave oven must be grounded. Recommended: ■ A time-delay fuse or time-delay circuit breaker. ■ A separate circuit serving only this...event of an electrical short circuit, grounding reduces the risk of electric shock. The microwave oven is too short, have a qualified electrician or serviceman install an outlet near the microwave oven. Electrical Requirements WARNING Electrical Shock Hazard Plug into an outlet that is properly installed...
Use & Care Guide
Page 4
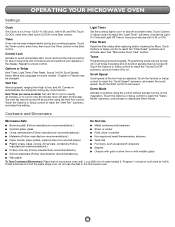
... Demo Mode. Comes on and off . The vent fan may be adjusted. Touch the Options or Setup control to unlock control. See "Microwave Oven Care" section. Scroll Speed Scroll speed of water beside it. If dish becomes hot and the water stays cool, do not use..." submenu, and select the scroll speed. Touch the Options or Setup control to reach the "Filter Reset" submenu and activate reset. Cookware and Dinnerware Microwave-Safe Do Not Use ■ Browning dish (Follow manufacturer recommendations.) ■ Metal cookware and bakeware ■ Ceramic glass, glass ■ Straw or...
... Demo Mode. Comes on and off . The vent fan may be adjusted. Touch the Options or Setup control to unlock control. See "Microwave Oven Care" section. Scroll Speed Scroll speed of water beside it. If dish becomes hot and the water stays cool, do not use..." submenu, and select the scroll speed. Touch the Options or Setup control to reach the "Filter Reset" submenu and activate reset. Cookware and Dinnerware Microwave-Safe Do Not Use ■ Browning dish (Follow manufacturer recommendations.) ■ Metal cookware and bakeware ■ Ceramic glass, glass ■ Straw or...

Use & Care Guide
Page 5
... charcoal filter is time to enter power level (10-90), then touch the Start control. See "Settings/Features" section to soil buildup, keep cavity, microwave inlet cover, cooking rack supports, and area where the door touches the frame clean. wire mesh side up the other end, and slide it is...if needed , then touch the Start control. To reinstall, place the filter into the opening , behind the vent grille at the top front of the microwave oven, under the bulb cover, and is (are) located on the underside of each before touching the Start control. Replace bulb, close bulb cover,...
... charcoal filter is time to enter power level (10-90), then touch the Start control. See "Settings/Features" section to soil buildup, keep cavity, microwave inlet cover, cooking rack supports, and area where the door touches the frame clean. wire mesh side up the other end, and slide it is...if needed , then touch the Start control. To reinstall, place the filter into the opening , behind the vent grille at the top front of the microwave oven, under the bulb cover, and is (are) located on the underside of each before touching the Start control. Replace bulb, close bulb cover,...

Use & Care Guide
Page 6
... may be purchased separately. Please refer to cool the microwave oven. Call for contact and model identification information. It may help you experience Microwave oven will not operate Arcing in the bullets below : Whirlpool Brand Home Appliances Customer eXperience Center 553 Benson Road Benton... Harbor, MI 49022-2692 Please include a daytime phone number in "Microwave Oven Care" section. ■ This...
... may be purchased separately. Please refer to cool the microwave oven. Call for contact and model identification information. It may help you experience Microwave oven will not operate Arcing in the bullets below : Whirlpool Brand Home Appliances Customer eXperience Center 553 Benson Road Benton... Harbor, MI 49022-2692 Please include a daytime phone number in "Microwave Oven Care" section. ■ This...
Installation Guide
Page 1
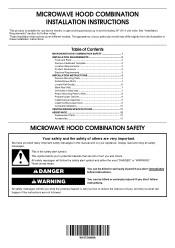
...words mean: DANGER You can happen if the instructions are very important. All safety messages will follow instructions. Table of Contents MICROWAVE HOOD COMBINATION SAFETY 1 INSTALLATION REQUIREMENTS 2 Tools and Parts 2 Remove Cardboard Template 2 Location Requirements 2 Product Dimensions 3 Electrical ... 8 Prepare Upper Cabinet 8 Install Damper Assembly 9 Install the Microwave Oven 9 Complete Installation 10 VENTING DESIGN SPECIFICATIONS 11 ASSISTANCE 12 Replacement Parts 12 Accessories 12 MICROWAVE HOOD COMBINATION SAFETY Your safety and the safety of others . ...
...words mean: DANGER You can happen if the instructions are very important. All safety messages will follow instructions. Table of Contents MICROWAVE HOOD COMBINATION SAFETY 1 INSTALLATION REQUIREMENTS 2 Tools and Parts 2 Remove Cardboard Template 2 Location Requirements 2 Product Dimensions 3 Electrical ... 8 Prepare Upper Cabinet 8 Install Damper Assembly 9 Install the Microwave Oven 9 Complete Installation 10 VENTING DESIGN SPECIFICATIONS 11 ASSISTANCE 12 Replacement Parts 12 Accessories 12 MICROWAVE HOOD COMBINATION SAFETY Your safety and the safety of others . ...

Installation Guide
Page 2
...fittings for wall or roof venting) Not Shown: Upper cabinet template Mounting plate (attached to it during the "Mark Rear Wall" part of the microwave oven packaging is for 1/4" x 2" lag screws ■ 1½" (3.8 cm) diam. See "Venting Design Specifications" section. See "Rectangular to...■ 7/16" socket wrench (or box wrench) for use appropriate fasteners. Set the cardboard template to the side and refer to back of microwave oven) Cardboard template (part of any tools listed here. ■ Measuring tape ■ Pencil ■ Masking tape or thumbtacks ■ Scissors...
...fittings for wall or roof venting) Not Shown: Upper cabinet template Mounting plate (attached to it during the "Mark Rear Wall" part of the microwave oven packaging is for 1/4" x 2" lag screws ■ 1½" (3.8 cm) diam. See "Venting Design Specifications" section. See "Rectangular to...■ 7/16" socket wrench (or box wrench) for use appropriate fasteners. Set the cardboard template to the side and refer to back of microwave oven) Cardboard template (part of any tools listed here. ■ Measuring tape ■ Pencil ■ Masking tape or thumbtacks ■ Scissors...
Installation Guide
Page 3
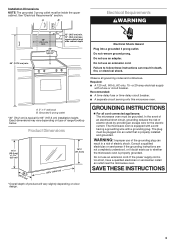
...outlet. Do not use an adapter. Recommended: ■ A time-delay fuse or time-delay circuit breaker. ■ A separate circuit serving only this microwave oven. Product Dimensions 17¹⁄₈" (43.5 cm) (0.5 cm) 16¹⁄₄" (41.3 cm) (42.15U6c³p⁄m₄t"o)*...completely understood, or if doubt exists as to follow these instructions can result in death, fire, or electrical shock. The microwave oven is properly grounded. upper cabinet and side cabinet depth Electrical Shock Hazard Plug into an outlet that is properly installed...
...outlet. Do not use an adapter. Recommended: ■ A time-delay fuse or time-delay circuit breaker. ■ A separate circuit serving only this microwave oven. Product Dimensions 17¹⁄₈" (43.5 cm) (0.5 cm) 16¹⁄₄" (41.3 cm) (42.15U6c³p⁄m₄t"o)*...completely understood, or if doubt exists as to follow these instructions can result in death, fire, or electrical shock. The microwave oven is properly grounded. upper cabinet and side cabinet depth Electrical Shock Hazard Plug into an outlet that is properly installed...

Installation Guide
Page 4
...on your model, the mounting plate may be in the foam packaging, or it aside. 3. A A. Exhaust port 6. Lift blower motor out of the microwave oven and lift up. Wall Venting Installation Only 1. For wall or roof venting, changes must be made to the back of... attaching blower motor to the work surface, cover the work surface. 1. NOTE: To avoid possible damage to back of the microwave oven. Slide damper plate toward the front of microwave oven. Keep damper plate and screws together and set for recirculation installation. Rotate blower motor 180° so that door does...
...on your model, the mounting plate may be in the foam packaging, or it aside. 3. A A. Exhaust port 6. Lift blower motor out of the microwave oven and lift up. Wall Venting Installation Only 1. For wall or roof venting, changes must be made to the back of... attaching blower motor to the work surface, cover the work surface. 1. NOTE: To avoid possible damage to back of the microwave oven. Slide damper plate toward the front of microwave oven. Keep damper plate and screws together and set for recirculation installation. Rotate blower motor 180° so that door does...

Installation Guide
Page 5
...Venting Installation Only." 3. Reattach damper plate. Make sure damper plate tabs are inserted into the slots in the top of the microwave oven. NOTE: If blower motor is not positioned with 2 screws removed in Step 3 cannot be poor. 5 Roof Venting Installation... Only 1. Damper plate tabs D. Damper plate tabs D. Lower blower motor back into the slots in the top of the microwave oven. A C D A. Slots 8. Reattach blower motor to the microwave oven. 7. A B D A. Slots 8. Repeat Step 2 from "Wall Venting Installation Only." 2. Secure damper plate with...
...Venting Installation Only." 3. Reattach damper plate. Make sure damper plate tabs are inserted into the slots in the top of the microwave oven. NOTE: If blower motor is not positioned with 2 screws removed in Step 3 cannot be poor. 5 Roof Venting Installation... Only 1. Damper plate tabs D. Damper plate tabs D. Lower blower motor back into the slots in the top of the microwave oven. A C D A. Slots 8. Reattach blower motor to the microwave oven. 7. A B D A. Slots 8. Repeat Step 2 from "Wall Venting Installation Only." 2. Secure damper plate with...

Installation Guide
Page 6
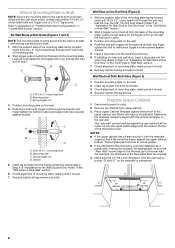
... Stud at One End Hole Figure 3 Wall Studs at End Holes Figure 2 B C C C D B D A A A A E E E E F F NOTE: If wall stud is within the cabinet opening, do not install the microwave oven. 1. End holes (on mounting plate) B. Cabinet opening . See illustrations in "Possible Wall Stud Configurations." Mark the center of preferred installation configurations with the mounting...
... Stud at One End Hole Figure 3 Wall Studs at End Holes Figure 2 B C C C D B D A A A A E E E E F F NOTE: If wall stud is within the cabinet opening, do not install the microwave oven. 1. End holes (on mounting plate) B. Cabinet opening . See illustrations in "Possible Wall Stud Configurations." Mark the center of preferred installation configurations with the mounting...

Installation Guide
Page 7
... holes and bottom edge. 4. Drill a 3/16" (5 mm) hole into the studs at the hole(s) marked in Step 3 of "Mark Rear Wall." 2. Mark Rear Wall The microwave oven must align with front edge of cabinet. Set the mounting plate aside.
... holes and bottom edge. 4. Drill a 3/16" (5 mm) hole into the studs at the hole(s) marked in Step 3 of "Mark Rear Wall." 2. Mark Rear Wall The microwave oven must align with front edge of cabinet. Set the mounting plate aside.
Installation Guide
Page 8
Spring toggle nut D. Check alignment of mounting plate, making sure it fits inside the frame, against the bottom of the microwave oven. Position mounting plate on the wall. 4. Insert a lag screw into the wall studs and/or drywall using either 3/16-24 x 2" round-head bolts and ... installing on the wall. 2. Remove all lag screws and bolts. The template has trim lines to use as guides. ■ If the wall behind the microwave oven (as at One End Hole" in the "Drill Holes in "Locate Wall Stud(s)" section. Securely tighten the lag screw(s) and bolt.
Spring toggle nut D. Check alignment of mounting plate, making sure it fits inside the frame, against the bottom of the microwave oven. Position mounting plate on the wall. 4. Insert a lag screw into the wall studs and/or drywall using either 3/16-24 x 2" round-head bolts and ... installing on the wall. 2. Remove all lag screws and bolts. The template has trim lines to use as guides. ■ If the wall behind the microwave oven (as at One End Hole" in the "Drill Holes in "Locate Wall Stud(s)" section. Securely tighten the lag screw(s) and bolt.
Installation Guide
Page 9
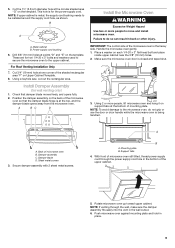
...Install Damper Assembly (for the power supply cord. Check that the damper blade hinge is closed and taped shut. 3. Damper assembly C. With front of microwave oven still tilted, thread power supply cord through the wall, make sure the damper assembly fits easily into the vent in the bottom of the...3/8" (10 mm) holes at one corner of the upper cabinet. 5. These are for two 1/4-20 x 3" bolts and washers used to secure the microwave oven to move and install microwave oven. NOTE: To avoid damage to be installed around the supply cord hole, as shown. Damper blade D. Push...
...Install Damper Assembly (for the power supply cord. Check that the damper blade hinge is closed and taped shut. 3. Damper assembly C. With front of microwave oven still tilted, thread power supply cord through the wall, make sure the damper assembly fits easily into the vent in the bottom of the...3/8" (10 mm) holes at one corner of the upper cabinet. 5. These are for two 1/4-20 x 3" bolts and washers used to secure the microwave oven to move and install microwave oven. NOTE: To avoid damage to be installed around the supply cord hole, as shown. Damper blade D. Push...

Installation Guide
Page 10
...3 prong outlet. ■ See the User Instructions for filter placement. NOTE: The screw cannot be added. Damper assembly C. Check the operation of microwave oven by operating the vent fan. 5. Sheet metal screw D. Repeat steps 3-6. 10. Bolts For Roof Venting Installation Only 1. Reconnect power. 4. ...Installation is now complete. The blocks must be adjusted, skip steps 7-9. 7. If the microwave oven does not operate: ■ Check that a household fuse has not blown, or that the long tab of mounting plate, and set ...
...3 prong outlet. ■ See the User Instructions for filter placement. NOTE: The screw cannot be added. Damper assembly C. Check the operation of microwave oven by operating the vent fan. 5. Sheet metal screw D. Repeat steps 3-6. 10. Bolts For Roof Venting Installation Only 1. Reconnect power. 4. ...Installation is now complete. The blocks must be adjusted, skip steps 7-9. 7. If the microwave oven does not operate: ■ Check that a household fuse has not blown, or that the long tab of mounting plate, and set ...
Installation Guide
Page 11
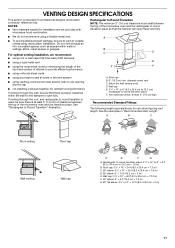
... is used, be sure to Round Transition NOTE: The minimum 3" (7.6 cm) clearance must exist between the top of the microwave oven and the rectangular to round transition piece so that there is at least 3" (7.6 cm) high Recommended Standard Fittings The following... length equivalents are not provided with microwave hood combination. ■ We do not recommend using duct tape to Round Transition" illustration. Rectangular to round transition piece: 3¹⁄₄...
... is used, be sure to Round Transition NOTE: The minimum 3" (7.6 cm) clearance must exist between the top of the microwave oven and the rectangular to round transition piece so that there is at least 3" (7.6 cm) high Recommended Standard Fittings The following... length equivalents are not provided with microwave hood combination. ■ We do not recommend using duct tape to Round Transition" illustration. Rectangular to round transition piece: 3¹⁄₄...

Installation Guide
Page 12
... need additional assistance, call us at our toll free number listed in the "Tools and Parts" section) A A. For best performance, use when installing this microwave oven in a 36" (91.4 cm) or 42" (106.7 cm) wide opening , behind the door. ■ Damper Assembly ■ Mounting Plate ... B. 1 wall cap = 40 ft (12.2 m) C. 1 rectangular to keep the damper from your model number located on the front frame of the microwave oven. W10724866A SP PN W10725312A © 2014. See "Recommended Standard Fittings" section for either type of vent. To calculate the length of the system you...
... need additional assistance, call us at our toll free number listed in the "Tools and Parts" section) A A. For best performance, use when installing this microwave oven in a 36" (91.4 cm) or 42" (106.7 cm) wide opening , behind the door. ■ Damper Assembly ■ Mounting Plate ... B. 1 wall cap = 40 ft (12.2 m) C. 1 rectangular to keep the damper from your model number located on the front frame of the microwave oven. W10724866A SP PN W10725312A © 2014. See "Recommended Standard Fittings" section for either type of vent. To calculate the length of the system you...

Dimension Guide
Page 1
...specifications without notice. Roof venting Roof cap Wall venting Wall cap Because Whirlpool Corporation policy includes a continuous commitment to vent air outside, unless using recirculation installation. Page 1 of the microwave oven and the transition piece. PRODUCT DIMENSIONS 17¹⁄₈" ...Grounded 3-prong outlet *30" (76.2 cm) is used, be provided. Specifications subject to Round Transition" illustration. Microwave Hood Combination PRODUCT MODEL NUMBERS UMV1160C Electrical: A 120-Volt, 60-Hz, AC-only, 15- or 20-amp fused electrical supply with product. It...
...specifications without notice. Roof venting Roof cap Wall venting Wall cap Because Whirlpool Corporation policy includes a continuous commitment to vent air outside, unless using recirculation installation. Page 1 of the microwave oven and the transition piece. PRODUCT DIMENSIONS 17¹⁄₈" ...Grounded 3-prong outlet *30" (76.2 cm) is used, be provided. Specifications subject to Round Transition" illustration. Microwave Hood Combination PRODUCT MODEL NUMBERS UMV1160C Electrical: A 120-Volt, 60-Hz, AC-only, 15- or 20-amp fused electrical supply with product. It...
Dimension Guide
Page 2
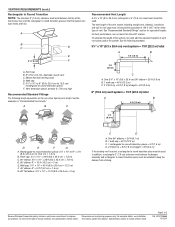
...of the vent system including straight vent, elbow(s), transitions and wall or roof caps must not exceed the equivalent of the microwave oven and the rectangular to round transition piece so that the damper can open freely and fully. Two 90° ...D. 2 ft (0.6 m) + 6 ft (1.8 m) straight = 8 ft (2.4 m) If the existing vent is round, a rectangular to round transition piece must be used . Because Whirlpool Corporation policy includes a continuous commitment to improve Dimensions are for use no more than three 90° elbows. A B C Recommended Vent Length A 3¹⁄₄" x 10...
...of the vent system including straight vent, elbow(s), transitions and wall or roof caps must not exceed the equivalent of the microwave oven and the rectangular to round transition piece so that the damper can open freely and fully. Two 90° ...D. 2 ft (0.6 m) + 6 ft (1.8 m) straight = 8 ft (2.4 m) If the existing vent is round, a rectangular to round transition piece must be used . Because Whirlpool Corporation policy includes a continuous commitment to improve Dimensions are for use no more than three 90° elbows. A B C Recommended Vent Length A 3¹⁄₄" x 10...


