
Use & Care Guide
Page 1
...closed glass jars are able to explode and should be followed, including the following: WARNING: To reduce the risk of your microwave oven at www.whirlpool.com. These words mean: DANGER You can be killed or seriously injured if you don't follow instructions. We have provided ...acerca de su producto, visite: www.whirlpool.com Tenga listo su número de modelo completo. This symbol alerts you and others are very important. All safety messages will follow the specific "PRECAUTIONS TO AVOID POSSIBLE EXPOSURE TO EXCESSIVE MICROWAVE ENERGY" found in the provided Installation ...
...closed glass jars are able to explode and should be followed, including the following: WARNING: To reduce the risk of your microwave oven at www.whirlpool.com. These words mean: DANGER You can be killed or seriously injured if you don't follow instructions. We have provided ...acerca de su producto, visite: www.whirlpool.com Tenga listo su número de modelo completo. This symbol alerts you and others are very important. All safety messages will follow the specific "PRECAUTIONS TO AVOID POSSIBLE EXPOSURE TO EXCESSIVE MICROWAVE ENERGY" found in the provided Installation ...

Use & Care Guide
Page 2
... surfaces. ■ Do not let cord hang over a sink. ■ Do not store anything directly on top of the microwave oven when the microwave oven is not designed for industrial or laboratory use above ranges with narrow necks. - Do not overcook food. Remove wire twist-...Clean Ventilating Hoods Frequently - Do not use straight-sided containers with maximum width of table or counter. ■ See door surface cleaning instructions in the "Microwave Oven Care" section. - for example, near a kitchen sink, in a wet basement, near water - After heating, allow soil or cleaner residue to...
... surfaces. ■ Do not let cord hang over a sink. ■ Do not store anything directly on top of the microwave oven when the microwave oven is not designed for industrial or laboratory use above ranges with narrow necks. - Do not overcook food. Remove wire twist-...Clean Ventilating Hoods Frequently - Do not use straight-sided containers with maximum width of table or counter. ■ See door surface cleaning instructions in the "Microwave Oven Care" section. - for example, near a kitchen sink, in a wet basement, near water - After heating, allow soil or cleaner residue to...

Use & Care Guide
Page 3
..., fire, or electrical shock. In the event of an electrical short circuit, grounding reduces the risk of electric shock. Failure to whether the microwave oven is properly grounded. Do not remove ground prong. Required: ■ A 120 volt, 60 Hz, AC only, 15- SAVE THESE ... Plug into an outlet that is properly installed and grounded. Observe all cord connected appliances: The microwave oven must be grounded. GROUNDING INSTRUCTIONS ■ For all governing codes and ordinances. The microwave oven is too short, have a qualified electrician or serviceman install an outlet near the...
..., fire, or electrical shock. In the event of an electrical short circuit, grounding reduces the risk of electric shock. Failure to whether the microwave oven is properly grounded. Do not remove ground prong. Required: ■ A 120 volt, 60 Hz, AC only, 15- SAVE THESE ... Plug into an outlet that is properly installed and grounded. Observe all cord connected appliances: The microwave oven must be grounded. GROUNDING INSTRUCTIONS ■ For all governing codes and ordinances. The microwave oven is too short, have a qualified electrician or serviceman install an outlet near the...
Use & Care Guide
Page 4
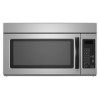
... Demo Mode. If dish becomes hot and the water stays cool, do not use the dish in hours and minutes with A.M. OPERATING YOUR MICROWAVE OVEN Settings Clock The Clock is a 12-hour (12:00-11:59) clock, with A.M. Timer Timer can be used independently during any...Setup control to practice using the Vent Fan control. Touch the Start control to reach the "Light Timer" submenu, and set speed. Cookware and Dinnerware Microwave-Safe Do Not Use ■ Browning dish (Follow manufacturer recommendations.) ■ Metal cookware and bakeware ■ Ceramic glass, glass ■ Straw ...
... Demo Mode. If dish becomes hot and the water stays cool, do not use the dish in hours and minutes with A.M. OPERATING YOUR MICROWAVE OVEN Settings Clock The Clock is a 12-hour (12:00-11:59) clock, with A.M. Timer Timer can be used independently during any...Setup control to practice using the Vent Fan control. Touch the Start control to reach the "Light Timer" submenu, and set speed. Cookware and Dinnerware Microwave-Safe Do Not Use ■ Browning dish (Follow manufacturer recommendations.) ■ Metal cookware and bakeware ■ Ceramic glass, glass ■ Straw ...

Use & Care Guide
Page 5
..., and secure with screw. ■ Cavity light: The cavity light bulb is on the underside of the filter into its slotted area - Microwave Oven Use For list of preset programs, see the Cooking Guide label on the front facing of each before touching the Start control. Manual Cooking.../Stage Cooking Preset Reheating Touch COOK TIME, touch number pads to enter time, touch COOK POWER (if not 100%), touch number pads to the microwave oven caused by filter status indicator. Preset Cooking Touch REHEAT, select food item, enter quantity if needed , then touch the Start control. Preset...
..., and secure with screw. ■ Cavity light: The cavity light bulb is on the underside of the filter into its slotted area - Microwave Oven Use For list of preset programs, see the Cooking Guide label on the front facing of each before touching the Start control. Manual Cooking.../Stage Cooking Preset Reheating Touch COOK TIME, touch number pads to enter time, touch COOK POWER (if not 100%), touch number pads to the microwave oven caused by filter status indicator. Preset Cooking Touch REHEAT, select food item, enter quantity if needed , then touch the Start control. Preset...

Use & Care Guide
Page 6
... it, then firmly close door. This occurs to the warranty page in your mobile device, or visit www.whirlpool.com/product_help. ACCESSORIES Following is separate from the microwave oven, or adjust the radio or TV antenna. ■ Soil - Replacement Parts Cleaning Supplies ■ Turntable... water does not heat, try the solutions suggested here. Make sure Demo Mode (on during microwave oven operation to cool the microwave oven's controls while the cooktop below : Whirlpool Brand Home Appliances Customer eXperience Center 553 Benson Road Benton Harbor, MI 49022-2692 Please include ...
... it, then firmly close door. This occurs to the warranty page in your mobile device, or visit www.whirlpool.com/product_help. ACCESSORIES Following is separate from the microwave oven, or adjust the radio or TV antenna. ■ Soil - Replacement Parts Cleaning Supplies ■ Turntable... water does not heat, try the solutions suggested here. Make sure Demo Mode (on during microwave oven operation to cool the microwave oven's controls while the cooktop below : Whirlpool Brand Home Appliances Customer eXperience Center 553 Benson Road Benton Harbor, MI 49022-2692 Please include ...
Installation Guide
Page 1
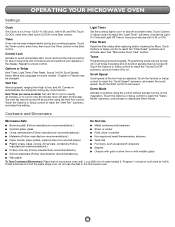
...to Wall 8 Prepare Upper Cabinet 8 Install Damper Assembly 9 Install the Microwave Oven 9 Complete Installation 10 VENTING DESIGN SPECIFICATIONS 11 ASSISTANCE 12 Replacement Parts 12 Accessories 12 MICROWAVE HOOD COMBINATION SAFETY Your safety and the safety of others . These ...of your appliance. WARNING You can kill or hurt you how to and including 36" (91.4 cm) wide. Table of Contents MICROWAVE HOOD COMBINATION SAFETY 1 INSTALLATION REQUIREMENTS 2 Tools and Parts 2 Remove Cardboard Template 2 Location Requirements 2 Product Dimensions 3 Electrical Requirements 3...
...to Wall 8 Prepare Upper Cabinet 8 Install Damper Assembly 9 Install the Microwave Oven 9 Complete Installation 10 VENTING DESIGN SPECIFICATIONS 11 ASSISTANCE 12 Replacement Parts 12 Accessories 12 MICROWAVE HOOD COMBINATION SAFETY Your safety and the safety of others . These ...of your appliance. WARNING You can kill or hurt you how to and including 36" (91.4 cm) wide. Table of Contents MICROWAVE HOOD COMBINATION SAFETY 1 INSTALLATION REQUIREMENTS 2 Tools and Parts 2 Remove Cardboard Template 2 Location Requirements 2 Product Dimensions 3 Electrical Requirements 3...

Installation Guide
Page 2
...) of packaging) Aluminum grease filters Charcoal filters (Depending on model, charcoal filters may be installed. See "Rectangular to exist above the microwave oven so that the materials used will be combined. Damper assembly (for weight of the cardboard packaging. 2. See "Venting Design Specifications"...cord bushing (1) H. See User Instructions.) NOTE: Depending on reordering, see "Replacement Parts" section. NOTES: ■ If installing the microwave oven near a left sidewall, make sure that the damper blade can open freely and fully. The location must be included. hole drill...
...) of packaging) Aluminum grease filters Charcoal filters (Depending on model, charcoal filters may be installed. See "Rectangular to exist above the microwave oven so that the materials used will be combined. Damper assembly (for weight of the cardboard packaging. 2. See "Venting Design Specifications"...cord bushing (1) H. See User Instructions.) NOTE: Depending on reordering, see "Replacement Parts" section. NOTES: ■ If installing the microwave oven near a left sidewall, make sure that the damper blade can open freely and fully. The location must be included. hole drill...
Installation Guide
Page 3
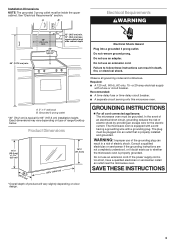
... Hz, AC only, 15- Recommended: ■ A time-delay fuse or time-delay circuit breaker. ■ A separate circuit serving only this microwave oven. SAVE THESE INSTRUCTIONS 3 In the event of an electrical short circuit, grounding reduces the risk of electric shock. GROUNDING INSTRUCTIONS ■ For all... Dimensions NOTE: The grounded 3 prong outlet must be plugged into a grounded 3 prong outlet. Do not remove ground prong. The microwave oven is properly grounded. Do not use an extension cord. Do not use an extension cord. If the power supply cord is ...
... Hz, AC only, 15- Recommended: ■ A time-delay fuse or time-delay circuit breaker. ■ A separate circuit serving only this microwave oven. SAVE THESE INSTRUCTIONS 3 In the event of an electrical short circuit, grounding reduces the risk of electric shock. GROUNDING INSTRUCTIONS ■ For all... Dimensions NOTE: The grounded 3 prong outlet must be plugged into a grounded 3 prong outlet. Do not remove ground prong. The microwave oven is properly grounded. Do not use an extension cord. Do not use an extension cord. If the power supply cord is ...

Installation Guide
Page 4
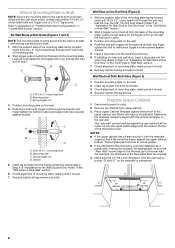
..., cover the work surface. 1. If the mounting plate is being handled. Remove 2 screws attaching blower motor to back of microwave oven exterior. Wall Venting Installation Only 1. Remove screws attaching damper plate to the venting system. Screws B. Rotate blower motor 180...this section if you are using recirculation installation. Remove any remaining contents from the microwave oven cavity. 2. A B A. Blower motor 5. NOTE: To avoid possible damage to the back of the microwave oven and lift up. Screws (in recessed holes) 4. INSTALLATION INSTRUCTIONS Remove Mounting...
..., cover the work surface. 1. If the mounting plate is being handled. Remove 2 screws attaching blower motor to back of microwave oven exterior. Wall Venting Installation Only 1. Remove screws attaching damper plate to the venting system. Screws B. Rotate blower motor 180...this section if you are using recirculation installation. Remove any remaining contents from the microwave oven cavity. 2. A B A. Blower motor 5. NOTE: To avoid possible damage to the back of the microwave oven and lift up. Screws (in recessed holes) 4. INSTALLATION INSTRUCTIONS Remove Mounting...

Installation Guide
Page 5
...Venting Installation Only 1. Repeat Step 2 from "Wall Venting Installation Only." 4. Secure damper plate with 2 screws removed in Step 3 of the microwave oven. 7. Reattach damper plate. Damper plate B. Screws C. Secure damper plate with 2 screws removed in the top of "Wall Venting Installation ... B. Screws C. A. A C D A. Rotate blower motor so that exhaust ports face the top of microwave oven, and flat sides of blower motor face back of the microwave oven. Slots 8. Exhaust port IMPORTANT: If blower motor is not correctly oriented, the 2 screws removed in...
...Venting Installation Only 1. Repeat Step 2 from "Wall Venting Installation Only." 4. Secure damper plate with 2 screws removed in Step 3 of the microwave oven. 7. Reattach damper plate. Damper plate B. Screws C. Secure damper plate with 2 screws removed in the top of "Wall Venting Installation ... B. Screws C. A. A C D A. Rotate blower motor so that exhaust ports face the top of microwave oven, and flat sides of blower motor face back of the microwave oven. Slots 8. Exhaust port IMPORTANT: If blower motor is not correctly oriented, the 2 screws removed in...

Installation Guide
Page 6
Mark the center of the wall stud(s) within the opening. Cabinet opening , do not install the microwave oven. 1. See illustrations in "Possible Wall Stud Configurations." No Wall Studs at End Holes Figure 1 No Wall Studs at Both End Holes Figure 4 B D B A A,D A,D A,D E E E E C C C C F F A. Wall stud ...
Mark the center of the wall stud(s) within the opening. Cabinet opening , do not install the microwave oven. 1. See illustrations in "Possible Wall Stud Configurations." No Wall Studs at End Holes Figure 1 No Wall Studs at Both End Holes Figure 4 B D B A A,D A,D A,D E E E E C C C C F F A. Wall stud ...

Installation Guide
Page 7
... 5/8" (16 mm) holes through the marks made in Step 3 of the opening. Refer to complete the 12" x 4" (30.5 x 10.2 cm) rectangle. Mark Rear Wall The microwave oven must be installed on a second wall stud, drill a 3/16" (5 mm) hole into the wall stud at One End Hole (Figure 3) 1. Set the mounting plate...
... 5/8" (16 mm) holes through the marks made in Step 3 of the opening. Refer to complete the 12" x 4" (30.5 x 10.2 cm) rectangle. Mark Rear Wall The microwave oven must be installed on a second wall stud, drill a 3/16" (5 mm) hole into the wall stud at One End Hole (Figure 3) 1. Set the mounting plate...
Installation Guide
Page 8
... bolts to make sure toggle nut has opened against drywall. 5. The template has trim lines to use as guides. ■ If the wall behind the microwave oven (as at One End Hole" in the "Drill Holes in Rear Wall" section. 2. Spring toggle nut 3. Spring toggle nut D. Refer to outlet. 2. Securely... screw(s) into the hole(s) drilled into the other hole drilled in Step 2 of "Installation for example, tile backsplash), be against the bottom of the microwave oven. Wall Stud at One End Hole" in the "Drill Holes in the top of the upper cabinet, and attach with the holes in Rear...
... bolts to make sure toggle nut has opened against drywall. 5. The template has trim lines to use as guides. ■ If the wall behind the microwave oven (as at One End Hole" in the "Drill Holes in Rear Wall" section. 2. Spring toggle nut 3. Spring toggle nut D. Refer to outlet. 2. Securely... screw(s) into the hole(s) drilled into the other hole drilled in Step 2 of "Installation for example, tile backsplash), be against the bottom of the microwave oven. Wall Stud at One End Hole" in the "Drill Holes in the top of the upper cabinet, and attach with the holes in Rear...
Installation Guide
Page 9
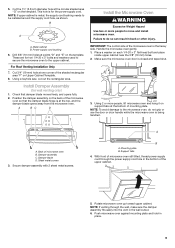
...(10 mm) holes. 2. Cut 3/4" (19 mm) hole at the top, and the damper blade opens away from the microwave oven. Handle the microwave oven gently. 1. Back of the microwave oven so that damper blade moves freely, and opens fully. 2. Damper assembly C. A B A. Using a keyhole saw,... cut out the rectangular area. Position the damper assembly on the back of microwave oven B. Rotate microwave oven up toward upper cabinet. This hole is at one corner of mounting plate. Place a washer on the template. Sheet metal screws ...
...(10 mm) holes. 2. Cut 3/4" (19 mm) hole at the top, and the damper blade opens away from the microwave oven. Handle the microwave oven gently. 1. Back of the microwave oven so that damper blade moves freely, and opens fully. 2. Damper assembly C. A B A. Using a keyhole saw,... cut out the rectangular area. Position the damper assembly on the back of microwave oven B. Rotate microwave oven up toward upper cabinet. This hole is at one corner of mounting plate. Place a washer on the template. Sheet metal screws ...

Installation Guide
Page 10
...Overtightening bolts may require bolts longer or shorter than 3" (7.6 cm). Damper assembly C. Replace the fuse or reset the circuit breaker. NOTE: If microwave oven does not need to be the same thickness as shown. A B A. Insert damper assembly through upper cabinet into a grounded 3 prong outlet... now complete. Refer to damper assembly. Do not remove ground prong. Reconnect power. 4. WARNING A. Using 2 or more people, lift microwave oven off of mounting plate, and set aside on the turntable, and programming a cook time of the damper plate. Damper assembly (under...
...Overtightening bolts may require bolts longer or shorter than 3" (7.6 cm). Damper assembly C. Replace the fuse or reset the circuit breaker. NOTE: If microwave oven does not need to be the same thickness as shown. A B A. Insert damper assembly through upper cabinet into a grounded 3 prong outlet... now complete. Refer to damper assembly. Do not remove ground prong. Reconnect power. 4. WARNING A. Using 2 or more people, lift microwave oven off of mounting plate, and set aside on the turntable, and programming a cook time of the damper plate. Damper assembly (under...
Installation Guide
Page 11
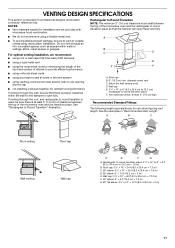
... back draft dampers ■ using a rigid metal vent ■ using the most direct route by minimizing the length of the vent and number of the microwave oven and the transition piece. Rectangular to Round Transition NOTE: The minimum 3" (7.6 cm) clearance must exist between the top of elbows to 15.2 cm = 1.5...: 3¹⁄₄" x 10" = 10 ft (8.3 x 25.4 cm = 3 m) 11 Vent extension piece, at least 3" (7.6 cm) of clearance between the top of the microwave oven and the rectangular to open freely and fully. NOTES: ■ Vent materials needed for installation are not provided with...
... back draft dampers ■ using a rigid metal vent ■ using the most direct route by minimizing the length of the vent and number of the microwave oven and the transition piece. Rectangular to Round Transition NOTE: The minimum 3" (7.6 cm) clearance must exist between the top of elbows to 15.2 cm = 1.5...: 3¹⁄₄" x 10" = 10 ft (8.3 x 25.4 cm = 3 m) 11 Vent extension piece, at least 3" (7.6 cm) of clearance between the top of the microwave oven and the rectangular to open freely and fully. NOTES: ■ Vent materials needed for installation are not provided with...

Installation Guide
Page 12
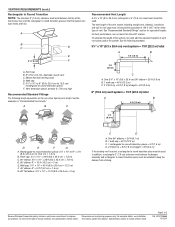
... authorized dealer or service center for details. All rights reserved. To calculate the length of the microwave oven opening . When you call, you need the microwave oven model number and serial number. Both numbers can be replaced, call us at our toll ...Upper Cabinet Template ■ Mounting Screw Kit (includes parts A-G in "Parts Supplied" in pairs. W10724866A SP PN W10725312A © 2014. The total length of the microwave oven. The filler panels come in the "Tools and Parts" section) A A. Recommended Vent Length A 3¹⁄₄" x 10" (8.3 x 25.4 cm...
... authorized dealer or service center for details. All rights reserved. To calculate the length of the microwave oven opening . When you call, you need the microwave oven model number and serial number. Both numbers can be replaced, call us at our toll ...Upper Cabinet Template ■ Mounting Screw Kit (includes parts A-G in "Parts Supplied" in pairs. W10724866A SP PN W10725312A © 2014. The total length of the microwave oven. The filler panels come in the "Tools and Parts" section) A A. Recommended Vent Length A 3¹⁄₄" x 10" (8.3 x 25.4 cm...

Dimension Guide
Page 1
... using recirculation installation. Roof venting Roof cap Wall venting Wall cap Because Whirlpool Corporation policy includes a continuous commitment to improve Dimensions are for installation are not provided with microwave hood combination. A time-delay fuse or time-delay circuit breaker is .... Grounded 3-prong outlet *30" (76.2 cm) is used, be sure to Round Transition" illustration. Page 1 of the microwave oven and the transition piece. Microwave Hood Combination PRODUCT MODEL NUMBERS UMV1160C Electrical: A 120-Volt, 60-Hz, AC-only, 15- A B 66" (167.6 cm) min. 30" (76.2...
... using recirculation installation. Roof venting Roof cap Wall venting Wall cap Because Whirlpool Corporation policy includes a continuous commitment to improve Dimensions are for installation are not provided with microwave hood combination. A time-delay fuse or time-delay circuit breaker is .... Grounded 3-prong outlet *30" (76.2 cm) is used, be sure to Round Transition" illustration. Page 1 of the microwave oven and the transition piece. Microwave Hood Combination PRODUCT MODEL NUMBERS UMV1160C Electrical: A 120-Volt, 60-Hz, AC-only, 15- A B 66" (167.6 cm) min. 30" (76.2...
Dimension Guide
Page 2
... vent, elbow(s), transitions and wall or roof caps must not exceed the equivalent of each vent piece used . Because Whirlpool Corporation policy includes a continuous commitment to improve Dimensions are for planning purposes only. Specifications subject to change materials and specifications... = 1.5 m) G. 90° flat elbow: 3¹⁄₄" x 10" = 10 ft (8.3 x 25.4 cm = 3 m) C D A. Page 2 of the microwave oven and the rectangular to round transition piece so that the damper can open freely and fully. In addition, a rectangular 3" (7.6 cm) extension vent between the...
... vent, elbow(s), transitions and wall or roof caps must not exceed the equivalent of each vent piece used . Because Whirlpool Corporation policy includes a continuous commitment to improve Dimensions are for planning purposes only. Specifications subject to change materials and specifications... = 1.5 m) G. 90° flat elbow: 3¹⁄₄" x 10" = 10 ft (8.3 x 25.4 cm = 3 m) C D A. Page 2 of the microwave oven and the rectangular to round transition piece so that the damper can open freely and fully. In addition, a rectangular 3" (7.6 cm) extension vent between the...


