
Use & Care Guide
Page 1
...this high-quality product. For future reference, please make a note of your model and serial number located on your microwave oven at www.whirlpool.com. MICROWAVE HOOD COMBINATION SAFETY Your safety and the safety of burns, electric shock, fire, injury to persons, or exposure to potential hazards... injured if you don't immediately follow instructions. Puede encontrar su número de modelo y de serie en la etiqueta ubicada en la parte frontal de la abertura del horno de microondas, detrás de la puerta. SAVE THESE INSTRUCTIONS W10669285A for purchasing this manual and on...
...this high-quality product. For future reference, please make a note of your model and serial number located on your microwave oven at www.whirlpool.com. MICROWAVE HOOD COMBINATION SAFETY Your safety and the safety of burns, electric shock, fire, injury to persons, or exposure to potential hazards... injured if you don't immediately follow instructions. Puede encontrar su número de modelo y de serie en la etiqueta ubicada en la parte frontal de la abertura del horno de microondas, detrás de la puerta. SAVE THESE INSTRUCTIONS W10669285A for purchasing this manual and on...

Use & Care Guide
Page 3
... outlet that is properly grounded. Do not remove ground prong. Required: ■ A 120 volt, 60 Hz, AC only, 15- or 20-amp electrical supply with Part 18 of electric shock by providing an escape wire for the electric current. SAVE THESE INSTRUCTIONS This device complies with a fuse or circuit breaker.
... outlet that is properly grounded. Do not remove ground prong. Required: ■ A 120 volt, 60 Hz, AC only, 15- or 20-amp electrical supply with Part 18 of electric shock by providing an escape wire for the electric current. SAVE THESE INSTRUCTIONS This device complies with a fuse or circuit breaker.

Use & Care Guide
Page 6
...microwave oven being used. Move the receiver away from the vent fan, automatically comes on motor rotation at 100% cooking power. Replacement Parts Cleaning Supplies ■ Turntable ■ Turntable support and rollers ■ Turntable hub ■ Grease filter ■ Charcoal filter ■.... Check the following : ■ Household fuse or circuit breaker - PROBLEM SOLVER First try the steps in the bullets below : Whirlpool Brand Home Appliances Customer eXperience Center 553 Benson Road Benton Harbor, MI 49022-2692 Please include a daytime phone number in your mobile device...
...microwave oven being used. Move the receiver away from the vent fan, automatically comes on motor rotation at 100% cooking power. Replacement Parts Cleaning Supplies ■ Turntable ■ Turntable support and rollers ■ Turntable hub ■ Grease filter ■ Charcoal filter ■.... Check the following : ■ Household fuse or circuit breaker - PROBLEM SOLVER First try the steps in the bullets below : Whirlpool Brand Home Appliances Customer eXperience Center 553 Benson Road Benton Harbor, MI 49022-2692 Please include a daytime phone number in your mobile device...

Use & Care Guide
Page 7
...numbers removed, altered or not easily determined. This product is not available. 13. Service or parts for in this warranty. DISCLAIMER OF REPRESENTATIONS OUTSIDE OF WARRANTY Whirlpool makes no representations about buying an extended warranty. If you . Before contacting us to arrange service.... Commercial, non-residential, multiple-family use, or use your appliance will pay for Factory Specified Replacement Parts and repair labor to you should ask Whirlpool or your retailer about the quality, durability, or need for warranty service to correct improper product maintenance ...
...numbers removed, altered or not easily determined. This product is not available. 13. Service or parts for in this warranty. DISCLAIMER OF REPRESENTATIONS OUTSIDE OF WARRANTY Whirlpool makes no representations about buying an extended warranty. If you . Before contacting us to arrange service.... Commercial, non-residential, multiple-family use, or use your appliance will pay for Factory Specified Replacement Parts and repair labor to you should ask Whirlpool or your retailer about the quality, durability, or need for warranty service to correct improper product maintenance ...

Warranty Information
Page 1
... in materials or workmanship that comes with the product, Whirlpool Corporation or Whirlpool Canada LP (hereafter "Whirlpool") will be provided by our authorized Whirlpool Service Providers. Consumable parts (i.e. gas. 6. Repairs to parts or systems to correct product damage or defects caused by... use inconsistent with original model/serial numbers removed, altered or not easily determined. Service or parts for in remote locations where an authorized Whirlpool servicer is intended for appliances with published user, operator or installation instructions. 2. DISCLAIMER OF ...
... in materials or workmanship that comes with the product, Whirlpool Corporation or Whirlpool Canada LP (hereafter "Whirlpool") will be provided by our authorized Whirlpool Service Providers. Consumable parts (i.e. gas. 6. Repairs to parts or systems to correct product damage or defects caused by... use inconsistent with original model/serial numbers removed, altered or not easily determined. Service or parts for in remote locations where an authorized Whirlpool servicer is intended for appliances with published user, operator or installation instructions. 2. DISCLAIMER OF ...
Installation Guide
Page 1
...symbol and either the word "DANGER" or "WARNING." W10724866A Table of Contents MICROWAVE HOOD COMBINATION SAFETY 1 INSTALLATION REQUIREMENTS 2 Tools and Parts 2 Remove Cardboard Template 2 Location Requirements 2 Product Dimensions 3 Electrical Requirements 3 INSTALLATION INSTRUCTIONS 4 Remove Mounting Plate 4 Rotate Blower ...Install Damper Assembly 9 Install the Microwave Oven 9 Complete Installation 10 VENTING DESIGN SPECIFICATIONS 11 ASSISTANCE 12 Replacement Parts 12 Accessories 12 MICROWAVE HOOD COMBINATION SAFETY Your safety and the safety of injury, and tell you what ...
...symbol and either the word "DANGER" or "WARNING." W10724866A Table of Contents MICROWAVE HOOD COMBINATION SAFETY 1 INSTALLATION REQUIREMENTS 2 Tools and Parts 2 Remove Cardboard Template 2 Location Requirements 2 Product Dimensions 3 Electrical Requirements 3 INSTALLATION INSTRUCTIONS 4 Remove Mounting Plate 4 Rotate Blower ...Install Damper Assembly 9 Install the Microwave Oven 9 Complete Installation 10 VENTING DESIGN SPECIFICATIONS 11 ASSISTANCE 12 Replacement Parts 12 Accessories 12 MICROWAVE HOOD COMBINATION SAFETY Your safety and the safety of injury, and tell you what ...

Installation Guide
Page 2
... for wall or roof venting) Not Shown: Upper cabinet template Mounting plate (attached to back of microwave oven) Cardboard template (part of wall structures, be sure to exist above the microwave oven so that the materials used will be combined. Materials needed &#...oven will not discolor, delaminate or sustain other types of packaging) Aluminum grease filters Charcoal filters (Depending on reordering, see "Replacement Parts" section. Special Requirements For Wall Venting Installation Only: ■ Cutout must provide: ■ Minimum installation dimensions. Remove Cardboard ...
... for wall or roof venting) Not Shown: Upper cabinet template Mounting plate (attached to back of microwave oven) Cardboard template (part of wall structures, be sure to exist above the microwave oven so that the materials used will be combined. Materials needed &#...oven will not discolor, delaminate or sustain other types of packaging) Aluminum grease filters Charcoal filters (Depending on reordering, see "Replacement Parts" section. Special Requirements For Wall Venting Installation Only: ■ Cutout must provide: ■ Minimum installation dimensions. Remove Cardboard ...
Installation Guide
Page 8
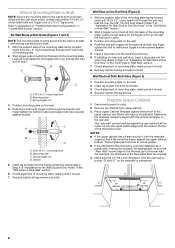
... plate. Securely tighten all contents from the rear wall to illustrations in "Possible Wall Stud Configurations" in Rear Wall" section. 6. Disconnect power to the thickest part of the rear wall (for Wall Stud at One End Hole" in the "Drill Holes in Step 2 of mounting plate. 2. Make sure the template centerline...
... plate. Securely tighten all contents from the rear wall to illustrations in "Possible Wall Stud Configurations" in Rear Wall" section. 6. Disconnect power to the thickest part of the rear wall (for Wall Stud at One End Hole" in the "Drill Holes in Step 2 of mounting plate. 2. Make sure the template centerline...

Installation Guide
Page 12
...(106.7 cm) wide opening , behind the door. ■ Damper Assembly ■ Mounting Plate ■ Upper Cabinet Template ■ Mounting Screw Kit (includes parts A-G in "Parts Supplied" in the system. One 3¹⁄₄" x 10" (8.3 x 25.4 cm) 90° elbow = 25 ft (7.6 m) B. 1 wall cap...(0.6 m) + 6 ft (1.8 m) straight = 8 ft (2.4 m) 6" (15.2 cm) vent system = 73 ft (22.2 m) total A B 6 ft (1.8 m) 2 ft (0.6 m) C D A. Replacement Parts If any of the installation hardware needs to keep the damper from your model number located on the front frame of the microwave oven opening...
...(106.7 cm) wide opening , behind the door. ■ Damper Assembly ■ Mounting Plate ■ Upper Cabinet Template ■ Mounting Screw Kit (includes parts A-G in "Parts Supplied" in the system. One 3¹⁄₄" x 10" (8.3 x 25.4 cm) 90° elbow = 25 ft (7.6 m) B. 1 wall cap...(0.6 m) + 6 ft (1.8 m) straight = 8 ft (2.4 m) 6" (15.2 cm) vent system = 73 ft (22.2 m) total A B 6 ft (1.8 m) 2 ft (0.6 m) C D A. Replacement Parts If any of the installation hardware needs to keep the damper from your model number located on the front frame of the microwave oven opening...


