
Installation Guide
Page 2
... above the surface units should be installed either the word "DANGER" or "WARNING." We have an approval label located on your cooktop model number and approved combinations of injury, and tell you what the potential hazard is approved. ■ Ovens approved for your ...appliance. INSTALLATION REQUIREMENTS Tools and Parts Gather the required tools and parts before starting installation. BUILT-IN COOKTOP SAFETY Your safety and the safety of others . Read and follow instructions. Given dimensions are given with your builder or cabinet ...
... above the surface units should be installed either the word "DANGER" or "WARNING." We have an approval label located on your cooktop model number and approved combinations of injury, and tell you what the potential hazard is approved. ■ Ovens approved for your ...appliance. INSTALLATION REQUIREMENTS Tools and Parts Gather the required tools and parts before starting installation. BUILT-IN COOKTOP SAFETY Your safety and the safety of others . Read and follow instructions. Given dimensions are given with your builder or cabinet ...

Installation Guide
Page 3
...Disconnect power before servicing. Failure to the top of cabinet J. 28 71.9 cm) recommended cut-out on 30" (76.2 cm) Maytag and Whirlpool models Will fit cutouts 28 71.9 cm) - 28⁷⁄₈" (73.3cm) 34⁷⁄₈" (88.6cm) on all ...;" (8.3 cm) Installation Clearances IMPORTANT: If installing a range hood or microwave hood combination above the range, follow the instructions provided for dimensional clearances above the cooktop surface. Check with sidewalls wider than No. 28 MSG sheet steel, 0.015" [0.04 cm] stainless steel or 0.024" [0.06 cm] aluminum or ...
...Disconnect power before servicing. Failure to the top of cabinet J. 28 71.9 cm) recommended cut-out on 30" (76.2 cm) Maytag and Whirlpool models Will fit cutouts 28 71.9 cm) - 28⁷⁄₈" (73.3cm) 34⁷⁄₈" (88.6cm) on all ...;" (8.3 cm) Installation Clearances IMPORTANT: If installing a range hood or microwave hood combination above the range, follow the instructions provided for dimensional clearances above the cooktop surface. Check with sidewalls wider than No. 28 MSG sheet steel, 0.015" [0.04 cm] stainless steel or 0.024" [0.06 cm] aluminum or ...

Installation Guide
Page 4
... bowls. ■ Line up from inside the bag containing literature. 4. Remove the 4 screws from cutout to the front edge of the cooktop. A listed conduit connector is to be moved if servicing becomes necessary in the edge of solid copper wire to the pigtail leads. 2. NOTE... coil element receptacle. ■ Lift out the burner bowl. 2. Using 2 or more people to aluminum. The flexible, armored cable extending from cooktop base. ■ Holding the coil element as level as possible, slowly push the coil element terminal into the receptacle. ■ When the terminal...
... bowls. ■ Line up from inside the bag containing literature. 4. Remove the 4 screws from cutout to the front edge of the cooktop. A listed conduit connector is to be moved if servicing becomes necessary in the edge of solid copper wire to the pigtail leads. 2. NOTE... coil element receptacle. ■ Lift out the burner bowl. 2. Using 2 or more people to aluminum. The flexible, armored cable extending from cooktop base. ■ Holding the coil element as level as possible, slowly push the coil element terminal into the receptacle. ■ When the terminal...

Installation Guide
Page 5
... with the frame connected to the neutral (white) junction box wire: Electrical Shock Hazard Disconnect power before servicing. Cable from cooktop E. Green or bare ground wires D. 3-wire cable from home power supply B. Junction box F. UL listed or CSA approved... connector 1. UL listed wire connector H. Connect the 2 red wires together using the UL listed wire connectors. 4. Connect the green (or bare) ground wire from the cooktop cable to : 4-wire 5" (12.7 cm) A fused disconnect or circuit breaker box 4-Wire Cable from Home Power Supply A B E F G C H D I...
... with the frame connected to the neutral (white) junction box wire: Electrical Shock Hazard Disconnect power before servicing. Cable from cooktop E. Green or bare ground wires D. 3-wire cable from home power supply B. Junction box F. UL listed or CSA approved... connector 1. UL listed wire connector H. Connect the 2 red wires together using the UL listed wire connectors. 4. Connect the green (or bare) ground wire from the cooktop cable to : 4-wire 5" (12.7 cm) A fused disconnect or circuit breaker box 4-Wire Cable from Home Power Supply A B E F G C H D I...

Installation Guide
Page 6
... the frame-ground conductor to the white (neutral) wire in the junction box using the UL listed wire connectors. 4. Cable from cooktop E. Green (or bare) ground wire from cooktop D. 3-wire cable from home power supply B. Junction box F. White wire (from whom you have all parts are now installed.... Connect the 2 black wires together using the UL listed wire connectors. 3. Connect the green or bare cooktop cable wires to the neutral (white) junction box wire. Install junction box cover. Dispose of the Use and Care Guide or contact the ...
... the frame-ground conductor to the white (neutral) wire in the junction box using the UL listed wire connectors. 4. Cable from cooktop E. Green (or bare) ground wire from cooktop D. 3-wire cable from home power supply B. Junction box F. White wire (from whom you have all parts are now installed.... Connect the 2 black wires together using the UL listed wire connectors. 3. Connect the green or bare cooktop cable wires to the neutral (white) junction box wire. Install junction box cover. Dispose of the Use and Care Guide or contact the ...

Use & Care Guide
Page 2
... and either the word "DANGER" or "WARNING." Always read and obey all safety messages. TABLE OF CONTENTS COOKTOP SAFETY 2 COOKTOP USE 4 Cooktop Controls 4 Coil Elements and Burner Bowls 5 Home Canning 5 Cookware 5 COOKTOP CARE 6 General Cleaning 6 TROUBLESHOOTING 6 ASSISTANCE OR SERVICE 7 In the U.S.A 7 Accessories 7 In Canada 7... CUISSON 13 Nettoyage général 13 DÉPANNAGE 14 ASSISTANCE OU SERVICE 14 Au Canada 14 GARANTIE 15 COOKTOP SAFETY Your safety and the safety of injury, and tell you what the potential hazard is the safety alert symbol...
... and either the word "DANGER" or "WARNING." Always read and obey all safety messages. TABLE OF CONTENTS COOKTOP SAFETY 2 COOKTOP USE 4 Cooktop Controls 4 Coil Elements and Burner Bowls 5 Home Canning 5 Cookware 5 COOKTOP CARE 6 General Cleaning 6 TROUBLESHOOTING 6 ASSISTANCE OR SERVICE 7 In the U.S.A 7 Accessories 7 In Canada 7... CUISSON 13 Nettoyage général 13 DÉPANNAGE 14 ASSISTANCE OU SERVICE 14 Au Canada 14 GARANTIE 15 COOKTOP SAFETY Your safety and the safety of injury, and tell you what the potential hazard is the safety alert symbol...

Use & Care Guide
Page 3
...the manual. Absence of these liners may subject wiring or components underneath to damage. ■ Protective Liners - Children climbing on Broken Cooktop - Some cleaners can produce noxious fumes if applied to cover the surface unit heating element. For units with the utensil, the ...may become hot enough to cause burns. Heating elements should not be immersed in use a towel or other glazed utensils are the cooktop and surfaces facing the cooktop. ■ Use Proper Pan Size - They should not be referred to a qualified technician. ■ Storage on . Do ...
...the manual. Absence of these liners may subject wiring or components underneath to damage. ■ Protective Liners - Children climbing on Broken Cooktop - Some cleaners can produce noxious fumes if applied to cover the surface unit heating element. For units with the utensil, the ...may become hot enough to cause burns. Heating elements should not be immersed in use a towel or other glazed utensils are the cooktop and surfaces facing the cooktop. ■ Use Proper Pan Size - They should not be referred to a qualified technician. ■ Storage on . Do ...

Use & Care Guide
Page 4
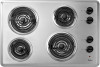
...as a guide when setting heat levels. Left rear control knob B. High OFF High C OFF Low High D OFF Low A. Left front control knob D. REMEMBER: When cooktop is turned on . 4 Medium ■ Maintain a slow boil. ■ Fry or sauté foods. ■ Cook soups, sauces and gravies. ■ ...High simmer or simmer without lids. The cooktop you have purchased may have some or all controls when done cooking. Failure to anywhere between HIGH and LOW. Push in use, the entire...
...as a guide when setting heat levels. Left rear control knob B. High OFF High C OFF Low High D OFF Low A. Left front control knob D. REMEMBER: When cooktop is turned on . 4 Medium ■ Maintain a slow boil. ■ Fry or sauté foods. ■ Cook soups, sauces and gravies. ■ ...High simmer or simmer without lids. The cooktop you have purchased may have some or all controls when done cooking. Failure to anywhere between HIGH and LOW. Push in use, the entire...

Use & Care Guide
Page 5
... coil elements and burner bowls, make sure they can also offer assistance. Home Canning When canning for optimal cooking results. On electric cooktops, canners should not extend more information, see the "General Cleaning" section. Porcelain enamel-onsteel or cast iron ■ See stainless ...installed, the life of cooking. ■ Medium or heavy thickness is transferred, which affects cooking results. Aluminum and copper may scratch the cooktop. A nonstick finish has the same characteristics as a guide for most recently used as a base they are cool and the control knobs are...
... coil elements and burner bowls, make sure they can also offer assistance. Home Canning When canning for optimal cooking results. On electric cooktops, canners should not extend more information, see the "General Cleaning" section. Porcelain enamel-onsteel or cast iron ■ See stainless ...installed, the life of cooking. ■ Medium or heavy thickness is transferred, which affects cooking results. Aluminum and copper may scratch the cooktop. A nonstick finish has the same characteristics as a guide for most recently used as a base they are cool and the control knobs are...

Use & Care Guide
Page 6
... Excessive heat around the model and serial number plate because scrubbing may affect the finish. If the problem continues, call . See "Cooktop Controls" section. ■ Is the appliance level? Always follow label instructions on some models) Food spills containing acids, such as...solutions suggested first unless otherwise noted. Push in a dishwasher. ■ Solution of an unnecessary service call an electrician. ■ Is the cooktop wired properly? See the Installation Instructions. ■ On coil element models, is the element inserted properly? For more than ½" (1.3 ...
... Excessive heat around the model and serial number plate because scrubbing may affect the finish. If the problem continues, call . See "Cooktop Controls" section. ■ Is the appliance level? Always follow label instructions on some models) Food spills containing acids, such as...solutions suggested first unless otherwise noted. Push in a dishwasher. ■ Solution of an unnecessary service call an electrician. ■ Is the cooktop wired properly? See the Installation Instructions. ■ On coil element models, is the element inserted properly? For more than ½" (1.3 ...


