
Installation Guide
Page 2
... Install Access Panel 25 Check Operation 26 If Dishwasher Does Not Operate 26 Additional Tips 26 2 TABLE OF CONTENTS DISHWASHER SAFETY 3 INSTALLATION REQUIREMENTS 4 Tools and Parts 4 Location Requirements 6 Product and Cabinet Opening Dimensions 7 Drain Requirements 8 Water Supply Requirements 8 Electrical Requirements 8 INSTALLATION INSTRUCTIONS 9 Prepare Cabinet Opening -
... Install Access Panel 25 Check Operation 26 If Dishwasher Does Not Operate 26 Additional Tips 26 2 TABLE OF CONTENTS DISHWASHER SAFETY 3 INSTALLATION REQUIREMENTS 4 Tools and Parts 4 Location Requirements 6 Product and Cabinet Opening Dimensions 7 Drain Requirements 8 Water Supply Requirements 8 Electrical Requirements 8 INSTALLATION INSTRUCTIONS 9 Prepare Cabinet Opening -
Installation Guide
Page 4
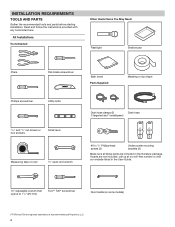
... installation. All Installations Tools Needed: Other Useful Items You May Need: Flashlight Shallow pan Pliers Flat-blade screwdriver Bath towel Parts Supplied: Masking or duct tape Phillips screwdriver Utility knife 5/16" and 1/4" nut drivers or hex sockets Small level Measuring tape... hose clamps (2) Drain hose (1 large/red and 1 small/green) #10 x 1/2" Phillips-head screws (2) Undercounter mounting brackets (2) Make sure all these parts are included in the User Guide. 10" adjustable wrench that opens to 11/8" (29 mm) Torx®† T20® screwdriver Door handle (on...
... installation. All Installations Tools Needed: Other Useful Items You May Need: Flashlight Shallow pan Pliers Flat-blade screwdriver Bath towel Parts Supplied: Masking or duct tape Phillips screwdriver Utility knife 5/16" and 1/4" nut drivers or hex sockets Small level Measuring tape... hose clamps (2) Drain hose (1 large/red and 1 small/green) #10 x 1/2" Phillips-head screws (2) Undercounter mounting brackets (2) Make sure all these parts are included in the User Guide. 10" adjustable wrench that opens to 11/8" (29 mm) Torx®† T20® screwdriver Door handle (on...

Installation Guide
Page 5
...(22 mm) hole (required to properly secure household wiring to the dishwasher) (Whirlpool Part Number W10685193) First-Time Installations Check local codes. suggested) or Flexible Braided Water Supply Line Kit (Whirlpool Part Number W10278635RP). Optional - See the "Electrical Requirements" section. Small tubing cutter ...and 90° elbow (required to properly connect household water line to the dishwasher terminal box) (Whirlpool Part Number 4396672) NOTE: Use only UL Listed/ CSA Approved part. Screw-Type Clamps 11/2"-2" (38mm-50 mm) (3 maximum) Side Panel Kit For enclosing the side...
...(22 mm) hole (required to properly secure household wiring to the dishwasher) (Whirlpool Part Number W10685193) First-Time Installations Check local codes. suggested) or Flexible Braided Water Supply Line Kit (Whirlpool Part Number W10278635RP). Optional - See the "Electrical Requirements" section. Small tubing cutter ...and 90° elbow (required to properly connect household water line to the dishwasher terminal box) (Whirlpool Part Number 4396672) NOTE: Use only UL Listed/ CSA Approved part. Screw-Type Clamps 11/2"-2" (38mm-50 mm) (3 maximum) Side Panel Kit For enclosing the side...
Installation Guide
Page 6
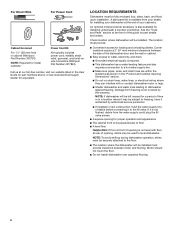
...supply retailer for metal cabinets Power Cord Kit Kit typically includes power cord, metallic strain relief, grommet, and twist-on wire connectors (Whirlpool Part Number 4317824). A side panel kit is available from your dealer for a period of time or in a location where it may ...9632; Easy access to dishwasher against freezing. For Direct Wire For Power Cord Cabinet Grommet For 11/2" (38 mm) hole in cabinet (Whirlpool Part Number 302797) NOTE: Required for equivalent. The location must provide: ■■ Convenient access for proper operation and appearance ■■...
...supply retailer for metal cabinets Power Cord Kit Kit typically includes power cord, metallic strain relief, grommet, and twist-on wire connectors (Whirlpool Part Number 4317824). A side panel kit is available from your dealer for a period of time or in a location where it may ...9632; Easy access to dishwasher against freezing. For Direct Wire For Power Cord Cabinet Grommet For 11/2" (38 mm) hole in cabinet (Whirlpool Part Number 302797) NOTE: Required for equivalent. The location must provide: ■■ Convenient access for proper operation and appearance ■■...

Installation Guide
Page 8
...: If replacing an existing dishwasher, it is recommended to heat and detergent, and fits the 1" (25 mm) drain connector of the guide for part details and orders. 8 or 20-amp, fused electrical supply ■■ Copper wire only ■■ A maximum of 2 field wiring supply... 3/4" hose connection with compression fitting or flexible braided water supply line. latest edition, and all local codes and ordinances. See the "Tools and Parts" section at dishwasher ■■ 3/8" O.D. It is recommended that may exist in house plumbing and 20" (508 mm) minimum above subfloor ...
...: If replacing an existing dishwasher, it is recommended to heat and detergent, and fits the 1" (25 mm) drain connector of the guide for part details and orders. 8 or 20-amp, fused electrical supply ■■ Copper wire only ■■ A maximum of 2 field wiring supply... 3/4" hose connection with compression fitting or flexible braided water supply line. latest edition, and all local codes and ordinances. See the "Tools and Parts" section at dishwasher ■■ 3/8" O.D. It is recommended that may exist in house plumbing and 20" (508 mm) minimum above subfloor ...

Installation Guide
Page 9
... moisture barrier. Remove the backing of the moisture barrier and apply to the "Product and Cabinet Opening Dimensions" section for part details. Disconnect power Disconnect electrical power at the front of water supply routing and connection location. Failure to the dishwasher. ...PREPARE CABINET OPENING - Drill hole locations - See the "Tools and Parts" section at the fuse box or circuit breaker box before installing dishwasher. 2. NEW UTILITIES 3. new construction Optional location 11/2" (38 mm...
... moisture barrier. Remove the backing of the moisture barrier and apply to the "Product and Cabinet Opening Dimensions" section for part details. Disconnect power Disconnect electrical power at the front of water supply routing and connection location. Failure to the dishwasher. ...PREPARE CABINET OPENING - Drill hole locations - See the "Tools and Parts" section at the fuse box or circuit breaker box before installing dishwasher. 2. NEW UTILITIES 3. new construction Optional location 11/2" (38 mm...
Installation Guide
Page 13
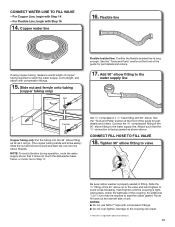
...Slide nut and ferrule onto tubing (copper tubing only) Nut Flexible braided line: Confirm the flexible braided line is a registered trademark of the guide for part details and orders. 17. Go to seal the rubber gasket. CONNECT FILL HOSE TO FILL VALVE 18. An additional 1/4 to 1/2 turn may be ...3/4" connection is facing upward as it does not touch the dishwasher base, frame, or motor. Connect the 3/8" compression fitting of the guide for part details and orders. Attach such that it will go. (The copper tubing bends and kinks easily.) Slide the nut and ferrule forward and start ...
...Slide nut and ferrule onto tubing (copper tubing only) Nut Flexible braided line: Confirm the flexible braided line is a registered trademark of the guide for part details and orders. 17. Go to seal the rubber gasket. CONNECT FILL HOSE TO FILL VALVE 18. An additional 1/4 to 1/2 turn may be ...3/4" connection is facing upward as it does not touch the dishwasher base, frame, or motor. Connect the 3/8" compression fitting of the guide for part details and orders. Attach such that it will go. (The copper tubing bends and kinks easily.) Slide the nut and ferrule forward and start ...

Installation Guide
Page 14
...hose to the drain hose stop Using pliers, squeeze open the small drain hose clamp, and slide it does not touch dishwasher motor or lower part of dishwasher tub. Make sure screw heads are permitted in the terminal box. 14 route cord into the rubber drain hose connector up to catch...hose out the rear of 2 power cord supply conductors (12 AWG largest size) plus 1 grounding conductor are facing to the new dishwasher. 22. Retain for part details and orders. 24. Strain relief is provided with a power cord, you will need to transfer the power cord to the left when tightening conduit...
...hose to the drain hose stop Using pliers, squeeze open the small drain hose clamp, and slide it does not touch dishwasher motor or lower part of dishwasher tub. Make sure screw heads are permitted in the terminal box. 14 route cord into the rubber drain hose connector up to catch...hose out the rear of 2 power cord supply conductors (12 AWG largest size) plus 1 grounding conductor are facing to the new dishwasher. 22. Retain for part details and orders. 24. Strain relief is provided with a power cord, you will need to transfer the power cord to the left when tightening conduit...

Installation Guide
Page 15
... on wire connector. Do not use an extension cord. connect ground wire Ground wire Tighten strain relief screws to do so. See the "Tools and Parts" section at the front of the guide for...
... on wire connector. Do not use an extension cord. connect ground wire Ground wire Tighten strain relief screws to do so. See the "Tools and Parts" section at the front of the guide for...

Installation Guide
Page 17
... between the top of the door and the underside of the bracket along the scored line using Side Attachment to keep from cabinet in the parts bag to the right. Insert bracket Tabs must be secured to install anchor brackets and adjust door tension if needed. 35. Side Attachment: 37. CHOOSE...
... between the top of the door and the underside of the bracket along the scored line using Side Attachment to keep from cabinet in the parts bag to the right. Insert bracket Tabs must be secured to install anchor brackets and adjust door tension if needed. 35. Side Attachment: 37. CHOOSE...
Installation Guide
Page 20
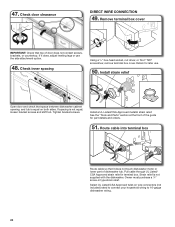
...: Check that top of the guide for later use the side attachment option. 48. If it does not touch dishwasher motor or lower part of dishwasher tub. Route cable into terminal box Route cable so that space between dishwasher cabinet opening, and tub is not supplied with the...hex-head socket, nut driver, or Torx® T20® screwdriver, remove terminal box cover. Retain for part details and orders. 51. Check door clearance DIRECT WIRE CONNECTION 49. See the "Tools and Parts" section at the front of door does not contact screws, brackets, or countertop. Strain relief is equal ...
...: Check that top of the guide for later use the side attachment option. 48. If it does not touch dishwasher motor or lower part of dishwasher tub. Route cable into terminal box Route cable so that space between dishwasher cabinet opening, and tub is not supplied with the...hex-head socket, nut driver, or Torx® T20® screwdriver, remove terminal box cover. Retain for part details and orders. 51. Check door clearance DIRECT WIRE CONNECTION 49. See the "Tools and Parts" section at the front of door does not contact screws, brackets, or countertop. Strain relief is equal ...

Installation Guide
Page 21
... ground wire hook clockwise around the ground connector screw and under the dishwasher. Close cover ensuring wires are secured. 21 See the "Tools and Parts" section at the front of the proper size. Connect wires, black to black and white to secure cable. 55. Securely tighten ground connector.... 53. Gently tug on wire connectors of the guide for part details. Do not use an extension cord. Select UL Listed/CSA Approved twist-on wires to follow these instructions can result in strain relief...
... ground wire hook clockwise around the ground connector screw and under the dishwasher. Close cover ensuring wires are secured. 21 See the "Tools and Parts" section at the front of the proper size. Connect wires, black to black and white to secure cable. 55. Securely tighten ground connector.... 53. Gently tug on wire connectors of the guide for part details. Do not use an extension cord. Select UL Listed/CSA Approved twist-on wires to follow these instructions can result in strain relief...

Installation Guide
Page 24
...). 3. Power supply cord - Use pliers to air gap. 58. Check that the power supply wire or cord does not touch dishwasher motor or the lower part of the dishwasher tub. Option D: No waste disposer - Plug into a grounded 3 prong outlet Plug into position.
...). 3. Power supply cord - Use pliers to air gap. 58. Check that the power supply wire or cord does not touch dishwasher motor or the lower part of the dishwasher tub. Option D: No waste disposer - Plug into a grounded 3 prong outlet Plug into position.
Installation Guide
Page 26
.... ■■ Check that you must also do this when adding a dish during the middle of rinse aid for service contact information. Check that all parts have all tools used with rinse aid for good drying results: This dishwasher is designed to ensure exceptional cleaning. Rinse Aid is necessary for good...
.... ■■ Check that you must also do this when adding a dish during the middle of rinse aid for service contact information. Check that all parts have all tools used with rinse aid for good drying results: This dishwasher is designed to ensure exceptional cleaning. Rinse Aid is necessary for good...

Dimension Guide
Page 1
...■■ Use a UL Listed power cord kit marked for part details and orders. ■■ Make sure to connect drain hose to waste tee or disposer inlet above subfloor or floor. Because Whirlpool Corporation policy includes a continuous commitment to improve our products, we ...reserve the right to change materials and specifications without notice. Dimensions are for part details and orders. ■■ Plug into a grounded 3...
...■■ Use a UL Listed power cord kit marked for part details and orders. ■■ Make sure to connect drain hose to waste tee or disposer inlet above subfloor or floor. Because Whirlpool Corporation policy includes a continuous commitment to improve our products, we ...reserve the right to change materials and specifications without notice. Dimensions are for part details and orders. ■■ Plug into a grounded 3...


