
Installation Instructions
Page 1
...be killed or seriously injured if you don't follow instructions. 2Y'(73.7CM)ELECTRIC DRYER INSTAILATION INSTRUCTIONS INSTRUCCIONESDE INSTALACIONPARALA SECADORA p ELECTRICADE 2Y'(73,7CM) Table of Contents / Indice DRYER SAFETY 1 INSTALLATION INSTRUCTIONS 2 Tools and Parts 2 Location Requirements 2 Electrical Requirements ...5 Venting Requirements 10 Plan Vent System 11 Install Vent System 12 Install Leveling Legs 12 Connect Vent 12 Level Dryer 12 Reverse Door Swing (Optional 12 Complete Installation 13 SEGURIDAD DE LA SECADORA 14 INSTRUCCIONES DE INSTALACION 15 Herramientas y...
...be killed or seriously injured if you don't follow instructions. 2Y'(73.7CM)ELECTRIC DRYER INSTAILATION INSTRUCTIONS INSTRUCCIONESDE INSTALACIONPARALA SECADORA p ELECTRICADE 2Y'(73,7CM) Table of Contents / Indice DRYER SAFETY 1 INSTALLATION INSTRUCTIONS 2 Tools and Parts 2 Location Requirements 2 Electrical Requirements ...5 Venting Requirements 10 Plan Vent System 11 Install Vent System 12 Install Leveling Legs 12 Connect Vent 12 Level Dryer 12 Reverse Door Swing (Optional 12 Complete Installation 13 SEGURIDAD DE LA SECADORA 14 INSTRUCCIONES DE INSTALACION 15 Herramientas y...
Installation Instructions
Page 2
... system hardware available for a garage installation. Check code requirements. Failure to 1" (2.5 cm) or hex-head socket wrench (for adjusting dryer feet) Vent clamps • Tin snips(new vent installations) • Caulking gun and compound (for proper exhaust installation. Check existing ...automatic cycle. Some codes limit, or do so can be considered. • A level floor with a maximum slope of the dryer in garages, closets, mobile homes or sleeping quarters. The combined weight of a companion appliance should also be extended. INSTALLATIONINSTRUCTIONS Gather the...
... system hardware available for a garage installation. Check code requirements. Failure to 1" (2.5 cm) or hex-head socket wrench (for adjusting dryer feet) Vent clamps • Tin snips(new vent installations) • Caulking gun and compound (for proper exhaust installation. Check existing ...automatic cycle. Some codes limit, or do so can be considered. • A level floor with a maximum slope of the dryer in garages, closets, mobile homes or sleeping quarters. The combined weight of a companion appliance should also be extended. INSTALLATIONINSTRUCTIONS Gather the...

Installation Instructions
Page 3
... of the door are for the minimum spacing allowed. • Additional spacing should also be large enough to allow the dryer door to the Manufactured Home Construction and Safety Standard, Title 24 CFR, Part 3280 (formerly the Federal Standard for the ... as a nearby window) should be made in the top and bottom of installation and servicing. • Additional clearances might be required for mobile home installations. Dryer Dimensions 433/o 151/4', ..... 4°,,,)(113 223/4'' -_-_(57.8 crn) (110cm) • 26"_ (66cm) _ _- (73.66em) A .273A _ (70.5cn" i k (73.66cm) B 43...
... of the door are for the minimum spacing allowed. • Additional spacing should also be large enough to allow the dryer door to the Manufactured Home Construction and Safety Standard, Title 24 CFR, Part 3280 (formerly the Federal Standard for the ... as a nearby window) should be made in the top and bottom of installation and servicing. • Additional clearances might be required for mobile home installations. Dryer Dimensions 433/o 151/4', ..... 4°,,,)(113 223/4'' -_-_(57.8 crn) (110cm) • 26"_ (66cm) _ _- (73.66em) A .273A _ (70.5cn" i k (73.66cm) B 43...
Installation Instructions
Page 4
... path is adequate. The 3-wire power supply cord, at least 4 ft (1.22 m) long. GROUNDING INSTRUCTIONS [] For a grounded, cord-connected dryer: This dryer must be at least 4 ft (1.22 m) long, must be removed from the external ground conductor screw (green screw), and secured under the neutral... are in doubt as to a grounded metal, permanent wiring system, or an equipment-grounding conductor must be connected to whether the dryer is properly grounded. The neutral ground wire is permanently connected to an individual branch circuit. SAVE THESE INSTRUCTIONS The National Electric Code ...
... path is adequate. The 3-wire power supply cord, at least 4 ft (1.22 m) long. GROUNDING INSTRUCTIONS [] For a grounded, cord-connected dryer: This dryer must be at least 4 ft (1.22 m) long, must be removed from the external ground conductor screw (green screw), and secured under the neutral... are in doubt as to a grounded metal, permanent wiring system, or an equipment-grounding conductor must be connected to whether the dryer is properly grounded. The neutral ground wire is permanently connected to an individual branch circuit. SAVE THESE INSTRUCTIONS The National Electric Code ...

Installation Instructions
Page 6
...12.7 ore) 3-wire receptacle (NEMA type 10-30R) A fused disconnect or cbiorcxu* it breaker A UL listed, 120/240-volt 30-amp, dryer mpcooinrwdime* rumsu, pply 4-wire connection: Direct Wire 3-wire connection: Power supply cord 3-wire direct A fused disconnect or box* circuit breaker 3-wire connection...the power supply cord is not available) CD E G A. 4-wire receptacle (NEMA type 14-30R) B. 4-prong plug C. Spade terminals with the dryer cabinet and be in a horizontal position. Be sure that the wire insulation on strain relief). t 4-wire connection: Power Supply Cord IMPORTANT: A 4-...
...12.7 ore) 3-wire receptacle (NEMA type 10-30R) A fused disconnect or cbiorcxu* it breaker A UL listed, 120/240-volt 30-amp, dryer mpcooinrwdime* rumsu, pply 4-wire connection: Direct Wire 3-wire connection: Power supply cord 3-wire direct A fused disconnect or box* circuit breaker 3-wire connection...the power supply cord is not available) CD E G A. 4-wire receptacle (NEMA type 14-30R) B. 4-prong plug C. Spade terminals with the dryer cabinet and be in a horizontal position. Be sure that the wire insulation on strain relief). t 4-wire connection: Power Supply Cord IMPORTANT: A 4-...

Installation Instructions
Page 7
...B C ,/ A. External ground conductor screw B. Center silver-colored terminal block screw C. Ground wire (green or bare) of extra length so dryer can be moved if needed. Secure cover with hold-down screw. 7. Now go to outer terminal block screws. Center silver-colored terminal block... _ A. External ground conductor screw - Js D A. Tighten screws. 5. Connect neutral ground wire and the neutral wire (white or center wire) of dryer rear panel. Neutral ground wire 3= Connect ground wire (green or bare) of 3-wire connections. A B C 4-wire connection: Direct Wire IMPORTANT: A ...
...B C ,/ A. External ground conductor screw B. Center silver-colored terminal block screw C. Ground wire (green or bare) of extra length so dryer can be moved if needed. Secure cover with hold-down screw. 7. Now go to outer terminal block screws. Center silver-colored terminal block... _ A. External ground conductor screw - Js D A. Tighten screws. 5. Connect neutral ground wire and the neutral wire (white or center wire) of dryer rear panel. Neutral ground wire 3= Connect ground wire (green or bare) of 3-wire connections. A B C 4-wire connection: Direct Wire IMPORTANT: A ...

Installation Instructions
Page 8
...of the other wires to outer terminal block screws. Neutral ground wire B. Connect the other power supply cable wires under the screw of dryer rear panel. Insert tab of terminal block cover into slot of the terminal block (hook facing right), squeeze hooked end together and tighten ...conductor screw. Neutral prong D. Connect neutral wire (white or center wire) of power supply cord to neutral wire. Bend ends of extra length so dryer can be moved if needed. Direct wire cable must have completed your electrical connections. You have 5 ft (1.52 m) of wires into a hook ...
...of the other wires to outer terminal block screws. Neutral ground wire B. Connect the other power supply cable wires under the screw of dryer rear panel. Insert tab of terminal block cover into slot of the terminal block (hook facing right), squeeze hooked end together and tighten ...conductor screw. Neutral prong D. Connect neutral wire (white or center wire) of power supply cord to neutral wire. Bend ends of extra length so dryer can be moved if needed. Direct wire cable must have completed your electrical connections. You have 5 ft (1.52 m) of wires into a hook ...

Installation Instructions
Page 9
... other power supply cable wires under the outer terminal block screws (hooks facing right). Insert tab of terminal block cover into slot of dryer rear panel. Optional 3-wire connection Use for direct wire or power supply cord where local codes do not permit connecting cabinet-ground conductor ... screw. 2. Connect neutral ground wire and the neutral wire (white or center wire) of power supply cord/cable under the center screw of dryer rear panel. Now go to neutral wire. 1. Neutral ground wire C. Remove neutral ground wire from the external ground conductor screw to outer terminal...
... other power supply cable wires under the outer terminal block screws (hooks facing right). Insert tab of terminal block cover into slot of dryer rear panel. Optional 3-wire connection Use for direct wire or power supply cord where local codes do not permit connecting cabinet-ground conductor ... screw. 2. Connect neutral ground wire and the neutral wire (white or center wire) of power supply cord/cable under the center screw of dryer rear panel. Now go to neutral wire. 1. Neutral ground wire C. Remove neutral ground wire from the external ground conductor screw to outer terminal...

Installation Instructions
Page 10
... connected or secured with screws or other fastening devices that may be at least 12" (30.5 cm) from your dealer or by calling Whirlpool Parts and Accessories. Box hood style The angled hood style (shown here) is in the path of the duct. Louvered hood style B. ...to woodwork, furniture, paint, wallpaper, carpets, etc. [] Housecleaning problems and health problems. 10 Exhaust vent must be fully extended and supported when the dryer is acceptable. 4-" 4" (10.2cm) heavymetal exhaust vent DURASAFF Mvent products can be used. Do not use an exhaust hood with rigid or flexible...
... connected or secured with screws or other fastening devices that may be at least 12" (30.5 cm) from your dealer or by calling Whirlpool Parts and Accessories. Box hood style The angled hood style (shown here) is in the path of the duct. Louvered hood style B. ...to woodwork, furniture, paint, wallpaper, carpets, etc. [] Housecleaning problems and health problems. 10 Exhaust vent must be fully extended and supported when the dryer is acceptable. 4-" 4" (10.2cm) heavymetal exhaust vent DURASAFF Mvent products can be used. Do not use an exhaust hood with rigid or flexible...

Installation Instructions
Page 11
... vent Alternate installations for purchase. Terminate the exhaust vent outside. Wall D. Please see the "Assistance or Service" section of the Dryer User Instructions. • Over-the-Top Installation: Part Number 4396028 • Periscope Installation (For use the fewest number of the...kinking. • Use the fewest 90 ° turns possible. B A .......... Rigid metal or flexible metal vent C. Exhaust outlet Standard exhaust installation with dryer vent to wall vent mismatch): Part Number 4396037 - 0" (0 cm) to 18" (45.72 cm) mismatch Part Number 4396011 - 18" (45.72...
... vent Alternate installations for purchase. Terminate the exhaust vent outside. Wall D. Please see the "Assistance or Service" section of the Dryer User Instructions. • Over-the-Top Installation: Part Number 4396028 • Periscope Installation (For use the fewest number of the...kinking. • Use the fewest 90 ° turns possible. B A .......... Rigid metal or flexible metal vent C. Exhaust outlet Standard exhaust installation with dryer vent to wall vent mismatch): Part Number 4396037 - 0" (0 cm) to 18" (45.72 cm) mismatch Part Number 4396011 - 18" (45.72...

Installation Instructions
Page 12
... change your door swing from cabinet side of the vent to its final position. Remove top screws from cabinet side of hinges (C). Stand the dryer up the dryer using a wood block. Install exhaust hood. Connect vent to exhaust hood with 4" (10.2 cm) clamp. 3. Use a wrench to finish turning... is made, remove the corner posts and cardboard. Secure vent to protect surface. 2. Avoid 90° turns. Do not use a large, flat piece of dryer to exhaust hood with a 4" (10.2 cm) clamp. 2. Failure to do not remove) top screws from a right-side opening around exhaust hood. 2. ...
... change your door swing from cabinet side of the vent to its final position. Remove top screws from cabinet side of hinges (C). Stand the dryer up the dryer using a wood block. Install exhaust hood. Connect vent to exhaust hood with 4" (10.2 cm) clamp. 3. Use a wrench to finish turning... is made, remove the corner posts and cardboard. Secure vent to protect surface. 2. Avoid 90° turns. Do not use a large, flat piece of dryer to exhaust hood with a 4" (10.2 cm) clamp. 2. Failure to do not remove) top screws from a right-side opening around exhaust hood. 2. ...

Installation Instructions
Page 13
...and/or electrical supply is still no heat, contact a qualified technician. Remove bottom screws from cabinet side of slots. Pull door forward off the dryer and check the following : • Controls are in large part of slots. Set door (handle side up so screws are in bottom of...Close door and check that the larger hole is not crushed or kinked. 5. Place towel (A) on door seal or plastic door catches. 6. Open dryer door. Lift door until top screws in cabinet are in hinges. 6. Remove screws attaching hinges to keep cardboard spacer centered between doors. Do not...
...and/or electrical supply is still no heat, contact a qualified technician. Remove bottom screws from cabinet side of slots. Pull door forward off the dryer and check the following : • Controls are in large part of slots. Set door (handle side up so screws are in bottom of...Close door and check that the larger hole is not crushed or kinked. 5. Place towel (A) on door seal or plastic door catches. 6. Open dryer door. Lift door until top screws in cabinet are in hinges. 6. Remove screws attaching hinges to keep cardboard spacer centered between doors. Do not...

Parts Diagram
Page 1
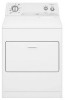
CABINET PARTS For Model: WED5500SQ0, WED5500ST0 (White) (Biscuit) 29"ELECTRIC DRYER 5−06 Litho in U.S.A. (LT.) 1 Part No. 8181353
CABINET PARTS For Model: WED5500SQ0, WED5500ST0 (White) (Biscuit) 29"ELECTRIC DRYER 5−06 Litho in U.S.A. (LT.) 1 Part No. 8181353

Parts Diagram
Page 2
...Instructions W10042960 Sheet, Cycle Feature 8578183 Use & Care Guide 8528190 Wiring Diagram Following May Be Purchased DO−IT−YOURSELF REPAIR MANUALS 677818 Dryer 2 343641 Screw, 10−16 x 1/2 3 693995 Screw, Hex Washer Head 4 8541400 Bracket, Cabinet 5 3396795 Cover, Terminal Block ... 13 3357011 Screw, 10−16 x 1/2 14 8541401 Spring, Door (2) 15 3394083 Clip, Front Panel (2) Illus. DESCRIPTION 16 3392100 Foot, Dryer 279810 Foot − Optional (Extended Length Package Of 2) (Not Included) 17 279318 Terminal, Tinned & Brass (3) (Includes Illus. 39) 18 ...
...Instructions W10042960 Sheet, Cycle Feature 8578183 Use & Care Guide 8528190 Wiring Diagram Following May Be Purchased DO−IT−YOURSELF REPAIR MANUALS 677818 Dryer 2 343641 Screw, 10−16 x 1/2 3 693995 Screw, Hex Washer Head 4 8541400 Bracket, Cabinet 5 3396795 Cover, Terminal Block ... 13 3357011 Screw, 10−16 x 1/2 14 8541401 Spring, Door (2) 15 3394083 Clip, Front Panel (2) Illus. DESCRIPTION 16 3392100 Foot, Dryer 279810 Foot − Optional (Extended Length Package Of 2) (Not Included) 17 279318 Terminal, Tinned & Brass (3) (Includes Illus. 39) 18 ...

Parts Diagram
Page 6
Part No. DESCRIPTION ACCESSORY PARTS 279948 Kit, Dryer Repair 8522199 Kit, Dryer Vent Testing 3404351 Dry Rack PAINT, TOUCH−UP (1/2oz.) 72017 White 4392899 Biscuit PAINT, PRESSURIZED SPRAY (12 oz.) 350930 White 4392901 Biscuit 350938 Primer, Gray PAINT, BULK (1 qt.) 799344 White (Uncut) 4392900 Biscuit (Uncut) 6 8181353 No. OPTIONAL PARTS (NOT INCLUDED) For Model: WED5500SQ0, WED5500ST0 (White) (Biscuit) Illus.
Part No. DESCRIPTION ACCESSORY PARTS 279948 Kit, Dryer Repair 8522199 Kit, Dryer Vent Testing 3404351 Dry Rack PAINT, TOUCH−UP (1/2oz.) 72017 White 4392899 Biscuit PAINT, PRESSURIZED SPRAY (12 oz.) 350930 White 4392901 Biscuit 350938 Primer, Gray PAINT, BULK (1 qt.) 799344 White (Uncut) 4392900 Biscuit (Uncut) 6 8181353 No. OPTIONAL PARTS (NOT INCLUDED) For Model: WED5500SQ0, WED5500ST0 (White) (Biscuit) Illus.


