
Installation Instructions
Page 1
... instructions. This symbol alerts you to reduce the chance of others . 2Y'(73.7CM)ELECTRIC DRYER INSTAILATION INSTRUCTIONS INSTRUCCIONESDE INSTALACIONPARALA SECADORA p ELECTRICADE 2Y'(73,7CM) Table of Contents / Indice DRYER SAFETY 1 INSTALLATION INSTRUCTIONS 2 Tools and Parts 2 Location Requirements 2 Electrical Requirements 4 Electrical Connection 5 Venting Requirements 10 Plan Vent System 11 Install Vent System 12 Install Leveling...
... instructions. This symbol alerts you to reduce the chance of others . 2Y'(73.7CM)ELECTRIC DRYER INSTAILATION INSTRUCTIONS INSTRUCCIONESDE INSTALACIONPARALA SECADORA p ELECTRICADE 2Y'(73,7CM) Table of Contents / Indice DRYER SAFETY 1 INSTALLATION INSTRUCTIONS 2 Tools and Parts 2 Location Requirements 2 Electrical Requirements 4 Electrical Connection 5 Venting Requirements 10 Plan Vent System 11 Install Vent System 12 Install Leveling...
Installation Instructions
Page 2
...61 cm) of either side of 200 Ibs (90.7 kg). Failure to water and/or weather. See "Electrical Requirements." • A sturdy floor to 1" (2.5 cm) or hex-head socket wrench (for adjusting dryer feet) Vent clamps • Tin snips(new vent installations) • Caulking gun and compound (for proper exhaust... may not tumble properly and models with any tools listed here. Check that opens to support the total weight (dryer and load) of the dryer. Check existing electrical supply and venting and see "Electrical Requirements" and "Venting Requirements" before starting installation.
...61 cm) of either side of 200 Ibs (90.7 kg). Failure to water and/or weather. See "Electrical Requirements." • A sturdy floor to 1" (2.5 cm) or hex-head socket wrench (for adjusting dryer feet) Vent clamps • Tin snips(new vent installations) • Caulking gun and compound (for proper exhaust... may not tumble properly and models with any tools listed here. Check that opens to support the total weight (dryer and load) of the dryer. Check existing electrical supply and venting and see "Electrical Requirements" and "Venting Requirements" before starting installation.
Installation Instructions
Page 4
...have four 10-gauge copper wires and match a 4-wire receptacle of least resistance for electric current. Connect to the neutral conductor (white wire) within the dryer. Electrical Connection To properly install your dryer, you will not fit the outlet, have a fuse in the neutral or grounding... strain relief. GROUNDING INSTRUCTIONS [] For a grounded, cord-connected dryer: This dryer must be grounded. WARNING: Improper connection of a neutral ground wire to the dryer must end in conformance with the National Electrical Code, ANSI/NFPA 70-latest edition and all mobile home installations...
...have four 10-gauge copper wires and match a 4-wire receptacle of least resistance for electric current. Connect to the neutral conductor (white wire) within the dryer. Electrical Connection To properly install your dryer, you will not fit the outlet, have a fuse in the neutral or grounding... strain relief. GROUNDING INSTRUCTIONS [] For a grounded, cord-connected dryer: This dryer must be grounded. WARNING: Improper connection of a neutral ground wire to the dryer must end in conformance with the National Electrical Code, ANSI/NFPA 70-latest edition and all mobile home installations...

Installation Instructions
Page 6
...dryer cabinet and be in a horizontal position. t 4-wire connection: Power Supply Cord IMPORTANT: A 4-wire connection is inside the terminal block opening C. The strain relief should have a tight fit with upturned ends F. 3_,,(1.9 cm) UL listed strain relief G. Do not further tighten strain relief screws at this point. Electrical...fused disconnect or box* circuit breaker 3-wire connection: Direct Wire *If local codes do not permit the use of electrical connection: 4-wire (recommended) 3-wire (if 4-wire is not available) Tighten strain relief screw against the direct wire ...
...dryer cabinet and be in a horizontal position. t 4-wire connection: Power Supply Cord IMPORTANT: A 4-wire connection is inside the terminal block opening C. The strain relief should have a tight fit with upturned ends F. 3_,,(1.9 cm) UL listed strain relief G. Do not further tighten strain relief screws at this point. Electrical...fused disconnect or box* circuit breaker 3-wire connection: Direct Wire *If local codes do not permit the use of electrical connection: 4-wire (recommended) 3-wire (if 4-wire is not available) Tighten strain relief screw against the direct wire ...

Installation Instructions
Page 7
... strain relief E. Tighten strain relief screws. 6. Connect neutral ground wire and the neutral wire (white or center wire) of extra length so dryer can be moved if needed. Secure cover with hold-down screw. 7. Neutral wire (white or center wire) D. 3_,, (1.9 cm) UL...Remove neutral ground wire from external ground conductor screw. Direct wire cable must have completed your electrical connections. Center silver-colored terminal block screw C. Neutral ground wire 3= Connect ground wire (green or bare) of dryer rear panel. Tighten screw. A B C ,/ A. You have 5 ft (1.52 ...
... strain relief E. Tighten strain relief screws. 6. Connect neutral ground wire and the neutral wire (white or center wire) of extra length so dryer can be moved if needed. Secure cover with hold-down screw. 7. Neutral wire (white or center wire) D. 3_,, (1.9 cm) UL...Remove neutral ground wire from external ground conductor screw. Direct wire cable must have completed your electrical connections. Center silver-colored terminal block screw C. Neutral ground wire 3= Connect ground wire (green or bare) of dryer rear panel. Tighten screw. A B C ,/ A. You have 5 ft (1.52 ...

Installation Instructions
Page 8
... cable wires under the screw of power supply cord to neutral wire. You have completed your electrical connections. Strip 31/2'' (8.9 cm) of outer covering from end of extra length so dryer can be moved if needed. Connect neutral wire (white or center wire) of the terminal ...block (hook facing right), squeeze hooked end together and tighten screw, as shown. Tighten screws. !! !! 5. You have completed your electrical connections. Tighten strain relief screws....
... cable wires under the screw of power supply cord to neutral wire. You have completed your electrical connections. Strip 31/2'' (8.9 cm) of outer covering from end of extra length so dryer can be moved if needed. Connect neutral wire (white or center wire) of the terminal ...block (hook facing right), squeeze hooked end together and tighten screw, as shown. Tighten screws. !! !! 5. You have completed your electrical connections. Tighten strain relief screws....

Installation Instructions
Page 9
... _" (1.9 cm) UL listed strain relief 3= Place the hooked ends of power supply cord/cable under the center screw of dryer rear panel. Neutral ground wire C. Squeeze hooked end together. A BC / D A. Tighten strain relief screws. 5. Optional ...permit connecting cabinet-ground conductor to "Venting Requirements." _E A. Insert tab of terminal block cover into slot of dryer rear panel. Tighten screws. !! !! 4. Tighten screw. Remove neutral ground wire from the external ground conductor...-down screw. 6. Tighten strain relief screw. 5. You have completed your electrical connections.
... _" (1.9 cm) UL listed strain relief 3= Place the hooked ends of power supply cord/cable under the center screw of dryer rear panel. Neutral ground wire C. Squeeze hooked end together. A BC / D A. Tighten strain relief screws. 5. Optional ...permit connecting cabinet-ground conductor to "Venting Requirements." _E A. Insert tab of terminal block cover into slot of dryer rear panel. Tighten screws. !! !! 4. Tighten screw. Remove neutral ground wire from the external ground conductor...-down screw. 6. Tighten strain relief screw. 5. You have completed your electrical connections.

Installation Instructions
Page 13
.... 8. Use a small, flat-blade screwdriver to keep cardboard spacer centered between doors. Remove screws attaching hinges to adjust alignment. 1. See "Level Dryer." 6. This odor is common when the heating element is first heated. Tighten screws halfway. Slide door up ) on . • Household fuse... and tighten top screws in Step 8 into an outlet and/or electrical supply is level. Attach door hinges to see which step was skipped. 2. Check that the dryer is on top of door (4 screws). Check the dryer's final location. Tighten screws halfway. If needed , slide door catch...
.... 8. Use a small, flat-blade screwdriver to keep cardboard spacer centered between doors. Remove screws attaching hinges to adjust alignment. 1. See "Level Dryer." 6. This odor is common when the heating element is first heated. Tighten screws halfway. Slide door up ) on . • Household fuse... and tighten top screws in Step 8 into an outlet and/or electrical supply is level. Attach door hinges to see which step was skipped. 2. Check that the dryer is on top of door (4 screws). Check the dryer's final location. Tighten screws halfway. If needed , slide door catch...

Parts Diagram
Page 1
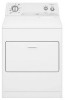
CABINET PARTS For Model: WED5500SQ0, WED5500ST0 (White) (Biscuit) 29"ELECTRIC DRYER 5−06 Litho in U.S.A. (LT.) 1 Part No. 8181353
CABINET PARTS For Model: WED5500SQ0, WED5500ST0 (White) (Biscuit) 29"ELECTRIC DRYER 5−06 Litho in U.S.A. (LT.) 1 Part No. 8181353


