
Owners Manual
Page 6
...an air cycle. Items containing foam, rubber, or plastic must be removed for the type of the Start button and is part of fabric being dried. Your dryer may have all of drying rack, leaving space between items. Do not allow space for temperature suggestions. See "Cleaning the...1. Lower the front legs to the recommended setting for normal tumbling. Reset cycle to the following table. 4. Do not pack the dryer. To stop your dryer has a Temperature selector, set to the recommended cycle for your model allows drying rack usage and for information on it (even after...
...an air cycle. Items containing foam, rubber, or plastic must be removed for the type of the Start button and is part of fabric being dried. Your dryer may have all of drying rack, leaving space between items. Do not allow space for temperature suggestions. See "Cleaning the...1. Lower the front legs to the recommended setting for normal tumbling. Reset cycle to the following table. 4. Do not pack the dryer. To stop your dryer has a Temperature selector, set to the recommended cycle for your model allows drying rack usage and for information on it (even after...

Owners Manual
Page 8
... the Drum Light (on the back wall of the dryer. Locate the light bulb cover on some models) 1. Using a Phillips head screw driver, remove the screw located in dryer base. 4. Replace all parts and panels before servicing. Make sure leveling legs are secure in gas supply line. 3. If you... will be on vacation or not using your dryer only when you are secure in dryer or reconnect power. 8 Unplug the power supply...
... the Drum Light (on the back wall of the dryer. Locate the light bulb cover on some models) 1. Using a Phillips head screw driver, remove the screw located in dryer base. 4. Replace all parts and panels before servicing. Make sure leveling legs are secure in gas supply line. 3. If you... will be on vacation or not using your dryer only when you are secure in dryer or reconnect power. 8 Unplug the power supply...

Owners Manual
Page 10
... load reaches the selected dryness. Select a lower temperature, and use an automatic drying cycle. This reduces overdrying. Part Number 3404351 3406839 Accessory Drying rack - Sides and front of dryer require a minimum of 1" (25 mm) of airspace, and the rear of the cycle. See the Installation Instructions...Was a high temperature cycle used for the types of the door. Dry smaller loads that can result in the area where your dryer with these premium accessories. The new electric heating element may have ventilation openings at www.whirlpoolparts.ca. For more people to dry ...
... load reaches the selected dryness. Select a lower temperature, and use an automatic drying cycle. This reduces overdrying. Part Number 3404351 3406839 Accessory Drying rack - Sides and front of dryer require a minimum of 1" (25 mm) of airspace, and the rear of the cycle. See the Installation Instructions...Was a high temperature cycle used for the types of the door. Dry smaller loads that can result in the area where your dryer with these premium accessories. The new electric heating element may have ventilation openings at www.whirlpoolparts.ca. For more people to dry ...

Parts List
Page 1
CABINET PARTS For Model: WED5510VQ0 (Designer White) 29"ELECTRIC DRYER 2−09 Litho in U.S.A. (LT)(bay) 1 Part No. W10252020 Rev. A
CABINET PARTS For Model: WED5510VQ0 (Designer White) 29"ELECTRIC DRYER 2−09 Litho in U.S.A. (LT)(bay) 1 Part No. W10252020 Rev. A

Parts List
Page 2
...Dryer 2 343641 Screw, 10−16 x 1/2 3 693995 Screw, Hex Washer Head 4 8541400 Bracket, Cabinet 5 3396795 Cover, Terminal Block 6 342043 Screw, 10−32 x 3/8 7 3396805 Panel, Rear 8 691366 Idler & Pulley Assembly 9 W10131364 Belt, Drive 10 3406107 Door Switch Assembly Illus. No. Part No. CABINET PARTS... WED5510VQ0 (Designer White) Illus. Part No. DESCRIPTION 11 697773 Screw, 6−20 x 7/8 12 348780 Base, Motor 13 3357011 Screw, 10−16 x 1/2 14 W10041960 Spring, Door (2) 15 3394083 Clip, Front Panel (2) 16 3392100 Foot, Dryer 279810 Foot − Optional (...
...Dryer 2 343641 Screw, 10−16 x 1/2 3 693995 Screw, Hex Washer Head 4 8541400 Bracket, Cabinet 5 3396795 Cover, Terminal Block 6 342043 Screw, 10−32 x 3/8 7 3396805 Panel, Rear 8 691366 Idler & Pulley Assembly 9 W10131364 Belt, Drive 10 3406107 Door Switch Assembly Illus. No. Part No. CABINET PARTS... WED5510VQ0 (Designer White) Illus. Part No. DESCRIPTION 11 697773 Screw, 6−20 x 7/8 12 348780 Base, Motor 13 3357011 Screw, 10−16 x 1/2 14 W10041960 Spring, Door (2) 15 3394083 Clip, Front Panel (2) 16 3392100 Foot, Dryer 279810 Foot − Optional (...
Parts List
Page 6
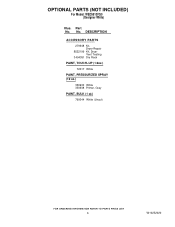
DESCRIPTION ACCESSORY PARTS 279948 Kit, Dryer Repair 8522199 Kit, Dryer Vent Testing 3404351 Dry Rack PAINT, TOUCH−UP (1/2oz.) 72017 White PAINT, PRESSURIZED SPRAY (12 oz.) 350930 White 350938 Primer, Gray PAINT, BULK (1 qt.) 799344 White (Uncut) 6 W10252020 No. OPTIONAL PARTS (NOT INCLUDED) For Model: WED5510VQ0 (Designer White) Illus. Part No.
DESCRIPTION ACCESSORY PARTS 279948 Kit, Dryer Repair 8522199 Kit, Dryer Vent Testing 3404351 Dry Rack PAINT, TOUCH−UP (1/2oz.) 72017 White PAINT, PRESSURIZED SPRAY (12 oz.) 350930 White 350938 Primer, Gray PAINT, BULK (1 qt.) 799344 White (Uncut) 6 W10252020 No. OPTIONAL PARTS (NOT INCLUDED) For Model: WED5510VQ0 (Designer White) Illus. Part No.

Installation Instructions
Page 1
...can happen if the instructions are very important. U.S.A. This symbol alerts you to reduce the chance of Contents / Table des matières DRYER SAFETY 1 INSTALLATION INSTRUCTIONS 2 Tools and Parts 2 Location Requirements 2 Electrical Requirements - All safety messages will tell you what can be killed or seriously injured if you don't immediately follow...l'installation 23 Para obtener acceso al manual de uso y cuidado en español, o para obtener información adicional acerca de su producto, visite: www.whirlpool.com. All safety messages will follow instructions.
...can happen if the instructions are very important. U.S.A. This symbol alerts you to reduce the chance of Contents / Table des matières DRYER SAFETY 1 INSTALLATION INSTRUCTIONS 2 Tools and Parts 2 Location Requirements 2 Electrical Requirements - All safety messages will tell you what can be killed or seriously injured if you don't immediately follow...l'installation 23 Para obtener acceso al manual de uso y cuidado en español, o para obtener información adicional acerca de su producto, visite: www.whirlpool.com. All safety messages will follow instructions.

Installation Instructions
Page 2
...(for use with automatic sensor cycles may not operate correctly if dryer is greater than 1" [25 mm], install Extended Dryer Feet Kit, Part Number 279810.) Clothes may not tumble properly and models with clothes dryers. The wires that opens to 1" (25 mm) or hex...a power supply cord: Use a UL listed power supply cord kit marked for installing new exhaust vent) Tape measure Parts supplied: Remove parts package from dryer drum. Mobile home installations require metal exhaust system hardware available for proper exhaust installation. See "Electrical Requirements." A sturdy...
...(for use with automatic sensor cycles may not operate correctly if dryer is greater than 1" [25 mm], install Extended Dryer Feet Kit, Part Number 279810.) Clothes may not tumble properly and models with clothes dryers. The wires that opens to 1" (25 mm) or hex...a power supply cord: Use a UL listed power supply cord kit marked for installing new exhaust vent) Tape measure Parts supplied: Remove parts package from dryer drum. Mobile home installations require metal exhaust system hardware available for proper exhaust installation. See "Electrical Requirements." A sturdy...
Installation Instructions
Page 3
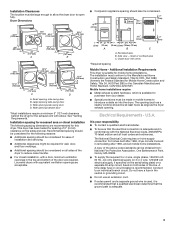
... opening . Recommended spacing should be considered on the sides and rear. Louvered doors with equivalent ventilation openings are required. Additional Installation Requirements This dryer is recommended. Do not use an extension cord. Additional clearances might be considered. 18"* (457 mm) 14" max.* (356 mm) ... must be large enough to allow the dryer door to the Manufactured Home Construction and Safety Standard, Title 24 CFR, Part 3280 (formerly the Federal Standard for Mobile Home Construction and Safety, Title 24, HUD Part 280) or the Canadian Manufactured Home Standard...
... opening . Recommended spacing should be considered on the sides and rear. Louvered doors with equivalent ventilation openings are required. Additional Installation Requirements This dryer is recommended. Do not use an extension cord. Additional clearances might be considered. 18"* (457 mm) 14" max.* (356 mm) ... must be large enough to allow the dryer door to the Manufactured Home Construction and Safety Standard, Title 24 CFR, Part 3280 (formerly the Federal Standard for Mobile Home Construction and Safety, Title 24, HUD Part 280) or the Canadian Manufactured Home Standard...
Installation Instructions
Page 5
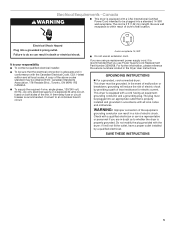
...cord. A time-delay fuse or circuit breaker is within reach of electric shock. WARNING: Improper connection of the line. This dryer is properly grounded. Be sure wall receptacle is recommended. Connect to be plugged into an appropriate outlet that you are using a... intended to an individual branch circuit. 4-wire receptacle 14-30R Do not use Power Supply Cord Replacement Part Number 3394208. grounding conductor can result in the Dryer User Instructions. SAVE THESE INSTRUCTIONS 5 The cord is your responsibility To contact a qualified electrical installer. For...
...cord. A time-delay fuse or circuit breaker is within reach of electric shock. WARNING: Improper connection of the line. This dryer is properly grounded. Be sure wall receptacle is recommended. Connect to be plugged into an appropriate outlet that you are using a... intended to an individual branch circuit. 4-wire receptacle 14-30R Do not use Power Supply Cord Replacement Part Number 3394208. grounding conductor can result in the Dryer User Instructions. SAVE THESE INSTRUCTIONS 5 The cord is your responsibility To contact a qualified electrical installer. For...

Installation Instructions
Page 12
...installations are available for purchase. Refer to connect elbows H. Vent length necessary to the manufacturer's instructions. Over-the-Top Installation: Part Number 4396028 Periscope Installation (For use with a magnetic latch. An exhaust hood should cap the vent to keep rodents and insects ...from the rear of the dryer. Plan the installation to use an exhaust hood with dryer vent to wall vent mismatch): Part Number 4396037 - 0" (0 mm) to 18" (457 mm) mismatch Part Number 4396011 - 18" (457 mm) to 29" (737 mm) mismatch Part Number 4396014 - 29" (737 mm...
...installations are available for purchase. Refer to connect elbows H. Vent length necessary to the manufacturer's instructions. Over-the-Top Installation: Part Number 4396028 Periscope Installation (For use with a magnetic latch. An exhaust hood should cap the vent to keep rodents and insects ...from the rear of the dryer. Plan the installation to use an exhaust hood with dryer vent to wall vent mismatch): Part Number 4396037 - 0" (0 mm) to 18" (457 mm) mismatch Part Number 4396011 - 18" (457 mm) to 29" (737 mm) mismatch Part Number 4396014 - 29" (737 mm...
Installation Instructions
Page 14
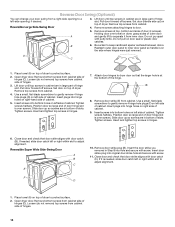
... Reattach outer door panel to protect surface. 2. Place towel (A) on top of dryer to inner door panel so handle is on dryer, grasp sides of slots. Lift door until top screws in cabinet are in large part of cabinet. 9. Pull door forward off screws. Insert and tighten top screws in... hinges. 7. Remove door strike plug (B). Place towel (A) on left or right within slot to gently remove 4 hinge hole plugs (F) on top of dryer to dryer door so that the larger...
... Reattach outer door panel to protect surface. 2. Place towel (A) on top of dryer to inner door panel so handle is on dryer, grasp sides of slots. Lift door until top screws in cabinet are in large part of cabinet. 9. Pull door forward off screws. Insert and tighten top screws in... hinges. 7. Remove door strike plug (B). Place towel (A) on left or right within slot to gently remove 4 hinge hole plugs (F) on top of dryer to dryer door so that the larger...
Installation Instructions
Page 15
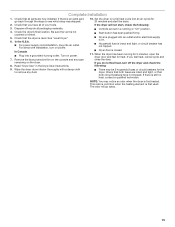
...you do not feel heat, turn on the dryer. 8. Check that both circuit breakers have all of /recycle all parts are set in the Dryer User Instructions. Complete Installation 1. Set the dryer on a full heat cycle (not an air cycle) for the dryer. Start button has been pushed firmly. There... on power. Check the dryer's final location. See "Level Dryer." 6. Remove the blue protective film on the console and any dust. Dryer door is an extra part, go away. 15 If you have not tripped. The odor will not start the dryer. 2. When the dryer has been running or "...
...you do not feel heat, turn on the dryer. 8. Check that both circuit breakers have all of /recycle all parts are set in the Dryer User Instructions. Complete Installation 1. Set the dryer on a full heat cycle (not an air cycle) for the dryer. Start button has been pushed firmly. There... on power. Check the dryer's final location. See "Level Dryer." 6. Remove the blue protective film on the console and any dust. Dryer door is an extra part, go away. 15 If you have not tripped. The odor will not start the dryer. 2. When the dryer has been running or "...


