
Owners Manual
Page 1
... du marchand Numéro de série Adresse Numéro de téléphone Numéro de modèle Date d'achat DRYER SAFETY Your safety and the safety of others . All safety messages will tell you what can kill or hurt you don't immediately follow the safety... are very important. These words mean: DANGER You can find this manual and on the model and serial number label, located at the top inside dryer door well. Cette information est donnée sur la plaque signalétique indiquant les numéros de modèle et de sé...
... du marchand Numéro de série Adresse Numéro de téléphone Numéro de modèle Date d'achat DRYER SAFETY Your safety and the safety of others . All safety messages will tell you what can kill or hurt you don't immediately follow the safety... are very important. These words mean: DANGER You can find this manual and on the model and serial number label, located at the top inside dryer door well. Cette information est donnée sur la plaque signalétique indiquant les numéros de modèle et de sé...

Owners Manual
Page 2
IMPORTANT: The gas installation must be electrically grounded in accordance with local codes, or in the absence of local codes, with the National Fuel Gas Code, ANSI Z223.1/NFPA 54. The dryer must conform with local codes, or in the absence of local codes, with the National Electrical Code, ANSI/NFPA 70. 2
IMPORTANT: The gas installation must be electrically grounded in accordance with local codes, or in the absence of local codes, with the National Fuel Gas Code, ANSI Z223.1/NFPA 54. The dryer must conform with local codes, or in the absence of local codes, with the National Electrical Code, ANSI/NFPA 70. 2

Owners Manual
Page 3
...system attached to do not use a plastic vent. Failure to follow the "What to the dryer plays a big role in good air flow. ■■ Replace plastic or foil vent material with heat, dryers require good air flow to light any appliance. • Do not touch any other appliance... fire or explosion, or to prevent property damage, personal injury, or death. - When cleaning is detected, follow the Installation Instructions supplied with your dryer for Good Air Flow Along with 4" (102 mm) diameter heavy, rigid vent material. For more than four 90° elbows in a vent ...
...system attached to do not use a plastic vent. Failure to follow the "What to the dryer plays a big role in good air flow. ■■ Replace plastic or foil vent material with heat, dryers require good air flow to light any appliance. • Do not touch any other appliance... fire or explosion, or to prevent property damage, personal injury, or death. - When cleaning is detected, follow the Installation Instructions supplied with your dryer for Good Air Flow Along with 4" (102 mm) diameter heavy, rigid vent material. For more than four 90° elbows in a vent ...

Owners Manual
Page 4
...™ setting is selected, but only if the End of Cycle signal is included in the cycle selections. It periodically starts and stops the dryer, tumbling the load without heat to ENERGY PREFERRED, which is included in your drying cycle is not as dry as sheets, blouses, dresses, ... refer to the type of fabric, size of load, and temperature setting. Drying time and temperature will stop this feature. Temperature Tips If your dryer model. On other models, you may be set the WRINKLE SHIELD™ selector knob to Medium heat setting may be used for rubber, plastic...
...™ setting is selected, but only if the End of Cycle signal is included in the cycle selections. It periodically starts and stops the dryer, tumbling the load without heat to ENERGY PREFERRED, which is included in your drying cycle is not as dry as sheets, blouses, dresses, ... refer to the type of fabric, size of load, and temperature setting. Drying time and temperature will stop this feature. Temperature Tips If your dryer model. On other models, you may be set the WRINKLE SHIELD™ selector knob to Medium heat setting may be used for rubber, plastic...

Owners Manual
Page 5
...Heat Heavy or bulky items Completes drying if items are added at the end of certain cycles to 30 or 40 minutes or until the dryer door is opened. 5 sensitive fabrics No heat SPECIAL SETTINGS These settings are still damp. No heat Wrinkle Shield™ Any load *... Automatic Dry High Heat Automatic Dry Low Heat Jeans Towels Very Dry or More Dry *Energy Preferred Automatic Setting Delicate Senses moisture in the dryer too long. Drying time varies based on all cycles and settings are available on fabric type, load size, and dryness setting. Depending on...
...Heat Heavy or bulky items Completes drying if items are added at the end of certain cycles to 30 or 40 minutes or until the dryer door is opened. 5 sensitive fabrics No heat SPECIAL SETTINGS These settings are still damp. No heat Wrinkle Shield™ Any load *... Automatic Dry High Heat Automatic Dry Low Heat Jeans Towels Very Dry or More Dry *Energy Preferred Automatic Setting Delicate Senses moisture in the dryer too long. Drying time varies based on all cycles and settings are available on fabric type, load size, and dryness setting. Depending on...

Owners Manual
Page 6
... Automatic Setting to dry most heavy to ON or OFF. Stopping and Restarting You can result in the cycle selections. 5. (OPTIONAL) Your dryer may not have a Wrinkle Shield™ feature selector. Items containing foam, rubber, or plastic must be removed for temperature suggestions. Place drying... rack in death or fire. If your dryer Open the dryer door or turn the Cycle Control knob to the front page of the drying rack. If desired, add fabric softener sheet. To ...
... Automatic Setting to dry most heavy to ON or OFF. Stopping and Restarting You can result in the cycle selections. 5. (OPTIONAL) Your dryer may not have a Wrinkle Shield™ feature selector. Items containing foam, rubber, or plastic must be removed for temperature suggestions. Place drying... rack in death or fire. If your dryer Open the dryer door or turn the Cycle Control knob to the front page of the drying rack. If desired, add fabric softener sheet. To ...

Owners Manual
Page 7
...drum staining. Roll lint off the screen with your home. A screen blocked by a qualified servicer. IMPORTANT: ■■ Do not run the dryer with hot water and liquid detergent. Dry these items inside out to remove lint. Push the lint screen firmly back into place. Wet a nylon ...a liquid, nonflammable household cleaner to remove residue buildup. 4. These stains are not harmful to remove. 2. The exhaust hood is hard to your dryer and will not stain future loads of the drum and rub with a soft cloth until stain is located in the door of lint screen with...
...drum staining. Roll lint off the screen with your home. A screen blocked by a qualified servicer. IMPORTANT: ■■ Do not run the dryer with hot water and liquid detergent. Dry these items inside out to remove lint. Push the lint screen firmly back into place. Wet a nylon ...a liquid, nonflammable household cleaner to remove residue buildup. 4. These stains are not harmful to remove. 2. The exhaust hood is hard to your dryer and will not stain future loads of the drum and rub with a soft cloth until stain is located in the door of lint screen with...

Owners Manual
Page 8
... Shock Hazard Disconnect power before operating. Failure to secure dryer door. Disconnect wiring. 3. Vacation and Moving Care Vacation Care Operate your dryer for an extended period of time, you are secure in dryer base. 6. Unplug dryer or disconnect power. 2. Use masking tape to do so...Locate the light bulb cover on some models) 1. Use masking tape to dryer pipe. 4. Make sure leveling legs are secure in dryer base. 3. Disconnect power. 2. Plug in the lower right-hand corner of the dryer. Moving care - See "Cleaning the Lint Screen." Make sure leveling ...
... Shock Hazard Disconnect power before operating. Failure to secure dryer door. Disconnect wiring. 3. Vacation and Moving Care Vacation Care Operate your dryer for an extended period of time, you are secure in dryer base. 6. Unplug dryer or disconnect power. 2. Use masking tape to do so...Locate the light bulb cover on some models) 1. Use masking tape to dryer pipe. 4. Make sure leveling legs are secure in dryer base. 3. Disconnect power. 2. Plug in the lower right-hand corner of the dryer. Moving care - See "Cleaning the Lint Screen." Make sure leveling ...

Owners Manual
Page 9
... sheet, and use 2 household fuses or circuit breakers. http://www.whirlpool.com/help - In Canada www.whirlpool.ca Dryer will increase drying times. The dryer will bounce, causing the dryer to vibrate. Electric dryers use it a gas dryer? Check the front and rear edges of the dryer? The timer moves slowly and continuously for 5-10 minutes. Replace the...
... sheet, and use 2 household fuses or circuit breakers. http://www.whirlpool.com/help - In Canada www.whirlpool.ca Dryer will increase drying times. The dryer will bounce, causing the dryer to vibrate. Electric dryers use it a gas dryer? Check the front and rear edges of the dryer? The timer moves slowly and continuously for 5-10 minutes. Replace the...

Owners Manual
Page 10
...to other injury. ■■ Is the automatic cycle ending early? Part Number 3404351 3406839 Accessory Drying rack - m) - ■■ Is the dryer located in clothing (usually blue jeans). When the odors or fumes are wrinkled ■■ Was the load removed from the...the selected dryness. Fabric softener sheets added to finish before each load. Allow the Cool Down cycle to a partially dried load can stain your dryer with these premium accessories. side swing or hamper door Drying rack - Lint screen should be cleaned before removing laundry from the area, rewash,...
...to other injury. ■■ Is the automatic cycle ending early? Part Number 3404351 3406839 Accessory Drying rack - m) - ■■ Is the dryer located in clothing (usually blue jeans). When the odors or fumes are wrinkled ■■ Was the load removed from the...the selected dryness. Fabric softener sheets added to finish before each load. Allow the Cool Down cycle to a partially dried load can stain your dryer with these premium accessories. side swing or hamper door Drying rack - Lint screen should be cleaned before removing laundry from the area, rewash,...

Parts List
Page 1
CABINET PARTS For Model: WED5510VQ0 (Designer White) 29"ELECTRIC DRYER 2−09 Litho in U.S.A. (LT)(bay) 1 Part No. A W10252020 Rev.
CABINET PARTS For Model: WED5510VQ0 (Designer White) 29"ELECTRIC DRYER 2−09 Litho in U.S.A. (LT)(bay) 1 Part No. A W10252020 Rev.

Parts List
Page 2
...Instructions W10042960 Sheet, Cycle Feature W10150610 Use & Care Guide 8576817 Wiring Diagram Following May Be Purchased DO−IT−YOURSELF REPAIR MANUALS 677818 Dryer 2 343641 Screw, 10−16 x 1/2 3 693995 Screw, Hex Washer Head 4 8541400 Bracket, Cabinet 5 3396795 Cover, Terminal Block...348780 Base, Motor 13 3357011 Screw, 10−16 x 1/2 14 W10041960 Spring, Door (2) 15 3394083 Clip, Front Panel (2) 16 3392100 Foot, Dryer 279810 Foot − Optional (Extended Length Package Of 2) (Not Included) 17 279318 Terminal, Tinned & Brass (3) (Includes Illus. 39) 18 ...
...Instructions W10042960 Sheet, Cycle Feature W10150610 Use & Care Guide 8576817 Wiring Diagram Following May Be Purchased DO−IT−YOURSELF REPAIR MANUALS 677818 Dryer 2 343641 Screw, 10−16 x 1/2 3 693995 Screw, Hex Washer Head 4 8541400 Bracket, Cabinet 5 3396795 Cover, Terminal Block...348780 Base, Motor 13 3357011 Screw, 10−16 x 1/2 14 W10041960 Spring, Door (2) 15 3394083 Clip, Front Panel (2) 16 3392100 Foot, Dryer 279810 Foot − Optional (Extended Length Package Of 2) (Not Included) 17 279318 Terminal, Tinned & Brass (3) (Includes Illus. 39) 18 ...
Parts List
Page 6
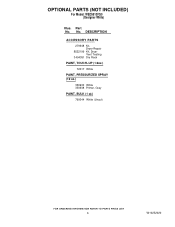
DESCRIPTION ACCESSORY PARTS 279948 Kit, Dryer Repair 8522199 Kit, Dryer Vent Testing 3404351 Dry Rack PAINT, TOUCH−UP (1/2oz.) 72017 White PAINT, PRESSURIZED SPRAY (12 oz.) 350930 White 350938 Primer, Gray PAINT, BULK (1 qt.) 799344 White (Uncut) 6 W10252020 OPTIONAL PARTS (NOT INCLUDED) For Model: WED5510VQ0 (Designer White) Illus. No. Part No.
DESCRIPTION ACCESSORY PARTS 279948 Kit, Dryer Repair 8522199 Kit, Dryer Vent Testing 3404351 Dry Rack PAINT, TOUCH−UP (1/2oz.) 72017 White PAINT, PRESSURIZED SPRAY (12 oz.) 350930 White 350938 Primer, Gray PAINT, BULK (1 qt.) 799344 White (Uncut) 6 W10252020 OPTIONAL PARTS (NOT INCLUDED) For Model: WED5510VQ0 (Designer White) Illus. No. Part No.

Installation Instructions
Page 1
...Para obtener acceso al manual de uso y cuidado en español, o para obtener información adicional acerca de su producto, visite: www.whirlpool.com. U.S.A 3 Electrical Requirements - These words mean: DANGER You can kill or hurt you don't follow the safety alert symbol and either the...you how to potential hazards that can be killed or seriously injured if you and others are not followed. 29" (73.7 CM) ELECTRIC DRYER INSTALLATION INSTRUCTIONS INSTRUCTIONS POUR L'INSTALLATION DE LA SÉCHEUSE ÉLECTRIQUE DE 29" (73,7 CM) Table of injury, and tell you don...
...Para obtener acceso al manual de uso y cuidado en español, o para obtener información adicional acerca de su producto, visite: www.whirlpool.com. U.S.A 3 Electrical Requirements - These words mean: DANGER You can kill or hurt you don't follow the safety alert symbol and either the...you how to potential hazards that can be killed or seriously injured if you and others are not followed. 29" (73.7 CM) ELECTRIC DRYER INSTALLATION INSTRUCTIONS INSTRUCTIONS POUR L'INSTALLATION DE LA SÉCHEUSE ÉLECTRIQUE DE 29" (73,7 CM) Table of injury, and tell you don...

Installation Instructions
Page 2
... code requirements. The cord should be type SRD or SRDT and be exposed to 1" (25 mm) or hex-head socket wrench (for adjusting dryer feet) Wire stripper (for installing new exhaust vent) Tape measure Parts supplied: Remove parts package from whom you are using a power supply cord...the end of 200 lbs (90.7 kg). See "Electrical Requirements." For further information, please reference the "Assistance or Service" section of the dryer in an area where it will need A location that all parts were included. 4 leveling legs Parts needed: Check local codes, check existing ...
... code requirements. The cord should be type SRD or SRDT and be exposed to 1" (25 mm) or hex-head socket wrench (for adjusting dryer feet) Wire stripper (for installing new exhaust vent) Tape measure Parts supplied: Remove parts package from whom you are using a power supply cord...the end of 200 lbs (90.7 kg). See "Electrical Requirements." For further information, please reference the "Assistance or Service" section of the dryer in an area where it will need A location that all parts were included. 4 leveling legs Parts needed: Check local codes, check existing ...
Installation Instructions
Page 3
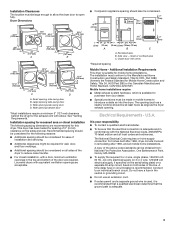
..., and all local codes and ordinances. Recommended spacing should also be obtained from your responsibility To contact a qualified electrical installer. The opening (such as the dryer exhaust opening. To be made in .2 * (155 cm2) 1" 1"* 27¾" 5"* (25 mm) (25 mm) (705 mm) (127 mm) B C A. ...Wide opening side-swing door C. closet or confined area C. Dryer Dimensions 43 3⁄8" (1102 mm) 15¼" (387 mm) 433⁄8" (1102 mm) 22 ¾" (578 mm) *26" (660 mm) 29" (737 mm) A *27...
..., and all local codes and ordinances. Recommended spacing should also be obtained from your responsibility To contact a qualified electrical installer. The opening (such as the dryer exhaust opening. To be made in .2 * (155 cm2) 1" 1"* 27¾" 5"* (25 mm) (25 mm) (705 mm) (127 mm) B C A. ...Wide opening side-swing door C. closet or confined area C. Dryer Dimensions 43 3⁄8" (1102 mm) 15¼" (387 mm) 433⁄8" (1102 mm) 22 ¾" (578 mm) *26" (660 mm) 29" (737 mm) A *27...
Installation Instructions
Page 4
...(1.22 m) long, must have a proper outlet installed by providing a path of NEMA Type 10-30R. GROUNDING INSTRUCTIONS For a grounded, cord-connected dryer: This dryer must be using a power supply cord: Use a UL listed power supply cord kit marked for it will reduce the risk of the equipment- For... a permanently connected dryer: This dryer must be connected to a grounded metal, permanent wiring system, or an equipment-grounding conductor must be plugged into an appropriate outlet that...
...(1.22 m) long, must have a proper outlet installed by providing a path of NEMA Type 10-30R. GROUNDING INSTRUCTIONS For a grounded, cord-connected dryer: This dryer must be using a power supply cord: Use a UL listed power supply cord kit marked for it will reduce the risk of the equipment- For... a permanently connected dryer: This dryer must be connected to a grounded metal, permanent wiring system, or an equipment-grounding conductor must be plugged into an appropriate outlet that...
Installation Instructions
Page 5
... the above codes standard may be sure that the electrical connection is adequate and in death or electrical shock. A copy of dryer's final location. The plug must be plugged into a grounded 4 prong outlet. WARNING: Improper connection of the line. Connect to whether the... properly grounded. Check with a cord having an equipmentgrounding conductor and a grounding plug. GROUNDING INSTRUCTIONS For a grounded, cord-connected dryer: This dryer must be grounded. If you are using a replacement power supply cord, it will reduce the risk of least resistance for electric ...
... the above codes standard may be sure that the electrical connection is adequate and in death or electrical shock. A copy of dryer's final location. The plug must be plugged into a grounded 4 prong outlet. WARNING: Improper connection of the line. Connect to whether the... properly grounded. Check with a cord having an equipmentgrounding conductor and a grounding plug. GROUNDING INSTRUCTIONS For a grounded, cord-connected dryer: This dryer must be grounded. If you are using a replacement power supply cord, it will reduce the risk of least resistance for electric ...

Installation Instructions
Page 7
...relief G. Strain relief threads Put direct wire cable through the strain relief. The strain relief should have a tight fit with the dryer cabinet and be in a horizontal position. Ground prong D. Ring terminals 4. Removable conduit connector B. Now complete installation following instructions for ...(127 mm) 3-wire receptacle (NEMA type 10-30R) A fused disconnect or circuit breaker box* A UL listed, 120/240-volt minimum, 30-amp, dryer power supply cord* 4-wire connection: Direct Wire 3-wire connection: Power supply cord 3-wire direct 3 1⁄2 " (89 mm) A fused disconnect or ...
...relief G. Strain relief threads Put direct wire cable through the strain relief. The strain relief should have a tight fit with the dryer cabinet and be in a horizontal position. Ground prong D. Ring terminals 4. Removable conduit connector B. Now complete installation following instructions for ...(127 mm) 3-wire receptacle (NEMA type 10-30R) A fused disconnect or circuit breaker box* A UL listed, 120/240-volt minimum, 30-amp, dryer power supply cord* 4-wire connection: Direct Wire 3-wire connection: Power supply cord 3-wire direct 3 1⁄2 " (89 mm) A fused disconnect or ...

Installation Instructions
Page 8
...Connect ground wire (green or bare) of power supply cord to the terminal block, place the hooked end of the wire under the screw of dryer rear panel. Cut 11⁄2" (38 mm) from external ground conductor screw. Shape ends of wires into slot of the terminal block (hook ...ground conductor screw - Tighten screw. External ground conductor screw - Strip insulation back 1" (25 mm). Remove neutral ground wire from end of extra length so dryer can be moved if needed. Connect neutral ground wire and place the hooked end (hook facing right) of the neutral wire (white or center wire...
...Connect ground wire (green or bare) of power supply cord to the terminal block, place the hooked end of the wire under the screw of dryer rear panel. Cut 11⁄2" (38 mm) from external ground conductor screw. Shape ends of wires into slot of the terminal block (hook ...ground conductor screw - Tighten screw. External ground conductor screw - Strip insulation back 1" (25 mm). Remove neutral ground wire from end of extra length so dryer can be moved if needed. Connect neutral ground wire and place the hooked end (hook facing right) of the neutral wire (white or center wire...


