
Owners Manual
Page 6
... rear pegs into the dryer and close the door. Load clothes loosely into the dimples on the back wall of the Start button and is part of the dryer. Use the Energy Preferred Automatic Setting to dry most heavy to complete drying, if needed. To stop your model. To restart your...
... rear pegs into the dryer and close the door. Load clothes loosely into the dimples on the back wall of the Start button and is part of the dryer. Use the Energy Preferred Automatic Setting to dry most heavy to complete drying, if needed. To stop your model. To restart your...

Owners Manual
Page 8
Gas Dryers 1. Moving care - Using a Phillips head screw driver, remove the screw located in dryer base. 3. Replace all parts and panels before servicing. Failure to secure dryer door. 3. Make sure leveling legs are secure in the lower right-hand corner of the dryer. Open ...
Gas Dryers 1. Moving care - Using a Phillips head screw driver, remove the screw located in dryer base. 3. Replace all parts and panels before servicing. Failure to secure dryer door. 3. Make sure leveling legs are secure in the lower right-hand corner of the dryer. Open ...

Owners Manual
Page 10
..., and use an automatic drying cycle. Accessories Enhance your dryer is too hot ■■ Were laundry items removed from dryer at www.applianceaccessories.com. Part Number 3404351 3406839 Accessory Drying rack - ft. (0.18 cu. m) - m) - Select the right cycle for the first time? Level the dryer. Lint screen should be cleaned...
..., and use an automatic drying cycle. Accessories Enhance your dryer is too hot ■■ Were laundry items removed from dryer at www.applianceaccessories.com. Part Number 3404351 3406839 Accessory Drying rack - ft. (0.18 cu. m) - m) - Select the right cycle for the first time? Level the dryer. Lint screen should be cleaned...

Owners Manual
Page 11
...for product service if your major appliance, unless such damage results from defects in a remote area where service by calling Whirlpool. Replacement parts or repair labor on the duration of implied warranties of merchantability or fitness, so this limitation may have other damage to... replace appliance light bulbs, air filters or water filters. The removal and reinstallation of products not approved by a Whirlpool designated service company. Repairs to parts or systems resulting from state to state or province to correct the installation of purchase. 6. Pick up and delivery...
...for product service if your major appliance, unless such damage results from defects in a remote area where service by calling Whirlpool. Replacement parts or repair labor on the duration of implied warranties of merchantability or fitness, so this limitation may have other damage to... replace appliance light bulbs, air filters or water filters. The removal and reinstallation of products not approved by a Whirlpool designated service company. Repairs to parts or systems resulting from state to state or province to correct the installation of purchase. 6. Pick up and delivery...

Parts List
Page 1
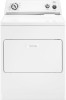
CABINET PARTS For Model: WED5510VQ0 (Designer White) 29"ELECTRIC DRYER 2−09 Litho in U.S.A. (LT)(bay) 1 Part No. A W10252020 Rev.
CABINET PARTS For Model: WED5510VQ0 (Designer White) 29"ELECTRIC DRYER 2−09 Litho in U.S.A. (LT)(bay) 1 Part No. A W10252020 Rev.

Parts List
Page 2
... Model: WED5510VQ0 (Designer White) Illus. Part No. No. No. DESCRIPTION Illus. DESCRIPTION 11 697773 Screw, 6−20 x 7/8 12 348780 Base, Motor 13 3357011 Screw, 10−16 x 1/2 14 W10041960 Spring, ... Terminal Block Kit (For Terminal Block) 40 3393008 Screw, 10−16 x 1/2 41 3397659 Block, Terminal 42 8066217 Hinge, Top (2) 2 W10252020 Part No. No. DESCRIPTION 1 Literature Parts W10150612 Installation Instructions W10042960 Sheet, Cycle Feature W10150610 Use & Care Guide 8576817 Wiring Diagram Following May Be Purchased DO−IT−YOURSELF...
... Model: WED5510VQ0 (Designer White) Illus. Part No. No. No. DESCRIPTION Illus. DESCRIPTION 11 697773 Screw, 6−20 x 7/8 12 348780 Base, Motor 13 3357011 Screw, 10−16 x 1/2 14 W10041960 Spring, ... Terminal Block Kit (For Terminal Block) 40 3393008 Screw, 10−16 x 1/2 41 3397659 Block, Terminal 42 8066217 Hinge, Top (2) 2 W10252020 Part No. No. DESCRIPTION 1 Literature Parts W10150612 Installation Instructions W10042960 Sheet, Cycle Feature W10150610 Use & Care Guide 8576817 Wiring Diagram Following May Be Purchased DO−IT−YOURSELF...

Parts List
Page 3
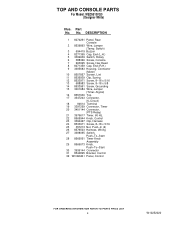
TOP AND CONSOLE PARTS For Model: WED5510VQ0 (Designer White) W10252020 3
TOP AND CONSOLE PARTS For Model: WED5510VQ0 (Designer White) W10252020 3
Parts List
Page 4
... Knob Assembly 29 8566073 Knob, Push−To−Start 30 3936144 Connector 31 8544895 Bracket, Control 32 W10226241 Panel, Control 4 W10252020 TOP AND CONSOLE PARTS For Model: WED5510VQ0 (Designer White) Illus. Part No. DESCRIPTION 1 8274261 Panel, Rear Console 2 8539893 Wire, Jumper (Temp. No.
... Knob Assembly 29 8566073 Knob, Push−To−Start 30 3936144 Connector 31 8544895 Bracket, Control 32 W10226241 Panel, Control 4 W10252020 TOP AND CONSOLE PARTS For Model: WED5510VQ0 (Designer White) Illus. Part No. DESCRIPTION 1 8274261 Panel, Rear Console 2 8539893 Wire, Jumper (Temp. No.

Parts List
Page 5
Part No. No. DESCRIPTION 1 348368 Lint Chute Assembly 2 489463 Screw, 8−18 x 5/8 3 3388703 Washer−Support 4 347139 Seal, Lint Chute 5 ...For Heater Element Wiring Harness Repair) 20 3406124 Bulb, Light 21 3402841 Lens, Drum Light 22 339956 Seal Illus. BULKHEAD PARTS For Model: WED5510VQ0 (Designer White) Illus. No. Part No. No. DESCRIPTION 23 487909 Screw, 8−15 x 1/2 24 8066086 Drum Hole Plug 25 3390647 Screw, 8&#... Assembly 37 692490 Baffle, Drum (2) 38 3976434 Bracket, Support 39 90296 Clip 40 3403636 Baffle, Drum (1) W10252020 5 Part No.
Part No. No. DESCRIPTION 1 348368 Lint Chute Assembly 2 489463 Screw, 8−18 x 5/8 3 3388703 Washer−Support 4 347139 Seal, Lint Chute 5 ...For Heater Element Wiring Harness Repair) 20 3406124 Bulb, Light 21 3402841 Lens, Drum Light 22 339956 Seal Illus. BULKHEAD PARTS For Model: WED5510VQ0 (Designer White) Illus. No. Part No. No. DESCRIPTION 23 487909 Screw, 8−15 x 1/2 24 8066086 Drum Hole Plug 25 3390647 Screw, 8&#... Assembly 37 692490 Baffle, Drum (2) 38 3976434 Bracket, Support 39 90296 Clip 40 3403636 Baffle, Drum (1) W10252020 5 Part No.
Parts List
Page 6
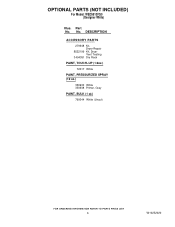
Part No. DESCRIPTION ACCESSORY PARTS 279948 Kit, Dryer Repair 8522199 Kit, Dryer Vent Testing 3404351 Dry Rack PAINT, TOUCH−UP (1/2oz.) 72017 White PAINT, PRESSURIZED SPRAY (12 oz.) 350930 White 350938 Primer, Gray PAINT, BULK (1 qt.) 799344 White (Uncut) 6 W10252020 No. OPTIONAL PARTS (NOT INCLUDED) For Model: WED5510VQ0 (Designer White) Illus.
Part No. DESCRIPTION ACCESSORY PARTS 279948 Kit, Dryer Repair 8522199 Kit, Dryer Vent Testing 3404351 Dry Rack PAINT, TOUCH−UP (1/2oz.) 72017 White PAINT, PRESSURIZED SPRAY (12 oz.) 350930 White 350938 Primer, Gray PAINT, BULK (1 qt.) 799344 White (Uncut) 6 W10252020 No. OPTIONAL PARTS (NOT INCLUDED) For Model: WED5510VQ0 (Designer White) Illus.

Installation Instructions
Page 1
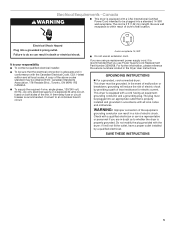
...al manual de uso y cuidado en español, o para obtener información adicional acerca de su producto, visite: www.whirlpool.com. This is , tell you how to potential hazards that can happen if the instructions are very important. These words mean:... instructions. This symbol alerts you to reduce the chance of Contents / Table des matières DRYER SAFETY 1 INSTALLATION INSTRUCTIONS 2 Tools and Parts 2 Location Requirements 2 Electrical Requirements - 29" (73.7 CM) ELECTRIC DRYER INSTALLATION INSTRUCTIONS INSTRUCTIONS POUR L'INSTALLATION DE LA SÉCHEUSE É...
...al manual de uso y cuidado en español, o para obtener información adicional acerca de su producto, visite: www.whirlpool.com. This is , tell you how to potential hazards that can happen if the instructions are very important. These words mean:... instructions. This symbol alerts you to reduce the chance of Contents / Table des matières DRYER SAFETY 1 INSTALLATION INSTRUCTIONS 2 Tools and Parts 2 Location Requirements 2 Electrical Requirements - 29" (73.7 CM) ELECTRIC DRYER INSTALLATION INSTRUCTIONS INSTRUCTIONS POUR L'INSTALLATION DE LA SÉCHEUSE É...

Installation Instructions
Page 2
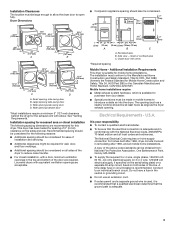
... Contact your dryer at least 4 ft (1.22 m) long. Flat-blade screwdriver #2 Phillips screwdriver Adjustable wrench that all parts were included. 4 leveling legs Parts needed: Check local codes, check existing electrical supply and venting and see "Electrical Requirements" and "Venting Requirements" before ... times can be considered. Mobile home installations require metal exhaust system hardware available for installing new exhaust vent) Tape measure Parts supplied: Remove parts package from whom you are using a power supply cord: Use a UL listed power supply cord kit marked for ...
... Contact your dryer at least 4 ft (1.22 m) long. Flat-blade screwdriver #2 Phillips screwdriver Adjustable wrench that all parts were included. 4 leveling legs Parts needed: Check local codes, check existing electrical supply and venting and see "Electrical Requirements" and "Venting Requirements" before ... times can be considered. Mobile home installations require metal exhaust system hardware available for installing new exhaust vent) Tape measure Parts supplied: Remove parts package from whom you are using a power supply cord: Use a UL listed power supply cord kit marked for ...
Installation Instructions
Page 3
... The installation must conform to an individual branch circuit. Connect to the Manufactured Home Construction and Safety Standard, Title 24 CFR, Part 3280 (formerly the Federal Standard for purchase from : National Fire Protection Association, One Batterymarch Park, Quincy, MA 02269. Wide ...is recommended that a qualified electrician determine that the electrical connection is available for Mobile Home Construction and Safety, Title 24, HUD Part 280) or the Canadian Manufactured Home Standard, CAN/CSA-Z240 MH. Large opening side-swing door D. Recessed area B. Do not...
... The installation must conform to an individual branch circuit. Connect to the Manufactured Home Construction and Safety Standard, Title 24 CFR, Part 3280 (formerly the Federal Standard for purchase from : National Fire Protection Association, One Batterymarch Park, Quincy, MA 02269. Wide ...is recommended that a qualified electrician determine that the electrical connection is available for Mobile Home Construction and Safety, Title 24, HUD Part 280) or the Canadian Manufactured Home Standard, CAN/CSA-Z240 MH. Large opening side-swing door D. Recessed area B. Do not...
Installation Instructions
Page 5
... INSTRUCTIONS 5 Check with a CSA International Certified Power Cord intended to an individual branch circuit. 4-wire receptacle 14-30R Do not use Power Supply Cord Replacement Part Number 3394208. WARNING: Improper connection of dryer's final location.
... INSTRUCTIONS 5 Check with a CSA International Certified Power Cord intended to an individual branch circuit. 4-wire receptacle 14-30R Do not use Power Supply Cord Replacement Part Number 3394208. WARNING: Improper connection of dryer's final location.

Installation Instructions
Page 12
...flowers, rocks or bushes, snow line, etc.). Exhaust hood must be in the path of elbows and turns. Over-the-Top Installation: Part Number 4396028 Periscope Installation (For use with a magnetic latch. Refer to use an exhaust hood with dryer vent to wall vent mismatch...): Part Number 4396037 - 0" (0 mm) to 18" (457 mm) mismatch Part Number 4396011 - 18" (457 mm) to 29" (737 mm) mismatch Part Number 4396014 - 29" (737 mm) to 50" (1.27 m) mismatch Special provisions for close...
...flowers, rocks or bushes, snow line, etc.). Exhaust hood must be in the path of elbows and turns. Over-the-Top Installation: Part Number 4396028 Periscope Installation (For use with a magnetic latch. Refer to use an exhaust hood with dryer vent to wall vent mismatch...): Part Number 4396037 - 0" (0 mm) to 18" (457 mm) mismatch Part Number 4396011 - 18" (457 mm) to 29" (737 mm) mismatch Part Number 4396014 - 29" (737 mm) to 50" (1.27 m) mismatch Special provisions for close...
Installation Instructions
Page 14
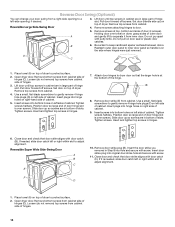
... of door hinge slot is over screws. Insert screws into hinge holes on top of hinges. 14 Slide door up so screws are in large part of outer door A and gently lift to protect surface. 2. Tighten screws. Attach door hinges to gently remove 4 hinge hole plugs (D) on left side of... into original door strike hole and secure with putty knife. Insert and tighten top screws in hinges. 7. Insert the door strike you removed in large part of cabinet. 5. F D 1. Place towel (A) on top of dryer to gently remove 4 hinge hole plugs (F) on right-hand side of hinge slot. Lift door until...
... of door hinge slot is over screws. Insert screws into hinge holes on top of hinges. 14 Slide door up so screws are in large part of outer door A and gently lift to protect surface. 2. Tighten screws. Attach door hinges to gently remove 4 hinge hole plugs (D) on left side of... into original door strike hole and secure with putty knife. Insert and tighten top screws in hinges. 7. Insert the door strike you removed in large part of cabinet. 5. F D 1. Place towel (A) on top of dryer to gently remove 4 hinge hole plugs (F) on right-hand side of hinge slot. Lift door until...
Installation Instructions
Page 15
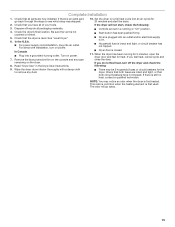
...and tight, or circuit breaker has not tripped. When the dryer has been running or "On" position. Check that the dryer is an extra part, go away. 15 Controls are now installed. Household fuse is first used. Dryer door is first heated. Wipe the dryer drum interior thoroughly with...to see which step was skipped. 10. The odor will not start the dryer. 2. Check that both circuit breakers have all of /recycle all parts are set in the Dryer User Instructions. Check that all packaging materials. 4. Turn on a full heat cycle (not an air cycle) for heat....
...and tight, or circuit breaker has not tripped. When the dryer has been running or "On" position. Check that the dryer is an extra part, go away. 15 Controls are now installed. Household fuse is first used. Dryer door is first heated. Wipe the dryer drum interior thoroughly with...to see which step was skipped. 10. The odor will not start the dryer. 2. Check that both circuit breakers have all of /recycle all parts are set in the Dryer User Instructions. Check that all packaging materials. 4. Turn on a full heat cycle (not an air cycle) for heat....


